Reinforced concrete walls and partitions provide poor protection against noise. As a result, comfortable living or work is disturbed by screams from the street and loud music from neighbors. There are several solutions to this problem: applying soundproofing plaster, installing mineral wool and special soundproofing panels.
Poor sound insulation of premises is a real scourge of modern housing and office construction.
First, let's talk a little about acoustics.
There are two different ways to protect yourself from noise: reflect it or absorb it.
- In the first case , sound waves, having encountered an obstacle, turn in the opposite direction; some noise barriers along highways operate on this principle; the reflection of sounds is taken into account in the construction of theater halls, music recording studios, etc.
- In the second case, the sound wave that hits the obstacle breaks up into several weaker ones, due to the unevenness of the internal structure of the insulating material. Residual vibrations quickly fade away and the noise level decreases. It is the second method that is implemented in building soundproofing materials.
Sound insulation under plaster: types of materials and their characteristics
Soundproofing materials and products are presented in a wide variety. They allow you to isolate walls , floors and ceilings from unwanted sound vibrations. Installation of panels (sheets) is carried out in stages. The selected design should be:
- quality;
- durable;
- aesthetic;
- environmentally friendly.
And it is important that it meets fire safety requirements.
Soundproofing plaster is also available in a wide variety. Gypsum plaster is often used to finish the wall. This composition not only levels the surface, but also creates a decorative coating, but it cannot be said that it absorbs noise 100%. If the apartment has a thin ceiling, sound-absorbing panels with a porous structure should be installed.
There are several options for effective sound insulation.
- Mineral wool or fiberglass. These materials do the job perfectly. The thickness of the commercially available slabs does not exceed 3 cm. To install them, you must additionally build a frame and cover it with plasterboard. When choosing cotton wool for sound insulation or fiberglass, you should be prepared for the apartment to become several centimeters smaller.
- Polyurethane boards. Made from foam rubber with acoustic properties, they differ from other similar materials in ease of installation. Glue is applied to the polyurethane panels, then they are fixed, lightly pressed against the ceiling or attached to the walls . Leveling the entire base is not necessary. The average thickness of the polyurethane panel is 10 cm.
- Liquid sound insulation. This is the composition that needs to be applied to the plaster. With this sound insulation, there is no need to additionally finish the walls in the apartment . Plasterboard panels must be mounted on top of the material.
- Leaf plug. It has a dense structure and serves as a decorative coating. The average thickness of sheet cork is 5.5 mm.
- Fiberboard panels. They consist of layers of waterproofing, polystyrene foam and mesh. Thickness – about 8 cm.
- Panels made of natural material. They are made from coniferous trees. Sound-absorbing structures provide proper sound insulation in the apartment. The maximum thickness of structures is 2.5 cm.
- High density membrane.
Presented in the form of thin panels, absorbs noise well and lasts a long time.
Each material is unique and has its own pros, cons and operating features. When choosing a soundproofing method for an apartment, you should take into account financial capabilities.
Objects of using soundproofing plaster.
The most common uses for sound-absorbing plaster are public places. As a rule, they are characterized by a high noise level, which depends on the number of people arriving in a public space. In this regard, there is a need to use soundproofing plaster. Public space facilities include:
A noisy establishment needs soundproofing
- courts and counseling centers, as well as business centers and meeting rooms for important meetings;
- various industries, next to which there are residential sectors;
- catering: cafe; dining room; restaurant;
- residential buildings;
- libraries, clubs, reading rooms and so on.
Such huge rooms require not only silence, but also comfort, which can be provided by another type of sound-absorbing plaster that provides warmth. Heat-soundproofing plaster applied to the walls allows you to maintain a comfortable temperature in the room, and also protects the inhabitants of this space from external irritants - noise.
Noise suppression methods
One of the most popular materials for creating sound insulation in an apartment is polystyrene foam. It is lightweight, inexpensive, and easy to use. Foam panels can be mounted on the surface of walls without the help of a professional. However, unlike its competitors, the material has a low level of noise absorption. Polystyrene foam itself does not look aesthetically pleasing, so decorative finishing is applied on top of it.
An equally common option for sound insulation is the use of acoustic slabs. They are strong, durable, environmentally friendly, do not require complicated installation, but are expensive, which is why they are not very popular. Acoustic structures are installed in studios; specialists are hired for this.
Acoustic insulation or mat is affordable and used in conjunction with drywall. Such sound insulation can be built inside the frame. Before purchasing a material, you need to determine its acoustic capabilities.
Soundproofing plaster for walls is in wide demand, despite the fact that it also has negative reviews. Many doubt the effectiveness of this remedy. But soundproofing plaster must be chosen correctly! It is worth highlighting the advantages of this tool:
- harmless;
- convenient to apply;
- is inexpensive;
- easy to decorate;
- provides good sound insulation.
Soundproofing plaster prevents the penetration of noise vibrations. However, in order for it to exhibit its properties, it is necessary to follow the application technology. Soundproofing plaster allows you to suppress unwanted sound waves as much as possible. You can apply it to the surface of the wall with your own hands; it will not take much time, especially if you have skills in finishing work.
Before applying the composition, the surface does not need to be further leveled. Soundproofing plaster is resistant to rodents and insects. It is applied in 2 ways: manually and using a machine. However, soundproofing plaster for walls has disadvantages: compared to other similar products, it is not cheap. Soundproofing plaster is of interest to many!
Note! After its application, you can perform additional finishing using drywall or other decorative material.
Process and processing features
To apply liquid sound insulation indoors, you need special technical equipment. Under pressure, the chemical composition is applied to the surface, forming a polyurethane layer. Such insulation will protect the house from noise, cold penetration and various pests.
The work process is simple. If working with other materials requires certain preparation, then in the case of polyurethane foam, all this is not needed. If there are large peeling elements on the surface of the wall, then they can be dismantled, but otherwise nothing is needed.
Application technology
The technological process of applying sound insulation has some similarities with painting. Liquid noise insulation must be applied evenly, like regular paint in several layers. Do not hold the sprayer at one point for a long time to prevent large foam formation. The thickness of the layer should be three centimeters, this is enough for the material to provide the necessary level of protection.
Stage 1. Preparatory
There is no preparatory stage as such when treating with liquid sound insulation, but you can clean the wall surface from peeling elements. It also doesn’t hurt to cover the floor with plastic film or paper. Foam that gets on the floor will dry out and be difficult to clean.
If there are wires and sockets on the wall, then they should be covered first so that in the end you do not have to completely change the wiring. A special corrugated casing should be used for cables. Upon completion of the preparatory work, equipment is brought in and application can begin.
Stage 2. Primer
The surface of the wall should be treated with a primer. As with any finish, the primer provides maximum adhesion to the coating. You can apply the primer either with a hand tool: a roller or brush, but also with a spray gun. Liquid impregnation of walls is a prerequisite when working with surfaces.
@zhidkaya_shumoizolyatsia
Thanks to the primer, fungi or mold do not form on the surface of the wall under the sound insulation. The primer must be applied evenly over the entire surface. It is better to start applying from the top of the room, this way you will not get smudges.
Stage 3. Applying sound insulation
Polyurethane foam must be applied in two stages. The first layer is thin for the binder, and the second is denser. It is during the application of the second layer that a reliable soundproofing coating is formed. The polymer expands, and the resulting bubbles will be an excellent insulating layer. When working with polymer, a special pressure-operated tool is used. When the insulation layer has reached three centimeters over the entire surface, you can finish processing and put away the equipment.
@zhidkaya_shumoizolyatsia
Stage 4. Drying
After completing the application of the polymer material, it must be allowed to dry. Depending on the manufacturer and composition of the foam, drying time may vary. When sound insulation hardens, it forms a dense porous structure. The outer surface of the coating is uneven, so to bring the wall to perfection it is necessary to use facing slabs or panels. As an option, you can use decorative panels, which, despite their small thickness, also have a certain level of sound insulation. When all finishing and installation work is completed, the object can be handed over to the owner.
Today, the variety of soundproofing materials is so great that you can choose according to your requirements and wishes. When it comes to a large apartment, using frame sound insulation in it will be beneficial for you, since its cost is cheaper than using liquid sound insulation. Liquid sound insulation of the floor in the apartment, as well as the walls and ceiling will make the room comfortable and convenient. The optimal treatment option is considered to be a small living space. Thanks to the insignificant thickness of the soundproofing layer, those important centimeters will be preserved in the apartment.
As stated earlier, only an integrated approach to sound insulation guarantees effective and reliable protection from various noises and sounds. By installing external and internal sound insulation in your apartment, you don’t have to worry about your sleep and peace of mind.
Soundproofing options
High-quality sound insulation in an apartment involves eliminating noise of any kind, including drums. To suppress airborne noise as much as possible, it is necessary to choose a structure with a thickness of 30 - 40 mm. These could be slabs. Soundproofing plaster can be used in combination with other materials that suppress noise.
Today, the “Floating Floor” system is popular, in which the screed is placed on soundproofing materials. For flooring, you can also use sandwich panels with elastomer supports.
The second method is soundproofing the ceiling and walls. It, in turn, can be framed or frameless.
Important! In this case, at least 8 cm of area is sacrificed.
To create frameless insulation, the material is glued and covered with plasterboard, and sealant is applied to the joints. Frameless sound insulation involves the use of sandwich plates; they are easy to install.
Experts say that a frame system is better than a frameless one, because it provides better sound insulation. To perform sound insulation using frame technology, you need to fix metal profiles to the wall surface, to do this use special rubber gaskets (the parts prevent the spread of vibrations).
To perform high-quality frame insulation, you need to make a gap of 5 mm and fill it hermetically with a compound. After this, equip the structure with the material chosen for sound insulation, and mount plasterboard slabs on top.
Floor installation
In an apartment with wooden floors installed on joists, sound insulation is easiest to do. Fill the space between the joists with any soundproofing material of your choice. After this, install the boards.
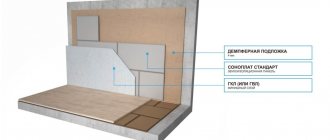
In other cases, floating floors are installed. They are efficient and environmentally friendly. They are called so because the screed in them is not connected to the floor slabs and walls, but is separated by a soundproofing substrate that serves as a barrier to impact noise. Depending on the materials, “floating floors” are divided into types:
To lay prefabricated floors, the surface must be perfectly flat. First, install sound insulation. It can be polystyrene foam, elastic polyethylene foam. When using cellulose sheet materials, the sound-absorbing effect is minimal: they serve more as a substrate than as a sound insulator.
To enhance the sound insulation of the floor, place a Texaund membrane or cork backing on the polymer layer, and a layer of plywood on top. Only then proceed with laying the finishing floor covering. This method of laying the floor does not affect the height of the room.
If it is not possible to lay a “floating” floor, use the ZIPS-FLOOR quick-assembly system. Its installation is simple and quick, within one day. Such floors can be used a day after completion of work.
Regardless of the method of soundproofing the floor, attach the baseboards either to the wall or to the floor. Place a rubber or cork gasket in the gap between the baseboard and the surface to which you are going to attach it. Do not use nails as they conduct sound well.
By getting rid of the noise from your neighbors, you will have the bonus of being able to watch football or listen to your favorite music late in the evening, celebrate birthdays and holidays with friends even until the morning. And all this - without scandals with neighbors.
Styrofoam
This material is often used for sound insulation. Its advantages:
- easy;
- accessible;
- environmentally friendly;
- comfortable in using;
- can be formed, cut and processed.
The walls are lined with polystyrene foam. The material releases volatile substances in very low concentrations, so it does not harm health. In exceptional cases, individual intolerance to polystyrene foam is observed.
Thanks to its porous structure, the material effectively absorbs vibrations. If you install soundproofing boards correctly, you will be able to reduce the noise level. Polystyrene foam has good functional characteristics. It is light in weight, which means it is easy to transport.
The slabs can be stored for a long time in an unheated room, they will not deteriorate or lose their properties. Foam plastic has a low melting point, regular foam melts at a temperature of + 145 degrees, and epoxy at a temperature of + 170 degrees. Lights for 4 seconds, after which it goes out if there is no source of fire nearby.
Brick walls
Brick walls have good soundproofing properties.
To improve sound insulation, a plasterboard frame filled with sound-insulating material is used.
The process of forming noise protection consists of several stages:
- first the frame is marked;
- For better sound insulation, it is recommended to attach the guides to the ceiling and floor, placing special insulating pads under them. If the guides are attached to the wall, they are covered with a soundproof seal;
- the gaps between the profiles are tightly filled with soundproofing boards;
- seams between slabs and gaps near the floor, ceiling and walls are sealed with sealant;
- Sheets of plasterboard are attached to the profiles and puttied. It is better to do the covering in two layers with overlapping seams. Gaps around the perimeter of the casing are sealed with sealant.
Drywall
To create reliable sound insulation, you need to choose a material of high density. Drywall, designed to suppress sound vibrations, contains special membranes and mineral wool. To enhance the sound insulation effect, many sheets should be laid. To make a sound-absorbing structure, you need to use 2 sheets of gypsum plasterboard or use a combination of gypsum plasterboard + gypsum plasterboard.
Drywall can withstand significant loads. It is fire resistant and not susceptible to moisture. The material can be formed and does not crumble. For high-quality insulation, exclusively dense plasterboard is used.
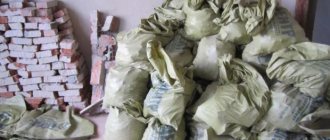
How to properly seal cracks
Before starting soundproofing work, all cracks must be sealed. It must be said right away that under no circumstances should you use polyurethane foam! It would seem that this is a simple and easy way to solve the problem, but polyurethane foam will not provide proper sound insulation: it practically does not delay the sound wave.
Small gaps can be sealed with ordinary silinok sealant. It is better to choose a non-hardening type that will maintain elasticity and will not dry out over time.
Large cracks should be tightly caulked with pieces of mineral wool soaked in cement mortar. At the end, the gap is filled with non-shrink putty.
If the edges of the crack are loose and crumbling, they must first be embroidered and only then can you begin sealing.
Another problem that significantly reduces sound insulation is through holes for sockets and junction boxes in the wall with neighbors.
Standard type of distribution boxes in panel and block houses
Pass-through sockets in the wall with neighbors
Be sure to move the sockets to a new location, and seal the former location in the same way as the cracks.
Advantages and disadvantages of liquid sound insulation
Liquid sound insulation has its pros and cons. First, you should consider its benefits.
- When using such a product, the cost of thermal insulation of walls is reduced, which means it becomes possible to save on heating.
- Thanks to its special structure, the material penetrates into the smallest gaps and provides high-quality sound insulation. It can also be used to finish cracks in window openings.
- The foam has adhesion to different surfaces, which means that it can be used immediately without additional preparation.
- Using this product it will be possible to create a sealed room.
- The foam is easy to use.
- By choosing this composition as an insulating material, you can save space in your home.
The foam is applied in a layer of 3 cm. If you use plasterboard sheets for cladding, you will be able to obtain sound insulation of 4 cm. If it is important to save space in the apartment, you should choose liquid sound insulation. This material does not put any load on the walls. As for the disadvantages, polyurethane foam is difficult to dismantle. The material has a long service life, but if the idea arises of removing it, it will not be easy to do.
Mineral wool
Laying mineral wool for heat and sound insulation of walls.
Features of the material.
Plates made of mineral wool or basalt fibers are used not only for insulation, but also for soundproofing the room. Mineral wool slabs are usually sold in sizes of 1 x 1 meter, or 50 x 50 centimeters. The composition may include additional components, such as fiberglass, to increase service life and prevent the spread of small insects and mice.
Advantages of mineral wool as a sound insulator:
light weight, small thickness (usually 50 mm), installation does not require special skills, affordable price.
Flaws:
limited sound insulation effect, may contain toxic substances.
Installation features.
Basalt wool is fastened for sound insulation using metal or wooden sheathing. Before attaching the sheathing, seal the cracks on the wall or ceiling with mortar or putty and treat with a primer.
Wooden blocks or metal profiles are mounted vertically or horizontally, the distance based on the size of the wool slabs. If the size of the mats is 50 cm, the distance between the lathing is 45 - 48 cm.
We install the slabs into the prepared frame; to increase the effect, you can attach a vapor barrier film on top. The last stage of soundproofing is attaching the external finishing, most often plasterboard, USB or wood.
Soundproofing under plaster. Liquid sound insulation for an apartment. Acoustic plaster.
Frame systems that are mounted on metal profiles are often used as soundproofing structures. ZIPS slabs are classified as frameless systems. To improve the properties of materials, they are laid in 3-4 layers, and mastic is used to increase the level of vibration insulation. Decorative materials also help to achieve effective sound insulation.
Soundproofing plaster for walls does exist, but it is important not to confuse it with regular plaster. If you use classic plaster to create sound insulation, there will be no effect. Acoustic plaster has a different composition. It contains fillers in the form of granules 5 mm in size. After application, the product acquires a porous structure; expanded clay gives it additional strength.
Soundproofing of walls under plaster must be done correctly. Wallpaper should not be glued over the applied composition, otherwise it will lose its properties. For painting, it is better to use paint that absorbs and dries quickly.
Acoustic plaster is divided into 3 types:
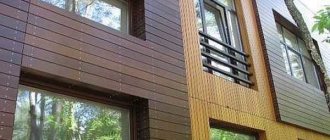
- stone;
- wooden;
- concrete.
The composition is applied to a surface that is covered with a Portland cement-based primer (this increases acoustic properties). Experts recommend applying a layer on surfaces made of coarse-grained material.
Acoustic plaster is very effective if there is an air gap between it and the wall, which is filled with asbestos fiber.
Note! Painting and whitewashing such plaster negatively affects its properties. The composition can be applied to different surfaces, this is its important advantage.
Frameless soundproofing of walls in an apartment
What to do if you want to reduce noise from neighbors, but there is not enough space for classic soundproofing schemes?
Frameless sound insulation of walls, which saves as much space as possible, solves a pressing problem for many small apartments! It is clear that such options will not save you from loud noise behind the wall, but they are quite capable of reducing the voices behind the wall by 2-3 times! Let's remember the saying “the best is the enemy of the good” - not everyone needs perfect silence; for many clients it is more important to reduce noise to a non-irritating level, with minimal loss of living space.
Acoustic plasters
Sound insulation under plastering of an apartment is carried out using different means. This section will look at the most popular types of acoustic plaster.
- ADC. Contains 2 active components: cement and building pumice. Water acts as a binding component here. First, cement plaster is applied with a layer of 1 cm, then a soundproofing layer of 2.5 cm is applied. The mixture hardens within 26 days. ADC can be applied to wood, concrete, stone.
- AGP. Its base is gypsum mixed with pumice. For 1 sq. m. plaster is applied in a layer of 2.5 cm. Grouting is not needed. Soundproofing plaster is applied to a previously prepared (plastered) concrete, stone or wooden surface.
- ACSH. This composition is based on crushed slag with a granule size of 3 mm. It serves as a filler, and the binding element is cement. ACSh plaster is applied in the same way as the previous one.
- TSA. The product contains crushed pumice, hydrochloric acid and magnesite. ASP is applied in a layer of 2.5 cm in the same way as AGP.
Soundproofing a wall in an apartment under plaster can be done quickly. Masters use the above-mentioned compositions, taking into account their physical and chemical properties. It is important to know how to use soundproofing plaster correctly.
- The composition must have a dense structure. During its application, voids should not appear, otherwise they will serve as a conductor of noise.
- A homogeneous composition must be applied to the wall surface, in this case it will be possible to achieve effective sound insulation.
- If the next room is too noisy, you need to apply the composition in a thick layer.
The sound insulation of plastered walls is durable and will please you with its quality for many years.
When choosing a soundproofing composition for wall finishing, you must take into account the following nuances:
- Before using the product, you must study the instructions, paying special attention to the section “Method of application”.
- If the manufacturer insists that the plaster must be applied by machine, it is better to apply it by hand.
- If the humidity level in the room is high, you should choose a product with a large amount of cement in the composition.
- For dry rooms, gypsum plasters are used.
Knauf soundproofing plaster differs from competing products in its high quality. It is easy to apply, has a light texture, and provides high quality sound insulation. The manufacturer produces products that can be worn manually or by machine. Soundproofing plaster is packaged in convenient bags. Knauf has proven itself well in the domestic construction market!
To buy a quality product for wall decoration, you should pay attention to its shelf life and date of manufacture. Soundproofing the walls in an apartment under plaster can be done using a product containing synthetic fibers.
Plasters are produced with the addition of gas-forming components (they are based on aluminum powder). When such plaster is dissolved, aluminum oxidizes, carbon dioxide is released and the mixture becomes porous. Such products are more expensive, but provide better sound insulation.
Important! Gypsum-based products should not be used in conditions of high humidity.
You can lay soundproofing plaster yourself. It is important to follow simple rules.
First prepare the surface. If you do not need to lay another one under the acoustic plaster, apply a primer to the surface - cement mortar (it can also be used for leveling). The optimal thickness of the primer layer is 1 cm.
Wait until the soil sets, then begin laying the soundproofing agent. It should be applied in accordance with the instructions and leveled using the rule. The gypsum composition must be applied with a spatula, the cement composition must be cast using a special ladle. The layer thickness should not exceed 1.5 cm.
Most manufacturers recommend applying acoustic plaster with a layer of 4 cm in 3 stages. Each layer should “set”.
Note! Acoustic plaster does not require grouting.
If it is laid along beacons, after the layers have “set”, these parts are removed. In their place, voids appear, which are filled with a soundproofing compound.
Panel and block houses
All current solutions for sound insulation in panel and block houses are presented in the wall sound insulation section.
In panel and block houses, the problem of noise behind the wall is extremely relevant. Slots and cracks, which are always present in “panels”, greatly reduce sound insulation.
Cracks appear over time as the house shrinks, and sometimes they are present immediately if the house is built poorly.