The need to plaster walls arises both when finishing new buildings after construction, and during renovation. The quality of such finishing work directly depends on compliance with the technology for their implementation. If it is not possible to attract master finishers, you can plaster the inside of the room or the outside walls yourself.
In this article we will focus on the basic rules that will help you learn how to plaster walls yourself. If you follow the sequence of actions step by step and follow the instructions, even beginners can master this useful skill.
How to prepare the base for plaster
The first stage is preparing the surface on which the plaster will be applied. The features of the process depend on the material of the walls, but there are several general rules:
- Remove old materials. If we are not talking about renovations in a new building, before plastering the surface, you will have to remove wallpaper, old dried plaster, traces of paint, etc. from it. If this is not done, the solution will not adhere properly. There are different techniques for quickly and easily removing coatings: for example, for glass wallpaper you can use special removers, and for paper wallpaper a sharp spatula is often enough.
- Inspect the area and remove defects if necessary. It is better to plaster walls that have no cracks or chips, so all noticeable defects must be repaired in advance.
- Clean the base from any dirt. If there is soot, oil stains, or other contaminants, they are removed. If there are no noticeable stains, you can simply wash the surface with clean water.
- Take care of good adhesion. Improving adhesion is an important stage of work that should not be skipped when plastering walls with your own hands. To increase the adhesion of wall materials, various methods are used.
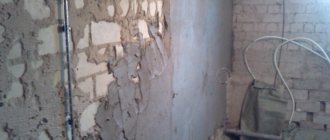
Preparing brick walls
When plastering brickwork, you need to take into account the specifics of the material. If the masonry is old, even before starting work it is worth assessing whether it needs repairs. If there are loose, unreliable bricks that fall out, they are removed, cleaned of mortar, and laid on fresh masonry mixture or polyurethane foam. Protruding uneven areas (for example, traces of hardened mortar) are removed.
To properly plaster brick walls, you need to ensure good adhesion. A popular method of improving adhesion is notching, which is applied over the entire surface. To do this, you can use any available tools: for example, a hammer and chisel or a hammer drill. Notches improve adhesion and are especially important for walls made of smooth brick.
The last step in the preparation of brick bases is a primer for walls, which you can purchase in our store in bulk. You can choose any composition suitable for brick.
Preparation of concrete surfaces
To improve adhesion, you can also use the notching technique before plastering concrete walls. Shallow (approximately 0.5 cm) recesses do not affect the strength of concrete structures, but significantly increase adhesion. Additionally, primer treatment is performed: it creates a film on the surface to which the plaster mixture adheres well.
Features of working with aerated concrete
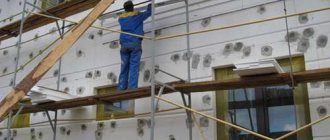
The aerated concrete surface to be plastered can be prepared in different ways. One option is cutting out notches and then treating them with a penetrating primer. You can also mount a reinforcing mesh, which will not only improve adhesion, but also increase the strength of the structure. Light non-metallic meshes, such as fiberglass, are well suited for aerated concrete.
If cracks or other damage to the aerated concrete masonry were discovered before plastering work, they must be repaired. For small defects on interior walls, gypsum wall putties, which you can buy in Minsk, are well suited.
Preparation of wooden surfaces
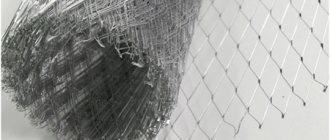
Wood has poor adhesion to plaster, so wooden structures must be prepared for work. If the house is new, you need to wait until the building shrinks before plastering the walls. In order for the solution to stick to wooden bases, shingles are stuffed onto them or a mesh is installed.
Using shingles is an old method that was used decades ago. To obtain a reliable base with good adhesion, thin wooden slats are nailed to the base crosswise, in increments of 4-5 cm. As an alternative, you can use plaster mesh - metal or polymer.
CEMENT MORTAR
To prepare the solution you need:
– 1 part cement;
– 2-3 parts of sand depending on its fat content.
Of course, sand significantly increases the strength of the mortar, but at the same time it reduces its plasticity, so the amount of sand for preparing mortar at home should not exceed three parts per one part of cement.
Cement and sand are poured into a container intended for preparing the solution, mixed, then water is added and thoroughly mixed again until a homogeneous mass is obtained. The prepared solution cannot be stored for a long time: it is best to use it no later than 1 hour, since it begins to harden, and repeated preparation of the solution significantly reduces its properties.
How to plaster walls
You can make the solution yourself or buy a ready-made mixture. Manufacturers produce dry building materials that need to be diluted before use, and ready-made solutions. Plasters differ in purpose, price, appearance of the finished coating and other parameters, but the main characteristic is their composition.
Cement mortars
This category includes cement-based compositions with the addition of sand and other additional components. They have several advantages:
- Versatility: suitable for plastering facades and walls inside buildings. Cement-sand compositions can be used in conditions of high humidity - in bathrooms and toilets.
- High strength. When the plaster is completely dry, you can drive nails into it, hang heavy furniture or large paintings.
- Low price, thanks to which cement-sand mortar is well suited for situations where a large volume of materials is required. For example, they are convenient for plastering rough foundations with large level differences.
- Long service life - up to 30 years or more.
The disadvantage of cement compositions is long drying time. Depending on the thickness of the layer, temperature and humidity, it may take up to a month for the coating to completely cure. In addition, working with them is not as convenient as with modern gypsum and polymer analogues. Before applying wallpaper or other finishing coating, the plaster layer will need to be puttied and primed.
Gypsum solutions
To make plaster, gypsum is used, to which plasticizers are added. Gypsum solutions have their advantages:
- Quick drying - such compositions dry faster than cement-sand ones. They set in just a few hours, and full strength gain usually takes no more than 7-10 days (depending on the thickness of the layer). It is important for beginners to remember this while working: do not make a lot of solution at once so that it does not dry out before application.
- Convenient work. Gypsum compounds are well suited for manual plastering of walls. When prepared correctly, they are viscous and plastic; the mixture is easy to scoop up with a spatula and throw onto the surface.
- High quality plastered surface. If you follow the work technology, the wall will turn out even and smooth; you don’t have to putty it before wallpapering it.
The main disadvantage of gypsum compositions is low moisture resistance. Because of this, they are not used in places with high humidity, which can quickly destroy the coating. Another disadvantage of gypsum-based plasters is the relatively high price.
Polymer solutions
Compositions with polymer components are relatively new products on the construction market. They are made using polymer resins and other additives that provide the finished solution with important advantages:
- Good adhesion to the surface: the mixture easily adheres to almost any material.
- High plasticity: even beginners can comfortably work with polymer compounds.
- Mechanical strength and water resistance.
- Good heat and sound insulation characteristics.
The main disadvantage of polymer compositions is their high price; they cost on average more than cement and gypsum mortars. Therefore, they are usually used as finishing plaster, which is applied to a leveled base or one with minor defects in a thin layer. The result is a smooth, beautiful coating that looks good even without additional finishing.
Choosing plaster based on wall material
- With proper preparation of the base, almost any plaster can be applied to wooden surfaces. Cement-sand and gypsum mixtures are often used.
- For internal walls made of foam blocks and gas blocks, gypsum-based compositions are well suited. It is better to choose lightweight mixtures that will not create a large load on aerated concrete structures.
- It is convenient to level brickwork and concrete partitions with cement mortars that adhere well to the prepared surface. Other types of mixtures can also be used.
The choice of the type of plaster mortar is influenced not only by the material of the walls, but also by other factors. Among them are the experience of the finisher and the method of applying the mixture. Professional builders can carry out mechanized application using plastering machines - special mixtures are produced for such devices.
Operating conditions play an important role: temperature and humidity levels. Thus, for facades, a cement-sand or polymer mixture that is resistant to temperature changes is used. Plaster for the interior decoration of walls in dry rooms can be of any kind, and for rooms with high humidity, waterproof cement or polymer solutions are suitable.
CEMENT-LIME MORTAR
To prepare the solution you need:
– 1 part cement;
– 2 parts lime mortar;
– 7 parts sand.
Lime mortar is very easy to prepare: the required amount of lime is thoroughly mixed with water until a dough-like mass is obtained. Then dry cement is mixed with sand and lime mass is added. If the solution turns out to be too thick, you can add a little more water and sand to it, and then mix thoroughly again.
What tools will you need?
You can use different tools for plastering. If the amount of work is small, you can get by with the minimum set:
- Hammer or drill with mixing attachment. It is impossible to make a high-quality mixture by hand, so you need to use additional tools or buy ready-made decorative plaster.
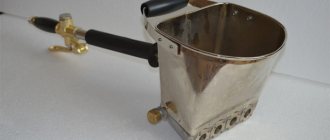
- Devices for throwing mortar. When plastering walls manually, one of the main working operations is throwing on the mixture. Professional finishers use a trowel for this, but beginners often find it more convenient to use a spatula. To apply the mixture to different areas, you will need at least two spatulas - a wide one and a narrow one.
- The rule is a bar for leveling the mixture along the beacons and cutting off excess. It is best to use the h-profile rule for leveling, the trapezoidal profile for trimming.
- Graters and graters for grating and smoothing the solution.
- Beacons, screws, fishing line or twine for installing them, pliers for removing profiles.
To dilute the composition you will also need a container. Before you learn how to properly plaster walls and apply the mixture quickly, it is better to prepare the solution in small portions, so you don’t need too large a container. To work with gypsum and cement compositions, you can take a regular 20-liter bucket.
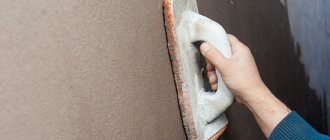
Grout
Grouting work can be started only after the solution has dried and does not slide off the surface when touched with a trowel, and it must remain sufficiently moist and flexible.
When the layer of mortar is applied and a smooth surface is obtained, the final grouting of the plaster mortar begins. This operation is performed using wooden plaster floats, as well as special troweling machines. The grater is pressed onto the surface as tightly as possible and with the entire plane, then the plaster is grouted using even circular movements, lightly pressing. The movement is performed counterclockwise. If necessary, moisten the grater with brushes so that cement “milk” remains on the surface. The edges of the grater cut off all protruding irregularities; with the same solution you can fill the depressions on the surface and at the same time rub it.
After troweling the surface with wooden floats, grooves may remain from circular movements; to remove them, finishing floats are used (a layer of felt or felt is applied to them). This operation is essential for a high quality finish.
Stages of plastering walls
For beginners, plastering can be a complex process, with mistakes at every step. Step-by-step instructions will help you understand how to plaster walls with your own hands when finishing a new building or renovating an apartment.
Installation of beacons
It is difficult to smoothly plaster a surface without guide beacons, especially for a non-professional, so before starting the main work you need to install them. The installation is carried out in several stages:
- Self-tapping screws are screwed into the corners, at a distance of 5-10 cm from adjacent walls, ceiling and floor. They should protrude to the expected thickness of the plaster layer.
- A fishing line or twine is stretched between the installed screws to bring them into the same plane. If there are areas where the wall protrudes beyond the fishing line or approaches it by less than 5 mm, the screws are unscrewed to the required distance.
- Using a fishing line stretched horizontally, the location for the beacons is determined. The optimal distance between them is 1 meter. Self-tapping screws are screwed into the places designated for beacons from below and above and brought into one plane.
- Between the corresponding pairs of upper and lower screws, small portions of the solution are applied into which the beacons are recessed. To better secure them, you can use additional mixture.
Calculation and preparation of solution
Before you make plaster for the walls, you need to correctly calculate the required amount of mixture, for this:
- Calculate the area of the site where the work will be performed.
- Mark several points on the wall at the same distance from the floor. The more points there are, the more accurate the calculation.
- Measure the distance between the points and the surface of the beacons.
- Add up the measurement results and divide by the number of points - this will give you the average layer thickness.
- The thickness must be multiplied by the area of the wall - the result will be the amount of mixture.
Thus, the consumption of plaster materials will depend on how uneven the walls are. If there is a noticeable curvature, even a small area can require a lot of mixture.
After all calculations have been made and materials have been purchased, you can begin preparing the solution. The proportions of water and mixture are determined according to the manufacturer's instructions, the mass is thoroughly mixed.
Surface spray
According to the technology, the walls are plastered in several layers. The first of them is spray. For this stage, you can use a mixture of a more liquid consistency - for a standard cement-sand mortar, the consistency of sour cream is recommended. The plaster is scooped up with a trowel or spatula and thrown onto the wall - it is important that it sticks to the surface, but does not splash around. The thickness of the spray layer is 2-5 mm, its main task is to provide good adhesion.
Application of primer
After the spray has dried, the base layer – primer – is applied. The consistency of the solution is standard. The work is carried out in several stages:
- The mixture, in the same way as in the previous stage, is spread in a continuous layer using a trowel or spatula; it is better to work from top to bottom. The thickness of this layer should be such that it covers the beacons.
- At the stage of applying the primer, the plaster of the walls is carefully leveled: before leveling it with the rule, you can use a wide spatula. Leveling must begin before the mixture has hardened - this is usually done when the solution is spread over the area between two beacons.
- To further level and remove excess mixture, the area is drawn according to the following rule: it must be pressed tightly against the profiles and drawn from bottom to top. To remove the mixture more efficiently, you can use the trapezoidal rule. As a result, all excess protruding beyond the beacons is cut off.
- After this, the surface is further leveled with a trowel.
Covering
When the soil is dry, you can begin the final layer of plaster coating. The mixture of liquid consistency is applied to the treated area in small portions. After this, a grater is used: the plaster is thoroughly rubbed in a circular motion.
Removing beacons
Before the plaster is completely dry, the profiles must be removed from it. To do this, you can use pliers to pry and pull out the beacon. Part of the mortar is removed along with the profile, so traces from the beacons need to be sealed with a plaster mixture and leveled.
Grout
The last stage in the technology for performing plastering work is grouting. The dried mixture is moistened with a small amount of water (you can use a paint brush for this). Grouting is done with special trowels or floats with a soft base. The tool is moistened with water and grinds the surface in a circular motion, making it smooth.
Just add some color
To paint decorative plaster, you can use silicate, acrylic and silicone paints. They are plastic, durable, environmentally friendly and easy to apply, have a variety of colors, and therefore are able to implement a wide variety of design projects.
Using different coloring options, you can achieve a variety of decorative effects. In general, to achieve a uniform effect when painting a volumetric texture, it is necessary to apply the paint in several layers. First we use it, then the roller. If you use a roller with long pile, you can ensure good quality painting in one pass.
Using several shades when painting, you can get a voluminous effect. Additional shade can be applied with a dry brush or rubbed with a rubber sponge. In some cases, the second layer of paint is applied with a short-haired roller, for example, to create a bark beetle effect. In this case, the recesses in the existing texture are not painted over, which emphasizes the depth of the relief.
After painting the wall, it is necessary to apply a layer of protective varnish, which will make it possible to use wet cleaning. Since the varnish must penetrate into all the cavities, it is worth diluting it with water in a ratio of one to one, and then applying it in several approaches.