On the plastered surfaces of buildings and structures, over time, for various reasons (moisture, mechanical damage, shrinkage of buildings), cracks, swelling or detachment of plaster fragments may appear. To restore the façade and walls of the building to an attractive appearance, work is being carried out to repair or completely replace the plaster. One of the ways to repair the coating is to grind the façade plaster.
Unlike a complete replacement, this method is less labor-intensive and cheaper. When grinding the plaster, the worn-out coating layer is renewed, rather than completely replaced, which allows the building to return to a beautiful, fashionable appearance in a short time.
What is plaster grinding?
Work on grinding plaster consists of completely cleaning the walls and facade from dirt, dust and old paint. After cleaning, large cracks are filled and repaired, and fragments of plaster with swelling are removed. Next, priming and new plastering are carried out to eliminate minor defects and traces of repair.
The last stages are final priming, painting and application of a water-repellent layer. This method can be used for both grinding the plaster of smooth facades and facades with decorative finishing.
Process Features
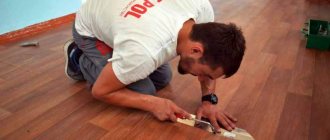
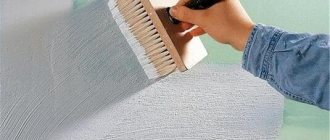
- For grouting work, you should use a wooden trowel.
- All prepared surfaces for grinding should be generously moistened with water.
- The main task is to distribute the solution over the surface as evenly as possible.
- The final layer has low strength; drying should occur naturally.
- It is necessary to avoid mechanical impacts on finished walls; drafts and temperature changes in the room should be prevented.
- The distance between the wall and the baseboards must also be carefully sealed. All stains from baseboards can be easily removed with water.
When the applied solution has completely dried, you can begin further finishing.
What tools are needed to grind plaster on a facade?
To carry out facade repair work, the following are used: units for washing facades; equipment for sandblasting, for mixing and supplying the finished plaster mixture; compressors and paint sprayers for finishing walls. The list of equipment and devices directly depends on the total volume of work performed. So, for small volumes, repairs and grinding of plaster are carried out from hanging cradles using only hand tools, and with an increase in the area being processed, the installation of scaffolding will be required.
The list of hand tools for preparatory work includes: a hammer drill or chisel and a hammer, as well as a spatula for removing peeling and cracking, a metal brush and a paint brush for cleaning from dust and other contaminants.
To prepare the solution you will need suitable containers, shovels and buckets, a mixer for mixing or a concrete mixer.
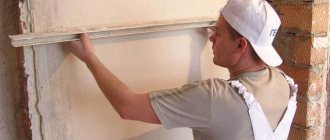
When performing work on applying plaster, you need: a ladle or trowel and a trowel for spreading the mortar, a metal rule for leveling the applied layer, a trowel for applying the mortar, leveling and preliminary troweling of the plaster surface, cutting - a small plaster spatula for sealing cracks, eliminating small defects, trimming mortar, trowel for final grouting of the surface of the plaster layer after it has dried.
Solution preparation technology
Grinding plaster in the basement
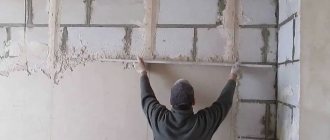
Basically, plaster restoration is carried out using the same mixture that was used when leveling the surfaces. But, grinding the plaster should be carried out with a mixture that must contain sand. The most suitable material would be sifted fine-grained sand.
Fresh plaster on the wall
The grinding solution is prepared in compliance with the following proportions:
- 1 part lime dough;
- 1 part sifted sand;
- water (you need to add enough liquid so that the mixture has a thick consistency).
If you need a lot of grinding solution (a large amount of damage), it is better to mix it in small portions. The finished mixture tends to set quickly, so the quality of such a solution will be significantly worse than a freshly prepared one.
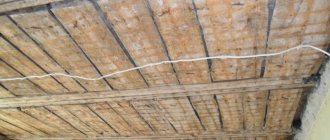
Defect detection
If large cracks on the walls and swellings of the plaster are clearly visible, then the places where the plaster has peeled off but has not fallen off must be found. To do this, the entire wall, regardless of its appearance, is tapped every 30 cm (for example, with the handle of a trowel). At the same time, a dull sound at the tapping site indicates a detachment that must be completely removed. If the sound is clear, the adhesion of the plaster to the wall in this place is strong.
Solution preparation technology
Basically, plaster restoration is carried out using the same mixture that was used when leveling the surfaces. But, grinding the plaster should be carried out with a mixture that must contain sand. The most suitable material would be sifted fine-grained sand.
Fresh plaster on the wall
The grinding solution is prepared in compliance with the following proportions:
- 1 part lime dough;
- 1 part sifted sand;
- water (you need to add enough liquid so that the mixture has a thick consistency).
If you need a lot of grinding solution (a large amount of damage), it is better to mix it in small portions. The finished mixture tends to set quickly, so the quality of such a solution will be significantly worse than a freshly prepared one.
Preparation for grinding
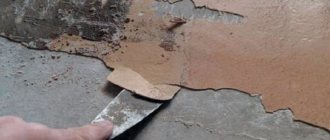
Preparatory work consists of completely removing swollen and loose fragments of the old coating from the wall, filling cracks, followed by priming and putty. If there are oil stains on the walls, then the layer of plaster in this place must be completely removed. Places on the walls where the plaster has been removed are carefully cleaned with coarse sandpaper, notches are applied to the wall with a chisel or a reinforcing mesh is attached. If the areas with the removed layer of old coating have a large area and exceed the length of the rule, hanging and installing beacons will be required. To correctly form the corners, edged boards are attached to the door and window slopes with self-tapping screws, protruding outward to the final thickness of the plaster layer. The next step is to thoroughly remove dust and dirt from the walls.
This measure is very important, since the presence of any contaminants on the surface of the walls significantly reduces adhesion, which in the future can cause peeling of the plaster.
The best way to clean is with a pressurized water hose. The last operation before applying plaster is the application of a deep penetration primer, and in the case of concrete walls, a “Betonokontakt” solution.
In this case, not only the walls are primed, but also the end surfaces of the old plaster coating.
Surface preparation work
The success of the entire restoration process directly depends on how carefully all actions are carried out.
The initial stage of any repair work is the preparation of the necessary structures and surfaces, which consists of the following:
- In order for the restoration work to be done efficiently, it is necessary to open up all the cracks for deep penetration of the plaster mortar. To perform such work, you can use a sharp knife or spatula, with which you need to make a cut at an angle of 45 0 (how deep to cut depends on the degree of damage to the surface: small cracks can be expanded by 1-1.5 cm, and large ones are better expanded over the entire layer of old plaster mortar).
- At the next stage, it is necessary to clean all the embroidered recesses from any remaining debris and dust, and sprinkle them thoroughly with water (instead of water it would be nice to use a primer solution, but such work will cost an order of magnitude more).
- Next, you can move on to preparing the gaps between the walls and baseboards. The cracks must be thoroughly cleaned of debris and old plaster, then moistened with water or treated with a primer.
- If rusty spots have formed on the surfaces over time, such fragments of the old wall must be removed to its base (when the spot is small, you don’t have to remove the layer of mortar, but be sure to sand this area).
Grinding solution
For carrying out plastering work, a variety of ready-made mixtures are available for sale, the properties of which are specified by the manufacturer, which allows you to select the required parameters for the plaster mortar. If the mortar is made independently, as a rule, two types of compositions are used - cement-sand and cement-lime.
A cement-lime mixture is preferable - cement gives the necessary strength to the plaster and resistance to the external environment, and lime provides good adhesion and, in addition, has antibacterial properties. Washed and sifted fine sand is added to the mixture as a filler. The quality of sand is very important, because impurities entering the solution can significantly change its properties, and small pebbles create defects, which is especially undesirable in the finishing layer. When mixed with water, the mixture acquires the necessary plasticity and fits well on any surface.
For a cement-sand mixture, use a mixture of sand and cement in a ratio of 2-4 to 1. Cement-lime plaster contains three components - cement, slaked lime and sand in a ratio of 1: 1-2: 6-10
To speed up hardening and acquire water-repellent properties, PVA glue is added to the plaster mixture, and a small amount of detergent is added to slow down drying. The amount of glue or detergent is selected experimentally.
Elimination of defects
Grinding plaster on a wall in an apartment
After the preparatory work is completed, you can begin to eliminate defects:
- deep cracks must be filled with a solution so that there are no empty areas left in the recess;
- if the gaps are thin and not very deep, they can be filled with acrylic (if this is not possible, you can prepare a mixture of chalk and plaster in a 2:1 ratio, but then be sure to treat this area with a primer);
- Next you need to fill the gap between the wall and the baseboard with a solution;
- if a defect has formed at the point of contact of the plaster with communication structures (ventilation, pipes, etc.), use acrylic sealant to seal them.
After all the cracks and gaps have been filled with the solution, give the surfaces time to polymerize, and only then proceed to grinding.
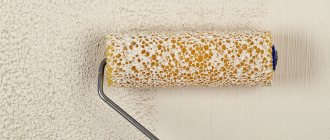
Grinding technique
The plaster mixture is applied to the prepared surface using a ladle, a falcon or a trowel, and then, moving the rule from bottom to top, the applied layer is screeded and leveled. The plaster is dried for 24 hours and the surface of the plaster is rubbed with a float or trowel.
The grouting stage is necessary for better leveling and to avoid the appearance of microcracks during the further operation of the building. To make work easier, the walls are moistened with water during grouting. If a cement-sand mixture is used, then the work is performed in two layers, in the case of using a cement-lime mixture, in three.
After completion of plastering work, the walls must be covered under plastic film. This precaution will slow down the drying of the plaster layer, which will prevent cracking in extreme heat, wind and mild frost. The walls should remain under such cover for at least a week.
After the plaster has completely dried, finishing work begins: applying a finishing layer (bark beetle, lambskin) or painting. The grinding stage is completed by treating the walls with water-repellent impregnation.
Peculiarities
Individual construction and industrial structures are equipped with plaster finishing of the surfaces of walls, ceilings, and stoves. Often, for safety reasons, heat-resistant materials are used during finishing. Fireproof mixtures are used by owners of country and country houses.
Fire safety authorities are considering five types of thermally resistant mortars. Modern construction widely uses the properties of such materials in design. Finishing of facades, interior design of premises for various purposes.
The plastering process differs in that special substances are introduced into the solution. But a reliable and durable layer of plaster undergoes wear and tear. In such a situation, grinding the plaster, what is it? It turns out that this common work is done using a felt or polyurethane trowel, generously wetting the surface. Technological methods are known: cleaning the surface, eliminating damage, applying a new restoration layer, drying and careful operation.