How much paint do you need for walls?
What paint to paint the house?
To choose the right paint, read the previous page about choosing façade paint
for painting the outside of the house.
It is quite possible to do the painting of the facade yourself; you only need time, knowledge and patience.
The paint packaging always contains information about paint consumption. Typically, the specific consumption of facade paint is indicated - the number of liters (kg) that will need to be used to paint 1m2 of facade in one layer, l/m2
.
Sometimes façade paint packages indicate the inverse consumption value - the surface area that can be painted with 1 liter of paint, m 2 / l
.
Usually the paint consumption is indicated in a certain range
, for example: flow rate 0.1 - 0.25
l/m2
. Here, a lower consumption value is for smooth primed surfaces, and a larger value is for rough, textured, unprimed facades.
On the websites of paint manufacturers and sellers you can find calculators for calculating the amount of paint chosen depending on the area of the house facade to be painted, the number of layers and the roughness of the surface being painted. Facade paint is usually applied in two layers.
To paint the outside of a house, the amount of paint is determined by multiplying the area of the surface to be painted - m2
, specific consumption -
l/m 2
, number of layers - 2, safety factor - 1.1.
A safety factor of 10% is necessary to avoid the unpleasant situation of running out of paint at the end of the job.
How to prepare the walls of a house for painting?
Preparing for painting old house walls
As a rule, it is always necessary to improve the condition of the base before painting the old walls of the house.
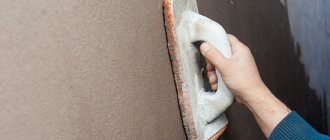
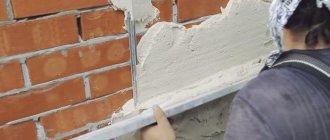
Before painting, the old wall must be cleaned of dust, mold, moss and easily peeling layers of old coatings . To do this, it is best to wash the wall with a pressure washer, for example, a car wash. Or you can wipe the entire surface of the wall with a stiff brush, but this option is more labor-intensive. It is better to use both methods; after washing, brush only areas of intense dirt.
After removing them, areas where mold and moss accumulate must be treated with a liquid bioprotective preparation. Otherwise, parts of these biological substances may remain in the thickness of the wall covering, which will quickly grow through the new paint.
Then the plastered surfaces are repaired, cracks and places with peeling plaster are sealed. Old paint on the facade should not peel off or become dusty. Places with peeling paint are cleaned, primed and covered with an additional layer of new paint.
If the old paint is damaged over a large area, then it is better to remove it from the entire surface of the wall. To remove old paint, it is convenient to use a sandblaster.
How to determine the strength of the surface of a wall to be painted?
To do this, stick a fairly large piece of transparent stationery tape to the wall.
and a minute later, with a sharp movement, they tear it off the wall. If pieces of the base do not come off the wall along with the tape, then such a wall can be primed and painted. Otherwise, the wall surface should be cleaned by removing the old paint.
Preparing to paint the facade of a new house
The plastered facades of new houses are quite durable. Preparing the facade for painting the outside of a new house comes down to the following steps:
- It is imperative to dry the freshly plastered facade for at least 30 - 60 days. The wall must be completely dry.
- Apply primer to the wall of the house.
Unplastered silicate brick facades
You can coat it with a special colorless protective compound, or you can simply paint it with façade paint. In any case, the surface of the wall is primed.
Facades made of facing ceramic bricks
Usually they don't paint.
New walls made of ordinary ceramic bricks
It is better to paint them in the first two years, before efflorescence appears on them.
Quicklime
It is used as a binder for cement mortars and various types of plasters. It increases adhesion between coatings and the treated base, gives plasticity to the materials, but is absolutely not suitable for whitewashing wall surfaces. If for some reason there is no ready-made fluff in the form of dough or powder, the lime is slaked.
On an industrial scale, lime is slaked in large special pits, into which the mixture is poured and water is poured. You can carry out the extinguishing procedure at home. The amount of water is calculated depending on what consistency the material needs to be obtained - thick or milky. In both small and large quantities, the extinguishing process takes 36 hours. You can reduce it to a day, but this will affect the quality of the resulting whitewash.
During the slaking process, the lime boils and splashes in different directions, but requires constant stirring. The mixture exhibits activity from 5 to 30 minutes, during which it must be stirred. To prevent the caustic solution from getting on the skin and mucous membranes, it is necessary to use personal protective equipment and a long object for mixing.
Priming the walls of the house outside
- strengthen the dusty base;
- increase the adhesion (adhesion) of paint to the base;
- reduce water absorption of the coating;
- reduce the consumption of facade paint.
Facade paint spreads more easily over a primed surface, and its consumption is noticeably reduced
.
It is best to use a primer recommended by the façade paint manufacturer.
chosen to paint the exterior of the house.
The quality of painting the facade of a house can be improved if the primer is tinted to match
, close to the color of the façade paint.
Facade paint diluted with water is sometimes used as a primer.
in a 1:1 ratio.
The primer is applied to the wall surface in the same way as paint. Before painting, the primer must be allowed to dry completely for at least 24 hours.
Whitewashing houses: advantages and disadvantages
Whitewashing the outside of the house
Whitewashing houses and trees involves applying lime or chalk dissolved in water to the selected surface. Today, whitewashing houses as a design solution has lost its popularity, although some summer residents still maintain the traditions of their ancestors.
Whitewashing trees as a landscape design idea
The advantage of whitewashing houses is as follows:
- Lime (or chalk) is an environmentally friendly material
- Whitewashing houses as a decorative finish for buildings is the cheapest option
- Lime disinfects the surface well, thereby preventing the appearance of fungus and mold
- Lime creates high-quality moisture resistance of the surface
- The appearance of the whitewashed building is very attractive and neat
- Whitewashing is a durable coating
- In order to whitewash a house you don’t need to have any special skills, you just need to know the basics, which we will provide you with a little below.
- Whitewashing a house will require a minimum amount of time, materials and tools.
As for the disadvantages of whitewashing a house, there are very few of them, namely:
- Lime is a caustic material that can damage both hands and eyes if minimal protection is not provided (goggles, respirator, rubber gloves)
- The appearance of whitewashed buildings can only complement country, landscape and rural garden styles. The rest will not be able to combine with this type of finishing work.
- Incorrectly mixed and applied lime can spoil the appearance of the building, because... when the material dries, spots, stripes of various shades, bubbles and even swelling of the coating will begin to appear.
How to apply paint?
Facades are most often painted with a roller, brush or spray gun.
The choice of tool is determined by the consistency (viscosity) of the paint, the texture of the surface to be painted and the qualifications of the workers.
Walls with a smooth surface
Paint with a brush or short-haired roller. Painting with a roller is more convenient and faster than with a brush, and less paint is consumed.
When painting walls with a textured surface
or directly on the brick, use a wide brush with long bristles.
You can use a spray gun to paint walls of any texture.
, both smooth and embossed.
Painting a house with a spray gun requires performers to have higher qualifications and experience working with this painting machine. It is necessary to choose the right paint viscosity and select nozzles for the sprayer of the device. You also need practical skill in applying paint evenly to the surface of the wall. It is better to entrust painting a house with a spray gun to specialists.
In the case of using special high-viscosity textured paints with filler
, to apply paint to the facade, in addition to the above tools, they also use a spatula.
Advantages of the method
Even a beginner without experience in the construction industry can do whitewashing with his own hands. The requirements for raw materials and tools are minimal. Advantages of the method:
- After drying, the lime coating is safe for humans. No hazardous substances are released into the air;
- lime available. Significant capital investments for cladding are not expected. Sold at any hardware store;
- easily and quickly applies to any surface: brick, wood, concrete, plastered surface;
- bactericidal properties. Used for painting walls of kindergartens, schools, medical clinics;
As an antiseptic, it is used to treat cellars and agricultural buildings: poultry house, barn.
- if you work strictly according to technology, the painted surface can be used for more than 3 years;
- The lime surface is resistant to moisture. Allowed to be used for cladding rooms with a high degree of humidity - kitchens, bathrooms;
- after drying, a reliable, durable film appears that is resistant to abrasion;
- no training required. Even a beginner can handle the job. It is necessary to follow the application technology, the correct proportional creation of the solution;
- absorbs well into microcracks.
Painting the house outside
paint the outside of your house yourself
by following these recommendations:
- The work of painting the facade must be planned by checking the weather forecast. On rainy, windy days or at temperatures below +5 o C, it is better not to paint the facade.
- The surfaces to be painted must first be primed
. To apply primer to the wall, use the same methods as for applying paint (see above). - Before starting work, all non-painted parts of the facade (windows, doors, slopes, plinth, blind area, etc.) are protected with plastic film.
- Painting work is carried out in dry weather in the absence of strong wind. The outside air temperature must be within the operating range indicated on the exterior paint packaging. Check the weather forecast before starting work.
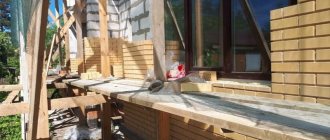
- To paint the facade at a height, install scaffolding or scaffolding. Painting the facade from the stairs is inconvenient and dangerous.
- A layer of paint is applied to one wall of the house without taking long breaks in work. If you paint part of the wall the next day, there will be streaks on the wall - places with different shades of paint.
- The second layer of paint is applied after a certain break, not earlier than indicated by the manufacturer on the paint packaging.
- In order not to wash the roller or brush before each break in work, wrap the tool in a plastic bag - the paint will not dry out.
The paint is distributed by moving the roller or brush in different directions alternately - vertically, horizontally and diagonally.
What color to paint the facade of the house
When choosing the color of the facade walls, they are guided by the following basic rules:
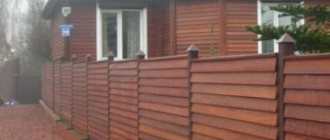
1. The color of the walls of the facade of the house should be different from the color of the roof.
2. The paint color should be in harmony with natural and other non-paintable materials with which the facade is finished: brick, natural stone, tiles, panels, etc.
3. Various architectural elements on the facade are distinguished by color: the front door, windows, shutters, cornices, cladding, etc.
4. If there is no contrast in the color scheme, the facade, as a rule, looks dull and unattractive.
5. It is recommended to use three paint colors for painting the facade : main color, decor and accent.
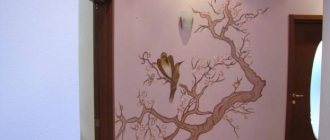
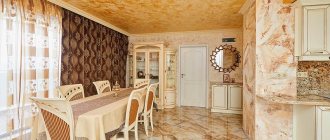
In the photo, the main color of the wall is combined with the color of the natural stone on the facade.
Smaller elements of the facade are highlighted with light beige paint. A warm light tone against the background of a thick dark wall color softens and makes the color scheme pleasing to the eye and successfully decorates the facade.
The color accent on the front facade is usually placed on the entrance to the house, the front door.
In this photo, the wall of the first floor of the house is made of unpainted clay bricks. The color scheme for the facade of the upper floor was chosen to visually reduce its volume and make the lower level more significant.
Maintenance and repair of façade plaster and painting
Regular inspection and elimination of any defects will ensure the durability of the façade. After each winter it is worth checking the condition of the plaster and paint layer. Here are basic tips for maintaining and repairing them.
The most common are damage caused by deformation of the base of the plaster or paint layer, as well as mechanical damage, and damage associated with leaching of the plaster by rainwater during leaks. Only after eliminating the causes of the damage can you begin to repair the damaged areas.
Well-made decorative thin-layer plasters applied to thermal insulation usually do not require any repairs for many years.
Regular inspection of the facade and cleaning of dirt are the main means of its maintenance.
Even small leaks, if left uncorrected for a long time, over time can lead to significant damage not only to the paint layer, but also to the plaster layer. If you react quickly, it is enough to restore only the color. It is necessary to eliminate the cause of the leaks, allow the wall to dry and carry out repairs.
When not to paint: how to clean old whitewash from walls or ceilings
Experts still do not recommend painting without first removing the whitewash. And therefore, the ideal solution in this case is to remove the layer of this very whitewash. There is no single master class here, and it all depends on the thickness of this layer and how firmly it holds:
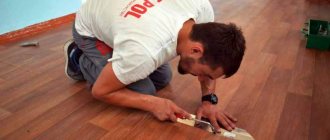
- Thin layer. Despite its insignificant thickness, it is very difficult to remove. Significant impact will be required, and a grinding machine can provide this;
- Medium thickness layer. If this is exactly what you get, then this whitewash will most likely hold up well. However, it’s still easier to pick it up and tear it off the wall. We use a roller with good pile, generously wetting the walls or ceiling with it;
- Thick layer . As a rule, such a layer of whitewash adheres very mediocrely, so in most cases it can be removed with an ordinary spatula, after wetting it first.
Green algae on the facade - how to prevent and remove
Green algae on a wall always indicates high humidity, which encourages algae growth.
Houses located near forests and parks, in areas with high humidity (near bodies of water), are especially vulnerable to biological pollution. Mainly only the northern and western walls are susceptible to green invasion. This is due to the fact that winds from the west blow more often, and rain falls on the walls from these directions, and the sun is less frequent in these places. Algae and fungal spores thrive on damp surfaces, and on south-facing walls the sun dries out the façade.
It is enough to disinfect walls with a slight degree of contamination with a preparation to combat microorganisms, and then rinse them with water under pressure. If after disinfection traces of algae remain, then the color will need to be restored - paint the façade with paint containing biocides.
It should be remembered that the active period of most biocides is from three to five years. After this time, in areas particularly susceptible to microbial contamination, facades should be re-protected by spraying the product. I know of no means of providing long-term permanent protection against algae.
The appearance of algae should be prevented regularly, because prolonged exposure to it not only spoils the paint, but can lead to weakening and damage to the plaster.
Small cracks in the plaster layer can be filled with putty. It is convenient to apply it from a cartouche, the tip of which must be cut so that a thin stream of mass is created.
The depressions after impact are filled with a mass applied with a spatula.
Whitewashing the walls is an important stage in any cosmetic renovation. Since the quality of the material used affects the appearance of the surface and resistance to external influences.
Advantages of whitewashing
To apply whitewash to walls, it is not necessary to undergo special training. You can understand the intricacies of the work, the undeniable advantages and disadvantages in the process of work.
Along with the accessibility of the technology for a beginner, there are a number of advantages of whitewashing over other surface treatment methods:
- Whitewashing becomes indispensable when budget funds are limited. Since the price on the market for the material is the lowest;
- ease of use. Even a schoolboy can handle whitewashing the walls and ceiling. However, it is important to adhere to technology and maintain the required proportions;
- beautiful smooth surface of a monochromatic fresh shade;
- environmental safety, absence of harmful substances that plague modern finishing materials;
- Whitewash has bactericidal properties, which allows it to be used when budgets are limited, for example, in various educational institutions, hospitals, and on private plots.
Preparation for work
Before removing old whitewash from the walls and ceiling, you need to know what was previously used - chalk or lime. The check will not take much time. It is enough to moisten the surface with water. If lime was used, the wet area will darken. Or just run your finger along the wall. If the surface was whitened with chalk, the finger will turn white. After lime it will not color.
The success of whitewashing is primarily influenced by careful surface preparation. To do this, just follow simple rules:
- empty the room of household appliances and furniture. If it is impossible to do this, you need to cover them with polyethylene film and secure it with tape to prevent it from slipping;
- if you wet a section of the wall in advance, it will be easier to remove the old layer of whitewash;
- to wash off the old layer, it is recommended to use a soap solution, plain clean water with the addition of citric or acetic acid;
- The old whitewash is removed with a spatula and collected in a special container. If this is not done, the cleanliness of the room will be at risk;
- When the old whitewash is removed, the wall is washed with a sponge to remove any residue.
- to remove stains from rust, grease, and soot, copper sulfate, soda ash, and hydrochloric acid are used;
- cracks and dents (depending on the size of the defect) are puttied or plastered;
- After removing the old whitewash and leveling the surface, an antiseptic composition is applied - a primer. You can either make it yourself or purchase it ready-made;
- After the surface has completely dried, we begin whitewashing.
Dyeing process
Let's look at it using the Finngard limestone paint from Tikkuril as an example. It must be diluted with clean water before application. The proportions are as follows: a 25 kg can of paint will require 16 liters of water. Do not use it undiluted. During the coloring process, the mixture should be stirred frequently, as heavy rocky particles constantly sink to the bottom.
Painting with limestone paint is carried out in at least 3 layers using a brush or brush. In this case, the interval between applying the next layer is equal to its drying and is a day. The wall is moistened with water before and after each layer is applied.
Note! To treat a solid surface, you need to stock up on enough limestone paint from one batch.
And the border between surfaces, covered with compositions from different batches of preparation, is treated with a solution of 1 part of the old batch and 1 part of the new one. At the same time, plan everything so that the junction is in the most inconspicuous place.
If the surface is solid and small, then the work is performed continuously. The end falls on the corners of the room, borders with windows, doors, balconies, etc. A uniform result can be obtained if you avoid repainting finished surfaces in small areas. The ideal way to process a work seam is to apply gentle pressure. It must be remembered that with fluctuations in humidity and temperature in the room, the color and shade may change in places. And subsequent moisturizing will make the color darker.
When the job is done, you need to thoroughly clean the tool. It is washed immediately after use with running water. You can use a weak aqueous solution of vinegar and then rinse with running water. This video contains detailed instructions on exactly how to paint a surface with limestone paint.
How to whitewash walls
The composition used for whitewashing is available in three types: lime, chalk, and water-based emulsion. But each finishing material has both its advantages and disadvantages.
Whitewashing walls with lime
To obtain a ready-to-use material, the lime is slaked with water. This type of whitewashing is the most popular. Among the advantages of lime it should be noted:
- good antiseptic and bactericidal properties;
- lime remains on the surface for more than three years;
- walls after whitewashing with lime tolerate moisture and temperature changes well;
- adhesion with other finishing building materials;
- the ability to fill cracks and correct minor surface defects;
- very low price.
However, along with obvious advantages, lime has significant disadvantages:
- Causes a burn if it comes into contact with exposed skin. It is necessary to use protective clothing, a respirator, and gloves;
- in the process of careless, inept work, stains, drips, and stains remain on the surface;
- lime is contraindicated for those who suffer from allergies.
Application of chalk
Along with being cheap and environmentally friendly, chalk has a number of advantages over lime:
- safe to work with;
- shades of white after application are more saturated;
- is hypoallergenic.
Chalk also has disadvantages that need to be taken into account:
- does not like high humidity. Since when interacting with water, the surface begins to crack, swell, and peel off over time;
- if used improperly, it leaves bubbles, drips, and stains on the surface;
- constantly stains and stains everything around - furniture, clothes, curtains.
Whitewashing walls with water-based paint
It would be more correct to call painting walls water-based paint. Since the composition usually contains lime, they talk about whitewashing, not coloring. In any case, this is a good alternative to chalk with a number of undeniable advantages:
- moisture resistance;
- wear resistance;
- high antiseptic properties;
- environmental Safety;
- easy to apply to the surface;
- dries quickly;
- safe to use.
Whitewashing with lime or chalk: what to choose?
Whitewashing as a method of finishing residential surfaces is becoming less and less popular. Modern materials are increasingly appearing in our apartments, and there is no longer any desire to tinker with bleaching solution. But, nevertheless, there is still a demand for lime and chalk whitewash. This finishing method is widely used in educational and medical institutions, utility rooms, etc.
In apartments you can also find whitewash, for example, on the ceiling in the kitchen or bathroom. Quite often, bleach solution is used to finish garages, sheds and cellars in private areas. And if you go outside the city, in the villages you can still find neat white houses, in which, of course, the central place is occupied by the stove. Whitewashing the stove with lime is still relevant today.
If there is a need for whitewashing, then first of all you need to choose the material on the basis of which the bleaching solution will be made. The most common options are chalk and lime. Of course, each option has its own positive and not so good properties. What do you know about them? Nothing? Then meet:
Lime is a material that is obtained by burning carbonate rocks. It is used both in construction and for the production of various chemical compounds. For bleaching, slaked lime is used, which is obtained by combining lime powder with water. Has the following positive characteristics:
- affordable and low cost material;
- has bactericidal properties;
- resistant to temperature fluctuations;
- moisture resistant;
- capable of healing small cracks;
- adheres well to brick, stone, wood and plaster.
Lime whitening also has negative aspects:
- possible defects (stripes, stains, stains);
- there is a risk of getting burned.
Since lime is a sodium alkali, when working with it you must take precautions to protect your health.
Chalk is a common and familiar material of natural origin. Advantages of chalk finishing:
- affordable price;
- environmental friendliness;
- deep white color;
- easy to wash off - easy to remove a layer of white;
- simplicity and safety in operation.
Flaws:
- washes off easily - not suitable in a humid environment;
- possible defects (stains, stains, bubbles, etc.).
How to change the color of whitewash
By introducing dye, you can achieve any shade. Since the walls and ceiling do not have to be white, like in a hospital. Previously, only one dye was used - blue. Ignorance that whitewashing can be done using certain, suitable pigments, which, above all, made the walls typically white, without an ounce of imagination.
To make lime whitewash colored, you need to add an alkali-resistant pigment to the finished solution. Liquid will not work, as the lime will simply dissolve it! The following colors are used to give different shades:
It should be taken into account that the more pigment in the lime mortar, the worse the strength of the surface.
Chalk, unlike lime, can be tinted with both liquid and dry pigments. This is easy to do: just add a dye of the desired shade to the solution. You just need to keep in mind that when wet the color is richer than when dry. Therefore, it won’t hurt to “paint” the surface again, after complete drying.
Among the significant disadvantages of colored chalk whitewash, it should be noted that it is easy to get dirty when interacting with it. In addition, the room must be dry, without dampness or temperature changes.
Features of working with lime
Whitewashing with lime is not a difficult job at all, but it also has its own characteristics. During work, rollers and large brushes are used. You can whitewash both internal and external surfaces. Indoors, as a rule, walls and ceilings are whitewashed. This method is quite effective for dark interiors. The room immediately becomes clean and bright. It is very important to wash off the old paint from the ceiling before new whitewashing; read how to do this HERE.
Lime whitewashing is done in one layer, but if the ceilings or walls are very dirty, sometimes it is applied twice. It must be remembered that when the whitewash is wet it may seem of poor quality, but after drying its layer becomes opaque and hides all color flaws. Moreover, over time, the paint layer becomes even more opaque.
How to dilute lime: Lime mortar for whitewashing
Tips: how to whiten correctly and effectively
Before actually carrying out the work, it is necessary to acquire a suitable tool: in an alicom, in a brush, in an excavation tool.
Most often, in terms of financial accessibility, brushes and rollers are used. Whitewash, after thorough mixing, is applied in at least 2 layers. The brush is pre-soaked so that it swells. Then its fibers do not fall out to the surface.
It's much easier to work with a roller. Since the surface is smooth, perfectly white. After completing the work, do not forget to rinse the tool so that it can be used again.
There are important safety rules that must be strictly followed:
- Protective clothing must cover the entire body. First of all, eyes, nose, mouth;
- If lime gets on your skin, rinse it thoroughly with water. Otherwise, you can get a serious, slow-healing burn;
- stains that inevitably appear on the walls can be removed with water and a sponge. But you need to wash them while they are fresh, and not let them dry out.
If you follow these simple rules, whitewashing walls will not take much time and effort. The surface, when properly applied with lime or chalk, will delight the eye for a long time, and will also make the room sterile, clean and aesthetically pleasing.
Safety regulations
- Extinguishing should only be done in an open and free space.
- To prevent contact with skin and eyes, be sure to use protective equipment: rubberized gloves, goggles, closed suit, protect the respiratory tract with a respirator or mask.
- Since the process of working with lime is not very clean, cover all objects with film before starting work.
Whitewashing with lime is a simple and cost-effective way to decorate a room, and the walls will fit perfectly into any interior.
Preparation of composition for whitewashing
It is not difficult to prepare a lime composition. Its ingredients are water, slaked lime, table salt, wallpaper glue, blue.
To obtain a composition suitable for whitewashing, you first need to mix about 3 kg of lime and a liter of water, then add salt to the solution - about 100 g. This is done in order to prevent hands and clothes from getting dirty if you accidentally touch a dry wall. If desired, you can add a little blue to change the color of the solution. The mixture is stirred, after which water is added to obtain a volume of 10 liters.
Before applying whitewash, the wall must be slightly moistened. This way the lime will stick better to the wall.
How to properly slak lime at home
It is best to purchase lime for planned repairs in the form of lumps. Such raw materials are preserved for quite a long time, and they can be prepared for use in a short time. In order for the dilution to result in a solution that will suit the concentration and homogeneity, you need to know the basic rules for preparing it from quicklime and be sure to follow safety precautions when working.
Rules for extinguishing lumps of lime at home:
- For whitewashing walls and ceilings, so-called lime milk is used. It is easy to prepare - you will need one part lime and about three parts cold water.
- Large lumps of lime should be crushed, but not into crumbs, and placed in a metal container.
- Water is poured into a container with lime; the solution must be stirred.
- After contact with water, a dissolution reaction occurs during which the lime may bubble and splash. Therefore, in the first 10-20 minutes, the container must be closed or moved to a safe distance. It is a good idea to use safety glasses and gloves, as splashes of the solution can cause burns.
- The prepared lime should sit for at least 6 hours, during which time it will completely dissolve.
- After preparation, the solution is filtered through a sieve. Thus, all undissolved elements and small debris are removed.
- Lime milk is completely ready for use. To increase strength and to prevent lime on the walls from staining clothes in the future, experts advise adding ordinary salt and drying oil to the solution. The amount of drying oil and salt is chosen from the volume of the resulting solution; 100 grams of both are sufficient for 10 liters.
If the solution turns out to be thick, then it can be diluted with water to the required proportions. Tint dyes are introduced in dissolved form; in order to give the lime an exceptionally snow-white appearance, it is recommended to add a little blue.
Slaking lime is not a labor-intensive process, but not safe. When slaking lime, you must follow safety precautions. Extinguish in the open air, in free space, always wearing glasses, gloves and special clothing:
How to apply whitewash to a surface
The lime composition can be applied to the surface only after the primer layer has dried. Whitewash can be applied manually using a paintbrush, or using a sprayer.
When choosing a regular brush to apply whitewash, dip it in water shortly before starting work. When immersed, the wooden base of the brush will absorb water and swell slightly. This way the bristles of the brush will be held in the base and will not remain on the whitened surface.
To whitewash, it is better to choose cloudy weather or a cool evening, when there is little activity in the sun. Lime does not tolerate direct sunlight very well, and extreme heat has a particularly bad effect on it.
The technology for whitewashing a building involves applying a prepared lime composition to the wall in two layers. For the first layer, apply lime to the wall in horizontal stripes. After this layer has dried a little, you can proceed to the second one - to complete it, you need to move the brush perpendicularly, strokes from top to bottom.
When whitewashing a house using a sprayer, you need to consider the following. The sprayer must be positioned so that it can apply the lime composition at right angles to the surface. This way the material will be applied not only evenly, but also economically.
Whitewashing houses: advantages and disadvantages
Whitewashing of walls with chalk or lime is used as application components. The second option is the most common. Today we will consider this issue in detail. Also in the video on how to whitewash walls you can see the details of this work.
Whitewashing for walls involves diluting lime or chalk in water and applying the liquid mixture to certain areas of the building. It is this coating that will serve as protection for the structure.
At the present time, this method of decoration is not popular among the population. However, there are still summer residents who adhere to the traditions of the past generation.
The advantage of whitewashing buildings is as follows:
- These materials are natural and environmentally friendly.
- This is one of the cheapest design solutions for finishing buildings. The price will probably be the lowest.
- Lime has disinfectant properties and therefore prevents the formation of mold and mildew.
- The material is highly moisture resistant.
- The facades of buildings that are covered with whitewash look very good.
- To decorate the surface of a building, you don’t need to spend a lot of time, you don’t need special tools, and a small amount of materials.
- To carry out work on whitewashing a building, you do not need to have any skills; to do this, it is enough to understand the basic principle of working with the material and everything can be done with your own hands. We will consider all stages in more detail below.
Before you whitewash a wall, you need to know the negative qualities:
- No variety of colors.
- Not a long service life, although this is compensated by its low cost.
- When working with lime, it is necessary to use methods to protect your hands and eyes, as the material is very caustic. For protection, use a respirator, goggles, gloves.
- There are very few garden styles that can be combined with whitewashed facades. You can use stylistic solutions such as country or Provence.
- Care should be taken when preparing the solution, as if mixed incorrectly, flaws may appear on the surface of the building. For example, bubbles, swelling of the material or stripes of different colors.
It’s worth saying right away that almost any walls can be whitewashed. Even the adobe walls are whitewashed. But this is more complicated. After all, straw is a material that must be carefully prepared.
If you are thinking about how to whitewash walls with water-based emulsion, then this is done according to the principle of applying chalk or lime. The principle is the same and will be described below.
Whitewashing a building using lime means that you need to apply a pre-prepared mixture to the façade. To do this, a base plane must be prepared. It should be smooth. After all, the coating will repeat all the unevenness.
Attention: Before you start whitening, you must treat the base of the facade with a primer, wait until it dries completely, and only then start whitening manually or using special devices.
Whitewashing the surface of buildings is only possible in the evening or in cloudy weather. Due to the fact that lime is not resistant to high temperatures, it is necessary to avoid exposure to the sun when working.
Attention: The composition must be homogeneous, there should be no lumps or clots. So when kneading it is worth using a drill with an attachment. Then the mass will be homogeneous.
If you choose a brush to apply the material, you must wet it. Some time before work, leave the brush in a jar of water so that its wooden base swells and particles of bristles do not remain on the surface that has already been whitened.
According to the technology of applying whitewash to the facade of a house, it is necessary to cover the base in several layers. The first layer of lime is distributed in horizontal stripes. The second layer is applied after the first has dried. However, it is applied from top to bottom, that is, perpendicularly.
If a spreader is used when whitening a building, then the rule should be strictly followed. The lime mortar is distributed using a machine at a right angle. This is necessary for economical consumption of material and uniform coverage of the entire surface.
Preparing lime mortar is not difficult. The mixture should include the following ingredients: hearth, slaked lime, wallpaper paste, table salt.
Preparing lime for whitewashing:
- We take a medium-sized container, pour 3 kg of lime into it, mix it with 1 liter of water, add 100 g of salt and glue.
- Stir the resulting mass thoroughly to ensure there are no lumps. Then add water until the total volume is 10 liters.
- Wallpaper glue will give the solution stickiness, making it easier for the whitewash to adhere to the wall surface.
- Salt is added so that hands and clothes do not get dirty when touching it. You can also add blue, then the solution will turn out to be snow-white.
Attention: It would be a good idea to wet the surface of the wall before starting work. Then the whitewash will be better applied and adhere to
Before starting any work with whitewashing, it is necessary to prepare the base so that the whitewashing lays down well and there are no flaws afterwards:
Before starting work, the surface must be cleaned. This material should not be applied to substrates with rust, unevenness, or even efflorescence and greasy stains.
If there are cracks on the surface, they must be treated and repaired. The old whitewash must be removed; it can be removed using a special brush. The entire surface is completely plastered and then primed. Before applying whitewash, it is necessary to cover all objects with film so that the solution does not get on them.
A brush can be used to treat small surfaces. And for large areas, rollers or a sprayer are best. Using a brush is the easiest and most cost-effective way.
As mentioned above, the brush needs to be soaked in a jar of water to prevent lint from getting onto the whitened surface. This determines what the final result of the work will look like.
A sprayer is used over a large area. Working with such a device requires compliance with the rules for applying whitewash. The distance between it and the application site should be about 30 cm, and sprayed at a right angle. Then the material consumption will be small, and this is economically beneficial.
Not everyone has the opportunity to buy a device; then an analogue of a sprayer can be a regular vacuum cleaner.
Experts can tell you how to whitewash walls and what to consider. There is a lot of useful advice in their advice.
Attention: Lime milk is the best means for disinfecting ceilings and walls. Prevents the formation of mold, mildew and the appearance of bedbugs in the house. To make the mixture, use 1 liter of water and 3 kg of slaked lime, mix them in a container
If you want to get a boiling white color, then add a little blue to the container with the mixture, which is used when washing things. To ensure that the already whitened surface does not stain anything upon contact with it, add regular salt in the amount of 100 grams.
If you want to diversify the color scheme of whitewash, you can use pigment. It is worth noting that it must be resistant to calcareous material. For one kilogram of lime add 100 grams of pigment. For example, stable pigments - chromium oxide, soot, umber. Before adding pigments to the lime mortar, they must be diluted separately in water. Stir the pigment until a homogeneous mass is formed and leave for five hours. Then add the resulting mass to the lime mixture with thorough mixing.
To reduce the possibility of cracking or swelling of the material on the surface, wallpaper glue should be added in a volume of 10%. Then the solution will be viscous and sticky, and will fit better on the wall.
Before starting work with whitewashing, it is necessary to apply water to the surface. The first layer is applied in horizontal lines. It should dry, and then apply the second layer perpendicularly, that is, from top to bottom. The craft should lie evenly.
Lime is not resistant to high temperatures, so you should not start working in the heat. It is also not resistant to sun exposure. This material is best applied in cloudy weather or in the evening. The material consumption per square meter is a little 200 grams.
Before starting work with whitewashing, you need to apply a primer to the entire base and let it dry. And then start whitewashing. You now know how to whitewash walls and can do it yourself. It’s also worth watching the video in this article and photos that will help you do the job correctly and take care of everything. The instructions are completely correct and if you follow them, then the coating will be applied efficiently and quickly. published econet.ru
Subscribe to our Yandex Zen channel!
If you have any questions on this topic, ask them to the experts and readers of our project here.
PS And remember, just by changing your consumption, we are changing the world together! © econet
Did you like the article? Write your opinion in the comments.
Subscribe to our FB: to see the BEST materials in your feed!