Home renovation is a good and interesting business, but expensive and troublesome. To reduce costs, there are various recommendations, secrets and even tricks that will help you save not only money, but also nerve cells. One of the most budget-friendly, simple and at the same time creative ways is wall painting. We are not talking about simple painting in a single color, but about creating interesting compositions using geometric shapes, interesting patterns and other details.
ReRooms will tell you about the 20 most interesting ways to paint walls that will help transform your interior. We will show that painting walls can be completely different from what you are accustomed to perceive.
Stripes
Stripes not only decorate the room, making the atmosphere more dynamic, but also help hide architectural flaws. To create the same interior as in the photo, you will need masking tape and paint of your favorite shade.
A little theory:
1. Horizontal stripes will help visually expand the space, but at the same time slightly lower the ceiling.
2. Vertical stripes raise the ceiling and visually make the space higher than it actually is.
The stripes can be of different shades, different widths - as your imagination dictates. When choosing a pattern, proceed from the characteristics of the room.
Photo:
1/2
Photo: bigcommerce.com
2/2
Chevron (zigzags)
Chevron in the interior is a truly bold solution for creative people. Decorate one wall with this pattern and paint the others a neutral color to prevent your apartment from turning into the Mad Hatter's home. Chevron is best used in the living room.
The geometry of this pattern simultaneously feels great energy and playfulness, harmony and ease. To achieve this effect, use the chevron zonally and in moderation, carefully selecting the colors and width of the pattern.
Photo:
1/2
Photo:
2/2
Herringbone
Another cool pattern that is somewhat similar to a chevron. But he is not so dynamic and catchy. The obvious advantage of this type of decor is its brevity and ease of perception. A striking geometric design can add expressiveness to any room without it ever becoming dull or outdated. This pattern is suitable for any style, as it finds a place in both vintage, minimalist and industrial spaces.
Photo:
1/2
Photo:
2/2
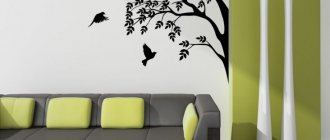
Hand painted wall art
In order to create your own wall painting, you must first make a sketch of the image. Then the area where the drawing will be is divided into squares (this is easy to do using a laser level) and the sketch is transferred along this breakdown.
After using paint of the appropriate shade, the contours are drawn. Then they need to be colored in accordance with the initial idea. In this case, various shades are used. To prevent colors from mixing, just as in standard painting, wait until the applied elements dry. Gradually the image will become more detailed, shadows will help make it more voluminous.
To preserve the drawing, you need to cover the image with a special varnish. It is best to use a matte acrylic composition - it does not affect the pattern itself, but helps protect it from dirt and other external influences.
Cobweb
Don't be afraid, we are not talking about real cobwebs or scary spiders that evoke the gloomy atmosphere of ancient castles. With our pattern it's the other way around. If you choose bright mother-of-pearl colors, the interior of the room will acquire a mischievous and original atmosphere.
How to make such a pattern? Choose a base color (it can be anything, either bright or pastel), paint the wall with it, then chaotically place strips of masking tape and cover the wall with a different color. By removing the tape, you will get an original and creative wall that will delight your eyes!
Photo:
1/2
Photo:
2/2
Geometric figures
Today this is one of the most popular and favorite ways to decorate walls. Geometric shapes are universal, so they can fit into any interior, regardless of style. Spectacular squares, triangles and rectangles will take pride of place in the design of the room. The undeniable advantages of this method of wall decoration are simplicity, elegance, dynamics and rhythm. If you want to create a modern atmosphere, geometric shapes are perfect for this, becoming either a laconic background or a bright accent.
Photo:
1/3
Photo:
2/3
Photo:
3/3
Styles
Below we will get acquainted with the most popular stylistic trends.
Classic
Classic is classic. It will never become outdated and will always be relevant. Classics are distinguished by restrained shades and harmonious shapes. Most often, idealistic and calm landscapes are depicted.
Baroque
Baroque is distinguished by majesty and splendor. The compositions contain ornate patterns and floral patterns. The walls and ceiling are often decorated with frescoes.
Empire style
The final stage in the development of classicism. Luxury combined with restraint and conciseness. The Empire style is full of symbols: triumphal arches, griffins, sphinxes and winged lions. The most important thing is to be able to maintain balance.
Modern
Modernity strives to give man unity with nature. Modernism is the absence of straight lines, freedom of expression and novelty.
Pop Art
Pop art borrows popular images from mass culture: advertising, cinema, television, comics, magazines. Bright and daring paintings will not go unnoticed.
Animation
This style is best suited for children. The drawing is simple to execute, however, it can become a bright accent in the interior. The main thing here is not to overdo it with the brightness of the colors, this can quickly tire you.
Abstraction
If you don’t want to think about the composition or think through the color palette for a long time, then you should resort to this style.
- This style is easy to implement, even if you've never held a brush in your hands.
- It will fit perfectly into a modern interior or can be a bold touch to a classic one.
Ombre
To create a trendy gradient, use colors that are one shade apart from each other. Shades that fade and blur, smoothly flowing into each other are an unusual solution for wall decoration. We are accustomed to the fact that walls should be painted in one color that lies perfectly on the surface. But don't be like everyone else and experiment with design.
Ombre can be done with either a soft, barely noticeable transition or a pronounced one. To experiment, create an ombre look using waves or stripes, where each segment is a different tone. To give the interior a complete look, use the same pattern in the decorative elements.
Photo:
1/2
Photo:
2/2
Preparing the walls
In order for the painting to be beautiful and durable, it is necessary to properly prepare the walls at the initial stage.
- First, remove any old wallpaper or previous layers of paint.
- Then level the surface using a sander or sandpaper.
- Afterwards the surface must be degreased. White spirit, primer or acetone are suitable for this.
- Use a level to check the evenness of the wall. For curvatures greater than 5 mm. eliminate unevenness with plaster. After drying, cover the area with putty and sandpaper.
- If the walls are covered with plasterboard, pay special attention to the joints and fastening points; it is better to disguise them with a layer of putty.
- After the painted wall has dried, apply a layer of primer (for a bathroom, choose a water-repellent one). It will help maintain the brightness of the colors and preserve the design for a long time.
The effect of an underpainted wall
It is believed that if paint strokes and transitions between colors are visible on the wall, this is a flaw that spoils the entire interior of the room. But this is far from true. This effect, on the contrary, can decorate your room. Do you want an interior that’s not like everyone else’s? Then take note of this method and feel free to implement it in your room. Moreover, repeating this effect on your own will not be difficult. If you want a loft-style room with unusual walls, then this option will suit you one hundred percent.
Photo:
1/2
Photo:
2/2
Options for painting walls in different rooms
Despite the versatility of painted walls, it is necessary to select a specific color palette and style for each room. You also need to rely on the general interior of the room, its purpose, and features.
Bedroom
In the room for relaxation and sleep, calm tones and unobtrusive images should prevail. It is worth excluding pictures of the elements, waterfalls, and predators. Flowering trees, sunny landscapes, and pomegranate fruits are more suitable for the bedroom. You can also depict a pair of birds or butterflies. The latter must be in pairs.
In the room for relaxation and sleep, calm tones and unobtrusive images should prevail.
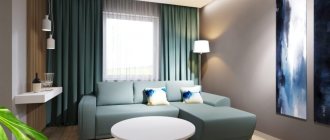
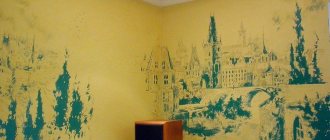
Living room
It is considered the main room in the home, where they welcome guests and spend time with family. Picturesque images that create an atmosphere of joy and comfort are suitable for decoration. It could be a reproduction of a famous painting, an abstraction, an image of a city, nature or the sea. The main thing is that the selected image does not conflict with the overall interior. Thus, abstraction in black and white, a view of a metropolis, are suitable for minimalism; for an ethno interior, a painting depicting a country and culture, which predominates in the living room, is suitable. For example, Egypt, Japan, etc.
Picturesque images that create an atmosphere of joy and comfort are suitable for decoration.
Kitchen
The peculiarity of using this design technique in the kitchen is the choice of a suitable place for painting. The area next to the sink and stove will not work. Wall painting will only suffer from high temperatures and high humidity. But if there is no other option other than this place, then you should definitely use moisture-resistant paints and cover the drawing with several layers of varnish.
A picture of a picnic, a landscape, or an imitation of a window opening will allow you to visually expand the space. If you want to emphasize the atmosphere of the dining area, you should choose a still life and other paintings depicting food and drinks.
A picture of a picnic, a landscape, or an imitation of a window opening will allow you to visually expand the space.
Bathroom
Many people refuse to paint bathroom walls because of the high humidity in the room. It can greatly spoil the originally created masterpiece. But modern materials and techniques make it possible to eliminate this problem and allow you to create the desired design in the bathroom. It is only necessary to use moisture-resistant compounds, including plaster and paint. Additionally, cover the painting with a protective varnish layer. A marine theme, including the depths of the sea, underwater inhabitants, etc., is suitable as an image for this room.
A marine theme is suitable as an image for this room.
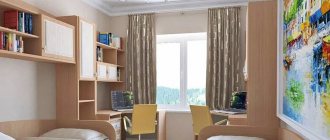
Children's room
Painting for children's rooms is often used. This is one of the most suitable premises. After all, on every wall there you can depict your child’s favorite characters or draw a real fairy tale, creating a magical atmosphere. Also, if you draw using stencils, you can involve children in the process. Time will pass with benefit and fun. It is worth remembering the psychological atmosphere in the room. You should not introduce aggressive, flashy colors and images into the nursery. If you want to add bright colors, it is better to do it in the play area, and not throughout the room. The wall background should be in calm colors so as not to create a strong contrast. If the child already has interests, hobbies, favorite characters, then you should definitely ask his opinion about the image in the nursery and rely on his desires.
The wall background should be in calm colors so as not to create a strong contrast.
Partial painting
Do you need something bright, but you don’t want to completely paint the walls or are you afraid that the interior will turn out to be too catchy and provocative? Don’t give up on rich colors for fear of overloading the interior. Simply choose the wall you would like to paint and begin the creative process. An interesting option is to paint not only one of the walls, but also the ceiling (in whole or in part). If you choose bright accessories or textiles, you will be guaranteed an atmosphere of eternal summer.
Photo:
1/3
Photo:
2/3
Photo:
3/3
Stamps (stencil)
It is not at all necessary to have the skills of an artist: if you want to depict something on the wall or create a complex ornament, use templates. Today it is not difficult to buy a ready-made template made of plastic or durable film. If you don't want to buy anything, you can easily find amazing templates online and print them on thick paper. Don't want to print? It's okay, there is another option: draw some simple pattern on a piece of cardboard. As you can see, the usual process of painting walls can be turned into a fun, creative game.
Don't know what to paint on the wall? It all depends on your preferences and the overall style of the room. As interesting accents, you can draw: - geometric or floral patterns, - drawings, - letters, words or whole text.
Photo:
1/2
Photo:
2/2
Idea 1. Painting walls using a stencil (+ master class)
Stencils come in handy when you need to outline the contours of a complex image, draw letters, numbers or any repeating patterns.
To paint the walls, you can use a ready-made template or one made to order in a printing house. Such stencils can be flexible or rigid, one- or two-layer (to create a multi-color pattern), self-adhesive or glueless. They are generally durable, fit tightly to the wall, and are designed to be reusable.
- Do you want to purchase a super-fashionable and unusual stencil? We advise you to search for it in the international online store Etsy using the query “stencil” (price from 10 to 100 $).
However, you can make a simple single-layer stencil for painting walls with your own hands, following our step-by-step instructions.
What you will need to make a stencil: office paper, plastic film or thick paper (for example, whatman paper or wallpaper), pencil, scissors, a stationery knife or a special knife for cutting stencils, masking and transparent tape, as well as a printer and some kind of graphic editor (vector or raster).
What you will need for stencil painting of walls: paints (preferably water-based acrylic), a synthetic round brush (7 cm in diameter for painting large designs and smaller ones for finer work), a sponge (can be used instead of brushes) and paper napkins for removing excess paints.
Instructions:
Step 1. Find a suitable vector(!) stencil on the Internet, for example, on the website https://www.getpattern.ru/. Please note that it is advisable to choose a contour image (or make it as such, following these instructions), because colored areas will only waste ink when printed.
- It is also important that the stencil does not have bridges that are too thin, otherwise the paint underneath may leak and ruin the design. Or they may simply break.
Step 2. The selected picture must be scaled to the desired size and printed. This is very easy to do if the stencil size does not exceed A4 format. However, if you need to print a large template, then you need to break it into several parts, following these instructions. Next, all you have to do is assemble the picture as a mosaic.
- If you are using transparent vinyl film, then you just need to lay it over the original design, trace its contours with a felt-tip pen or pen, then cut out the unnecessary segments (see photo).
12
Step 3. At this stage, the A4 paper stencil must be covered with transparent tape on both sides and overlapped (!) to protect the paper from getting wet. Finally, use a craft knife to cut out all the segments intended for painting.
If you have printed several A4 sheets for a large stencil, then at this stage you can immediately start cutting, but keep in mind that you will have to paint the stencil with an almost dry brush so that the paper does not get wet. But in order not to take risks, it is advisable to laminate the design or copy it onto a denser base (for example, vinyl wallpaper). To do this you can:
- Use carbon paper (place it between the base and the printouts, and then trace all the lines with a pencil).
- Cut out all the holes for painting from the printed drawing, and then transfer its contours to the base. Next, you need to take the knife again and cut out segments for painting, now on the base.
When cutting out the stencil, be sure to protect the table from scratches by placing some kind of backing on it, such as glass.
Step 4. Now it's time to glue the stencil to the wall. To do this, try on your template to the selected location, align it with the building level and glue it with tape. If necessary, for example, if you need to draw repeating elements at equal intervals, you must first make markings using a building level.
- If the stencil has thin and movable bridges, secure them with small pieces of double-sided masking tape (you can twist a piece of regular masking tape into a ring).
- A more convenient way to fix the stencil is with a low-adhesion spray adhesive, which allows you to remove the template easily and without a trace (sold in craft stores).
Step 5. Hurray, the most labor-intensive work is left behind, it's time to start painting.
- If you are using a sponge: dip the sponge into the paint, wipe off the excess on a napkin, then begin painting the stencil using a tamping motion.
- If you are using brushes: dip the brush into the paint, then roll it around a little on a cloth to remove the excess (the bristles should be almost dry), then start painting in a circular motion. Be careful when painting areas near the very edges of the stencil so that paint does not bleed under the holes and ruin the outline of the design.
- If you are using spray paint: spray the paint carefully, in thin layers and in several passes to avoid smudges.
- If you are using a roller: place the roller in the paint trough, wipe it on a napkin, then start painting. Along the edges of the stencil, move the roller from side to side, not up and down.
Step 6. When the drawing on the wall is completely dry, coat it with matte varnish to protect it from moisture.
See also: Decor and design of the dining area
Paintings
Unlike the previous method, here you can and should draw something yourself. If you love to draw and brushes and paints are your best friends, then feel like Van Gogh or Picasso while painting a masterpiece of fine art on your wall. Well, if you are not friends with them at all, do not despair. Invite a professional artist to do this, who will draw you whatever your heart desires - from the simplest geometric shapes to entire compositions. The main thing is not to overdo it with the chosen motif and organically fit it into the design of the room.
Photo: shopify.com
1/2
Photo:
2/2
Fresh original decor
Artistic wall painting is an unusual decor for modern room decoration. However, recently it has been increasingly gaining popularity. Suitable for both art connoisseurs and lovers of original decor. It can bring a touch of elegance and pomp to the apartment, especially if the design project includes columns. And also create an extravagant image invented by you. Everything the owner's soul desires.
Depending on the expected result, you can find a professional artist and order a painting in accordance with any requirements. In this case, you can give free rein to your imagination by depicting any, even the most unusual ideas. But if it is not possible to resort to the help of a master, you can paint the walls yourself. This is one of the important advantages of this decor: it will not cause difficulties and will reduce repair costs. Plus, you can bring all your ideas to life with a brush and paint.
If you don’t have drawing skills, you can use the services of a professional
This option is suitable not only for a large room with a huge blank wall. You can decorate a small bedroom, a nursery, a kitchen, and even a bathroom. It will be convenient to decorate and painting a wall with a window will only add originality. Another proof of the usefulness of this design is that you can “disguise” an air conditioner or TV cord hanging on the wall, and also turn a child’s wall doodles into a real masterpiece.
This decor option is suitable for any room
Choosing paint
Modern technologies for creating paints offer you a wide range. You can use:
- oil;
- acrylic;
- tempera;
- fluorescent paint.
They differ mainly in properties, drying speed and saturation. Fluorescent paint is known for its ability to glow when exposed to ultraviolet rays.
Here are the main types of paint used for artistic painting. You can also use the aerosol type. But after working indoors in this way, long-term ventilation will be necessary. It can also negatively affect the artist’s well-being: cause nausea, dizziness and headaches, and an allergic reaction is possible. It is recommended to deal with aerosol paints in an open space with plenty of fresh air.
You can choose the paint to your taste. There are colors that will glow
The choice of base depends on the expected result. Watercolor will create a delicate drawing with blurry outlines. To highlight the necessary zones, you can combine it with other types. Please note that watercolor painting must be varnished to better preserve the design. Fluorescent can be used to highlight some elements, or to draw celestial bodies in the nursery. Often, an oil base is used for artistic painting of residential premises.
Paint can be combined with other types
Placement of the picture
A factor that is also worth paying attention to. If you do not plan to varnish the design, you need to be careful in choosing its location. The main criteria for placement are temperature and humidity. Do not place the painting on the wall above the radiator or in a place where condensation may accumulate. The paint may bleed or crack in these areas. For reliability, it is better to protect the drawing from the effects of negative environmental factors using varnish.
To prevent the drawing from being damaged or cracked, it is worth treating it with varnish
Stages of creation
Let's move on to a detailed description of how to paint a wall. We begin the creation with preparatory work. It is necessary to prepare the necessary materials: brushes, paints, solvent (if necessary), rags, stencils (depending on the technique), stepladder, palette (for mixing colors). Preparing the wall. Pay attention to the surface. Painting can be applied to plaster and wallpaper intended for this type of use. The surface must be degreased and free of dust, plaque and previous paint. For oil materials, the wall needs to be coated with a primer; for watercolors, it should be slightly damp.
After completing the preparatory stage, we proceed to drawing the sketch. The contours can be applied by attaching a stencil to the wall, or drawn “by hand” in accordance with the sketch. Next, fill the resulting shell. Let the drawing dry well. After this, cover it with a layer of varnish.
Remember! After completing the work, be sure to ventilate the room well.
After drawing the sketch, you can start drawing. After completion, it is recommended to varnish the drawing
Application Features
For better preservation of the drawing, pay attention to some features when working:
- It is better to apply the material in a thin layer;
- before coating, be sure to treat the wall with a primer (for oil paint) or leave the plaster wet (for watercolor);
- drawing sketches is an obligatory part for both small and large rooms;
- be careful when applying the image to the ceiling or high surfaces;
- Before varnishing, make sure the design is dry. Be sure to check areas where paint has accumulated heavily.
Important! Take precautions when working with caustic substances
Make sure the design is completely dry before applying varnish.
Various techniques
Modern painting departs from medieval frescoes using the technique of painting walls on wet plaster. At the moment there are various options.
To begin with, the type of painting depends on the chosen paint, which we discussed above. If you are in doubt about your choice, consult a specialist. He will make a project, showing what the creation will look like when completed. He will also create a sketch and help in choosing a base.
The second criterion is the type of application. To transfer a design to a surface, use the following methods:
- Stencil
To do this, print out the pattern you like, transfer it to a hard surface, then trace the outline, placing the stencil on the wall. You can also buy this device ready-made, or seek the help of a designer. This technique is mainly used to apply simple patterns or simple designs. Here you can use both a brush and a roller to speed up the process.
- Hand painted
All presented types generally refer to hand painting. But this technique involves drawing a contour sketch, and then filling the resulting shell. This type is considered the most difficult. Although it all depends on the chosen pattern.
- Using projection
A technique that does not require creating a sketch. It is enough to find a picture you like, use a projector to transfer it to the wall, and draw according to this projection. This method helps to accurately reproduce the nuances of a painting without being an artist.
Hand painting is the most difficult type of drawing
Watercolor stains
As children, we all loved to draw simple patterns, mixing all the colors of the palette and pouring water on the resulting stains. The young artists in us were screaming. Feel like a child again by transferring children's drawings to the walls of your room. To make the interior seem even brighter and more original, add textiles of the same color as on the walls.
Photo:
1/3
Photo:
2/3
Photo:
3/3
What does wall art provide?
It doesn’t just look beautiful, the drawings on the walls in the apartment with your own hands attract attention, fascinate, just look at the photo. Artistic painting of walls in the interior always transforms the room for the better and gives it a certain charm. At different times of the day the pattern changes, the lighting always gives it something new. You can admire it for a long time, you don’t get tired of it, as often happens with photographs and wallpaper pasted on the wall.
An artistic image takes you deeper into the room, allowing you to visually increase its size. It allows you to correct shortcomings - crooked walls, low ceilings, and define zones in space.
The size of artistic painting has no limits; it can be done in small quantities or occupy the entire surface of the walls. However, this means that the apartment should look like an art museum. Everything needs moderation, and if you follow this rule, you can create a magnificent wall design with your own hands. Your drawing will be a beautiful bright spot, the pearl of the entire interior.
The best gifts you need:
|
Drips
Does your soul require change and something bright? A wall covered in colorful streaks from ceiling to floor will help you with this. Thanks to this method, the wall will turn into a real art object that can be seen on the streets of the city. The advantage of this type of decoration is that it is self-sufficient, that is, you do not have to additionally decorate the space, since the colorful drips are magnificent in themselves.
How to achieve this effect? Choose a base color for the background (usually neutral and discreet shades), and a contrasting color for the drips. Feel free to pour paint on the walls so that it flows down freely. To complement such an interior, several decorative items can be decorated in the same style.
Photo: agsia.com
Preparing the surface for painting
The durability of the design depends on the quality of the surface on which it will be applied. Therefore, before you start painting, you should get rid of all the irregularities and defects that are on your wall.
You can prepare the surface in several stages:
- We remove the old coating.
- We cover cracks and cracks. Level the surface.
- Before applying paint, the surface must be primed.
- Wait until the wall is completely dry.
If the surface on which you are going to paint is located outdoors or is in contact with a damp environment, then you need to take care of waterproofing.
Like clockwork
Another way for those who like to draw for the soul and lift their spirits. Use your walls as an artistic canvas and use big, bold strokes to fill a monochromatic space. Feel like an artist who works in impressionist technique! It’s impossible to do something wrong because there are no strict rules. So choose your favorite colors and go ahead.
Photo: abigailahern.com
3D painting
3D painting can perhaps be called one of the most complex and non-standard modern techniques. Works performed using this technology are capable of creating the illusion of distorted space, which is often used to correct any errors in architecture.
Color splashes
This option is suitable not only for walls, but also for the ceiling - the composition will look much more colorful and original. Take more paint onto the brush and splash it in different directions. Then the renovation will not be so boring, but will become a real holiday (and help you relax). This effect will not only transform the interior of the room, but will also mask the architectural imperfections of the surfaces.
Photo: clementinehfg.com/
Photo ideas for wall art
A selection of different wall decoration options for inspiration.
bstLet's discuss this article together:
Click to cancel reply.
Along the curve
Painting walls in several colors is not an easy task because it requires care and precision. We are used to the fact that the line between colors should be perfectly even, like a ruler. Or is it still not quite even?
Forget about boring rules and give free rein to your imagination. This method will give the interior freshness and originality. To make the design even more classy, each zone of the same color can be decorated with various accessories (for example, paintings or photographs framed to match the color of the walls).
Photo:
1/2
Photo:
2/2
Colorful waves
Do you like to relax by the sea and splash in the azure waves? Then transfer your love directly to the walls of your room. Such waves can be painted both in similar colors and in contrasting ones. This option will look especially cool in a children's room or living room. Under the brightest wave color, choose an accent of the same color, such as textiles.
Photo: decorationmaison.info
Fashionable ways to paint walls
That's why we decided to share the hottest block paint ideas for your home, from draperies to wall decals.
The main point is that the lines should be geometric and smooth, so you need to take some bright favorite color. You can complement it with other colors. The main thing is the combination and monochrome of the rest of the interior design.
Inscriptions
Love inspirational quotes that energize you to do great things? Great! Many people hang up such phrases, designed as posters, or simply look at them on their phone screens. It's time to take it to the next level. Using a stencil, write your favorite phrase on the wall - and it will always be in your sight, as if to say: get out of bed, great things are ahead of us!
Photo: hirespace.com
Modern types and techniques
Today, there are several options for painting walls - various materials, tools and techniques are used for them.
Airbrush
The artist's main tool is the airbrush. With the help of an air brush, a professional can quickly and easily create real masterpieces that amaze with their realism.
Using this method, it is easy to obtain a smooth surface and smooth color transitions without smudges or streaks. With a spray gun you can paint any motifs: from stylish abstractions and panoramas to portraits in the smallest detail.
The only drawback of modern wall painting in the interior is its high cost.
Fresco
The first mention of wall painting on wet plaster appeared in the 15th century, but it remains popular to this day.
One of the main advantages of finished frescoes is wear resistance, because if samples from the 16th-18th centuries have been preserved to this day, then such an artistic image in an apartment will definitely survive more than one renovation.
Today, when painting interior walls using this technique, they copy both today’s popular painting and create an imitation of ancient images. The second is especially in demand in classic interiors - thanks to the patina, it feels like the painting was created several decades, or even hundreds, of years ago.
Painting with fluorescent paints
Colors that glow in the dark open up possibilities for flights of fancy. Their peculiarity is that in the daytime the image looks like a simple wall painting with the most ordinary paints, and in the dark or ultraviolet radiation the design begins to glow. When choosing this option for painting walls in an apartment, be prepared to transform the room in the dark.
An unusual idea for wall painting is to apply the image with a special invisible fluorescent paint. Then during the day the picture will not be visible at all, but in the evening it will “turn on”. One popular use for invisible paints is starry sky ceilings.
The photo shows an image created with fluorescent paints
Painting with acrylic paints
The most versatile material for painting walls in the interior is acrylic paints. They have gained popularity among both professional artists and ordinary people and deservedly so. The paints are odorless, easy to apply, dry quickly, do not fade in the sun even without protective varnish and are suitable for all types of surfaces.
Acrylic is suitable for all rooms in the interior - it is environmentally friendly (which is especially good for a child's room), waterproof (after drying, a protective film is formed - this will allow you to use the paint in the bathroom and kitchen).
Thanks to the wide tinting possibilities, such wall painting in the interior can look completely different: from pastel landscapes reminiscent of frescoes to acid graffiti.
Volumetric painting
Such interesting wall painting is used when it is necessary to expand or change the space. Three-dimensional painting refers to two options:
- 3D drawing. A kind of illusion of continuation of the room. For these purposes, they often depict a landscape, a window with a beautiful view, a terrace, a bridge over a river - see the photographs below for an original example.
- Relief decor. The image is applied in several layers and seems to come out of the wall, this adds volume to the entire room. Landscapes and animals in this technique seem absolutely realistic.
Any of the technologies requires certain skills to perform, so do not try to do everything yourself - use the help of a professional. This is where the main disadvantage of volumetric painting comes from - the high price.
The photo shows 3D wall painting
Using stencils
If you are planning to paint interior walls yourself, but you don’t have the skills, use a stencil. Most often they are made in the form of various patterns and ornaments, repeating which you can easily paint over the entire wall.
All you need for successful artistic painting is the stencil itself, paints (often available as a set), a brush or roller and your accuracy. Simply apply the template to the prepared wall surface, apply paint, transfer it to another place - and so on until the end.
The advantage of this method is not only its simplicity, but also its final cost. Plus, with its help you will leave your mark on the walls.
The photo shows an example of applying an image using a stencil.
Color blocks
Using this method, Lego constructors will appear on your walls. Or imagine that you are playing Tetris and the game seems to come to life and move into your room. Miracles and that's it. Experiment with colors, shapes and sizes of blocks, because there are tons of options for combining them. These can be either bright rectangular blocks that are separated from each other by a frame along the contour, or delicate light shades that will create a gradient. Imagine!
Photo:
1/2
Photo:
2/2
Rules of care
Despite the fact that the materials and the method of their application differ from those used in the Middle Ages, some care for the product will be required.
- First, don't forget to varnish the picture. This will simplify care and allow it to remain fresh for a long time.
- If coating is not part of the plan, use a dry cloth to remove dust.
- Monitor the temperature and humidity of the room.
- If the drawing has smudged, make small corrections with a brush.
- Periodically update the brightness of the image, or change it completely.
In general, when using a protective coating, maintenance is reduced to removing dust from the wall with a damp cloth. The rules of care are quite simple, so you can safely make your dreams come true, creating unrealistic images to your delight and to the envy of your friends.
Polka dots
Do you want something light and mischievous? Then peas are perfect for you. You can use both large and small circles, on the entire wall or just emphasizing some part of it, multi-colored or plain. Combine several of the options listed above - and your room will turn into one of the installations of the famous avant-garde Japanese artist Yayoi Kusama. This print can be used in any room and in any style - no restrictions.
Photo:
1/3
Photo:
2/3
Photo: shopify.com
3/3