Artyom Kukshinsky
Co-founder. I work in Moscow and St. Petersburg.
How to make geometric painting in an apartment with your own hands? We will show you step-by-step photos, reveal the price and be as honest as possible. This is the most budget-friendly design option, it is simple and fits into any interior. The price per square meter of such a design starts from 2,000 rubles. Do you want to learn how to paint on walls and make money from it? Take our course!
Time: 1 day Size: 12 m2 Price: 23,000 rub.
Making a sketch
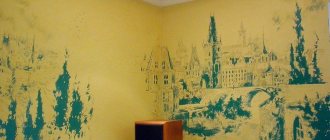
Anastasia contacted us; she wanted to paint the wall of the living room and sent a photo from the design project:
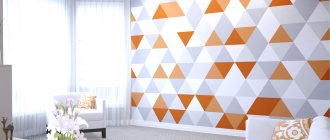
On the right wall we replace the paintings with paintings, without thinking twice we make a simple geometric design:
We fit it into the interior and send it to Anastasia:
We get approval and prepare the layout for transfer to the wall.
Partial painting
You can paint only part of the wall: the bottom, the top, or draw a wide horizontal stripe. It looks interesting if you paint not only the wall, but also the door or other objects that come across the way.
Preparing the layout for transfer
We go into Photoshop and create a file in pixels equal to the size of the wall in centimeters, in this case 438 * 270 (4.38 width and 2.7 height).
Select the “rectangular marquee” tool. We rest against the left edge of the picture, hold down LMB, reach the desired line and look at the value of Width or Height.
Then we transfer all the data to the drawing.
Looking at the sketch we understand that it consists of 6 colors: two shades of gray, white, and three shades of emerald. We will mix the colors on the spot.
Ombre
A color that gradually fades and blurs or gradually flows into another is an interesting solution for wall decoration. Ombre can be with soft transitions, or it can be striped (each stripe is a different color tone) or even in the form of waves. Link to master class.
We glue the tape
We put on construction clothing (things that you wear at home), apply marks with a tape measure and a pencil to the places where the tape will be. Then we glue the tape with a slight stretch so that the line is smooth and not a wave.
The surface of this wall is paintable wallpaper from the developer. They are embossed and are not so easy to cover from paint with tape.
The person on top holds the beginning of the tape, unwinds it and gives it to the person below, who finds the mark with a pencil and sticks the tape there, so we get one line.
Knowing where the line should be, we very easily and quickly (in about 40 minutes) covered the entire wall with tape.
Finally, using any flat and soft object, we press the edges of our tape so that it is secured as tightly as possible. It is important for us that not a single drop of paint penetrates under the tape:
Herringbone pattern
Another interesting pattern that can be easily created using a ruler and tape. Looks especially charming in children's rooms. Link to the master class.
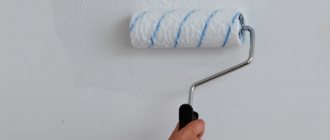
Roller painting
We mixed the required colors, took 6 rollers (one roller for each color) and began to paint the triangles with the required colors.
Using a beautiful girl, we painted over all the areas. We apply two or three layers so that the geometric pattern is without jambs. Do not leave thick layers of paint, and do not forget to paint over the corners.
What to consider when combining coloring
The basic rule is a reasonable combination of colors. There are 3 combination options:
- related shades - classic black and white, neutral, pastel cold tones,
- degrade - a transition within one color from dark to light tones,
- a combination of different colors taking into account saturation and temperature.
Combining colors requires care. You will need high-quality masking tape that will protect the surface and come off easily. To decorate less-than-ideal borders, you can use polyurethane molding, paper and stone borders, mosaics and decorative slats. All markings must be made only after the paint has completely dried.
The catalogs present a huge number of shades. But if none of them is suitable for decoration and design, you can create any shade yourself. You just need to do this with a reserve, since it can be difficult to re-mix the desired color.
Removing the tape
Remove the tape immediately after applying the last coat of paint. When drying, there is a chance that the paint will stick to the tape and with it you will remove the film from the wall.
The photo above clearly shows areas where the paint has flowed. This cannot be avoided, since our wall is textured and the tape did not stick to all the holes. And if any painter could cope with all the previous tasks, then only an artist with straight arms can handle the next step!
Zigzags (chevron)
Making zigzags is more difficult - you will need to first draw the wall using a ruler. Link to the tutorial.
Finished geometry
finished drawing in just 1 day
The renovation is going on, furniture assemblers are running around, and we painted the room in 1 day and won’t cause any more trouble to the owner of the apartment. The paint dried in a couple of hours, and the work was accepted with delight.
boy mopping the floor for photo
the sofa fits perfectly
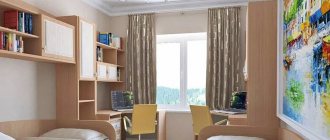
Focus on the zone
Painting a small section of the wall serves as a great accent and helps with zoning. With the current trend toward minimalism, this is a great decorative touch that doesn't take up space in the room. Accents can be, for example, a circle around a shelf, triangles behind the dining area, a vertical wide strip behind the cabinet. This technique was actively used to transform this one-room apartment on Yugozapadnaya.
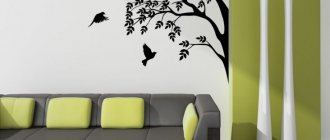
Painting walls using a stencil: pros and cons
Painting walls using a stencil is an original solution for giving the interior a special design. To do this, you don’t need to have special skills or be a professional, just do the job carefully.
Painting walls using a stencil: pros and cons
Almost everyone is an art lover. It truly brings people together and creates admiration. And if everything is done with your own hands, then it is especially attractive. The expression of the inner world is the main feature.
Creativity also comes into play when painting on a wall. Interior detail is the main goal.
List of advantages when applying stencils:
- The artistic design is more expressive.
- Integration is concentrated in a single concept.
- The uniqueness of the compositions, due to the author's origin.
- A huge variety of drawings from different angles.
- By applying a pattern with a stencil, you can highlight individual zones.
Despite all the advantages, there are also some disadvantages.
List of disadvantages:
- The requirements for surface quality are high.
- Drawings are quite difficult to apply.
- Attention. It is imperative to respect the style of the decorated room.
- The work takes a long time to complete. This depends on the complexity of the stencils.
Attention. There are a number of images that can be applied in literally a couple of hours, but in practice there are cases when the drawings take a long time to apply.
What are the requirements for surfaces?
If the surface is uneven, then you should:
Need to remember. Defects are sure to appear on the wall if they are not eliminated in a timely manner.
This can be done in two ways:
- Place drywall on the wall. To do this, it is necessary to attach a metal frame to the base, then cover it with sheets.
- Treat with plaster mortar. To perfectly level the surface, you need to have working skills.
With plasterboard sheets, much more time will be spent, but the surface will be ideal for applying a stencil.
Several painting techniques and what are their features
To paint a wall, it is not enough to pick up paint and a brush. To do this you need to work hard and know several techniques.
- Drawing with regular paint. This method is simple and accessible: a picture is drawn on the wall without lines or contours. To work, you need to prepare a brush, paints and a tray for mixing colors.
- Pencil drawing. A sketch is made and then applied to the surface of the wall. It is necessary to determine the boundaries of the drawing in advance. You need to prepare a pencil, eraser and soft cloth.
- Technique of execution in fragments. Each square is applied to the wall separately, thus proportionality is better maintained. You need to prepare a plumb line, an eraser, a ruler and a pencil.
- Applying shadow. Although this design is rarely used, it looks quite original. Used for transferring ornaments and geometric shapes. Suitable for use as a separate painting. You need to prepare a simple pencil, a video projector and an eraser.
- Using a stencil. Conditional drawings are obtained, patterns or individual details are drawn. An eraser, knife and pencil will be needed during preparation.
- Relief drawings. To give a conditional relief, plaster is used, which is then repainted in different colors.
The painting technique is different, so it is better to choose it in advance, weighing all the nuances.
Types of figures and interior styles
Each style has its own mood and a certain philosophy, for which you can find a match among geometric shapes. What style should you use to decorate your home if you know exactly what is closer to you - sharp corners or smooth lines?
The use of geometric shapes in the interior
Squares and rectangles
The clean lines and right angles of the square go well with understated modern styles. Furniture and decor of this shape look great in minimalism and loft (in the latter, rectangular lamps are often used). Scandinavian style is also not complete without right angles, which are found here either in clear forms of furniture (sofas, shelves, chests of drawers), or in decoration - for example, in the form of perfect clinker bricks.
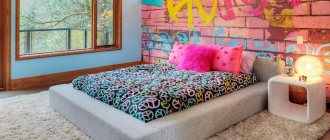
Drawn squares in bedroom design, photo by Egor Pyaskovsky
Volumetric square panels in the interior
Combination of squares and rhombuses in the interior
Square lamp and tiles in the kitchen interior
Poster with squares and checkered print in the interior of the room
Rectangular shelves in the interior of the room
High-tech especially loves these figures: the combination of rectangles and squares is found here in furniture, in decor, and in the design of walls, ceilings or floors.
The use of rectangles in decoration and furniture in high-tech style
Triangles and zigzags
Triangles are a common element in Scandinavian style: they usually appear as a pattern on wallpaper or textiles. Scandinavian interiors are also characterized by wall decor with these figures. Source: posters, paintings) and various pyramid-shaped lamps.
Wallpaper with triangles in a Scandinavian interior
Shelves in the form of triangles in the interior of the room
Posters with triangles in Scandinavian interior style
Pyramid lamps in the bedroom interior
Zigzag print in a Scandinavian interior
The zigzag pattern is a distinctive feature of boho interiors and the Mediterranean style, since it clearly shows the ethnic motifs characteristic of such design. Blankets, bedroom textiles, upholstery and carpets - in these styles such a pattern can be anywhere.
Zigzag print in a boho style interior
Zigzag print on an ethnic style carpet
Triangle print in a Mediterranean style interior
Wallpaper with zigzags in the hallway interior
Parquet laid in zigzags (herringbone pattern) is a classic, suitable for any style - from classic to loft; this is the simplest and most versatile way to add geometry to the interior.
Parquet laid in zigzags (herringbone) in the kitchen
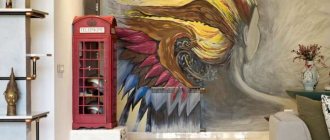
Arcs and curves
Smooth lines are more suitable for traditional styles: classic, Provence, romance, art deco. Soft rounded shapes can be read here in the outlines of sofas and armchairs, tables and chairs, as well as in various decorations and objects of art - from the shape of mirrors to prints on decorative vases.
Rounded sofas and armchairs in the interior
Mirrors in the form of wavy lines in the interior of the room
Decor in the form of curved lines in the bedroom interior
Mirror of irregular rounded shape in the living room interior
Sofas and couches in the form of curved lines are a fashionable technique in modern-style interiors - in combination with the same lamps and abstract paintings, they create a spectacular, very balanced ensemble.
Arched sofa in a modern style interior
Curved sofa in a minimalist interior
Curved sofa in an eclectic interior, photo by Nikita Kryuchkov
Circles, ovals and spheres
It’s not for nothing that a circle and a ball are called the most harmonious and ideal shapes: they are appropriate always and everywhere. Round tables and poufs, mirrors and lamps look great in any style, be it minimalism, Provence, Scandi, loft or modern.
Round tables in a modern interior style
Round dining table and ball lamps in the interior
Several round coffee tables in the living room interior
Round mirrors in the hallway interior
A round mirror and a table of the same size look harmonious
However, a circle-shaped bed or sofa is a bolder and far from universal solution: these pieces of furniture will look best in large rooms in a classic or eclectic modern style.
Round sofa in the living room interior
Bed of an unusual round shape in the bedroom interior
Ball lamps are an option that can be suitable for rooms of any design, if you pay special attention to the materials. Wicker or fabric lampshades are more appropriate for Provence or boho, metal ones for loft or Scandinavian style, and glass options for classic or art deco.
Ball lamp in a Mediterranean style interior
Glass ball chandelier in an Art Deco style interior
Fabric ball chandeliers in a boho style interior
Metal ball chandelier in a Scandinavian interior
Round and semicircular lamps in Scandinavian interior style
Round chandeliers in a loft style interior
Geometric prints and patterns
Stripes, checks, polka dots - each of these prints is a rhythmic geometric pattern. Since stripes have strong associations with a nautical theme, they look great in a Mediterranean style. Upholstered furniture with striped upholstery in pastel colors also perfectly complements the Provence style.
Striped print in a Provence style interior
Striped print on upholstered furniture in a Mediterranean style interior
Striped print on wallpaper in the interior of the office, photo by Pablo Sarabia
Polka dots are a delicate and naive print that is most appropriate in romantic interiors. Choose textiles for the bedroom or nursery, as well as curtains, with this pattern.
Tulle curtains with polka dot print in the living room interior
Chair upholstery in the kitchen interior with polka dot print
Polka dot print in the design of a children's bedroom
The most universal geometric pattern is the checkered pattern: many variations allow you to choose a solution for any style. Focus on the color scheme - to make the print look harmonious, let the shades support the overall design of the room.
Check print on a sofa in a loft style interior
Checkered print on wallpaper in an American-style interior
Textiles with a checkered print in a Provence style interior
A monochrome checkered windowpane type looks great in a minimalist interior on textiles, and a classic Scottish one will be an excellent addition to a loft or American style - both in the form of traditional rugs and as upholstery of upholstered furniture.
Cage windowpane in kitchen design
Cage windowpane in the design of the floor in the living room
Classic Scottish check in an American-style interior
Combination of different shapes
The combination of various geometric shapes in one room is a very striking element of the interior: use this technique yourself. Source: without the help of a designer) is quite difficult. This combination looks most harmonious in styles based on eclecticism - boho and modern. In other styles, this option can visually overload the space, so it should be used with caution.
A combination of smooth and angular shapes in an Art Deco style interior
The combination of circles and stars in the interior of the hallway
The combination of different shapes in the interior of a room, photo by Mattia Aquila
How to make a geometric pattern on the wall with your own hands?
- hang posters and much more that you can think of!
Today we will paint your wall, or rather create a geometric pattern to enliven the space around you.
What will you need?
1. Paint for walls (two or three colors, but no more)
2. Masking tape (two or three rolls)
3. Brushes (three pieces)
Let's get started, what needs to be done?
1. Place masking tape on the wall the way you would like to see a geometric pattern.
2. First paint the selected fragments with one color, then with another. If there is a third color, then don’t forget about it either.
3. Once you have painted, wait thirty minutes and remove the masking tape. This will allow the paint to set a little but not bleed when you remove the tape.
4. If there are any imperfections, correct them with a thin brush using the desired color.
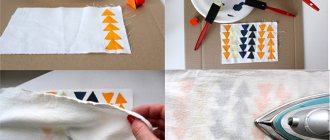
Step-by-step instructions on how to paint a wall Step-by-step instructions on how to paint a wall
Adviсe:
1. If your wallpaper has some kind of pattern, then it is better to paint the entire room in a single color or re-glue the wallpaper and paint it in a single color.
2. Paint colors should be matched to the main color of the walls and interior around you. Do not make the spots too bright if you do not have such accents in the room and in the apartment in general.
What colors would you recommend combining or what colors did you combine for your room?
Painting walls: 7 unusual ways.
Hi all! It's no secret that the easiest way to refresh your interior is to add color. You can add color in different ways. For example, using textile elements, furniture, decorative items and art. But this article will talk about a more radical method - painting the walls.
In fact, this method is very simple and fast if you are the owner of the originally painted walls in the house. Then you can significantly change your interior, spending not so much time and money on it, and getting the maximum effect from it.
In addition, if for some reason the result does not suit you, then you can simply return everything back, or look for new options.
Today there are different ways to paint walls, but I will give the main ones. But the main thing to remember is that you can experiment with color and painting methods and find something that you really like and suits your home.
Gradient.
A very interesting method that shows the smooth flow of one color into another. You can use two or more colors, make the transition smoother or, conversely, sharper. The direction of the gradient can also be different: vertical, horizontal, from a corner, from the center - everything is limited only by your imagination.