Environmental friendliness in the construction of private cottages is gaining increasing popularity. For this reason, wooden facades are no longer uncommon. Everyone knows that wood has a beautiful texture and is at the same time a very difficult material to use. In this article we will tell you how to preserve the strength of natural wood and protect it from the harmful effects of the external environment. Let's figure out why impregnations are required and what paint is best to paint a wooden house. Let us describe the technology for carrying out measures for processing a wooden facade, taking into account previous operation.
What paint is best to paint a wooden house?
“I will show you paints and stains and even some varnishes...”
Good afternoon Natasha Udovina and the team of the TAIR Creative Studio are with you. I want to tell and show how you can paint wood in different ways. Paint in a broad sense. I will show you paints and stains and even some varnishes. All the techniques that I showed can be combined with each other and select any colors.
All these methods are applicable on small objects, such as a box, and on furniture. For the next master class, I was planning to decorate such a chest of drawers.
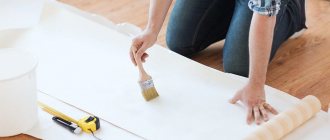
1. Full painting with paint For any type of painting without highlighting the texture of the wood, it is necessary to thoroughly prepare the surface for work. I specifically chose a piece of wood that had a crack in the knot and obvious unevenness. To make the surface smooth, it is necessary to seal the cracks. I use gesso primer; regular putty will also work.
Using a spatula, the composition is rubbed into the depths of the unevenness, and the excess is removed. note
that the aqueous composition may sag a little in deep cracks after drying and re-puttying will be required. After drying, I sand the gesso primer until it is perfectly smooth.
Next, to save paint consumption and facilitate its application, you need to cover the absorbent surface of the wood and gesso with primer, inexpensive paint or varnish. I apply white acrylic primer diluted with water. Next, paint of the selected color is applied with a wide flat brush.
As much as you might want to finish this process quickly, remember that it is better to apply several thin coats to dry rather than one thick coat. This will help avoid obvious brush marks and make the coloring even. In this method, I hide the wood texture as much as possible, but if you want to preserve it, then you need to do without putty and primer.
How to paint interior wooden doors, how to choose paint
The question of what is the best way to paint wooden doors will certainly arise before any person who, in one way or another, decides on the process of restoring old doors or simply recultivating new ones. It will have to be solved in any case, and it is better to do it correctly, since the life and quality of use of wooden doors directly depends on the choice of paint and varnish products. It probably won’t be a secret to anyone if I say that the doors can be coated with varnish or colored paint - that’s what we’ll pay the lion’s share of attention to.
Lucky. They come in glossy, matte and even colored - regardless of this, they have one property - the structure of the wood is visible underneath them. We can say that every smallest defect in the wood will be visible under the varnish - it is for this reason that it is better to refuse to use them if the door has undergone a global restoration using putty and give preference to paint. In general, if we talk about the choice of this decorative coating, then we can distinguish two main options for this material - oil-based varnish and the so-called alcohol varnish. There are also solvent-based nitrovarnishes, but it is better to avoid using them for the reason that they negatively affect the condition of the wood. Polyurethane varnish is considered the most ideal option - its strength and resistance to mechanical damage can be called unsurpassed. Paints. Today, the choice of this material is huge, which allows you to give doors almost any look, even the most unusual. Paints can be glossy, matte or highlight the structure of wood - the question of what paint to paint a wooden door can be solved using almost all options
But, again, you need to pay attention to the base on which this paint is made - oil and alcohol are suitable. But you can also use nitro paint
How to paint interior wooden doors
There is also a third, more expensive material for coating wood - wax-containing oils, which give the wood a silky surface. Wax oils, like varnishes, can be colored or transparent. In addition, they can be successfully combined, giving the doors an interesting look.
Stain | gradient toning
Stain is the easiest way to tint wood while still keeping the wood grain showing through.
The first stage in staining
- wetting the wood with clean water. After drying, the wood fibers rise and must be sanded off with fine-grained sandpaper.
Second phase
- then the stain is applied either in one layer or in several, depending on how dark the tone you need. I decided to show gradient coloring with three stains, it turns out to be a smooth transition. You need to work quickly with the brush and not let the stain dry out so that a sharp border does not form at the transition point. I decided to deepen the color and applied another layer.
Reasons for aging wood in wooden houses
From time immemorial, wooden houses have served people, protecting them from cold, precipitation and wind. At the same time, the building is exposed to negative environmental influences, leading to the aging of wood and the deterioration of its properties as a building material. Centuries-old operating practice has determined the approximate wear period of wooden residential buildings, which does not exceed 80-85 years.
The main natural factors aging the natural wood of building facades are:
- direct sunlight, which mercilessly dries out wood fibers. Dried fibers lose their elasticity and strength, change their position, and become prickly. The surface becomes rough, begins to actively absorb sedimentary moisture, burns out and becomes covered with dark spots;
- sedimentary moisture, causing deformation and swelling of the material;
This is what will happen if you don’t take care of how to beautifully paint the outside of a wooden house in time; the photo below is not the worst option.
An unprotected wooden surface quickly begins to deteriorate Source lestorg32.ru
- temperature changes are the worst enemy of any building material. During sudden cooling, the moisture filling the pores of damp wood freezes, turning into a crystalline state. Ice crystals expand the fibrous structure of the tree until individual fibers break. When drying, the fibers narrow, which, when repeated cyclically, leads to the appearance of cracks;
- wood not protected from moist air is prone to rotting, mold and fungal deposits;
- wood-boring insects such as bark beetles, which wear away wood and destroy the integrity of the wood structure.
Acrylic paint stain | gradient coloring
Classic store-bought stains most often match the colors of valuable tree species.
But sometimes you want to tint the wood in some non-standard color, and at the same time preserve its texture. In this case, you can make the stain yourself using acrylic paints. I'll do a gradient again just to show off a few colors at once. I take white, Turkish green and manganese blue. I dilute them with water until liquid.
If the paint is thick, like mine, then rub it well so that there are no lumps left. As in the case of ordinary stain, I first wet the board with clean water, and after drying, I sand the raised fibers. Then I wet the surface again with water and apply colors one by one, making smooth transitions between them. Can be applied in one or several layers.
Finally, after drying, I lightly sand the board, exposing the natural color of the wood in places, this also gives an interesting effect. You can create a stain of any color!
Which façade coatings do not require sanding? Oil, hydraulic oil and their features
Kremlev Andrey Aleksandrovich production manager
Wood panels on the facade of your home are constantly under stress from the environment. They are wet by the cold autumn rain. The bright summer sun is scorching. The winter cold burns with its frosty breath. A dusty wind carries sand with it, which acts as an abrasive.
The only barrier that stands between the wood on the facade and harsh weather conditions is the “dry film” of the coloring system, or the film-free oil that impregnates the upper layers of the wood. She is like a bulletproof vest that protects a special forces soldier from bullets and shrapnel. The inquisitive minds of chemists from the largest paint manufacturing concerns were able to develop film-free painting systems. When updated, they do not require re-polishing. These are oils. Facade oils are a film-free painting system. It works in the upper layers of wood.
To put it simply, when applied, oils impregnate the top layer of wood and, while there, protect it from the aggressive influence of the external environment. If you want to update the oil-painted wooden facade of your home, there is no need to sand it. Just apply another layer of oil on top.
What will you learn about in the article?
- How to paint the outside of a wooden house. Paint oil, hydraulic oil for wood
- Do oil and hydraulic oil have adhesion? Why does oil take so long to dry?
- Painting the larch facade. Gum in wood, what is it and how to deal with it
- Why is it important to protect the ends of logs and boards?
How to paint the outside of a wooden house. Paint oil, hydraulic oil for wood
On our website, coloring systems using oils look like this:
- Premium.
Three-layer painting scheme. Pre-grinding with two abrasives. Application of oil antiseptic. In this scheme, it replaces the primer. First layer of oil. Intermediate sanding. Second layer of oil. We use Renner YS M 300 oil. Matte shade. The durability of this coating exceeds all expectations; it lasts up to 15 years. Updating without refinishing. - Three-layer painting scheme.
Sanding the working surface of wood with grain 80 and 120. Oil antiseptic. First layer of oil. Sanding the first layer. Second layer of oil. We use Italian oil “Renner 46”. The finish is matte. Service life is at least 6 years. 120 shades from the Teknomix catalogue. The update does not require re-sanding. - Three-layer painting system with
Tikkurila Pinja Wood Oil hydraulic oil. Sanding in two passes. Application of antiseptic. First layer of oil. Sanding the first layer. Second layer of oil. The finish is matte. Service life up to 6 years. - Two-layer translucent scheme with
Visasol hydraulic oil. Sanding with abrasive materials 80 and 120. Apply antiseptic. First layer of oil. We carry out intermediate sanding of this layer. Second layer of oil. Color range according to the Teknomix catalog, more than 120 shades. The overall color of the coating is semi-matte. Service life of at least 3 years. - Two-layer treatment with
Tikkurila Pinja Wood Oil. We grind with two abrasive materials 80 and 120 microns. Apply an oil antiseptic. Apply a layer of oil on top. Service life up to 4 years.
Photo 1. Tikkurila Pinja Wood Oil
Photo 2. Renner hydraulic oil
All of the above systems are oil and hydraulic oil, glazing, that is, (translucent). All the beautiful wood texture will be visible on the façade. Looks very elegant. Tinted oil pigments carefully highlight all the beautiful essence of wood. Each layer, each fiber takes its place in the exquisite pattern on your façade. The house will look very beautiful. Look at the photos in our catalogue. Rate them. Better yet, find time. Come to the office. Take the “painted” panel with oil in your hands. Look at this beauty with your own eyes.
Photo 3. Stands with paints in our office in St. Petersburg
Photo 4. Oil on the facade of a one-story house
Photo 5. Oil on planken
We do painting with natural oils exclusively on site. The point is that the oil takes a very long time to dry. Each layer takes up to 24 hours. And this is at normal temperatures. At 15 degrees, this time will be noticeably longer.
In production conditions with such indicators, it is not possible to make serious volumes. This will delay the execution of other orders. Our ethics towards clients does not allow us to do this.
Photo 6. Painting on site
Photo 7. On this site we removed the old paint and applied Renner YS M300
Fortunately, this problem, because it is common, not only Russian, was drawn to the attention of the heads of large concerns producing painting systems. An industrial line of quick-drying hydraulic oils appeared on the market simultaneously from three large companies.
Photo 8. Applying hydraulic oil to the plank
Photo 9. Hydraulic oil in light shades
- Teknos, which developed its Visasol composition. It was made for the needs of the Finnish army. It was used to process wooden weapon boxes.
- Tikkurila has created a whole complex. Oil antiseptic, analogue of primer. It has fungicidal properties. Actively fights fungi in wood.
- Hydraulic oil "Tikkurila Pinja Wood Oil". The system was originally specialized for use on painting lines. Especially for painting molded wooden products. That is, there was also a special calculation for working with large volumes.
- The Italian company created its own hydraulic oil. It was specialized for painting sea piers. There are also large areas for painting.
Photo 10. Hydraulic oil on pine
Photo 11. Hydraulic oil on larch
The chemical laboratories of these concerns solved the problem of oil drying time. They changed its composition on a molecular basis. Hydraulic oil consists of hybrid molecules. Alkyd and acrylate have become one. One hybrid molecule. It successfully penetrates into the pores of wood and forms a thin film on the surface. Substances that accelerate its drying were also added to the hydraulic oil.
Photo 12. Oil on larch façade in BC grade
Photo 13. Renner YS M300 on a larch facade
Our company closely monitors all new products on the market. We are constantly developing. Therefore, of course, we immediately began to use these compounds to the delight of our customers. By the way. We recommend Renner oil for facades. "Tikkurila" and "Teknos" for treating roof overhangs, fences or for budget painting of the same facades. The choice is always up to the customer. This is a matter of taste and the planned renovation budget. Everyone decides for themselves. We only tactfully advise and do our technical part of the work, with the highest quality possible.
Photo 14. Facade made of pine needles, coated with oil
The main difference between film painting systems and non-film ones is the ability to renew the coating without resurfacing. You simply apply a new layer of oil on top of the old coating, and the facade is like new again.
Photo 15. Planken painted with oil
A number of our respected customers believe that film varnish coating is more aesthetically pleasing. Some people like the muted matte shine of oil on the facade. To each his own. Tastes could not be discussed. We cautiously recommend using oiled patterns on hardwoods. Larch, ash, oak. We think they look most beautiful under oil. The luxurious texture of larch looks especially good. This Siberian beauty is not for nothing considered the Queen of Texture. Its exquisite drawing, shaded with oil, looks phenomenally beautiful. Cosmic aesthetics.
Photo 16. Facade covered with planken pine needles and coated with Renner oil
Do oil and hydraulic oil have adhesion? Why does oil take so long to dry?
Adhesion is the interaction of dissimilar surfaces, say solid and liquid. In our case, this term means the adhesion of paint to the surface of wood. Oil has no adhesion at all. It interacts with wood according to a completely different principle. The oil is absorbed into the upper layers of wood, mixed with them and located there. This process is called diffusion. Having penetrated the upper layers of wood, the oil begins to work. After a certain time, it polymerizes. Here we are talking about natural oils. Hydraulic oil, as we wrote above, behaves differently. Polymerization of oil in wood is a complex chemical process. The oil changes the structure of its molecular lattice. It turns from liquid to solid. In parallel, it interacts with wood fibers at the molecular level. For ease of understanding, this process can be divided into stages or phases.
- Grasping.
- Touch dry.
- Complete drying (polymerization).
Photo 17. Oil on planken
In the first phase, under the influence of oxygen, driers with their internal enzymes in the form of fatty acids, the oil begins to oxidize. It becomes more viscous. When touched with your fingers, a mark remains on the surface. In the second phase, if you touch the painted surface, it feels dry to the touch. However, the oil inside the wood is still liquid. If you press hard on the wood with a hard object, oil may come out onto the surface of the panel. In the third phase, the oil turns into a solid polymer, which remains forever in the upper layers of the wood.
Photo 18. Blue hydraulic oil on the plank
It must be noted that polymerization is influenced by a number of other factors. In order for the oil to dry well, approximately within the technical specifications, several important points must be observed. Wood should have 8 - 10% moisture content. Availability of good sunlight. Low air humidity. Temperature +22 - 24 degrees.
Photo 19. Facade covered with oil
Oil, like a capricious girl, requires a very careful approach. It must be applied in a thin layer, as if slightly rubbing it into the surface of the wood. After “drying to touch”, it is necessary to completely remove excess oil from the surface of the panel. Gently wipe it dry with a clean cloth. Ideally, wait an extra few hours after this.
Photo 20. Renner oil in 2 layers on larch
If you apply the second layer before the entire “face” of the panel is completely dry, it will take a very long time to dry. Much longer than 24 hours. The bottom line is that the second layer will block the access of oxygen to the first layer and stop the oxidation process. Plus, if the first layer is not completely dry, it will not allow the second layer to be absorbed into the wood. As a result, the second layer may not dry for a very long time. Up to 3 - 4 days. By the way, the tinting paste added to the oil significantly increases the time of its drying and polymerization. As a result, after complete polymerization, the oil remains forever in the upper layers of the wood.
Photo 21. On this object, the oil was applied in 2 layers, as a result of which we received an incredibly beautiful color
The structure and technology of the polymerization process of hydraulic oil is exactly the same. With one pleasant difference. The process is much faster. Drying to touch, in our workshop, occurs within 1 hour. We wait another 1 hour for a guaranteed result. Then, apply a second layer of oil. General polymerization occurs within approximately 14 days. During this time, painted panels must not be rubbed or walked on. Ideally, it is better not to touch them at all during these 14 days.
Photo 22. Planken covered with oil in brown shades
Our company's specialist painters paint facades with natural oils exclusively on site. Our ethics towards the customer do not allow us to occupy the paint booth and workshop for so much time, and because of this delay the execution of orders from other clients. We paint panels with hydraulic oil in our production.
Painting the larch facade. Gum in wood, what is it and how to deal with it
Gum, gum (from the Greek κομμίδιον, κόμμι) High molecular weight hydrocarbon. If we return to comparisons. Wood is a living material. In case of mechanical damage to her skin (bark) or diseases, she, like a person, secretes her life-giving fluids. Resin and gum. By analogy, resin is the blood of wood. The gum is her sweat.
Photo 23. Gum that came out due to an incorrectly selected coloring composition
We have had to deal with gum more than once. You arrive at the customer’s site and see the picture. Red stains on the facade after rain. There were cases when the customer began to rub the stains, trying to remove them. The oil had not yet had time to polymerize on the panels, and he washed it down to the wood. Then it rains again. The leaks have disappeared. Panic. Lack of understanding of the situation. We started to figure it out.
Photo 24. When the customer contacted us, the facade was in a deplorable, neglected state. We carried out a number of works to restore it and applied oil from
System analysis revealed. A similar thing happened with larch. They began to study. They've scoured the Internet. They took samples. They sent it to the laboratory. We received an answer. Water-soluble gum. It is found in large quantities in larch.
Photo 25. Painting a log house Renner YS M300
We found the answer. Oil-free film coloring system. The facade is painted absolutely correctly. Everything is based on technology. When it comes to touch, the oil is already dry. It started to rain and the wood absorbed moisture through the oil. The oil has not yet polymerized, this is not a quick process, as you read above. It is completely moisture permeable. The sun came out. Heated the surface well. The wood began to actively release moisture and, along with it, gum. It is also water soluble. It dissolved in the water and came out with it. The water dried up, and the gum remained in the form of red smudges. Then, it started to rain again. Dissolved and washed off the gum. Understanding the essence of the situation, we stopped worrying. Calmed down an agitated customer. They told him the situation schematically. They began to wait. Polymerization of the oil was completed within the expected time frame. The exit for gum became closed. After the rain, the leaks stopped appearing. You can add: in fact, gum is found in absolutely all types of wood. This is their standard component. It’s just that the amount of it in larch is fantastically high. We have not yet encountered similar situations on other types of wood.
Photo 26. Oiled larch on the facade
Photo 27. Oil emphasizes the texture and natural pattern of wood, making it even more beautiful
Why is it important to protect the ends of logs and boards?
The weakest point of a log is its end. All wood begins to collapse from the end. It is a fact. An axiom if you like. At the end of the wood there are the largest capillaries and sap-conducting channels. Therefore, protecting the end of the wood is of utmost importance. It is there, inside the log, that spores of fungi and bioparasites will try to penetrate.
Photo 28. Protection of log ends
Photo 29. Ends covered with sealant
In the old days, back in the days of Kievan Rus, master carpenters already knew this. And they fought to the best of their ability, protecting the ends of the logs. They were thickly covered with tar or resin. They were burned. If there was no such opportunity. They were beaten off with the butt of an axe. The meaning of the latter was that the blows of the butt would crush and seal the mouth of the capillaries and sap-conducting channels. At least to prevent parasites from getting deeper into the log.
Fortunately, we live in enlightened times, and we do not need these old brutal methods. There are a lot of good sealants with an antiseptic effect available that can protect wood from destruction. Of course, in addition to the logs in the log houses, it is also necessary to protect the ends of all the boards in the structure. For example, there is JRM Teknos. This is an excellent sealant. It is enough to apply it in one layer, and it will tightly seal the sap-conducting channels and capillaries of the wood. By the way, this is why wood antiseptic treatment is best done using the industrial “immersion” method. The boards are completely lowered into a special container with an antiseptic and left there for some time. This ensures excellent absorption. Including through the ends of the board.
Photo 30. Applying sealant
Photo 31. Protection of plank ends
If you want, our master painters will be happy to help you paint the facade. Men are real luminaries of their business. All as one, professionals from our “School of Painters”. They will give you standard quality coloring. We guarantee. You'll like it.
We work for you in Moscow and St. Petersburg.
See how we can
October 13, 2020 696
How we saved the facade and terrace and even window frames from destruction
700 m2 1 548 500
34 days Losino-Petrovskoye
April 22, 2020 788
We paint the log house so that the customer forgets about repairs for 10 years. We insulate using the “warm seam” technology
230 m2 437 000
25 days SNT "Birch"
October 24, 2019 3187
The cost of sanding timber inside and outside the house. Price per 1 m2
416 m2 674 000
28 days M.O. "Domodedovo"
View other works
Ombre colors
Ombre is a type of gradient that does not imply a transition from color to color, but a transition from light to dark or vice versa. By the way, I have a detailed video. The ombre effect is often used in furniture decor, for example, to darken the edges of drawers, or to create a transition on the legs.
First, as in the first case, we do the usual staining. Then, after the paint has dried, we take a darker or, conversely, lighter in tone color and begin to paint the edge. It is very important not to leave a sharp border, so as you approach the center, the paint becomes more and more diluted, and the very bottom edge is simply washed away with clean water.
Depending on how much you want to lighten or darken the edge, you can apply several coats of paint or limit yourself to one or two. I decided to show what the ombre transition from all edges to the center would look like. I get a strictly rectangular gradient shape, but you can make it smoother, for example, round or oval.
Manufacturers of facade paints for wooden houses
The leading brands among manufacturers of facade paints on the Russian coatings market include:
- Tikkurila (Finland) is a name that has become a kind of synonym for quality for any paint. The main consumer characteristic of coatings produced by Tikkurila is considered to be excellent hiding power. Tikkurila feels great on wooden surfaces of any configuration.
- Alpina (Germany) is one of the leaders in the production of paints and varnishes, successfully competing with other “promoted” brands. The compositions have increased resistance to abrasion and temperature changes. Clients are offered individual computer tinting to create an exclusive façade.
Toning with varnishes
Another way to give wood a noble shade is to use varnishes.
It is important to sand the wood thoroughly before applying. Shellac varnishes are used in woodworking; they give the wood pleasant golden shades. TAIR has two types in its assortment: shellac alcohol and clarified alcohol. The alcohol varnish in the jar looks very dark, almost like bitumen, but in use it is slightly more golden than the lightened varnish. I show them on one board. I really like the result.
But since I started talking about bitumen, I’ll show that too. The use of bitumen varnish is already in the area of aging. I apply varnish along the edges and the wood immediately looks as if it has been burned. I apply bitumen varnish using a sponge. Bitumen varnish can be removed with white spirit, so if you accidentally drop more bitumen than necessary, it can be easily removed from a varnished or painted surface.
You can apply bitumen varnish directly to wood, but it is very actively absorbed into the wood and cannot be wiped off. Also note that bitumen varnish is very glossy and sticky, it is recommended to cover it with shellac varnish on top. Brushes after bitumen and shellac varnish should be washed in solvents.
Exterior or interior wood paints?
Finishing, coating color, transparency - of course, these are very important issues. When selecting a wood stain product, you should first try to provide the best possible protection to the surface. It is important to determine the level of protection taking into account the potentially damaging factors that affect it. The simplest - and at the same time applicable in most situations - division of products distinguishes them into:
- indoor wood paints;
- paints for exterior woodwork.
Interior products are resistant to, among other things, standard amounts of moisture, abrasion, cleaning, etc. Exterior wood paints should be distinguished by their resistance to rain and airborne moisture, solar radiation, variable temperatures or resistance to the growth of microorganisms.
The range of disruptive factors can be very wide, so it's worth thinking about what your priority is. In the case of the facade of a house located, for example, near bodies of water, this may be protection from moisture and the formation of mold or fungal outbreaks. In other cases we focus on mechanical resistance, such as in very windy areas (wind can move sand and pebbles causing damage to the surface).
In addition, attention should be paid to the intended use of the product, that is, the specifics and location of the surface on which the paint is to be used. A wooden floor requires a different type of protection (risk of mechanical damage and abrasion), while walls or furniture are different (dirt and abrasions). Therefore, it is recommended to use the terminology imposed by the manufacturer, who indicates the name of the product in the title (for example, “paint for wooden parquet”, “paint for wooden garden furniture”, etc.).
Multi-layer painting with a rubber spatula
I take the next primed board.
I paint it in a color that will show through from under the others. I have this purple-red one from the Acrylic-Art line. Pay attention when applied in one layer - it has such a delicate pink undertone, and when you apply subsequent layers it darkens to a noble brown! I love using this color in painting!
Then I put the following colors on a rubber spatula, maybe two at a time. I take light cold cobalt green, dark cobalt and manganese blue. It is better to wet the surface first, then the colors will float into each other more smoothly.
As a final chord I add a bright note of lemon color. Since the work is done in the raw, the colors float into each other quite interestingly.
Painting birch wood products
The most accessible raw material is birch, which has similar mechanical properties to beech.
Birch timber is well glued, polished, and etched with dyes.
When using stains, birch is well stained. The most common use of birch is to make veneer.
The selection and painting of joinery has nuances. It should be noted that there is a drawback when choosing birch - it is damaged by microorganisms.
Multi-layer painting with holes. Using a metal scraper.
The next method is simple, but very effective for those who love aging techniques.
The first color is applied to the primed wood. I took gray linen. In this case, you can apply the color in one thick layer and use an old bristle brush, which leaves marks. I lightly dry the paint with a hairdryer, but not completely. I take a metal spatula and start peeling off the paint.
In those places where it has not dried out, it is very well removed in whole layers. The next color is sage. I apply it randomly, making strokes in different directions. I dry it again and peel it off with a spatula. In some places you can apply force and even scratch the soil right up to the wood.
One-step craquelure
I paint the primed wood gold. One-step crackle p
is an imitation of cracks in paint that appear over time due to changes in temperature and humidity. The first color is the one that will remain visible through the cracks; you can come up with many interesting options, make it darker or lighter than the main one, use metallics or mother-of-pearl. After the paint has dried, a thick layer of craquelure varnish is applied to the surface.
I leave it to dry until it is slightly sticky to the touch. I take the red color, because I really love the noble combination of red and gold, and with a wide flat brush I begin to paint the entire board.
Very important!
You can apply paint over craquelure varnish only once, so it is important that the paint immediately has sufficient coverage and a well-spreadable consistency. If you try to apply a second layer of paint, it will simply start to roll off unsightly. Let's paint joint to joint! As you can see, cracks appear immediately. After the paint has dried, the craquelure must be covered with shellac varnish.
How to normally paint a door
Painting a wooden door
We told you how to paint a wooden entrance door or an interior door, now it’s time to talk about how to do simple painting to avoid smudges and other problems. If you need to update the outside canvas or paint only the doors, there is no point in buying a spray bottle.
To do this, it will be enough to buy a narrow brush (for hard-to-reach places) and a roller that will suit any canvas (natural wood, fiberboard, MDF, Canadian, etc.). The only drawback of brushes is that they often lose hair, so before work you need to fluff it up so that everything unnecessary and poorly fixed falls out, so as not to spoil the finish.
For panel doors, it is better to use a roller so that the paint applies evenly. Work begins from the end, moving to the right. You will have to paint the canvas in 3 passes, so each subsequent layer should be applied in opposite movements. If painting is done on any other surface, do not allow an excess of paint to prevent smudges from forming.
Two-step craquelure
Two-step craquelure
imitates cracks that appear in the varnish over time. I will show how to create these cracks without covering the wood with paint or primer so that the texture of the wood remains visible. But, of course, such cracks can be created over a painted surface, or over decoupage, or painting, or even painting.
First I apply several layers of shellac varnish. I took the unbleached one because I really liked it in one of the previous methods. Wood is a very absorbent material, so you don’t even need to take into account the first layer of varnish; it will be completely absorbed. After it, it is better to apply another 3-4 layers of shellac varnish with intermediate drying.
Then, as in one-step craquelure, I distribute a thick layer of craquelure varnish over the surface. I leave it to dry for a day. In the morning, these gorgeous cracks appear in the light. If your room is humid or cool, there may be fewer cracks, then you need to warm the surface with warm air from a hairdryer. Craquelure loves dryness and warmth. To show the cracks, I rub oil paint into them. I cover the craquelure with shellac varnish.
Boat board | multi-layer painting using a wax candle
I paint everything with thinly diluted brown paint.
After drying, in some places I rub the board with a wax candle. Keep in mind that the paint in these places will come off later! Then I paint one half with the color kraplak, and the other with dark green. The main thing is not to forget and not to start blow-drying, otherwise the wax will start to melt! After the paint has dried, I take a metal scraper and start removing the paint. In areas covered with wax, it can be removed very easily. Next, I take a candle and rub new areas with it.
I try to include both new colors and the color that we tore out from under the second layer. I cover one half with orange, and the other with light cobalt green. I dry it naturally in the same way, then remove the paint with a scraper. I cover some parts again with candle wax.
I paint everything with one color - Persian turquoise from the Acrylic De Luxe line. I dry it and scrape through the paint. This is another way of aging.
Decorative painting
There are tips to help you achieve the best visual effect with your own hands:
- Painting like bleached oak. The easiest way is to cover the surface with a stain of a suitable color. It is much more difficult to produce such paint; complex tinting is required for this.
- To obtain a bleached wood color, a pigment (acrylic or polyurethane) primer is used. It is diluted and applied to the surface. A similar effect can be achieved by using oil with a similar color. After installation, the base is treated with wax and rubbed.
- Patination is used for an antique effect. It is recommended to use special compositions: paste, liquid patina or beveled varnish.
If desired, you can get any decorative result.
Using wet paper
This is also one of the methods of multi-layer painting.
I apply thinly diluted ocher as the first layer and dry it with a hairdryer. Next, I take a sheet of paper and tear it into pieces of different shapes and sizes. Try to have complex shapes and not just straight stripes. I wet the paper with water and place the pieces on my piece of wood. The next color is applied with a palette knife. I chose warm gray. You need to apply it so that pieces of paper do not move off during the process. You can safely leave a slight sloppiness in the application, uneven thickness of strokes. While the paint is still fresh, I carefully lift the paper with a palette knife and remove them. And I leave it to dry.
Then I tear up the next batch of pieces of paper, moisten them and place them on the board. I try to ensure that there are different areas under the paper - both gray and ocher. I apply the next color - dark ocher, and remove the paper without waiting for it to dry. Drying the paint. Then all stages are repeated as many times as you want to add colors to your work.
I apply red ocher, and the very last layer is burnt umber. This method differs from others in that each layer has its own small thickness, and it seems as if entire layers of paint were actually falling off the board after numerous stains.
Gold plating
Before gilding with gold leaf, you need to prepare a very flat and smooth surface.
I cover the board with gesso primer. I let it dry completely and then sand it with fine-grit sandpaper. After sanding, it is better to smooth the surface with a piece of natural fabric, such as linen. Levskas has an absorbent surface, so you need to cover it with the first layer. In icon painting techniques, where gilding also requires a smooth surface, shellac varnishes are used for this, and here I also use shellac. After this, if any brush marks remain, you can sand and smooth the surface again. Then I apply another coat of shellac varnish.
If you want to get perfect smoothness, reminiscent of an even gold bar, it is better to use alcohol-based gilding compounds. I use acrylic water-based, it won’t achieve perfect smoothness, but you can get another beautiful effect. After the glue has dried to transparency, you can apply gold leaf. I use the classic one.
Ideally, special wide brushes are used to transfer it to the surface. Then the gold leaf will lie more smoothly and evenly. But I think that the resulting cracks and creases have their own charm. Moreover, you can scratch the gold leaf on top with a metal brush (Although I’m sure many would condemn me for this!). According to technology, classic gold leaf is sealed with alcohol varnishes to avoid oxidation. I use shellac varnish.
Selecting the material that will be used for painting
Wood has always been very popular in the production of furniture and interior decoration. Is it possible to paint ceramics with acrylic paints? But since it is a natural material, when painting surfaces, all the flaws and flaws can come out.
Therefore, proper preparation of products is important here. We'll talk about this right after we choose the paint we need.
To paint wood you can use the following materials:
- Varnish and enamel are almost transparent materials used to protect surfaces. But even after such staining, wooden products acquire an attractive shade
- Paint - can completely change the color of the object being painted, but at the same time leave the original wood texture
Table of divisions by composition:
Important! Modern paints are distinguished by their naturalness. More precisely, they are less toxic than varnishes and enamels
That is why use a respirator when painting with such materials.
Impregnations can not only shade wooden elements, but also protect them from the influence of fire. They have antibacterial properties and are quite often used for woodworking.
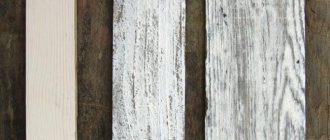
Brushed firing and gray wood
Firing with brushing requires a gas burner, metal brushes and compliance with fire safety regulations.
Don't be afraid to burn the wood thoroughly if you're doing it for the first time. Usually, beginners do a very weak firing, achieving a barely brown color. When firing, we burn soft wood fibers so that we can then easily comb them out and reveal the relief texture. To do this, after firing, we moisten the board with water so that dust does not fly in all directions, take metal brushes and comb our wood with pressure. This technique is often called “Barn Board” - this is the attempt to age a board to the state of a board left over from a dismantled old barn. Any means will work here: you can use a nail puller or a hammer to leave deep dents, or use a chisel to mark and widen cracks. An awl or nail is suitable for creating round holes. Using a drill and a drill bit, you can create paths for bark beetles. Use a saw to mark some old cuts.
You can hammer in a couple of nails and oxidize their heads with acid, but I didn’t. A new board will first of all be distinguished by a smooth cut, so for authenticity it’s worth adding some unevenness to it, you can even cut out some pieces..
After all these terrible abuses of the board, I take a torch and once again burn through the newly formed cracks and potholes. I comb out the burnt wood again with a wire brush. Next, I sweep away the remaining dust with a brush and take white paint. Over time, the tree loses its color, fades in the sun, and becomes clogged with dust. To imitate such gray wood, you need to patina it. I apply thinly diluted white paint and then immediately wipe it off with a wet cloth. I dry it. The paint melts right away. I apply the next layer.
It is important
not to overdo it with white!
Wash the paint thoroughly after application. The wood should appear slightly dusty. The final step is to lightly sand the wood with sandpaper.
Brushed firing and metallic patina (dry brush)
I have another board with firing and brushing. By combining firing, brushing and dry brushing, you can achieve different visual effects, lightening the texture of the wood or, conversely, darkening it. And I want to show the metallic patina in this example. I paint the board deep black, using velvet black from the Acrylic De Luxe line.
Metallic paints look best and shimmer on dark surfaces. Next, I take Decolor metallic paints and work using the dry brush technique: I put paint on a brush (it is better to use flat, coarse bristles), wipe off the excess on a napkin and begin painting in the direction of the wood grain.
It is important not to overdo it and stop in time. The result is an elegant metallized coating that emphasizes the wood grain.
Properties of wood
Wood is an extremely heterogeneous material, susceptible to the damaging effects of moisture.
The heartwood, unlike sapwood, is naturally resistant to biological degradation.
| Rice. 1. Sectional view of a tree trunk |
Wood of a radial cut changes its dimensions 2 times less with changes in humidity compared to tangential ones, is not subject to warping due to its uniformity, is most resistant to biological damage, but is less decorative.
| Rice. 2. Cutting a tree trunk |
What causes the main defects when painting wood?Finishing defects can appear on softwood due to the presence of resins, gums, and on hardwood due to the presence of pores, waxes, tannins, and oils. The pile on wood during painting may rise when paints and varnishes are applied to the surface of the wood due to the swelling of the piles and the action of capillary forces. But porosity is one of the main properties of wood. To close pores in large-vascular rocks, special thick paints and pore fillers may be necessary. |
Brushing without firing + washing technique
Of course, you can brush wood without firing it, which is exactly what I did before I bought the burner.
This can be done with special drill attachments and hard metal brushes. Or brush by hand, which is what I do. This, of course, is a great way to keep warm when there is no heating) You definitely need to sand the board after brushing so as not to get splinters.
Next I start painting. I apply purple and immediately wash off the unabsorbed paint with a wet rag. I introduce an additional color in some places - ultramarine - and do the same with it.
This technique allows you to delicately highlight the texture of the board. Next, I take green Chameleon paint, apply it to the entire surface, and also wash away the residue, allowing it to remain only in the depths of the pores. After drying, a delicate pearlescent effect is obtained.
Painting wooden surfaces
Before you learn how to paint wood correctly, you need to study the question of why wood is painted. Coloring is used to obtain the following properties:
- Painting wood helps to obtain a coating that will help prolong the life of the product;
- Emphasizing the pattern of the wood itself, improving natural colors;
- Renew antiques, give them a second life;
- Create a protective layer against natural factors to which an item used outdoors may be exposed.
Often houses are built of wood; they must be covered on the outside with special means to prevent the harmful effects of the environment. Painting wood prevents it from blackening under the influence of external factors.
Painting wood helps to obtain a coating that will help prolong the life of the product.