Wood painted white looks very simple, stylish, and cozy at the same time. This type of painting while preserving the wood texture has become one of the most popular interior and exterior styles!
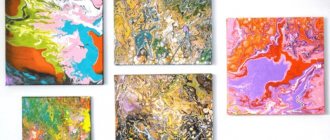
In this article, we'll look at 3 simple methods for painting wood with distressed or aged effects , as well as beautiful and inspiring examples of floors, walls, doors and furniture painted with them.
“I will show you paints and stains and even some varnishes...”
Good afternoon Natasha Udovina and the team of the TAIR Creative Studio are with you. I want to tell and show how you can paint wood in different ways. Paint in a broad sense. I will show you paints and stains and even some varnishes. All the techniques that I showed can be combined with each other and select any colors.
All these methods are applicable on small objects, such as a box, and on furniture. For the next master class, I was planning to decorate such a chest of drawers.
1. Full painting with paint For any type of painting without highlighting the texture of the wood, it is necessary to thoroughly prepare the surface for work. I specifically chose a piece of wood that had a crack in the knot and obvious unevenness. To make the surface smooth, it is necessary to seal the cracks. I use gesso primer; regular putty will also work.
Using a spatula, the composition is rubbed into the depths of the unevenness, and the excess is removed. note
that the aqueous composition may sag a little in deep cracks after drying and re-puttying will be required. After drying, I sand the gesso primer until it is perfectly smooth.
Next, to save paint consumption and facilitate its application, you need to cover the absorbent surface of the wood and gesso with primer, inexpensive paint or varnish. I apply white acrylic primer diluted with water. Next, paint of the selected color is applied with a wide flat brush.
As much as you might want to finish this process quickly, remember that it is better to apply several thin coats to dry rather than one thick coat. This will help avoid obvious brush marks and make the coloring even. In this method, I hide the wood texture as much as possible, but if you want to preserve it, then you need to do without putty and primer.
Is it possible to paint furniture with acrylic paint?
Colored paints allow you to paint furniture in any desired shade and thereby achieve an effective combination of interior items with the design of the room. If you need to quickly treat the surface without complex preparation for painting, acrylic paint is the best option.
Interesting materials:
How to take a screenshot from an Android phone? How to take a photo from a web camera? How to take a photo of an entire website page on an iPhone? How to make your son the owner of an apartment? How to make content in PowerPoint 2007? How to pair headphones? How to pair i7s headphones? How to make an employee financially responsible? How to make honeycombs in Minecraft? How to make a bedroom without a window?
Stain | gradient toning
Stain is the easiest way to tint wood while still keeping the wood grain showing through.
The first stage in staining
- wetting the wood with clean water. After drying, the wood fibers rise and must be sanded off with fine-grained sandpaper.
Second phase
- then the stain is applied either in one layer or in several, depending on how dark the tone you need. I decided to show gradient coloring with three stains, it turns out to be a smooth transition. You need to work quickly with the brush and not let the stain dry out so that a sharp border does not form at the transition point. I decided to deepen the color and applied another layer.
Materials and tools
To repaint the cabinet, as well as to prepare for work, you will need the following tools:
- Paint roller, spray gun or brush;
- Paper tape;
- Putty knife;
- Sandpaper with a fine or medium abrasive layer;
- A block for fixing sandpaper.
If you have a grinding machine or drill with special attachments, this will significantly speed up the process of preparing surfaces for painting. In addition, you will need a wide container of water and soft cloths for drying and cleaning surfaces.
Thanks to the roller, painting furniture will happen faster.
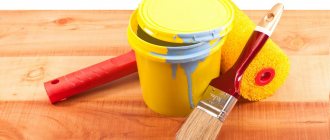
What to use: roller or brush? This question does not and cannot have a clear answer. Much depends on the habits of the master: some work exclusively with a brush, while others only use a roller. And also on the area of the surface to be painted. It is clear that it is easier to paint a larger area with a roller. On the other hand, when painting small parts and decorative elements, you simply cannot do without a brush.
The most difficult thing is to determine the required amount of material.
It allows you to feel the process and distribute the paint evenly over the product. If you prefer to work with a brush, have several options on hand: larger, smaller, and with different bristles. Regardless of what you prefer to paint with: a brush or a roller, the tool must be of high quality. Otherwise, loose lint will remain on the painted parts, and the paint will not lay down in an even layer.
You can paint the cabinet in different colors, such as a light base and multi-colored details.
You can also purchase aerosol enamel for furniture. Spray paint is very convenient for painting corners, hard-to-reach places and protruding decorative elements. When deciding on the amount of paint, remember that you need to cover the surface with two or three layers.
And in addition to the paint itself, you will also need:
- Solvent;
- Putty;
- Primer.
Acrylic paint stain | gradient coloring
Classic store-bought stains most often match the colors of valuable tree species.
But sometimes you want to tint the wood in some non-standard color, and at the same time preserve its texture. In this case, you can make the stain yourself using acrylic paints. I'll do a gradient again just to show off a few colors at once. I take white, Turkish green and manganese blue. I dilute them with water until liquid.
If the paint is thick, like mine, then rub it well so that there are no lumps left. As in the case of ordinary stain, I first wet the board with clean water, and after drying, I sand the raised fibers. Then I wet the surface again with water and apply colors one by one, making smooth transitions between them. Can be applied in one or several layers.
Finally, after drying, I lightly sand the board, exposing the natural color of the wood in places, this also gives an interesting effect. You can create a stain of any color!
No. 2 Paint filling method
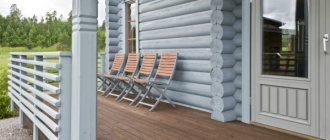
This method works best on unsanded wood with a slightly rough surface (such as a wooden fence). With its help, wood can be given a rustic look and an antique effect.
Step by step:
- Clean the wood with soapy water and a brush and leave to dry.
- If your paint is too rich, thin it with thinner.
- After this, pour some paint onto the wood surface, and then take a scraper and spread the paint over the wood.
On an unsanded, that is, not completely flat, wooden surface, the paint layer will not be the same everywhere. A little more paint will flow along the depressions and less on the bulges, that is, in some places the white color will be more saturated, and in others more transparent, which will create the effect of antiquity.
You can see the result of painting a wall using this method above.
How to age wood with paint - in this article!
Ombre colors
Ombre is a type of gradient that does not imply a transition from color to color, but a transition from light to dark or vice versa. By the way, I have a detailed video. The ombre effect is often used in furniture decor, for example, to darken the edges of drawers, or to create a transition on the legs.
First, as in the first case, we do the usual staining. Then, after the paint has dried, we take a darker or, conversely, lighter in tone color and begin to paint the edge. It is very important not to leave a sharp border, so as you approach the center, the paint becomes more and more diluted, and the very bottom edge is simply washed away with clean water.
Depending on how much you want to lighten or darken the edge, you can apply several coats of paint or limit yourself to one or two. I decided to show what the ombre transition from all edges to the center would look like. I get a strictly rectangular gradient shape, but you can make it smoother, for example, round or oval.
Choosing paint
Before you start working, you need to choose a paint. At home, painting is best done with acrylic dyes. They are easily diluted with water, and you can get the desired shade by adding the desired pigment.
Choose high-quality furniture paint.
The main advantage of acrylic paint over oil or alkyd paint is the absence of a pungent odor. Don’t think that only professionals can change the color of furniture; even a beginner can do it. Remember that the applied layer can be washed off only in the first hours after painting. Once the surface is dry, you won't be able to change anything.
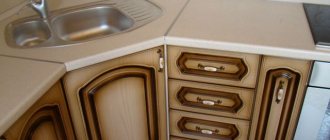
Furniture can be easily updated, you just need to paint it.
A wooden cabinet in the living room or a kitchen set made of MDF and chipboard can also be repainted with alkyd enamel. It comes in glossy, matte and semi-matte. It lies evenly on the surface and has a rich palette of shades. The truth is that it has a slight unpleasant odor, so it is better to paint in a well-ventilated area.
Interior items made from chipboard absorb moisture to a lesser extent than wood.
Toning with varnishes
Another way to give wood a noble shade is to use varnishes.
It is important to sand the wood thoroughly before applying. Shellac varnishes are used in woodworking; they give the wood pleasant golden shades. TAIR has two types in its assortment: shellac alcohol and clarified alcohol. The alcohol varnish in the jar looks very dark, almost like bitumen, but in use it is slightly more golden than the lightened varnish. I show them on one board. I really like the result.
But since I started talking about bitumen, I’ll show that too. The use of bitumen varnish is already in the area of aging. I apply varnish along the edges and the wood immediately looks as if it has been burned. I apply bitumen varnish using a sponge. Bitumen varnish can be removed with white spirit, so if you accidentally drop more bitumen than necessary, it can be easily removed from a varnished or painted surface.
You can apply bitumen varnish directly to wood, but it is very actively absorbed into the wood and cannot be wiped off. Also note that bitumen varnish is very glossy and sticky, it is recommended to cover it with shellac varnish on top. Brushes after bitumen and shellac varnish should be washed in solvents.
Removing the top laminated layer
To protect the painted surface from swelling and cracking, the top layer should be removed from furniture elements. To do this, use sandpaper. Firstly, you will need coarse-grained sandpaper for cleaning at the main stage, and only then fine-grained sandpaper to consolidate the result and create a surface for painting kitchen furniture made of chipboard or bedside tables. This action creates roughness and the paint will stick.
During work, personal respiratory protection should be used to prevent dust from entering the lungs.
Multi-layer painting with a rubber spatula
I take the next primed board.
I paint it in a color that will show through from under the others. I have this purple-red one from the Acrylic-Art line. Pay attention when applied in one layer - it has such a delicate pink undertone, and when you apply subsequent layers it darkens to a noble brown! I love using this color in painting!
Then I put the following colors on a rubber spatula, maybe two at a time. I take light cold cobalt green, dark cobalt and manganese blue. It is better to wet the surface first, then the colors will float into each other more smoothly.
As a final chord I add a bright note of lemon color. Since the work is done in the raw, the colors float into each other quite interestingly.
How to choose paint
Choosing paint is the main task for anyone who is looking for a way to repaint chipboard furniture themselves. Of course, it is better to stick to special paints that are marked “for furniture,” but alkyd or polyurethane paint is also suitable for these purposes. Formulations with a strong odor and those that take a long time to dry should be avoided.
To paint chipboard furniture, you can also choose interior acrylic paint, but in this case the primer should be applied at least twice.
There are several components in acrylic paint and varnish compositions:
- Water as a solvent. By evaporating, it ensures rapid drying of the material.
- Coloring pigments give the composition the desired color.
- Acrylic resin acts as a fixative - it forms a strong and elastic film on the painted surface, resistant to temperature and mechanical influences.
For furniture located in rooms with high humidity, it is advisable to use interior acrylic paint containing latex or silicone. These components provide the coating with resistance to water and detergents.
The stores offer a huge palette of paint shades, but when the finished product is not suitable for the implementation of the plan, you can buy white water-based paint and tint it in any color.
Multi-layer painting with holes. Using a metal scraper.
The next method is simple, but very effective for those who love aging techniques.
The first color is applied to the primed wood. I took gray linen. In this case, you can apply the color in one thick layer and use an old bristle brush, which leaves marks. I lightly dry the paint with a hairdryer, but not completely. I take a metal spatula and start peeling off the paint.
In those places where it has not dried out, it is very well removed in whole layers. The next color is sage. I apply it randomly, making strokes in different directions. I dry it again and peel it off with a spatula. In some places you can apply force and even scratch the soil right up to the wood.
Preparing for painting
The laminated surface of furniture elements is a special type of plastic that is resistant to moisture. Paint will not adhere to such smooth materials, regardless of its characteristics. Therefore, before painting old chipboard furniture made by yourself, you need to carefully prepare.
First, remove all dust, dirt and grease from surfaces using solvents and special cleaning agents. This work is very important to ensure that the paint holds up in the future.
Furniture can be disassembled for convenience. In the case where only the facades are to be painted, they are removed from their hinges and laid horizontally. Fittings and furniture handles should be protected from paint using masking tape.
One-step craquelure
I paint the primed wood gold. One-step crackle p
is an imitation of cracks in paint that appear over time due to changes in temperature and humidity. The first color is the one that will remain visible through the cracks; you can come up with many interesting options, make it darker or lighter than the main one, use metallics or mother-of-pearl. After the paint has dried, a thick layer of craquelure varnish is applied to the surface.
I leave it to dry until it is slightly sticky to the touch. I take the red color, because I really love the noble combination of red and gold, and with a wide flat brush I begin to paint the entire board.
Very important!
You can apply paint over craquelure varnish only once, so it is important that the paint immediately has sufficient coverage and a well-spreadable consistency. If you try to apply a second layer of paint, it will simply start to roll off unsightly. Let's paint joint to joint! As you can see, cracks appear immediately. After the paint has dried, the craquelure must be covered with shellac varnish.
Practical tips
You can add uniqueness to absolutely any furniture.
- It is better to paint the cabinet outside or in a well-ventilated area. Place all necessary tools and materials near the work site. All fittings from the cabinet should be removed.
- The enamel should have a liquid consistency. If the paint has thickened, it must be thinned.
- When you decide to change the color of your cabinet, remember that the first coat of paint applied will be a lighter shade. Therefore, if after applying the first layer you notice that the furniture has become lighter than you would like, do not rush to draw conclusions.
- A thick layer of paint gives a more saturated color. This, by the way, is also true for white paint. Several layers will give an excellent snow-white result.
- Painting tape will help prevent paint from staining individual cabinet elements.
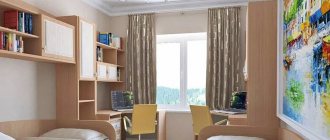
White furniture in the interior is an unusual and stylish solution. You can change the color of the cabinet to white, or, conversely, make it unusually bright and non-standard yourself. This will require minimal time and effort.
Two-step craquelure
Two-step craquelure
imitates cracks that appear in the varnish over time. I will show how to create these cracks without covering the wood with paint or primer so that the texture of the wood remains visible. But, of course, such cracks can be created over a painted surface, or over decoupage, or painting, or even painting.
First I apply several layers of shellac varnish. I took the unbleached one because I really liked it in one of the previous methods. Wood is a very absorbent material, so you don’t even need to take into account the first layer of varnish; it will be completely absorbed. After it, it is better to apply another 3-4 layers of shellac varnish with intermediate drying.
Then, as in one-step craquelure, I distribute a thick layer of craquelure varnish over the surface. I leave it to dry for a day. In the morning, these gorgeous cracks appear in the light. If your room is humid or cool, there may be fewer cracks, then you need to warm the surface with warm air from a hairdryer. Craquelure loves dryness and warmth. To show the cracks, I rub oil paint into them. I cover the craquelure with shellac varnish.
Decorative chipboard coating
Decorative coatings are often applied to standard slabs. These include:
- Melamine film and subsequent coating with a layer of varnish. In this way, a laminated material is obtained, which can be identified by looking at the marking: the letter “K” is added to the name.
- Melamine film pasted under high temperature and pressure is a lamination process. The letter "L" is added to the name. This type of coating significantly increases resistance to moisture and improves appearance.
- Veneer is a very thin cut of wood. It is glued to the surface of the slab and coated with varnish. Externally, such slabs differ little from real wood.
When wondering how to repaint chipboard furniture with your own hands, it is important to have knowledge of which types of boards are better: chipboard, laminated chipboard or veneered. The worst option is laminated slabs. The varnish wears off quickly, the design disappears, and furniture made from such material cannot be restored.
Veneered chipboard and laminated chipboard have approximately the same properties in terms of coating strength, but the former is less resistant to moisture and is much more expensive. It is not always wise to use it in rooms with high humidity: kitchens, bathrooms, and so on.
Boat board | multi-layer painting using a wax candle
I paint everything with thinly diluted brown paint.
After drying, in some places I rub the board with a wax candle. Keep in mind that the paint in these places will come off later! Then I paint one half with the color kraplak, and the other with dark green. The main thing is not to forget and not to start blow-drying, otherwise the wax will start to melt! After the paint has dried, I take a metal scraper and start removing the paint. In areas covered with wax, it can be removed very easily. Next, I take a candle and rub new areas with it.
I try to include both new colors and the color that we tore out from under the second layer. I cover one half with orange, and the other with light cobalt green. I dry it naturally in the same way, then remove the paint with a scraper. I cover some parts again with candle wax.
I paint everything with one color - Persian turquoise from the Acrylic De Luxe line. I dry it and scrape through the paint. This is another way of aging.
Using wet paper
This is also one of the methods of multi-layer painting.
I apply thinly diluted ocher as the first layer and dry it with a hairdryer. Next, I take a sheet of paper and tear it into pieces of different shapes and sizes. Try to have complex shapes and not just straight stripes. I wet the paper with water and place the pieces on my piece of wood. The next color is applied with a palette knife. I chose warm gray. You need to apply it so that pieces of paper do not move off during the process. You can safely leave a slight sloppiness in the application, uneven thickness of strokes. While the paint is still fresh, I carefully lift the paper with a palette knife and remove them. And I leave it to dry.
Then I tear up the next batch of pieces of paper, moisten them and place them on the board. I try to ensure that there are different areas under the paper - both gray and ocher. I apply the next color - dark ocher, and remove the paper without waiting for it to dry. Drying the paint. Then all stages are repeated as many times as you want to add colors to your work.
I apply red ocher, and the very last layer is burnt umber. This method differs from others in that each layer has its own small thickness, and it seems as if entire layers of paint were actually falling off the board after numerous stains.
Gold plating
Before gilding with gold leaf, you need to prepare a very flat and smooth surface.
I cover the board with gesso primer. I let it dry completely and then sand it with fine-grit sandpaper. After sanding, it is better to smooth the surface with a piece of natural fabric, such as linen. Levskas has an absorbent surface, so you need to cover it with the first layer. In icon painting techniques, where gilding also requires a smooth surface, shellac varnishes are used for this, and here I also use shellac. After this, if any brush marks remain, you can sand and smooth the surface again. Then I apply another coat of shellac varnish.
If you want to get perfect smoothness, reminiscent of an even gold bar, it is better to use alcohol-based gilding compounds. I use acrylic water-based, it won’t achieve perfect smoothness, but you can get another beautiful effect. After the glue has dried to transparency, you can apply gold leaf. I use the classic one.
Ideally, special wide brushes are used to transfer it to the surface. Then the gold leaf will lie more smoothly and evenly. But I think that the resulting cracks and creases have their own charm. Moreover, you can scratch the gold leaf on top with a metal brush (Although I’m sure many would condemn me for this!). According to technology, classic gold leaf is sealed with alcohol varnishes to avoid oxidation. I use shellac varnish.
MDF furniture
MDF is also a chipboard material, but it is produced using improved technology. The slab includes small compressed fractions of sawdust. Because of this bonding, MDF becomes a homogeneous, high-strength and safe for human health board. But it costs more than chipboard.
The main difference between MDF and chipboard is its coating. It is pressed into the structure of the slab, which makes it stronger and more resistant to water. These slabs can also be found in a variety of patterns and textures.
Due to its environmental friendliness, furniture for children's rooms is often made from MDF.
This is a fairly dense material, which is why it is indispensable in the manufacture of furniture with an unusual design: elegant lines and roundness.
The disadvantages, in addition to the high price, include low resistance to damage and easy flammability.
Brushed firing and gray wood
Firing with brushing requires a gas burner, metal brushes and compliance with fire safety regulations.
Don't be afraid to burn the wood thoroughly if you're doing it for the first time. Usually, beginners do a very weak firing, achieving a barely brown color. When firing, we burn soft wood fibers so that we can then easily comb them out and reveal the relief texture. To do this, after firing, we moisten the board with water so that dust does not fly in all directions, take metal brushes and comb our wood with pressure. This technique is often called “Barn Board” - this is the attempt to age a board to the state of a board left over from a dismantled old barn. Any means will work here: you can use a nail puller or a hammer to leave deep dents, or use a chisel to mark and widen cracks. An awl or nail is suitable for creating round holes. Using a drill and a drill bit, you can create paths for bark beetles. Use a saw to mark some old cuts.
You can hammer in a couple of nails and oxidize their heads with acid, but I didn’t. A new board will first of all be distinguished by a smooth cut, so for authenticity it’s worth adding some unevenness to it, you can even cut out some pieces..
After all these terrible abuses of the board, I take a torch and once again burn through the newly formed cracks and potholes. I comb out the burnt wood again with a wire brush. Next, I sweep away the remaining dust with a brush and take white paint. Over time, the tree loses its color, fades in the sun, and becomes clogged with dust. To imitate such gray wood, you need to patina it. I apply thinly diluted white paint and then immediately wipe it off with a wet cloth. I dry it. The paint melts right away. I apply the next layer.
It is important
not to overdo it with white!
Wash the paint thoroughly after application. The wood should appear slightly dusty. The final step is to lightly sand the wood with sandpaper.
How to paint a children's wooden bed
The decision to paint the bed yourself allows you to not only save on the purchase of a new product or the services of a hired craftsman. This approach ensures that the work is completed efficiently, correctly, taking into account all the nuances. Initially, you need to choose the right paint . The main criterion here is the complete absence of harmful substances . The composition should not contain lead, phenol, xylene, toluene and formaldehyde. Manufacturers indicate the presence of such substances on the packaging.
It is recommended to choose one of the following types of finishing coating:
Acrylic
Latex
Polyurethane
Oil-wax
All of the listed products are absolutely safe for health, have a wide range of shades from snow-white to black, and highlight the texture of the wood. The coatings are durable, wear-resistant and waterproof.
The finishing can be applied manually - with a brush, sponge, spray can or spray gun . In the latter case, the material consumption will be greater, but the quality of the final result will be higher.
The drying time of surfaces depends on the composition of the coating and the temperature in the room. During the drying period, it is better to keep the room closed so that dust and debris do not enter it, which stick to the paintwork and spoil the appearance.
Recommendation for painting and paint selection
Ivan Bokorezov
Furniture columnist and designer
Ask a Question
Despite the fact that almost all paints dry within a few hours, restoration of furniture must be carried out no later than two weeks before the start of its use, so that even the slightest odors inherent in paintwork materials completely disappear. It is best to stay with an acrylic composition. The material is absolutely harmless, even if a child chews on the handrail and swallows part of the coating. You should also pay attention to the texture of the product. Glossy looks more beautiful and is easier to remove dirt from. But when light hits the varnish surface, it produces strong glare that negatively affects the eyes. Therefore, it is advisable to focus on a matte composition. There will be no difference in price, but even the slightest risk to the body will be eliminated.
Brushed firing and metallic patina (dry brush)
I have another board with firing and brushing.
By combining firing, brushing and dry brushing, you can achieve different visual effects, lightening the texture of the wood or, conversely, darkening it. And I want to show the metallic patina in this example. I paint the board deep black, using velvet black from the Acrylic De Luxe line. Metallic paints look best and shimmer on dark surfaces. Next, I take Decolor metallic paints and work using the dry brush technique: I put paint on a brush (it is better to use flat, coarse bristles), wipe off the excess on a napkin and begin painting in the direction of the wood grain.
It is important not to overdo it and stop in time. The result is an elegant metallized coating that emphasizes the wood grain.
Wood and necessary materials:
Different painting methods will show how much of a difference the appearance of wood can make, whether it's a smooth pine board or an unsanded pallet . All three methods are very easy, fast and with wonderful results!
- White water-based paint for interior and exterior use
- Paint mixing container
- Rag
- Brush
- Scraper or piece of hard plastic for method #2
- Candle for method No. 3
Brushing without firing + washing technique
Of course, you can brush wood without firing it, which is exactly what I did before I bought the burner.
This can be done with special drill attachments and hard metal brushes. Or brush by hand, which is what I do. This, of course, is a great way to keep warm when there is no heating) You definitely need to sand the board after brushing so as not to get splinters.
Next I start painting. I apply purple and immediately wash off the unabsorbed paint with a wet rag. I introduce an additional color in some places - ultramarine - and do the same with it.
This technique allows you to delicately highlight the texture of the board. Next, I take green Chameleon paint, apply it to the entire surface, and also wash away the residue, allowing it to remain only in the depths of the pores. After drying, a delicate pearlescent effect is obtained.
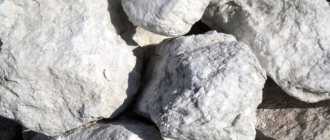
What paint do we use?
Traditionally, whitewashing was used as a cheap and easy way to protect wood (lime has antibacterial properties) and give it a neat appearance. Nowadays, when we recreate a whitewash, it is usually done with any water- or acrylic-based white paint for interior or exterior work (which is what we will do in the methods described here).
Water-based or acrylic paints without odor!! and can be used indoors