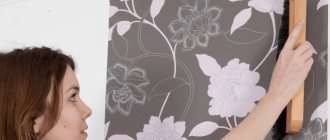
Rules for wallpapering yourself
When you do the work yourself, you have to look for answers to all questions on the Internet or specialized literature. The set of basic rules is as follows:
- The air conditioner and fan are turned off until the glue has completely dried.
- Doors and windows remain closed to prevent drafts and keep the air moist.
- Pregnant women are not recommended to do repairs so that the stale, humid air does not cause dizziness.
- The air temperature in the room is not lower than +15 and not higher than +32. Slight deviation is allowed.
- It is prohibited to warm up an unheated room with a heater. The heating must be on.
- The drying time of wallpaper pasted on a cold wall increases by 2-3 times compared to the normal period.
- The ends of the strips near the ceiling and floor are cut off with a utility knife, which is drawn along the attached wide metal spatula.
- To determine whether it is possible to glue without adjusting the pattern, you need to read the markings on the packaging.
The stripes are oriented vertically. Wallpaper pasted horizontally is too heavy, wide strips that are poorly fixed with glue on the wall. In order for the process to be smooth, first of all you need to take care of the availability of the mandatory requisites that will be needed for work carried out in stages.
Preparatory work
This is an important step in the gluing process. Everything unnecessary in the room must be removed, all carpets, paintings, sockets, etc. must be removed from the walls. Wires must be insulated. For lighting, if necessary, use an extension cord from the next room or corridor.
If the floor covering is not moisture resistant, cover it with polyethylene.
Removing the old coating before properly wallpapering
Past cladding - there may be coatings of various types, whitewash or paint. Each material has its own method of removal.
If the walls are covered with canvases:
- Using a spatula, pry up a corner or edge of the canvas and pull it towards you. If possible, remove everything that can be removed onto a dry surface.
- The remaining part is moistened with water using a spray bottle or a rag. If the canvas contains a waterproof layer, it must be scratched so that the liquid can seep through to the base. Wait a while to get wet.
- Remove the wet layer.
If the walls are painted:
- Use a spatula to clean thoroughly.
- Use a store-bought mixture to remove paint from the walls: after applying it, the paint becomes soft, bubbles appear, and simply comes off with a spatula.
If the walls are whitewashed or painted with a water-based liquid:
- Apply some water to the surface using a spray bottle.
- Wait a while.
- Remove with a spatula or a special scraper.
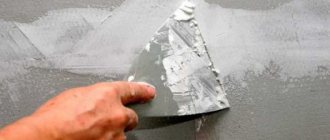
Leveling walls before wallpapering
After removing the old coating, the walls are clearly visible and, if necessary, leveled. Leveling process:
- Sweep dust from the surface.
- Apply a coat of primer.
- Wait until completely dry - about 15 hours.
- Using putty, seal cracks and level the surface.
- Wait until completely dry, the time indicated in the instructions on the package.
- Grout to remove minor inaccuracies.
- Remove dust with a damp cloth.
- Apply primer.
- Wait until completely dry.
If the walls are badly damaged or contain large irregularities, it is better to plaster them rather than level them with putty.
Surface priming
Surface priming cannot be ignored. This mixture performs a dual function: it improves the adhesion of materials to surfaces and prevents the formation of fungus and mold.
The composition is applied with a roller, and in inaccessible areas with a brush. The last treatment before gluing is done just before work, in order to avoid dust. Drying should take place with closed openings.
We recommend watching a video about proper priming of walls:
What tools will you need?
To install wallpaper strips you will need:
- plastic film to cover the floor;
- containers for mixing the adhesive mass;
- brushes and rollers for applying glue to contacting surfaces;
- rubber rollers for rolling joints between strips;
- wallpaper knife and scissors as cutting tools;
- building level, plumb line or laser level;
- pencil, pen or marker for marking;
- a wide spatula used to adjust the length of the glued strip.
All this must be purchased before installation begins. Primer and glue are purchased before the fragments are cut, and in the quantity needed for the entire scope of work.
We create uniqueness
How fashionable it is to hang wallpaper now
?
This question is probably asked by every person who wants to create a unique interior in their home.
Embossed wallpaper
For stylish wall decoration, wallpaper is selected according to the following principles:
- purpose of the room;
- lighting;
- quality of walls.
For example, wallpaper with a smooth texture must be used on a perfectly flat surface. On walls that are not level enough, it is better to stick embossed wallpaper.
Focusing on the dictates of fashion, you need to take into account the result.
What would you like to get from a fashionable wrap:
- the latest fashion;
- positive atmosphere;
- the most popular method of pasting.
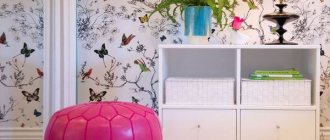
Wall decoration with photo wallpapers
Let's dwell a little on each result so that it is clear how fashionable it is to glue wallpaper now:
- One way or another, the pasting trend is repeating itself, so the latest trend is photo wallpaper on the wall. But don't be alarmed, this is not a material from the past that had a paper backing and fell apart under the influence of glue. Today, photo wallpapers are fashionable due to their quality, variety of images, the possibility of pasting large canvases or individual fragments framed by a baguette;
- To create a positive atmosphere, it is fashionable to use wallpaper with a clear pattern and moderately saturated color. For bedrooms and children's rooms, you can use wallpaper in warm colors. Nowadays, decorating walls with wallpaper with floral motifs, wallpapering in the art decor style (wallpaper with multi-colored blots and spots), primitivism in decoration (wallpaper in the spirit of cave paintings), anthroposophy (depicting motifs of archeology, ancient civilization and writing on wallpaper;
Floral motifs
- If we take into account the level of popularity of pasting, then in the question of how to fashionably hang wallpaper, it is better to give preference to a combination style. By the way, you can combine not only colors, but also textures. A horizontal, vertical or diagonal combination of canvases looks original. It is also appropriate to create a unique style by covering three walls with wallpaper of one color, and the fourth in another. In this way, a certain zone is allocated in the room.
Combination of pattern and color in stripes
Advice.
When using a combined style, it is important to follow the color combination. When decorating with wallpaper, you need to repeat at least one tone of the furniture.
When combining horizontal canvases, it is recommended to use stripes of dark colors on the bottom, and light stripes on top.
Features of preparing walls and ceilings for gluing
Non-professionals need to take into account that the surface to be pasted must be prepared. For this:
- Remove dirt and remnants of old decorative coating.
- They putty the surface, eliminating cavities, cracks, and other irregularities.
- Primed. It is easier to apply the primer with a soft roller.
- Wooden walls are treated with antiseptic disinfecting compounds.
The primed surface must dry completely. Only after this can you start gluing.
Nuances depending on the surface
The table shows the types of surfaces on which you can paste wallpaper, but you need to take into account a number of features:
| Surface type | How to glue, what needs to be done for this? |
| Painted walls | The paint is completely removed. The procedure differs depending on its type: water-based, oil-based, acrylic, latex, water-dispersion. |
| Drywall (GKL, GVL, GKLV) | The joints are puttied; it is not necessary to putty the surfaces. |
| OSB board | It is taken into account on which side the laminated coating is applied, on which the wallpaper does not stick. |
| Plaster | Primed. But if it is plaster or other decorative, textured, then it needs to be removed and the wall treated as described earlier. |
| putty | After impregnation of the putty walls with primer, you can begin gluing. Latex finishing putty is removed. |
| Whitewash | Whitewashed walls are washed off until no traces of lime remain on the surface. |
| Plywood | You can glue paper wallpaper and paper-based materials without a primer. |
| Fiberboard and hardboard | The material does not have sufficient strength, which does not allow covering it with wallpaper. |
| Fiberglass | It is removed because it is a suitable base. |
| Old wallpaper | It is better to remove and treat the wall as required by the gluing technology. Instructions for removing wallpaper. |
| Concrete walls | It is enough to prime it if we are talking about a flat surface. Sinks and joints are puttied. |
| Plastic panels | The frame is dismantled. Plastic does not have the ability to hold a load. |
| Betonkontakt | This polymer coating is specifically designed to provide adhesion. |
| Wooden surfaces | The lining or timber will have to be sewn under the plasterboard frame. |
| Glass | Smooth and cannot be used as a base to be wallpapered. |
| MDF panels | It is better to abandon the idea, since the material has weak adhesion. |
| Cork | The cork covering is removed because it is soft and cannot guarantee the safety of the wallpaper under mechanical stress. |
| Styrofoam | The material does not have sufficient strength and must be dismantled. |
| Penoplex | Glue does not provide sufficient adhesion. |
| Tiles (tiles) | Completely dismantled. |
| SIP panels | The surface, if necessary, is puttied at the joints and primed. |
| Clay walls | They are treated with special impregnations to impart the necessary strength. |
FAQ
At what temperature to glue wallpaper
Many recommendations indicate that wallpaper should be glued at a temperature of 23-25°C. However, this temperature regime can only be achieved in summer. Winter, when heating is needed, does not allow working in such conditions (in most Russian cities in winter the temperature in the apartment is 18-20°C).
So at what temperature can you wallpaper walls? Manufacturers of trellises and glue have taken this point into account and recommend finishing work at a temperature of 10-25°C. Therefore, it is not recommended to glue wallpaper in unheated rooms (dacha, veranda) in winter.
When can you open windows after pasting?
Impatient apartment owners try to quickly get rid of the smells of glue and wallpaper. But open windows mean drafts. And in drafts, the glue dries quickly and unevenly, as a result of which the adhesive mass does not have time to create the necessary adhesion to the wall. The result is that the seams come apart or the wallpaper peels off.
When can you open windows? You can open the windows after the pasted wallpaper has completely dried - after 1-3 days (the time for complete drying is usually indicated in the instructions printed on the packaging with the glue). For insurance purposes, it is better to add one day to the specified time.
What to do if the wallpaper bubbles
In practice, a situation often occurs, even among professional finishers, when minor violations of technology lead to the appearance of bubbles and air cavities on the surface of glued walls. This is both unsightly and a potential breeding ground for mold and mildew. How to get rid of bubbles on wallpaper?
Depending on the size of the lagging area, we can advise:
First, re-glue the canvas if there are very large air cavities. All attempts to fix the problem without tearing the wallpaper off the wall will be noticeable.
Secondly, for medium-sized pockets, it is also better to re-glue plain trellises (the mark of the cut will be very clearly visible). Wallpaper with a pattern is cut with a construction knife in the middle of the resulting cavity. The edges are carefully pulled away from the wall using a spatula and the adhesive mass is delivered into the resulting space using a brush. It is not necessary to coat the entire dry surface.
You can disperse the glue with a dry cloth while pressing the seam of the cut tightly. Allow the base of the trellis to soak in glue for 5-10 minutes, and then roll the lagging area with a wallpaper roller to remove excess mites and air. It should be remembered that paper wallpaper stretches from the glue and decreases in size after drying. Therefore, the edges of the cut should overlap. Vinyl and non-woven wallpapers have butt joints.
Thirdly, small bubbles are eliminated using a syringe. The needle must be taken according to the thickness of the glue - the thicker it is, the thicker the needle. The bubble is pierced in a circle, from the edges to the center, at an angle of about 30 degrees relative to the wall.
This pattern of punctures allows you to cover the entire loose surface of the wallpaper, as well as release excess adhesive mass through the punctures when smoothing the problem area. If large folds form, they need to be smoothed out. Small wrinkles will disappear on their own after the glue dries.
What to do if the wallpaper is see-through
The problem of translucent wallpaper after it has completely dried is solved in the only way - by redoing the work done. Therefore, at the preparatory stage it is necessary to try to avoid this headache:
- prime the walls with a special primer (as a last resort, whitewash them with water-based paint);
- buy thick trellises;
- check medium and thin wallpaper for transparency - place a piece of sheet on a bright spot and evaluate the degree of density.
How long does it take for wallpaper to dry?
No one will give a definite answer to this question. There are a lot of factors here. And the type of wallpaper, and the adhesive mass used, and the temperature conditions of the room, and air humidity, etc. The maximum delay is from 12 to 72 hours.
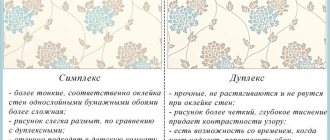
Duplex and paper-based non-woven wallpapers take the longest to dry - up to 3 days. Non-woven wallpaper on a different base (not paper) needs about a day to dry completely, vinyl wallpaper - about 48 hours.
Double-layer paper wallpaper.
You can determine the degree of drying of the pasted wall with your palm - pressing it against the wallpaper. If you feel warm - the wall is completely dry, there is a chill - you still need to wait. In passing, we note that it is strictly forbidden to speed up the drying process with heating devices.
How to glue meter-long wallpaper alone
The technique of gluing meter-long wallpaper alone does not have any special techniques that differ from the above instructions for gluing wallpaper.
Some tips from the professionals
Good quality work can be achieved if you take advice from specialists with extensive experience.
- Before starting work, the room where the work is planned is ventilated and then tightly closed for a day.
- It is better to dismantle the plinth - it can be easily removed (gluing the trellises will become faster and easier). In order not to look for the dowel holes under the wallpaper later, self-tapping screws are screwed back into them.
- It is better to cover the floor with cardboard or newsprint, but not with plastic film (on the film, glue easily gets under the wallpaper when coating the edges of the sheet, as a result of which it stains them).
- Use a stepladder. The table and trestles often leave marks on papered walls when moved to another location. In addition, it is more difficult to install the bottom of the wallpaper using them.
- Use specialized wallpaper glue - universal adhesive does not hold trellises on the wall well.
- Do not join the trellises at the corners - glue them with an overlap (1-2 cm), and then cut with a knife, forming a seam.
- Constantly dry (wash) your hands.
- Do not correct uneven cuts of wallpaper along the top and bottom of the walls. At the bottom, errors can be hidden with a plinth, at the top with a frieze or baguette.
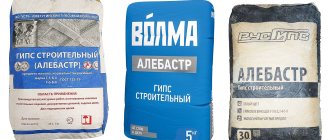
Wallpaper glue
Plastered and primed surfaces are covered with an aqueous adhesive solution. The consistency of the glue should be viscous enough for the wallpaper to stick across the entire width of the strip, but the solution should be fluid so that it can be evenly applied to the surfaces being treated.
Which one is better to choose?
| For what wallpaper? | A type of adhesive solution |
| Paper | Universal, for paper |
| Vinyl washable | Special composition for vinyl |
| Embossed | Special composition or for vinyl |
| Non-woven | Only specially designed |
How to breed?
In order to be able to properly process the contact planes, you need to dilute the granular mass with water. Instructions and dosage are indicated on the package. The solution is prepared immediately before gluing the wallpaper. The optimal amount is for 3-4 stripes.
Selection of the ideal model
It's no secret that each type of wallpaper has its own advantages and disadvantages. Therefore, in order to choose the right finish for a room, you need to know what qualities a particular type has.
For a bedroom, especially a child’s bedroom, it is better to choose eco-friendly models: budget paper, non-woven without vinyl, natural, made from plant fibers, or textile wallpaper from the premium segment.
These options are no longer suitable for the kitchen or hallway.
- For rooms with high loads, you need to choose materials that are stronger: vinyl, mineral chips, glass wallpaper.
- Such wallpaper retains its original appearance for a long time and gets dirty less.
- Most of them are washable and do not absorb odors.
- Items that can be washed and cleaned have a three-wave icon on the label, indicating moisture resistance, and a brush, indicating abrasion resistance.
Another important parameter is resistance to burnout. For rooms on the sunny side, it is important that the wallpaper does not fade in the sun. On the label this parameter is indicated by a sun icon with a plus, or two suns.
Where to start gluing?
Before cutting the wallpaper, you need to mark the room, marking the places of future joints with lines. If the room is glazed, the first strip is glued level with the window. Next, the stripes are marked to the corner, and so on in the same direction to the door. Having gone around the doorway, the strips are laid further to the same window. The places under and above it are pasted over last.
When the preparatory treatment of the walls in a corridor or other room without windows is completed, the walls are also marked before gluing the wallpaper. In this case, the doorway can serve as a starting point (if there is enough space nearby to lay a whole strip without a longitudinal bend). Another way is to glue wallpaper from the corner.
Combining two types of wallpaper: eight basic gluing techniques
It is important to understand that the main condition for creating a comfortable interior is a harmonious combination of all its components, including wallpaper. They serve as a background or, figuratively speaking, as a canvas on which the entire interior landscape is painted.
Therefore, before going to the store to buy them, it would not be superfluous to carefully consider successful examples of the design of combined wallpaper of two types for a bedroom or living room in the photos of finished interiors. Analyze them, mentally imagine how good they will look in the decor of your room and, based on this, choose the most suitable option for yourself.
Despite the fact that there are a lot of methods for gluing combined wallpaper and each designer brings some personal ideas to them, eight main technical techniques can be roughly identified from them.
- Walls of different colors. One or two vertical planes are completely covered with each type of wallpaper. If one wall is pasted over, it is made accent - darker or brighter. Since walls decorated with dark wallpaper look narrower, while walls decorated with light wallpaper look wider, this method helps to visually adjust the perimeter of the room.
- Vertical stripes. Wallpaper of two types is cut into strips, the length of which is equal to the height of the wall and, when gluing, they alternate along the entire perimeter of the room in any order. The most popular alternation is when stripes of different colors follow one another. This technique helps to visually raise the ceilings. The visual effect of high ceilings can be enhanced even further by alternating two strips of wallpaper in neutral colors and one in a rich dark color.
- Horizontal stripes. Horizontal stripes can also be pasted, alternating in different sequences. To make the joints look aesthetically pleasing, you need to select wallpaper of the same thickness. This technique makes the walls seem wider and the ceilings lower, so it is better not to use it in rooms with low ceilings. This drawback will not be so noticeable if the stripes of wallpaper of neutral colors are made wider than those of wallpaper of rich and bright colors.
- Horizontal wall division. The walls along the entire perimeter at a height of 120-140 cm are divided into two horizontal zones. Wallpaper is glued in the traditional vertical way. The horizontal joints are decorated with polyurethane molding, decorative strip or paper border (if the thickness of the panels is the same). This method allows you to aesthetically combine wallpaper with different textures. A classic example of this design is striped wallpaper at the bottom and with a floral pattern at the top. Since any horizontal division visually shortens the height of the walls, in rooms with low ceilings it is better to cover the upper zone with light-colored wallpaper.
- Dividing walls diagonally. This method is not very common, however, it is original and quite worthy of mention. It is also good because it visually does not affect the geometric parameters of the room in any way and is suitable in cases where they completely suit you. The wallpaper connection line can be made straight, stepped or wavy. Wallpaper with this gluing technique must be chosen with the same texture, since it will not be possible to beautifully and aesthetically hide the place where they meet under the molding.
- Wallpaper inserts. Inserts made of dense textured material with an interesting pattern in contrasting color to the main wallpaper look best. If they are small, first decorate the entire wall with background wallpaper, preferably plain and with a smooth surface. And only after that pieces of contrasting fabrics with an interesting pattern are glued onto them. If the inserts are large, both types of wallpaper are glued end to end. To give this design completeness, contrasting pieces are framed with molding or decorative slats.
- Patchwork gluing. The patchwork design on the walls looks very nice, but it is not formal enough for the hall. Therefore, almost all photos of interiors with “patchwork” walls demonstrate how you can beautifully and economically hang wallpaper of two colors in the bedroom. The biggest advantage of this type of pasting is that it is waste-free. It allows you to use the minimum possible number of rolls, does not require adjustment and can be handled by one person. For a patchwork combination, choose types of wallpaper that have at least one common element. For example, wallpaper with the same pattern on a different background or canvases in different shades of the same color. They are cut into rectangles, squares or triangles and glued in any way: end-to-end or overlapping, ordered or chaotic.
- Identification of niches and protrusions. In modern interiors, walls are often decorated with niches or projections made of plasterboard. In the bedroom they are usually located at the head of the bed, and in the living room behind the sofa, fireplace or in the place where the plasma is supposed to be hung. To attract attention to these areas of the wall, emphasis is placed on them, decorating them with wallpaper that contrasts with the main background of the interior.
Basic visual techniques for combining two types of wallpaper of different colors or textures
Having studied the basic techniques for gluing two types of wallpaper on walls, you can move on to the question of how you can aesthetically decorate the interior with canvases of different colors and thicknesses. The main techniques for combining wallpapers that differ in these characteristics are as follows:
- A combination of canvases in different shades of the same color, for example, peach and coral, green and light green, blue and light blue, sand and beige.
- Combining wallpaper with a pattern (stripes, ornaments, floral patterns, monograms) and plain ones.
- Combining wallpaper of different colors. For such a design to be harmonious, you need to choose an active color for one type of wallpaper and a neutral color for another.
- Combination of wallpaper from different materials in one interior. They try to choose wallpapers of different textures, for example with a smooth and foamed surface, in one color (different shades are possible). An emphasis focused only on an interesting texture will be brighter. In addition, by playing on the difference in textures and colors, you can create various effects in the interior of the living room and bedroom that are useful not only from an aesthetic, but also from a practical point of view:
- Hide small defects in rough finishing. To do this, a wall with unevenness and roughness is covered with neutral wallpaper, and the opposite, smooth wall is made an accent wall and decorated in bright, saturated colors.
- Divide the space into zones. The combination of two types of wallpaper is very convenient to highlight certain areas in a multifunctional or overly large room. With their help, you can clearly define the boundaries of each zone without resorting to installing partitions or hanging curtains.
- Correct planning deficiencies. By experimenting with combinations of two types of wallpaper, you can influence the visual perception of the size of the room. For example, a narrow room will be visually expanded by covering the end walls with light wallpaper and the side walls with dark wallpaper. Vertical alternation of dark and light canvases, as mentioned earlier, will visually raise the ceilings. There are many such techniques, and for any room there is always a suitable way to visually adjust its size with wallpaper of different colors.
Which order should I follow, or which comes first?
When carrying out work, it is important to adhere to the correct sequence of actions. This applies to the procedure for repairing walls, ceilings, installing door frames, windows, baseboards, flooring, etc.
Wallpaper or installation of a stretch ceiling?
The ceiling structure is installed before it is time to glue the wallpaper. This is necessary so that during the installation process the already glued strips are not damaged.
Wallpaper or floor? (laying laminate, linoleum, parquet)
First, the flooring is installed. Laying a screed means spreading dirt into the room, which will inevitably end up on the new walls.
Wallpaper or door installation?
The door frame must be installed before wallpapering. Cash donations are not needed yet. They will cover the cut points of the strips when adjusting the sizes.
Wallpaper or ceiling?
It makes sense to paste over the ceiling, since when performing this work, glue can get on the surface of the wallpaper that has already been glued to the walls.
Wallpaper or plinth (fillets)?
Overhead skirting boards are installed last after the room is wallpapered. The moldings are glued first, and the length of the strip is adjusted to them.
Is it possible to hang wallpaper yourself?
But no matter how great the inertia of thinking and fears about an unsuccessful result, wallpapering walls with your own hands is a repair procedure that everyone should master. Skills and knowledge in this area will appear quite quickly, and in the future they will allow you to do without the help of hired specialists, which is very beneficial in terms of saving money.
Step-by-step instructions for wallpapering yourself
After preparing the wall surfaces and installing all the necessary elements, the room is cleaned. The floor is covered with plastic film. Apply markings and cut 5-6 strips of wallpaper. They dilute the glue and start gluing.
The sequence of application to walls and stripes depends on the type of wallpaper.
Links to detailed gluing instructions:
- Paper;
- Non-woven;
- Vinyl;
- Liquid;
- Photo wallpaper.
Each type involves the use of specially developed gluing technology.
Pasting the ceiling
The technology for gluing the ceiling is not fundamentally different from gluing wallpaper to walls. The difference will be in the following points:
- First of all, you need to decide on the direction of the stripes: along or across the room, along the line of incidence of the light.
- When attaching canvases to the ceiling, it is difficult to do without an assistant. If you need to work alone, you should choose non-woven wallpaper. They do not need to be coated with glue, so the strip can be rolled into a roll and raised to a height without any problems.
Step-by-step instructions for gluing the ceiling are here.
The nuances of gluing with overlap
The following factors are taken into account:
- The strip that is overlapped is on one side.
- The top wallpaper is generously coated with adhesive.
- The joint is rolled with a rubber roller with pressure. I wipe off the excess glue completely.
To prevent the overlap from being noticeable, start pasting from the door to the far corner of the room so that the ends of the wallpaper are not visible.
Wallpaper on furniture facades and doors
Furniture fronts are covered with wallpaper for different purposes. For example, to disguise a cabinet as a wall, quickly update the condition of the doors, or add texture to the interior.
How to glue in hard to reach places?
The specifics depend on what the difficulty is.
Angles
The processes for gluing internal and protruding corners are technologically different. Detailed information on gluing corners can be found here.
To the ceiling
The technology is specific and requires separate consideration. The main thing is to glue the wallpaper from the window into the room. Detailed information on wallpapering the ceiling can be found here.
Behind the battery
The fragments are cut, the wallpaper and the wall are coated, and gluing is carried out according to the developed technology.
Around the window (under the window sill)
A strip is being prepared in which the outline of a window opening is cut out, which is covered with wallpaper. Individual elements are glued and prepared according to the dimensions of the unclosed areas. Under the windowsill the procedure is identical.
Behind the gas water heater
It is prohibited to dismantle gas equipment yourself. But the body can be removed. It must be glued in such a way that after its installation there are no “bare” areas left.
Behind the gas stove
Technically, gluing is possible if the slab is connected to the gas supply system with a flexible hose. It is prohibited to dismantle rigid pipeline connections yourself.
Under the air conditioner
It makes sense to dismantle the structure and glue the wallpaper continuously. The main thing is to measure where the holes for fasteners are located. This is not difficult if you insert a toothpick, a nail or screw in a self-tapping screw while gluing.
With stretch ceiling
Wallpaper can be driven under the guides or glued close to them.
Arch
The elements involved are cut out according to pre-measured templates.
Above the doorway
There will be only one joint. The covering consists of two strips in which segments are cut out in accordance with the areas of the opening covered with wallpaper.
On the slopes of a door or window
The cut is adjusted close to the bend. The corner is mounted using a special profile, which is covered with plaster and remains perfectly level.
On a flight of stairs
If it is not possible to dismantle the stairs, you will have to measure and cut out each element of the wallpaper in order to glue the finished fragments.
On an uneven wall or a wall with a protrusion
It all depends on the configuration and scale of the problem. Sometimes you have to cut and glue with filigree precision.
On the wires
Electrical communications that are not embedded in the wall should not be sealed. It is better to disconnect the cable, make repairs, and then install it in place.
Near sockets and switches
The electricity goes out. Sockets and switches are dismantled or sealed with masking tape. The wall is pasted over. Places for sockets and switches are cut out with a wallpaper knife.
Behind the pipes
The strip is inserted into the space between the wall and the pipe, without touching the coated side. The standard procedure is then followed.
Niche
The procedure is identical to pasting internal corners. But if the dimensions are small, you will have to measure and prepare the elements in advance.
Beams on the ceiling
The technology is the same as for pasting the ends of partitions, niches and arches.
In the attic with a slope
The order, direction and sequence are the same as when pasting vertical planes.
Popular trends in wallpaper design
Now wide rolls are at the peak of popularity. By using this type of material, it becomes possible to obtain the effect of a monolithic wall by reducing the number of seams. Working with wide rolls is much more convenient than with standard ones.
The color range of popular wallpaper is very wide: sea green, sand shades, eggplant, tangerine shades, dried rose color, turquoise, chocolate shades.
Abstractions and geometric designs, broken lines and smooth patterns are back in fashion. Not inferior to the top levels of popularity are various types of cells, stripes, plant and floral patterns. One can also note the increase in the size of floral motifs, which allows them to be used in different types of combinations.
How long does it take to dry?
Drying time depends on the density of the materials and the room temperature. Under normal conditions, in accordance with the type of wallpaper, the time indicated in the table should pass until complete drying:
| Type of wallpaper | Time until completely dry |
| Paper | 8-12 hours |
| Non-woven | 12-18 hours |
| Vinyl | 18-24 hours |
| Liquid | 24-36 hours |
Selection and preparation of glue
The quality of wall decoration with trellises is primarily influenced by the type of wallpaper glue. The correct choice of composition allows you to glue walls without bubbles and air pockets, with invisible joints, and uncontaminated canvases.
When choosing an adhesive composition, it is necessary to take into account the type of wallpaper base. So, for paper wallpaper, glue KMC, “Moment”, etc. is suitable. For vinyl wallpaper, special types of glue are produced, as indicated on the packaging. Non-woven ones can be glued with a special adhesive for non-woven fabrics.
You can read about the types of glue, methods of their preparation and application, as well as their suitability for different types of wallpaper in the material “How to choose wallpaper glue.”
Gluing Tips for Beginners
For those making renovations for the first time, you need to consider:
- A special adhesive composition has been developed for each type.
- Attractive appearance ensures high accuracy.
- Bubbles are not acceptable. They are kicked out, not pierced.
- It is better to use a specialized tool from the list above.
- Before gluing wallpaper, study the recommendations and watch the video.
It is important that the surfaces are prepared and that the drying time is sufficient. In this case, the wallpaper will not lag behind.
Ideas for choosing a wallpaper pattern
In order to gradually capture all the stages of this process with your imagination, you can first watch a video of wallpapering with your own hands on the World Wide Web. This will give a general idea of the work ahead, as well as introduce you to the arsenal of tools and the range of pastes. Next, it remains to carefully consider the entire sequence of actions in relation to your own apartment.