Reliability of the floor base - what determines this indicator? Of course, a lot depends on whether the quality material was chosen, as well as the competent installation process. If both conditions are met, the plasterboard will fit perfectly on the floor - the room will be cozy, the coating will look very decent, and in terms of functionality everything will also be great.
A fairly common question that people without construction experience like to ask is whether it is worth using plasterboard for flooring at all? In fact, plasterboards have been used specifically for this purpose for quite some time. There is even a special technology for this type of work.
Should I put drywall on the floor?
Advantages and disadvantages of the method
Using drywall, the floor can be made absolutely flat.
If you lay drywall on the floor, you need to know what the benefits will be from this, as well as what the negative aspects of such work are. Let's start with the positive aspects:
- the floor is much easier to make flat and smooth. For laying linoleum, this may not be so critical, but if tiles or laminate are used, then this point is very significant;
- there is no need to carry out any additional work to prepare the floor before laying gypsum boards;
- this method is comparatively cheap, because plasterboard sheets will cost less than mortar and related materials for concrete screed;
- Using gypsum board for the floor, you don’t need to wait for something to dry before laying the decorative coating;
- time costs are much lower than classical repair methods;
- the building material used does not create the same loads as concrete pavement.
GVL sheets are laid on a dry backfill, so there is no need to wait for the layers to dry.
Among the disadvantages, the following points can be noted.
- Drywall is not the most reliable material for flooring. Over time, it may begin to crumble, spoiling the entire structure of the finished coating. Therefore, only moisture-resistant plasterboard is used for the floor, but it would be even better to use gypsum plasterboard. Gypsum fiber board is excellent for these purposes. It has the properties of gypsum plasterboard, but is stronger and more reliable. As a result, such material will cost more.
- Even if you lay drywall in 2-3 layers, it still remains a fragile material. With sufficient mechanical impact on the floor, gypsum boards can be easily damaged. Therefore, you cannot do without additional coverage. Linoleum won't help much here.
- Don't rely too much on leveling the floor with plasterboard. All leveling will be carried out before laying the plasterboard sheets, and they will only preserve this effect.
Application area
Dry screed is useful when you need to quickly and economically level the floor. But the technology is not very good in the sense that the base is still declining. Even if you carefully follow all the advice. If there are no large differences in the base, and the backfill was laid without voids, the deviations will not be noticeable. But if mistakes are made, the deviations will be more significant. Therefore, for less expensive coatings, a dry screed is more suitable so that replacement does not put too much of a strain on your wallet.
Do-it-yourself dry screed: in progress
There are also restrictions:
- The minimum thickness of the filling is 4 cm; a layer of a smaller size is unacceptable.
- The permissible difference in the base is 5 cm. Anything larger must be covered/sanded/filled before starting work.
And one more thing: if the filling thickness is more than 6-7 cm, it is recommended to lay another layer of gypsum fiber board 10 mm thick on top of the floor slabs (20 mm thick). As a result, the thickness of the sheet material will be 30 mm.
Choice of material and quantity
We strongly recommend that you pay attention to GVL. You can use regular wall moisture-resistant plasterboard, but gypsum fiber boards will be the best solution. They are ideal for dry screeding subfloors and also have high sound insulation characteristics.
If gypsum board is required for flooring under tiles in a damp room, then the sheets must have moisture-resistant characteristics.
There is nothing difficult in choosing the required amount of material. Each sheet has its own area, depending on its parameters. It is also easy to calculate the floor area. You can assume that 10% of the sheets will be scrapped, and calculate how many of them will be needed.
It is important to consider that laying drywall on the subfloor is carried out in two or even three layers. If you plan to further lay the tiles, then it is advisable to take three layers, otherwise two layers will be enough.
Expenses
How much will dry screed cost for a given area of the room?
To calculate it, you need to know the current prices for all materials necessary for installing the screed. I will present them in the table below and perform the calculation for the same room with an area of 20 square meters with a screed thickness of 40 mm.
| Material | Unit | Price, rubles | Quantity | Total cost, rubles |
| Knauf floor element (area 0.72 m2) | sheet | 300 | 30 | 9000 |
| Dry expanded clay backfill Knauf | bag | 260 | 10,5 | 2730 |
| Vapor barrier film | m2 | 15 | 24 | 360 |
| Edge tape | roll | 300 | 1 | 300 |
| Phosphated self-tapping screw | PC | 0,28 | 608 | 170,24 |
| PVA glue | l | 70 | 2 | 140 |
| Total | 12700, 24 |
Instead of a special edge tape, you can use polyethylene foam about a centimeter thick.
Procedure for preparing a floor for drywall tiles
Before laying linoleum, parquet or tiles on drywall on the floor, you need to carry out certain work. To begin with, all debris is removed from the floor so that the base is clean. Polyethylene film is laid over the entire area of the subfloor. Ideally, a single piece will be used. If this is not possible, then the film should overlap by 10-20 cm. This material is needed for vapor barrier.
At the initial stage, a vapor barrier film must be laid
The places where the film joins can be additionally secured with tape. Polyethylene is laid so as to cover part of the walls above the level of the finishing floor covering.
Logs are laid on the floor, which perform several functions at once. They press down the polyethylene so that it does not move. If two pieces of film were used, then it is advisable to lay one of the lags so that it covers the place where they are connected. The logs themselves can be made of wood or a regular metal profile will do. They will serve as additional support for the drywall.
The logs are attached in increments of about two meters. For their installation, dowels of the appropriate length are used. A thermal insulation layer is poured along the height of the logs. Expanded clay is best suited, but other materials can be used. If it is not used, the plasterboard sheets will not have sufficient support to withstand mechanical stress. It would be possible to lay sheets directly on the subfloor if it were perfectly flat and would not require insulation.
The scattered expanded clay is leveled so as to be flush with the joists. You will have to level away from the window and head towards the entrance to the room. As a result, the surface should come out smooth. Further work will be carried out from the front door so as not to disturb the evenness of the expanded clay layer.
Now you can lay drywall on the floor under tiles or any other decorative covering.
After leveling the expanded clay layer, you can lay sheets of plasterboard on the floor
Finish coating
How to lay a finished coating (for example, laminate) on a finished dry screed?
The technology is no different from installation on a concrete floor:
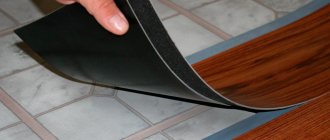
- A backing is laid on the screed (foamed polyethylene with a thickness of 2 mm, cork, etc.);
Foamed polyethylene is a cheap and practical substrate for laminate flooring.
- Wedges are placed along the edges between the laminate and the walls, forming a gap about a centimeter wide (an expansion joint). It is necessary in order to compensate for the expansion of the laminate with changes in humidity and temperature in the room. Later, expansion joints around the perimeter of the room will be covered with plinth;
- The boards are joined with click locks; the remaining gaps can be eliminated by tackling the board to the adjacent one through a block attached to its edge.
Laying laminate flooring on a cork base.
How to properly lay gypsum plasterboard on the floor
You cannot use drywall that has just been brought from the street. He must rest for a day in the room where the repairs are being carried out. GCR tends to expand and contract depending on ambient temperature and humidity. That’s why it needs to rest so that it doesn’t become deformed after installation.
Scheme of laying sheets on the floor
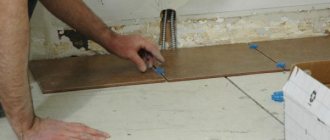
It is necessary to start laying the sheets from the door so as not to damage the laid layer of leveling fill. Only after laying the first sheet on the embankment will it be possible to crawl onto it to lay adjacent sheets.
You can lay drywall on the floor from the wall towards the front door. To do this, a temporary path is made from plasterboard, along which you can walk to the opposite edge of the room. From there the main work will begin.
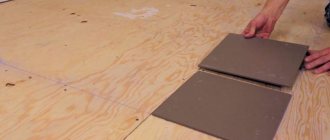
The second layer of gypsum plasterboard or gypsum board must overlap so that the distance between the edges of the lower and upper layer is at least 20 cm. To do this, the drywall will need to be trimmed so that the so-called ligation of seams occurs.
If drywall is laid on the floor under linoleum, then you can stop at the second layer. For tiles, it is advisable to lay three layers.
A special mounting adhesive is applied between all layers, which holds the gypsum plaster together. Glue is also applied to the joints. For greater reliability, the sheets are connected with self-tapping screws in increments of 30 cm. For self-tapping screws it should be 18-25 mm. For greater quality, all self-tapping screw heads are puttied after screwing them in. When the putty layer has dried, you can move on to the next stage.
Preparing to lay tiles
Only high quality ceramic tiles should be used.
- The pattern should be clear and even.
- The tiles must be smooth and uniform.
- When struck lightly, ceramic tiles should produce a dull sound.
Due to the use of a base made of plasterboard sheets, it is necessary to select the highest quality adhesive composition. You can pay attention to the following options:
- Liquid nails are good in everything except their cost. For beginners, a more suitable adhesive composition cannot be found, if the budget allows;
- Cement adhesive is a budget option. It is difficult to work with, and any mistakes are fraught with the appearance of various defects. But it costs quite little;
- If you need something as easy to work with as liquid nails and not as expensive as cement adhesive, you can opt for flexible tile adhesive.
General conclusion
Leveling the floor with drywall is a very good idea. The process is not very simple - although the first impression will most likely be that way. There are many different little things that need to be taken into account; it is quite possible that you will not be successful the first time.
This is especially true for finishing work. For example, if the floor is made of plasterboard, you should not glue expensive piece parquet onto it. But you can safely lay ceramic tiles! If you study the technology from the very beginning, there will be a minimum of problems in the work and the finished result will impress not only the owner himself, but also all the guests.
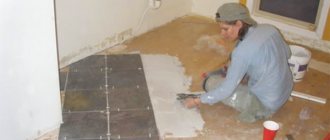
Laying tiles on plasterboard floors
Laying tiles on a plasterboard base.
Drywall must be treated with deep penetration primer. One layer will be enough. After the primer has dried, you need to apply tile adhesive. Laying tiles on drywall on the floor can be done using various adhesive mixtures that are prepared in their own way. The packaging with glue always contains instructions for its preparation.
The adhesive mixture is applied to the drywall and then leveled using a special notched trowel. You can lay tiles only in places where the drywall is completely covered with adhesive. During the work, you need to use a water level so that the tiles lie evenly. Although the surface is quite smooth, due to lack of experience, it is possible to make an adhesive layer of different thicknesses.
To ensure that the joints between the tiles have the same gap, you need to use special dividing crosses.
You can't lay out tiles any way you want. You need to lay down one row, and only then move on to the next. When the entire floor is tiled, you will need to remove the crosses (after the mortar has completely dried) and cover the seams with a special grout.