Ceramic tiles are one of the most common finishing materials. If there is no flat surface, tiles in the bathroom are laid on gypsum fiber board or gypsum fiber sheets. Installation can be carried out on the floor or wall, regardless of the type of coating. The sheets are securely attached to concrete, brick and other bases, which makes this material truly universal.
In addition, gypsum boards differ from standard plasterboard sheets or gypsum boards in their reliability, durability, and long service life. Gypsum fiber sheets are characterized by high performance characteristics, so they are excellent as a base for laying tiles on floors and walls. By and large, installation of the material is no different from ordinary drywall, so no extra tools or skills are required.
Recommendations from experts
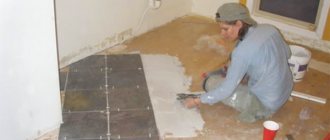
In order to correctly lay ceramics on gypsum fiber boards, you need to break down all the work into several stages. This will allow you to accurately carry out all the necessary procedures, maintain a balance between materials and use them rationally. In addition, division into certain zones also makes it possible to most effectively distribute the load across the areas of laying tiles on the floor and walls in the bathroom.
- Surface preparation. Initially, a thorough inspection of the old foundation is carried out, i.e. wooden boards are checked, defects are studied and the degree of their degradation is assessed. After identifying the defects and inspecting them, a full or partial reconstruction of the floor covering is carried out. Bonding is carried out with wooden logs, if there are unpleasant sounds in the form of creaking, the voids are filled with polyurethane foam.
- Laying gypsum fiber board on the floor is a relatively easy process, however, it has its own nuances. For example, in order to reduce the consumption of building materials, gypsum fiber sheets must be laid on the floor along the bathroom, and one must not forget about bandaging. In addition, the wooden base is fastened to the gypsum plasterboard using ordinary self-tapping screws up to 20 cm. This stage ends with careful priming with a protective compound.
Need to remember! To cut gypsum fiber board panels to the required size, it is best to carefully coat all the folds with special glue, and then lay the tiles on the floor surface.
Varieties
Gypsum fiber boards of the type in question differ primarily by area of application into the following categories with appropriate markings:
- Standard - GVL . For ordinary premises.
- Moisture resistant - GVLV . For humid environments.
- Fire resistant - GVLO . With increased fire resistance.
- Moisture-resistant - GVLVO . For finishing in areas with high air humidity and elevated temperatures.
GVL for the "warm floor" system Source pol-exp.com
GVL, classified as fireproof, are classified into the following subcategories:
- Non-flammable - G1.
- Do not produce smoke when burning - D1.
- Non-flammable - B1.
- Low toxic - T1.
Due to the fact that it does not support the combustion process, the material is recommended for covering wooden structures of all types - when building houses using frame technology, creating partitions or finishing in wooden structures, including subfloors on joists made of boards or bars.
Note! GVL floor slabs allow not only leveling the surface, but also effectively insulating walls and ceilings from sound and saving heat in the room. At the same time, the structure of the material does not interfere with the passage of air and moisture, and therefore ensures a healthy microclimate in the house.
Finishing a house from GVL Source stroy-podskazka.ru
See also: Catalog of companies that specialize in finishing materials and related work
Installation features
In order to give the room your own style, you should lay the tiles in a non-standard way. This will give the shower room its individuality, as well as highlight some interior details, for example, a washbasin, sink or large mirror. Before finishing work begins, ceramic tiles must be carefully prepared for installation.
To do this, you need to have certain knowledge or become familiar with the features of this process:
- It is necessary to purchase and put in order all the tools and necessary materials.
- Take measurements of the area of the shower room, and also calculate the required amount of tiles. The calculation should be carried out not in square meters, but according to piece parameters.
- It is best to think in advance about the shape of the pattern, the color scheme of the images, the geometry of the angle and the brightness of the lighting.
- It is necessary to decide on the type of installation and choose the most interesting or suitable option, based on the characteristics of the room. For example, diagonally, classic, i.e. straight or horizontal, herringbone, square and others.
- Today, the most popular styling method is classic. It is carried out from the far corner of the wall or floor, after which the coating is laid towards the exit. Or the center of the room is determined using ordinary cords, and then the resulting area is visually divided into 4 zones and installation occurs.
- In addition to a wooden base, GVL can be laid on various reinforced concrete coverings. However, this will require careful adherence to the specifics of the technology.
Finishing work on the internal space from gypsum fiber board allows you to eliminate many unnecessary and unnecessary problems associated with arranging the floor. The most common example is leveling the coating using a wet screed. After installation, you need to wait for complete drying, which will take several weeks. This makes it possible to finish laying the surface in a short time.
Which will ultimately lead to the quick completion of the main stage, after which it will be possible to proceed to the next one in a couple of days. It is best to fix the ceramic products with a reliable adhesive that does not allow the tiles to change their location or partially detach from the base. To do this, it is necessary to clarify the shelf life of the adhesive solution, as well as its ability to be used on GVL surfaces.
Preparatory work
Before starting work, it is necessary to prepare the flooring. First, the old floor is dismantled. In the bathroom and toilet, this process may take longer, since it will be necessary to dismantle the plumbing.
Floor preparation includes screeding so that the base on which gypsum fiber boards and tiles will be laid is level. GVL can be laid on both dry and wet screed, but the second option is practically not used in apartments due to the labor-intensive process.
In order to make a dry screed, a waterproofing material is laid on the base. Waterproofing is always laid in several layers, and special attention must be paid to the joints. An edge film is placed on the end of the walls. For screeding, you can use fine-grained expanded clay - it is easily leveled and easier to work with than making a concrete base.
In addition to the leveling function, GVL can perform other tasks. Firstly, with their help you can raise the level of the subfloor by 1-1.2 cm. It should be taken into account that if the floor level rises, then it is necessary to file the door frame. They do this with 2 goals at once. Firstly, the tile goes under the box, which looks more aesthetically attractive.
Scheme and order
Gypsum fiber sheets have a sufficient number of useful performance characteristics. The main advantage of such material is environmental safety, i.e. it does not pose any problems for human health. In addition, the material has good fireproof protection, which is very important for products used in finishing. GVL sheets can withstand open fire for about 20 minutes.
In relation to this, other materials cannot boast of such results. In addition, the material does not contain harmful substances in the form of various resins or formaldehydes. Although, for example, in chipboard or fiberboard panels they are contained in sufficient quantities to cause very serious damage to a person in the event of a fire. Due to its general safety, GVL enjoys stable popularity among consumers in the domestic finishing materials market.
What it is
Often, when choosing a finishing material, the consumer has the question of what is gypsum fiber board for the floor. As the name suggests, it is a gypsum fiber sheet. However, unlike the standard well-known drywall, it does not have an outer paper shell. The structure of the slab is homogeneous. The basic necessary properties are given to it during the following production process:
- The main components - gypsum, cellulose and various modifiers are mixed evenly.
- The mixture is filled into the form.
- The workpiece is saturated with water and fed into the press installation.
- The formed slab is dried - the material is brought to a certain degree of humidity.
- The finished product is transferred to the warehouse.
Another important difference between the material and conventional drywall is its higher strength, water resistance and density. Thanks to this set of properties, the GVL slab is used not only and not so much for finishing, but as a substrate for a coating, for example, laminate or parquet, and also as a rough version of the floor and even as a sound insulator.
GVL close-up Source company-megapolis.rf
Materials and tools
You may need:
- Primer;
- Brush;
- Ditch;
- Glue;
- Container for glue;
- Drill;
- Nozzle – whisk;
- Water;
- The tile itself;
- Notched trowel;
- Rubber hammer;
- Building level;
- Distance crosses;
- Painting knife;
- Fugue;
- Half a rubber ball;
- Rubber spatula;
- Clean cloth.
If you have everything, we can begin to solve the problem - how to lay tiles on the gvl.
How it's done
The preparation of the base on which to work can be omitted, since a more complex issue is being considered here: how the heated floor itself is installed directly under the tiles on a gypsum plaster base. There will be very few or no difficulties at all:
- First, steam and waterproofing should be laid on the base. Everything here is simple and clear - we use available materials, covering the entire floor area.
- Next, the first plane is mounted.
- If the base is level, then no additional operations will be required. If you need to level the surface, the easiest way is to pour expanded clay or perlite onto it.
- Then the first or only plane of gypsum fiber sheets is laid on top. On a single layer, markings are applied, according to which grooves for laying the cable are selected using a router.
- If the installation is carried out in two passes, then on the first plane a diagram of the laying of all elements of the heating system is marked - it will be easier to cut out the parts of the second “floor” and lay cables or pipes.
- The second part of the structure is the cut parts, which are mounted with glue and screws on top of the assembled first layer.
- When everything is in place, including the heating elements, the gaps in which the tubes or cables are laid need to be filled with tile adhesive. It will fix everything and make the floors even.
Sometimes craftsmen advise, during such work, to assemble a structure from three layers - the last one will fix everything in place and serve as a level basis for the subsequent installation of finished floors. However, since we will have tiles on top of the entire structure we have just assembled, we can do without the third leveling layer of gvl.
Surface preparation
Despite the best performance, gypsum fiber also requires a primer. In general, you need to get used to the fact that any surface requires cleaning and priming before any type of finishing.
Dip the brush into the primer previously poured into the ditch and apply the solution to the wall. Make sure that the entire wall is covered so that there are no empty areas.
When the soil is absorbed, you can begin preparing the adhesive solution for laying the tiles on the gypsum fiber.
To do this, it is better to purchase a dry mixture, which you pour into a bucket. Then you add water there too, only here you act strictly in proportion, you cannot add at random, since you only need the right consistency.
It is better to mix with a drill or hammer drill at medium speed so that the mixture is well mixed. After the solution has been stirred. Let it sit for 15 minutes, and then only you can start laying the tiles on the gypsum fiber.
Preparation of glue
We choose glue from the following types:
- cement-based adhesive is economically acceptable, but does not always meet the requirements of water resistance;
- elastic glue - a more expensive, but at the same time higher quality option;
- Liquid nails are the most expensive option; I advise you to use them only in places with a lot of load on the tiles, where they most often fall off.
Most often we use elastic glue, but the choice depends entirely on the person’s wallet.
If the glue mixture is liquid in the bucket, then it is ready for installation. If the mixture is dry, it still needs to be prepared. The algorithm is like this. Pour the mixture into a container of water in small portions, while at the same time stirring it with a drill mixer.
Which is better: heated floors or radiators?
Warm floorBatteries
From my experience, I will say that you don’t need to pour a lot of the mixture at once, because it will be difficult to mix it immediately to the desired consistency, while avoiding the formation of lumps of glue.
As a result, we will end up with a mixture that is not very liquid, so that it does not spread over the surface, but also not very thick, so that it is not difficult to stretch. After preparing the adhesive mixture, we can begin installing the tiles.
Tile installation
In order to correctly lay tiles on the tiles, it is advisable to apply the solution not to the tiles, but to the surface itself. That is, use a narrow spatula to scoop the solution onto a notched one, or immediately with a notched one, and distribute the glue evenly over the wall. However, cover an area of no more than one square meter.
Now take the tile in your hands and place it at the corner from which you will start laying. And be sure to press firmly to ensure a good grip. Pinned? Great! Then pick up a level and check how evenly the tiles are laid. If the edge is sticking out, immediately tap the top with a rubber mallet to force the tile into place.
But if the tile is recessed, there is nothing you can do about it - pry it up and remove it from the wall, you will need to reposition it.
And just like that, tile by tile, you lay the entire wall.
Important! After each tile, check how the tiles are now laid relative to the previously laid ones.
This is how you will be able to correctly lay the tiles on the gvl.
Technology for laying GVLV sheets
After cleaning traces of the old coating and cleaning the floor, you can begin laying GVLV sheets.
GVLV sheet is a moisture-resistant gypsum fiber sheet. An excellent preparatory base for laying tiles. GVLV sheets smooth out small defects in the base and create an even base for high-quality tile laying.
The question arises whether it is necessary to lay gypsum fiber board sheets on a concrete base. The answer is simple. If you have a solid, level concrete base or a good screed on the floor, gypsum fiber sheets are not needed. True, GVL sheets can perform additional tasks. For example, raise the level of the subfloor to a minimum thickness (10-12 mm) or cover the subfloor covered with stains of tar or mastic that cannot be removed. In these cases, a subfloor made from gypsum fiber board sheets can be an excellent solution.
Before laying gypsum fiber board sheets, you need to cut the doorway.
Before laying gypsum fiber board sheets, the rough base is primed with any deep penetration primer.
GVL sheets are laid on tile adhesive and secured with self-tapping screws along the perimeter to the base. The thickness of GVL sheets is 10 or 12.5 mm. Self-tapping screws for fastening need to be 30-40 mm. The pitch between the screws is 35-40 cm. The screws are recessed into the sheet by 2-3 mm.
/p{amp}gt;
For a durable rough foundation, one layer of gypsum fiber board is sufficient. If it is necessary to lay gypsum fiber board sheets in two layers, each layer of sheets must be secured with self-tapping screws, and the sheets themselves must be laid offset, like brickwork. The offset width should not be less than 20 cm.
The seams between the gypsum fiber board sheets must be sealed with the same glue on which they are laid, and the joints must be glued with reinforced tape so that it also covers the screw heads.
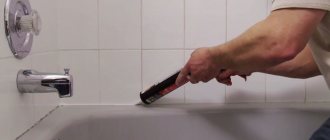
In rooms where there is a high probability of leaks (bathrooms), it is necessary to waterproof the junctions of the slabs to the wall and the seams between the slabs.
In 24 hours. After laying the gypsum fiber board sheets and gluing the seams, you can begin laying the tiles.
Layer of GVL sheets
Fugue application
Fugue is the last stage of installation. And very important - it is with the help of grout that the masonry itself is protected.
However, before grouting, you need to remove the crosses from the seams so that the fugue subsequently has the same shade along the entire length of the seams.
So, are you ready? Then we start mixing the grout. To do this, pour a small amount of fugue into half of a rubber children's ball, add water and, using the same rubber spatula that we will use to apply the fugue, mix.
Why half the ball? It’s just so convenient, holding this container in your left hand, to apply the mixture into the seams, calmly moving along the laying of tiles on the gypsum fiber, and without constantly dragging a bucket behind you.
So, take the mixture onto a rubber spatula and run it first with force across the seam, and then along it. And just like that, carefully and slowly, you cover all the seams.
Now you know how to lay tiles on the gvl.
| How to select and install grout for bathroom tiles: a guide |
| Crosses for tiles: how to choose the right one and not make a mistake? |
| Learning how to cut tiles without a tile cutter |
| How exactly to clean bathroom tiles |
GVL is bad. No one said that it needs to be tightened with self-tapping screws 20cm apart - experts. There is no better tie
What should I use to cover the gypsum fiber board seams? if not for tiles, but for painting??
When installing gypsum plasterboard, it is advisable to leave a small gap between them - about 2 mm - this will allow the putty solution to be pressed into it. Moreover, first apply putty to the seam, then press in the serpyanka and only after that do the final, leveling layer of putty, moreover, this must be done in one step so that the first applied layer of putty does not harden. Select putty specifically for GVL.
I was worried that when laying tiles on the gypsum plasterboard it would be damaged by moisture, gypsum plasterboard is moisture resistant, but everything worked out and was even great. The whole process went pretty quickly. This option is quite viable!
This is indeed true - the option is more than viable. With the use of drywall, the process of leveling the surface of the walls becomes faster and cleaner than plaster. There are pros and cons, so everyone chooses the option that they consider more suitable.
I would like to clarify - what leveling method do you recommend as a specialist?
I am still a supporter of plastering on beacons - in my opinion, this is a more durable base if done in compliance with all technical aspects, but sometimes you need to make a box - this is where gypsum fiber board with subsequent finishing of the tiles is perfect
Good day! I “filled” a niche in the wall in the bathroom with moisture-resistant gypsum plasterboard, although there are differences and unevenness. You need a flat surface for laying tiles. Tell me what is the best way to level it?
The question is not entirely clear, namely, why did the unevenness appear? Was it because the niche was “flooded” and the plasterboard gave way, or was the problem because the frame was assembled with errors?
Seam processing
Next, we need to process the seams to give the tile a finished look.
For this we need a fugue. It can also be purchased at a hardware store; currently, there is a huge selection of colors and shades of this material. It is also important not to forget to buy a rubber spatula, with which we will joint the seams.
We begin to apply the fugue only after the tiles have completely dried.
After jointing, the seams and tiles must be treated with a protective mixture, which will protect against penetration of moisture and various types of bacteria into the drywall, and will also add additional shine to your tiles.
Now let’s summarize all of the above a little:
- for laying tiles on drywall, special gypsum fiber moisture-resistant sheets (GVL) are used;
- Guide strips should be placed under the drywall at a distance of 30-40 cm, and the sheets should be attached to it using self-tapping screws;
- It is necessary to apply two layers of primer to the drywall, the interval between them is 30-40 minutes;
- to apply the primer, it is best to use a notched trowel so that after stretching it, stripes remain on the surface;
- the consistency of the lei should be approximately comparable to the consistency of sour cream;
- for better adhesion of sheets to tiles, use a rubber hammer, which is gently tapped on the surface of the tile;
- It is best to lay the tiles in several approaches, the optimal amount of laying at a time is 5 rows, after which it is best to take a break of an hour to relieve the tension that arises in the base;
- After laying the tiles, the surface must dry for at least 24 hours;
- to fill the seams, a special mixture is used - fugue; a rubber spatula is used for its application;
- After the glue has dried, it is best to treat the tile with a protective mixture, which protects the seams and tiles from moisture, dirt and bacteria, and also gives additional shine.
Now the work is finished. As it turned out, laying tiles on drywall is a completely doable task, which we completed in full, for which I sincerely congratulate you. New achievements to you in arranging your home.
Features of the gypsum fiber base
Gypsum fiber sheets are the same drywall, only in a more improved form. These coatings have a number of identical properties. However, there is a difference and it concerns the structure: GVL does not have a double-sided frame with cardboard. There are reasons for this. In this case, strength is imparted to gypsum through reinforcement with cellulose components, as well as through special additives with moisture resistance and fire resistance properties (these characteristics of gypsum fiber board are higher than those of gypsum board).
The strength of gypsum fiber board is an order of magnitude higher than that of gypsum plasterboard, and therefore gypsum fiber sheets are recommended for use when constructing a leveled dry screed base. When a dry screed needs to be done in a bathroom or toilet, then a special moisture-resistant GVLV is used.
To lay a high-quality floor with your own hands, it is important to follow the technology and have an idea of how to lay wall or floor tiles. Creating a new floor involves the following sequence of actions:
- dismantling the old coating, repairing the base;
- arrangement of dry screed made of gypsum fiber board;
- laying tiles;
- grouting joints.
It is possible to lay a sheet of gypsum fiber board on top of a wet screed. However, such work is difficult and is almost never used in modern home finishing practice.
Application area
Taking into account its versatile qualities, GVL can be called a universal building material. The following areas of application exist:
- Formation of dry floor screed.
- Use as a lining under the finishing coating - linoleum, parquet, etc.
- Creation of interior partitions.
- Construction of a subfloor on a wooden sheathing over a concrete floor.
- GVL flooring sheets can be part of the heat or sound insulating layer of various house structures.
- Installation of a heated floor system.
- Design of fireproof communication boxes.
- Formation of fire-resistant surfaces in bathhouses and boiler rooms.
- Creation of moisture-resistant finishes in bathrooms, saunas, showers.
Advice! When choosing GVL, first of all, it is necessary to take into account the operating conditions. For example, for a bath or sauna, an option with increased resistance to water and fire is suitable.
GVL partitions indoors Source guruotdelki.ru
Technology for arranging a tiled floor on a dry GVL screed
The first step is to study the condition of the original floor. The old covering is dismantled. And the base is checked for defects. If the base is wooden, the boards are evaluated. They are either completely replaced or strengthened by additional fixation to the joists. Large gaps are sealed with polyurethane foam.
Next, the GVL slabs are laid.
Features of laying GVL:
- Laying sheets along the room with dressing will significantly reduce material consumption;
- The fastening elements for sheets to a wooden base are self-tapping screws, which are screwed in increments of 20 cm;
- Priming gypsum fiber board sheets after installation is a mandatory procedure. The primer will help retain the putty and provide better adhesion to the tile adhesive;
- The displacement (otherwise known as the spread) at the seams of the gypsum fiber sheets is clearly monitored when subsequent rows are formed. It should be within 20 cm when combining two rows;
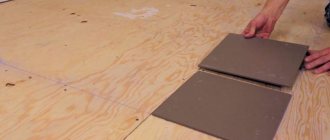
- The use of specialized GVL sheets (the so-called floor covering elements), glued together during the production process, is very convenient when forming a two-layer floor. The thickness of such plates is 20 mm, and a special rebate at the ends allows you to significantly speed up and facilitate the installation process. Before laying tiles on sheets of this type, they are cut to the required size, the folds are glued and only then the sheets are laid on the floor surface.
Characteristics
Standard gypsum fiber sheets for flooring are characterized by the following parameters:
- Strength – does not exceed 1.2 thousand kg/m³.
- Density – over 5.5 MPa.
- Humidity – less than 1%.
- Hardness index – 22 MPa and more.
- Thermal conductivity value is from 0.22 to 0.35 W/m × °C.
The dimensions of the standard plate are within the following values:
- Length – 250 cm.
- Width – 120 cm.
- Thickness – 10 mm.
In this case, the values of physical parameters may be different - depending on the wishes of the customer or the characteristics of production. For example, small-format versions are available in sizes 120 by 60 or 150 by 50 cm.
Additional recommendations from professionals
Many years of professional experience shared by specialists indicate that some manipulations should be done in a certain way, and not in any other way. After all, the secret to successfully creating a high-quality floor lies precisely in such nuances.
- Tying GVL sheets together will provide them with greater resistance to stress. Fixing with self-tapping screws will allow you to hold on better;
- Before laying the tiles, the gypsum fiber flooring is kept indoors for about 3 days, and only then covered with a primer;
- When buying tile adhesive in a store, be sure to find out its capabilities regarding gypsum fiber;
- Laying tiles begins only on a completely dry primer. This is done using a hammer, beacons and a spatula. In this case, all the rules described above are taken into account.
These are all the nuances that you will encounter in your work.
Video instruction
In some cases, laying tiles on GVL is considered the most appropriate option for surface cladding. Tile is a finicky material that requires a leveled base. In addition, it is most often used in rooms with high heat and humidity conditions, that is, in the bathroom and toilet. And for such conditions, a gypsum fiber sheet with special improved properties, called GVL, is just suitable.
GVL differs little from ordinary drywall in many external parameters (with the exception of the color: for gypsum board it is gray, for gypsum board it is greenish). However, there is a difference, and it is based on the degree of density of the sheets. In this regard, gypsum fiber takes a more advantageous position, since it is very difficult to break. It is precisely the quality of strength of GVL that is responsible for the fact that it is chosen as a tile base for the floor.
Location of tiles at joints
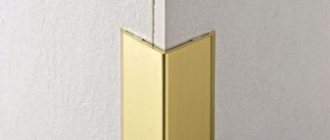
At the corners of the room, tiles are laid using trims - special corners. Their use makes it possible to lay the tiles beautifully and evenly. Specialists often use trims in their work. However, nothing prevents beginners from also using these devices for corner tile laying. Trims are a profile applied to the edges of the tiles when they are laid. They come in different colors, so choosing them to match the coating will not be difficult.
When laying tiles end to end, the elements are laid in a standard manner. For beginners, this method of laying out elements on the corners is considered the best, although the appearance of the corners with this method leaves much to be desired.
The most difficult option is laying elements with cutting an acute angle (45 degrees). To carefully cut the tiles, use a tile cutter. Or they do it not on a machine equipped with a rotating bed. Of course, it is better to trim elements on a machine, but not everyone has one.
Ceramic tiles laid on GVL are a worthy decoration for any surface, be it the floor or walls in any room. This floor has high heat and sound insulation characteristics. Which is very positive for a residential apartment or house. And it’s even more commendable when a smooth and beautiful floor is made with your own hands.
Moisture-resistant plasterboard in the bathroom under tiles: how to carry out the work correctly
When renovating a bathroom, many people prefer to choose the dry method of finishing walls with plasterboard. This method is chosen because it is fast, high-quality and relatively inexpensive. Special moisture-resistant plasterboard in the bathroom has been successfully used for a long time to level walls and create boxes, but this material has one significant drawback. It is quite fragile and can be easily damaged during installation. In addition, he is also afraid of moisture, although to a lesser extent.
Based on feedback and demands from the consumer market, manufacturers have created a new generation of materials called moisture-resistant gypsum fiber, or GVLV for short. In fact, this is the same drywall, only significantly modified according to market requirements. In this article we will try to analyze the advantages of this material, areas of application and the main differences from its predecessor.
We invite you to familiarize yourself with: Tiles for Russian stoves
Moisture-resistant drywall used in the bathroom is made from ordinary gypsum, which is placed between two sheets of cardboard and pressed under pressure. Various additives are added to gypsum, which increase its resistance to a humid environment and prevent it from softening. A moisture-resistant product can be distinguished from a regular one by the green color of the cardboard itself.
Gypsum fiber or GVLV is made from the same gypsum solution and is also pressed under pressure, but in addition to water-repellent components, cellulose fibers are placed in the solution, which give strength to the material and resistance to moisture. Unlike regular drywall, this material does not have a cardboard wrapper.
Many people often face the difficult decision of what to choose as a finishing material: waterproof plasterboard for the bathroom or gypsum fiber? We will help resolve this issue and consider the distinctive features of GVLV, as well as the advantages of the material over analogues. Important advantages include:
- strength of the material. Thanks to the use of cellulose fibers, the material has high strength. It is for this reason that it is often used as a dry floor screed, which can easily withstand the weight of heavy furniture and does not break;
- resistance to moisture. Gypsum fiber, like drywall, is also divided into moisture-resistant and conventional products. GLVL can remain in direct contact with water for a long time and not lose its physical properties. Therefore, we can say with confidence that installing gvlv in the bathroom will be the best option;
- resistance to mechanical stress. This feature is both a positive and negative feature of the material. If a ruler and a mounting knife are enough to cut sheets of drywall, then in the case of gypsum fiber you will already need a hacksaw. In addition, mechanical strength makes it almost impossible to create shaped elements;
- sound insulation and thermal insulation. If GLVL is used to create partitions and ducts, then the need for laying additional insulation disappears, since the material has a high degree of noise absorption and prevents heat transfer.
It is also worth noting that gypsum fiber, like its analogues, is not a flammable material and does not support combustion. It is environmentally friendly and does not emit toxic substances.
Types of GVLV material
Floor or wall slabs differ from each other not only in thickness, but also in size. For the convenience of laying dry screed, smaller slabs of 1500 x 1000 millimeters are used, while standard wall sheets are produced with dimensions of 2500 x 1200 millimeters.
The use of gypsum fiber has already become widespread among large construction companies, so the advantages of this material when finishing rooms with high humidity are obvious. Strength allows you to build not only various wall structures with increased load, but many people even use this material to build steps on a metal or wooden frame.
Using moisture-resistant gypsum fiber for the bathroom would be the best option.
When using ceramic tiles for interior decoration, you must take into account a very important rule that concerns the quality of the final result. This is a smooth and durable surface for cladding. Unfortunately, in block multi-storey buildings the walls cannot boast of this. Therefore, they have to be leveled either with plaster solutions or drywall (gypsum plasterboard or gypsum board).
Many may doubt whether it is worth using drywall in the bathroom. After all, it often contains high humidity, which is the worst enemy of gypsum. Can be used if moisture-resistant drywall is selected. But this is not the only requirement for a bathroom. To reduce the humidity level, it is necessary to organize well-functioning ventilation.
Attention! You can choose a moisture-resistant gypsum board based on the color of the cardboard shell. It has a greenish color.
But is it possible to lay tiles on drywall, because its outer shell is just paper? And in this regard there are no big problems either. But everything is in order.
Drywall installation
There are two ways to level bathroom walls using plasterboard: on an installed frame or using glue, that is, by gluing the sheets themselves to the wall surface. The second option is used very rarely. Experience and accuracy are required here, especially when it comes to placing plasterboard sheets in the plane of the wall, both horizontally and vertically.
The frame method is much simpler. You must first install a frame structure made of metal profiles in the plane of the wall. And plasterboard sheets are already laid and fastened on it. That is, the technology for installing gypsum boards in the bathroom is no different from cladding in other rooms. But there are also some nuances.
- Before installing drywall under the tiles in the bathroom, you need to treat its edges with a moisture-resistant sealant or mastic; you can cover them with a waterproofing membrane.
- It is imperative to use only moisture-resistant putty to seal the seams between the sheets.
- Tile adhesive. There are several options here that need to be discussed separately.
The cement-sand mortars on which tiles were planted have long since sunk into oblivion. Tiles on drywall in the bathroom are placed only with special adhesives. In this case, it is necessary to choose the one that is suitable for cladding plasterboard surfaces.
- Cement based. This is a dry mixture, which is brought to readiness using water, which must be poured into the mixture in a certain proportion. Today this is the cheapest adhesive composition. The only thing that experts recommend is to increase the number of supports under the gypsum board so that the sheets can withstand both the tiles and the cement mortar.
- Polymer adhesive mixtures. They are offered by manufacturers, both dry and ready-made. This glue has excellent strength characteristics with a small thickness of the applied layer. There are two-component compositions based on epoxy and polyurethane in this category.
- Liquid Nails. An excellent option for gluing tiles onto drywall in the bathroom, but very expensive. It is most often used in cases where one or more cladding elements have peeled off and need to be glued in place.
- Experts recommend laying tiles on gypsum boards using a special gypsum mortar “Perlfix”. Essentially, it is a finely dispersed putty that adheres very well to the cardboard surface of the leveling material.
Before you start laying tiles on drywall in the bathroom, here is one important piece of advice from the experts. When cardboard comes into contact with the adhesive composition (which is liquid), it will begin to warp and swell. Therefore, it is necessary to cover the surface with a water-repellent composition, which can quickly dry out. It should take a couple of hours to dry.
Therefore, the gaps between the sheets of drywall are first filled with putty (moisture resistant). After it dries, a water-repellent primer is applied, preferably in two layers, to create a thick film. Each primer coat typically takes between 45 minutes and 1.5 hours to dry. It all depends on the temperature inside the room.
So, the installation and preparation of drywall for the bathroom under the tiles is completed, you can proceed to the main process - laying the tiles on the drywall. First of all, a layout scheme is selected. That is, the number of ceramic tiles in the horizontal and vertical rows is determined.
- The vertical row is the easiest to count. It is necessary to measure the side of the facing element that will be laid vertically. Then measure the height of the ceiling in the bathroom, which is divided by the length of the side of the tile. This is the number of tiles vertically. Usually the number turns out to be a non-integer, so the maximum value is taken, that is, rounded. The tiles must be laid from the ceiling so that the lower element can be trimmed, because the area near the floor is considered the most inconspicuous.
- To calculate the number of tiles in the horizontal direction of laying, you need to lay them out on the floor along the wall. The cut tiles should be laid in the most inconspicuous corner of the room. Therefore, when laying tiles on drywall in the bathroom, you should start with a solid element, moving in the opposite direction, laying the cut tiles last.
Tags: slab, tiles
« Previous entry
Properties of drywall
Gypsum fiber sheet, henceforth we will call it GVL for short, is a modern building material, it consists of gypsum and cellulose fiber and special additives. During the production process, the ingredients are mixed and pressed, obtaining smooth, durable sheets. This material is characterized by the following properties:
- It has a perfectly flat surface that does not need to be further leveled before finishing;
- High degree of strength. Even such heavy materials as ceramic tiles are mounted on drywall;
- Plasticity, which corresponds to the level of wood. That is, the driven nail will be securely held in the drywall without crumbling the material.
moisture-resistant-plasterboard
| Name | Scope of application | Leaf color | Marking color |
| UKL (plasterboard sheet) | Not suitable for installation in a bathroom or toilet | Grey | Blue |
| GVLV (moisture-resistant gypsum fiber sheet) | Optimal for bathrooms and bathrooms | Grey | Red |
| GKLVO (moisture- and fire-resistant gypsum fiber sheet) | Suitable for equipping saunas, baths, steam rooms | Green | Red |
Moisture-resistant plasterboard in stock. Which drywall should I use for installation in the bathroom? Of course, it is moisture resistant. However, there are nuances here too.
For example, how to distinguish moisture-resistant drywall for a bathroom from simple one? Are there more reliable materials of this type?
GKLV - moisture-resistant plasterboard - is distinguished by the green color of the facing cardboard. You can easily distinguish it from the wood-yellow or gray color of simple plasterboard.
Here you can clearly see how GKLV differs in color from other types of gypsum boards.
Pay attention to the marking, it is green. As for more reliable materials, I can recommend GVLV
This is a gypsum fiber board that is more durable and has better performance. It can even be used as drywall for floor tiles
As for more reliable materials, I can recommend GVLV. This is a gypsum fiber board that is more durable and has better performance. It can even be used as drywall for floor tiles.
Waterproof GVL from Knauf.
Leveling the floor with a self-leveling mixture.
Marking
Tiles near the ceiling - it is advisable that the tiles under the ceiling do not have to be cut, this will not look very attractive. It is better to place the cut piece of tile in the lower part of the room.
Tiles at corners - divide the length of the wall by the size of the tile. If the tile is not divided without a trace, then the cut element is better in the corner opposite the door.
Layout of decorative tiles – decorative elements are the most expensive, place them so that they are visible, but at the same time so that they do not have to be cut
Also make sure that plumbing fixtures do not block them.
It is recommended to use a tile cutter to cut tiles. It is the safest and allows you to get an even cut without chips. Tools such as a grinder are difficult to use and can ruin the tiles. If you don’t have a tile cutter, you can cut the tiles with a glass cutter.
At the location of the bottom row of tiles, use a level to mark the horizontal line. In this place you need to secure a steel profile or a wooden block - it will serve as a support for the tile.
The zero mark should be set along the horizon line so that the tiles do not have an inclined seam.
Best answers
NOT OLD YET:
If you put chipboard, then the meaning of a warm floor is lost; it will not warm up the stove. If you want to lose a heated floor, then lay chipboard. It looks like you want to lay slabs to level the floor, but you can level the floor not with a slab, but with a self-leveling mixture (dry mixtures). Then the warm floor will fully fulfill its role as a heater.
vonemugI:
wood is a very poor conductor of heat! It’s better to use a normal screed and immediately the material that you want to see on your floor.
Nick Storozhev:
nothing to do?
it:
What the hell? You don't know what to do anymore?
Haruhito:
When the chipboard heats up, it will emit vapors of some kind of crap impregnation, formaldehyde in my opinion...
Vladimir Pykov:
What is chipboard for????
Applying grout
Grouting of joints is carried out after 24 hours from the moment of laying the tiles. That is, allow the glue to dry completely. For floor surfaces, the optimal waiting period is 3 days. At the same time, the level of humidity in the room is monitored. It is contraindicated to use water during this period. Otherwise, the glue will lose its functionality and will not adhere well.
Grouting is the final step in tiling. It is impossible not to do it. After all, we are talking about creating protection for the entire masonry.
Before grouting, remove the crosses from the seams. Then they proceed to mixing the grout using a rubber spatula. The grouting of the seams is done by him. The process of applying putty consists of first making strong transverse strokes relative to the seam, and then longitudinal ones.