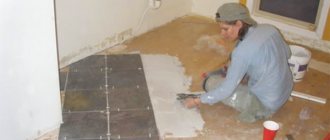
When finishing walls, corners for tiles in the bathroom solve the problem of masking the uneven edge of cut tiles. In a standard separate bathroom there are 4 internal corners of the walls, one junction of the side of the bath, joints between the vertical enclosing structures, the ceiling and the floor.
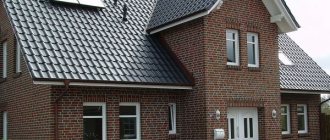
External corners appear on gypsum board frames, doorway slopes, and homemade architectural elements. Metal, PVC, ceramic profiles allow you to hide the untreated end of the tile and improve the quality of the interior.
There are options for decorating corners on walls with tiles without a special profile. For example, professional tilers do not work with corners, preferring to “bevel” - trimming or grinding the ends at outer corners at 45°.
Peculiarities
Decorative corners are used during the final stage of renovation.
The main purposes of the corners:
- give the finishing touch to the decorative design;
- neat and stylish design of the joints between tiles and plumbing fixtures, especially when it comes to difficult areas of the room;
- Use during refinishing or upon completion of renovations.
Depending on the shape, experts distinguish two types of corners.
- External. Use to design a convex corner. The main purpose is wall decoration. Thanks to them, sharp parts can be covered simply and practically.
- Internal. They are chosen when you need to design a concave (internal) corner. If you need to level the surface between the tiles and the bathtub or create a corner, choose corners of this type.
From a design point of view, corners can be divided into two groups:
- Decorative. During the manufacturing process of these elements, special attention is paid to the appearance of the product. They can have different colors and shapes depending on the style. The material most often used for manufacturing is ceramics or PVC.
- Functional. This is the main group of corners presented on the modern market. They are characterized by increased reliability, stability and practicality.
Useful tips
During preparatory activities and purchasing the necessary materials, you should carefully study the available range. This is especially true for profiles used in practice. Their use may be associated with the creation of external and internal corners, depending on the purpose. When it comes to choosing colors, it is best to purchase tiles and profiles in the same network. This will give better final results.
If you do everything correctly and choose the appropriate option for joining the tiled elements, the interior will not deteriorate and the entire room will become attractive. The use of additional profiles from various materials for finishing the corners of the tiles will hide possible defects in the work performed, and will also fasten adjacent rows of tiles together.
The article was written specifically for.
Where will corners be needed?
Trimming tiles is inevitable when decorating walls with this facing material for a number of reasons:
- the most aesthetic option for laying out tiles is “from the middle”, the tiles are cut in both corners;
On the boxes, all tiles are cut to obtain a beautiful layout without narrow and asymmetrical pieces. - the edge of the cut is very rarely perfectly smooth, the glaze may chip;
- If the finisher is not sufficiently qualified, the tiles may turn out shorter than the required size.
Therefore, you have to seal the joint with grout or initially use a special profile that allows you to hide minor defects. A corner seam occurs at the junctions of the following surfaces:
- wall/wall – internal vertical;
- wall/ceiling – internal horizontal;
- wall/floor – horizontal internal;
- wall/bath – internal horizontal;
- wall/wall – vertical external;
- wall/slope – external vertical and horizontal.
Important: In a separate bathroom with brick walls, the last two options are rare, since communications, metering devices, shut-off valves are often located near the toilet, that is, the boxes are built inside the toilets.
The joint between the bathtub and the wall needs not only finishing, but also sealing against leaks.
Elimination of defects
During the work, it is not uncommon for errors to occur. No one is immune from this, but everyone should know how to get rid of them.
You may end up with an uneven joint between the walls in the room. To eliminate this, you can simply slightly adjust the adhesive mass under the tile. It is evenly distributed over the entire surface.
There are often cases when cutting tiles at an angle does not bring the desired result. A slightly different angle has formed, and not 45. In this case, you should take sandpaper in your hands and use it to finish the job. The main thing is not to overdo it.
Problems at the junction of tiles are the most common. To solve this problem, two main methods are used in practice:
- Classic grouting of existing joints between adjacent walls.
- Installation of decorative profiles in places where chips and gaps appear in the material. In addition, gluing the profile is very easy and quick using a special sealant or liquid nails.
Advantages and disadvantages
Before using the above items, you need to familiarize yourself with the advantages and disadvantages of this product.
Pros:
- due to reliable adhesion at the corners, the strength of the walls increases;
- the work of installing tiles becomes easier due to the absence of the need to trim the material;
- decorative design acquires accuracy and sophistication;
- increased level of safety - additional elements cover sharp parts that can cause injury;
- protection against mold and mildew in tile joints;
- the level of tile resistance to moisture increases;
- In the process of cutting tiles, the percentage of chipping decreases.
Due to the above advantages, structural elements are the best option for renovation work in the bathroom. They have a positive effect on the appearance of the room, facilitate the work process and improve the performance of the finishing material.
The parts also have certain disadvantages.
They are related to the materials used in manufacturing and some other aspects:
- After a certain time, corners made of white plastic begin to lose their former whiteness, acquiring a yellow tint. Designers recommend using colored or dark elements whenever possible.
- If a small gap is formed during the installation of a plastic profile, moisture will accumulate in it.
- Installation of ceramic products is difficult. During the process, you must be as careful as possible so as not to damage the product.
- To ensure that chrome corners retain their shine and shine for a long time, do not install them on a surface that you will touch frequently.
- Perfect evenness is necessary when installing metal corners, since it will be impossible to correct this later.
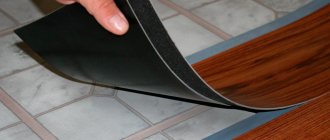
Down with the old coating!
Regardless of whether it is planned to glue the tiles without preliminary preparation, or a decision is made to level the walls with a layer of plaster, it is necessary to remove all the old coating, be it enamel, whitewash, wallpaper or old tiles. If it turns out that the layer of old plaster under these coatings is crumbling or coming away from the brick in layers, then the plaster will also have to be brought down to the ground. The work is not pleasant, but you can’t do without it. Enamel and whitewash are difficult to remove, so you can leave them, but you should make frequent notches on the wall. Notching the walls can be done with any handy tool convenient for this: a grinder, the pointed end of a hammer, or even an old ax.
Materials
Manufacturing companies use various materials to produce corners. Each of them has its own performance characteristics.
Metal
Designers call aluminum products the optimal choice for most stylistic trends. Lightweight and durable metal harmonizes perfectly with sanitary ware, bathroom furniture and a wide color palette. Elements of this type are ideal for working with outdoor tiles.
In terms of strength and hardness, the leading positions are occupied by corners made of stainless material. Due to its special properties, it is ideal for use in rooms with high humidity. As a rule, they are made in gold or silver. Often there are options plated with brass, chrome and nickel.
Chrome elements are an ideal choice for high-tech style.
PVC (plastic)
The products are lightweight and particularly flexible. Manufactured in a variety of colors. Can be used at any stage of gluing. In terms of price, this is the most profitable option, and therefore widespread.
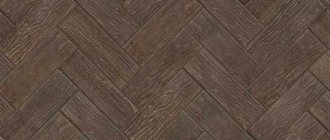
Ceramics
Ceramic models attract attention with their expressive appearance. They stand out from the rest with their decorativeness, patterns and expressiveness. If tiles were used to decorate the bathroom, ceramic corners are ideal.
How to lay tiles in corners: basic rules
There are several options for connecting tiles:
- Perpendicular connection. The simplest way to solve the problem is a direct connection. In this case, the tiles are laid at 90 degrees, that is, one cut remains open, and the second is disguised under the top element. This way you can close any corner with minimal effort. If tile trimming is required, it is best to install the cut from below. The disadvantage of this method is the seam when connecting. Subsequently, it is masked with grout, but it is still visible on the surface.
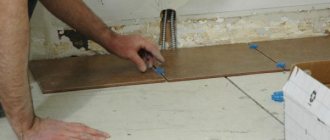
- Trims. The most popular option is probably the installation of special elements - trims. This is a plastic profile that forms the necessary direction. For external corners, an L-shaped installation is used. The internal corner has the shape of an arc. Sometimes narrow convex trims are used.
- Pruning. This method is based on trimming the edge of the slab. It is performed in such a way that the fragments can be connected to each other at 45 degrees.
Perpendicular arrangement
The simplest solution to the issue is direct docking. In this case, the elements are laid perpendicular to each other, that is, so that one cut remains visible, and the other is hidden under the upper fragment.
In this case, a corner in any part of the walls is closed with minimal effort. If adjustment of the tile is necessary, it is advisable to place the cut edge under the bottom. The disadvantage of this method is the presence of a seam at the junction. Later it is sealed with grout, but this still affects the appearance of the surface.
Options for laying tiles at internal joints
There is another way to join tiles perpendicularly in the corners. This method is suitable, for example, for finishing curbs or bathroom frames. The main condition is that the cladding should not be visible from below.
The essence of the method is as follows: it is necessary to glue the tile so that the horizontally located (top) tile hangs over the edge. The corner will turn out neat if the width of the canopy is within 3-5 mm. The only condition is that the edge must be solid.
Edge Trimming
For more accurate work you will need special equipment. The method is based on cutting the edge of the tile at 45 degrees. The task is performed in the following ways:
- grind the edge with a grinder;
- a tile cutter is used;
- sandpaper is used.
The best option is to process tiles with an electric tile cutter with an inclined bed.
How to lay such wall tiles? For this purpose, the tiles are cut and glued with mortar into the corner so that their edges coincide and form a solid covering.
One way to lay tiles in internal and external corners is to trim the chamfer at 45 degrees.
For beginners, laying tiles in the bathroom using this method is not easy. If possible, practice on unnecessary material. Please ensure that the surface of the walls is as smooth as possible, otherwise you will need to lay a layer of glue of different thicknesses on it, which will disrupt the position of adjacent elements.
Using Trims
These are special inserts. The method using them is the most popular. They are a plastic profile that forms the angle of the desired direction. An L-shaped pad is used for external projections. And the inner surface has the appearance of a concave arc. Narrow convex models are also used.
One more important issue needs to be resolved - how to glue the plastic corner to the tile. Several options are possible:
- sealant;
- glue;
- liquid Nails.
Often, such trims have a special design that allows them to be laid on the solution. A special plate is driven under the tile and fixed with tile adhesive. This installation is extremely simple, the surface acquires a neat appearance, and the joints are protected from moisture and bacteria.
Some options for cladding inserts
The external plastic corner and trims at the junctions with the plumbing (curbs) are fixed differently, for example, using silicone or acrylic sealant. How exactly to glue the plastic to the tiles in the bathroom does not make much of a difference. This type of finishing of walls or corners of the box is suitable for almost any type of material.
Installation technology
Aluminum, plastic and metal trims are attached to the wall surface using tile adhesive. The profiles have a perforated inner surface, which allows them to be slightly pressed into the adhesive layer for better fixation.
Layouts are divided into 3 groups: hard, semi-rigid, soft. To design corners and joints of complex geometry, the best option in choosing profiles would be plastic layouts, since they are easy to cut. Straight and clear joints cover metal products well.
Installation of corners for external joints:
- Make markings on the wall. To do this, cut off the required length of the profile and apply it to the finished joint. Rectangular tiles or products of a different configuration are inserted into the trim groove on both sides. Measurements are taken and the necessary marks are marked on the wall.
- The corner is covered with glue and the elements are laid. The correct installation is controlled by the marks made at the beginning.
- The edges of the tiles are inserted into the grooves and the trim is pressed against the surface of the cladding to remove voids.
- Remains of glue are removed with a rag, and the surface of the cladding is wiped dry.
To prevent the tile from “floating”, it is additionally fixed with masking tape, which is removed after the glue has dried.
The decorative corner for internal joints consists of several parts:
- groove for tiles;
- perforated protrusion;
- concave fragment.
Installation begins after the facing material has been completely laid on the wall. The profile is chosen 2-3 mm larger than the thickness of the tile. Apply glue to the cladding. The elements are applied to the edge of the wall covered with adhesive material, pressing tightly. Place the tile into the groove. The same procedure is done on the other side of the corner. Press firmly to remove voids between the tiles and the trim. After drying, grout the joints.
Particular attention should be paid to the processing of joints. When installing the layout between the edge of the bathtub and the adjacent wall, you need to treat all the cracks with sealant so that there are no large gaps left
This very important procedure is performed using an aquarium protective coating. Laying of trims begins after the glue has completely dried. The use of a PVC profile to seal the joint between the bathtub and the wall is most justified. It cuts well, does not allow moisture to pass through, and quickly sticks to “liquid nails” or tile adhesive. When gluing, the corner is pressed tightly against the wall and the edge of the bathtub.
Pruning
When cutting layouts, it is necessary to take into account the characteristics of the material. Cutting is done with a hacksaw or grinder. When using a hacksaw, you can use a miter box. This carpentry tool is essential for cutting corners correctly.
Preparatory activities
Before tiling a corner, you should think about carefully preparing the walls and floor themselves.
- They are pre-aligned so that the material does not peel off over a short period of time.
- Another possible defect in laying ceramic tiles on an uneven base is a poorly executed external or internal corner.
- In addition, the surface at the time of work must be not only dry, but also clean.
- It is important to check the horizontality of the floor and the verticality of the walls. This is done after the old coating has been removed.
- If we are talking about walls, then a plumb line is used in the form of a selected type of load attached to a thread.
A large number of tools can be used to measure angles:
- For horizontality, a building or water level is used. Everything will depend on the preferences of the performer.
- There is also a laser level, but its cost is very high for use in one-time work.
If these works are not completed before laying the tiles, subsequently gaps will form in the corners, spoiling the whole picture.
A layer of waterproofing in the form of a coating mastic is first applied to the cleaned surface, followed by a primer. If there are even minor defects, they should initially be repaired with putty. To create a flat surface, pour the following onto the base of the floor:
- cement-sand screed;
- self-leveling mixture.
We must also not forget about waterproofing and a primer layer.
Application of trims
The outer or inner corner of the tile can be made with high quality using a decorative profile called trim. It is selected taking into account the color scheme of the tile. Can be made of plastic or metal (metal corners for tiles).
- If you are making an external corner, you should purchase L-shaped trims
- Internal – trims with a concave arc.
The last option is also most often used when moving from the wall to the floor (plinth). Their scope of application is very wide. The main thing is to choose the right option for execution.
In addition to its main function, trims can protect against external mechanical influence. Consequently, the service life of the laid tiles will increase slightly. The work is carried out very simply, without special knowledge and the use of special equipment.
Silicone or acrylic based sealant can be used to glue the profile. Any glue for this type of work, as well as liquid nails, is also perfect.
It is worth noting that for the bathroom there are features of the external corner. It is best to make it in one piece, rather than choosing from the remaining fragments.
Tools and materials
In the process of finishing the walls and floors indoors with tiles, the material itself will not be enough. You will also need the following list:
- Special glue (if you are laying tiles in corners in rooms with high humidity, such as a bathroom, purchase water-repellent glue).
- Spatula with teeth.
- Crosses that allow the tile elements to be joined together correctly and evenly. Their thickness is selected individually, taking into account the created distance.
- Profiles for finishing (for example, plastic or ceramic corner).
- A building level for even distribution of tiles on the surface, as well as a tile cutter necessary to create even corners, both external and internal.
It is important at this stage to find out the exact number of tiles required for the job. In this case, the tile seam between the elements is taken into account, which is usually 3-5 mm, and the “red” place (in plain sight) is determined, to which increased demands are placed due to constant attention from the entrance.
End trimming
To perform this option of joining tiles in the corners of the room, you should acquire special equipment for the job. The implementation process will take some time and effort, which indicates the need for experience.
- In places where tiles of adjacent walls are attached, the end part is cut at an angle of 45 degrees.
- If you subsequently join the two tiles to each other, you should get an angle of 90 degrees. At the same time, the decorative part of the tiles faces each other.
This action is performed using an electric tile cutter equipped with a diamond blade, sandpaper or grinder. Each option has its own characteristics and implementation difficulties, which are worth familiarizing yourself with in more detail. The method can be used not only to create internal corners between adjacent walls, but also when laying tiles on an external corner (in door and window openings).
Sandpaper should be used wisely. After all, not every option is suitable for performing the work. In the process, you should purchase at least two types of it:
- No. 40 and No. 60.
- No. 40 and No. 80.
No. 40 is suitable when used for rough fitting, and the second option will do an excellent job of accurately leveling the surface and eliminating possible defects.
When trimming the end part for the first time, it is best to first take unnecessary fragments and practice on them. When everything starts to work out well, we begin the main work.
If there is no desire to carry out such manipulations, tiles without corners can be purchased. This is a separate type of decorative finishing.
Making an internal corner
If you need to work with corners on the walls, then everything should start from the “red” place. There are several nuances:
- The tiles should be laid on adjacent sides and strictly symmetrically.
- If tile scraps are used, they must be identical in size and parameters.
- When a special tile cutter is used, it already has such a function as determining the exact distance for cutting tiles. If you don’t have a tool, you’ll have to calculate everything yourself.
Stages of work
- Work begins from the floor in the room. Initially, the selected adhesive option is applied to the wall, occupying approximately 1 square meter. A special spatula will allow you to distribute it evenly over the entire surface.
- One tile after another is glued.
- You can achieve an even seam in various ways, one of which is by inserting special crosses.
- When the first row is ready, it should be checked using a building level. In this case, when joining with the opposite wall, the tile is cut to the required length, after which it is attached to the wall.
Ways to create an internal corner
When you begin laying tiles on an adjacent wall, you can use the remainder of the tiles from the first row. It will be more problematic to choose the right drawing. The main thing is to combine them with each other, not forgetting about the tile seam at the joint. If there remains a gap of 2 mm after laying the tiles overlapping, we will get a feeling of curvature. Maintains attractiveness and appearance.
Ceramic borders
It was quite difficult and diligent work: I had to cut small squares from the tiles, which were then used to form the slope from the wall to the bathtub. If the work was done conscientiously, the effect was absolutely decent. Now there is no such need.
In many construction stores, when you buy tiles for a toilet, they can immediately recommend favorable ceramic borders. But often they still have to be purchased separately. When choosing such a frame, you need to work hard so that the border matches the color of the tile itself.
In exceptional cases, you should choose a white border, then merging with the plumbing fixtures, it will not stand out from the uniform design.
In fact, all ceramic products are considered quite strong and hard. And therefore, of all the options that have been considered, ceramic borders will especially last a long time; they are virtually not subject to deformation and can be used without replacement for many years.
But you need to remember about the disadvantages of this option: it has poor resistance to mechanical damage, i.e. with a strong blow, such an object may prick.
In most cases, this kind of trouble occurs when installing ceramics, and already installed borders add to their own hardness the mechanical strength of the wall and bathtub and are virtually invulnerable.
Working with ceramic components requires specific skills, and therefore the best option is to entrust this process to specialists. If, for example, you personally agreed to take on this task, then it will be useful for you to read how to make a border in the bathroom from ceramic profiles (or baseboards).
Features of installation work
To work, you need to purchase the required number of blanks. Buy borders with a reserve (in case of damage), and also calculate how many corner-type elements you will need. You will also need specialized tile adhesive (it must be moisture resistant), sealant and grout. All work consists of several stages:
- Surface preparation. They must be very thoroughly cleaned and dried.
- Sealing the gap. If it is small, you can get by with silicone sealant. If, for example, the gap is large, it is sealed with foam for installation.
- Preparation of glue (according to the rules).
- Laying the border itself. How to glue a ceramic skirting board to a bathtub? Using a spatula, glue is applied to the back side of the parts, and they themselves lie close to each other so that there is no gap. Special corner components are placed in the corners. You need to give it a day to dry.
- Grout. The finished grout removes small gaps between the parts, and also between the wall and the baseboard.
Any of these types of borders has both its own advantages and disadvantages. When choosing an option for yourself, consider the entire interior of your bath. In any case, decorating your bathtub with a border will give it a complete and beautiful look.
Differences between external and internal corners
When carrying out work, remember the difference between internal and external elements. The first option is the space where the surfaces of two walls meet along the perimeter of a standard room. The second is a protruding area.
The most striking difference is demonstrated when installing plastic corners for tiles. Trims have fundamental differences from each other, depending on their purpose for a particular area.
Examples of designing corners using trims
Also keep in mind that it is easier to glue the internal trim tiles, because in case of deviation from the norms, the situation is corrected with the help of glue and grout. In general, the fugue looks more organic on the inner corners of the walls. In the bathroom this is of particular importance, because external projections, for example, when installing a box, are more susceptible to destruction. Over time, the fugue simply crumbles and is washed out from there. That is why it is better to lay an additional plastic corner on the tile, which will not only protect, but also decorate the surface.
Drawing horizontal lines
Next is drawing lines between the marks. The easiest way to draw lines is to use a marker. Its cord is covered with special paint. The cord is pulled according to the marks, after which they need to slap the base of the wall, pulling it a little and sharply releasing it. This is how all the lines are drawn. Next, it all depends on the size of the tile.
It is worth measuring a certain amount from the main line so that the mark at the bottom is slightly less than the height of the tile. It is better to trim the bottom row a little. So marks are applied along the entire perimeter and lines are also marked.
Other corner design options
Installing a profile is an optional condition for upgrading the ribs between enclosing structures lined with tiles or mosaics. You can perform the same operations correctly in several ways:
- grind the edges of the cladding at 45 degrees;
- lean the tiles overlapping each other;
- Leave space between the tiles for grouting.
The most difficult is the corner on a short box, a podium, formed by three planes at once - two vertical walls, one horizontal plane.
Universal trims: internal and external corners when laying tiles
If we take as a basis not cheapness, but indeed ease of installation, it makes sense to pay attention to laying tiles in the internal corners, as well as in the external ones, using trims. These are a kind of functional profiles of a special shape, which are most often made of plastic, but can also be aluminum or even brass. For external corner joints they have a U or L-like shape, and for internal corner joints they often have the appearance of a concave arc. There are also a variety of convex trims, but they are used less frequently.
These trim profiles will easily help solve such a complex issue as how to lay tiles if the corners are uneven, because these defects must be hidden from view. To glue the trim, you can use liquid nails, sealant, as well as the usual tile adhesive that you used to lay it, but only if we are not talking about cement compounds.
There are also complex trim designs for which installation with cement or cement-based adhesive is truly acceptable. Such trims are attached immediately to the mortar, since their edge is driven under the tile, where it is finally fixed. This is a fairly basic process that even a beginner can complete. At the same time, trims reliably protect the seams from moisture entering them, therefore, preventing the proliferation of bacteria, as well as the growth of mold and fungi.
Overlapping method
The perpendicular joining method is used for right external/internal corners. The end of one tile is located at a 90 degree angle to the other, flush.
The same seam is left between the tiles as in the adjacent rows. The joint is positioned in such a way that the solid tile masks it when viewing the room from the doorway, as in the photo below.
Cutting tiles at an angle
Another very popular method for making corners when laying tiles is cutting them at an angle of forty-five degrees, then you get a beautiful joint, but you can’t do this without special equipment.
The most affordable method for grinding tiles at an angle is to use a professional electric tile cutter, which allows you to turn the cutting diamond wheel at the desired angle. However, such an instrument is quite expensive, so not everyone can afford it. How to cut tiles at an angle without a tile cutter is worth reading the article on our website, where everything is written out and laid out on shelves for ease of understanding.
It is worth understanding that for a beginner this installation method may be overwhelming, since there are many nuances and subtleties that will have to be observed. It is very important that the tiles match perfectly, otherwise a harmonious appearance will hardly be achieved. If the corners themselves are not even enough, you will have to level them using tile adhesive, which without much experience “by eye” will definitely not work the first time.
Burying method
The method is used only for external corners, called the “Kremlin corner”, bevelling, trimming, sharpening, cutting at 45 degrees. The ends of the tiles are cut at 45°, the decorative elements are joined closely to each other without seams or grouting.
You can grind off unglazed ceramics from the back of the cladding manually with a file or a whetstone. However, it is more convenient to use an angle grinder with a flexible diamond disk “Turtle” with a grain size of 50 units.
The outer corner in a combined bathroom often ends up on the edge of the inspection hatch under the tiles. In this case, instead of regular grout, use silicone sealant of a suitable color.
This material has increased plasticity, even after hardening, it does not fly off the edge of the tile.
Forming an angle at the junction of three planes
An additional element - a capsule plug for an external/internal corner - is available exclusively in collections of metal corners from domestic and foreign manufacturers.
The tiled profile itself is ideal for cladding the ribs formed by connecting walls.
Plug capsule for metal trims.
The plug is designed to fit into a vertex formed by the intersection of two or three edges. One side of the capsule is inserted inside the profile, the other two are adjacent to the remaining layout on the adjacent walls.
Wall-floor joint
To decorate the internal corner formed by porcelain stoneware flooring and tiles on the bathroom wall, the following methods are used:
- embedded profile made of polymer material, metal, ceramics;
Aluminum corner corner. - patch corner PVC, aluminum, brass;
Corner for the internal corner of the invoice. - baseboard for tiles;
Embedded plastic plinth for the bathroom. - ceramic or porcelain stoneware border.
- without a plinth - this is the most aesthetic and correct option; the joint is grouted with tile grout.
A regular PVC skirting board does not fit well with ceramic cladding, however, this is the only option with cable channels inside for electrical wiring, ensuring high maintainability of the wire.
Connecting the wall to the ceiling
The choice of layout for designing the angle of contact between the wall tiles and the ceiling depends on the method of finishing the floor slab:
- whitewashing, painting - overlay polystyrene foam fillet, glued to both surfaces;
Foam ceiling plinth in the bathroom. - PVC panel - profile made of the same material;
PVC profile. - suspended ceiling - special insert.
Connecting tiles to a suspended ceiling without a plinth.
Bathtub connection unit
The main problem with the junction of the bathtub bowl and the walls around it is to ensure tightness. The classic option is to tile the walls entirely along the entire height. There are several methods for designing the junction of the bathtub to the wall:
- sealant is a budget option, but short-lived;
Seal the seam with sealant. - border tape - heated with a hairdryer, has an adhesive layer for fixing one edge to the wall, the other to the bathtub bowl;
Border tape. - polymer plinth – F-shaped profile with a long bottom shelf, side plugs included;
Sealing the bathtub against the wall with a plastic baseboard/ - ceramic border - low manufacturability of installation due to the short length of the elements and their large number;
Upgrading the bathtub junction with a ceramic border.
The downside of all of the above options is the lack of tightness of the upper joint, plus the easy dismantling of the bath without destroying the lining. But at the same time, the most reliable technology is wall cladding from the side of the bathtub, when its bowl is partially embedded in the wall.
Laying tiles from the side of the bathtub.
The bottom row is usually trimmed to even out the lack of horizontal lines and to hide other defects. After which, you have to mask the defects of tile cutting. For this, a PVC layout is used, which has elastic properties to compensate for the linear expansion of the bath when heated.
Tile profile classification
There is a profile division for finishing rooms with tiles according to several criteria:
- material of execution – plastic, metal (aluminum, brass), ceramic;
- purpose – external, internal, ceiling fillet, floor plinth, bath border;
- profile section – one-sided, two-sided, flat, L-shaped, volumetric;
- decorative properties - white, colored, chrome-plated, gold-plated, silver, gloss, matte;
- functionality – compensatory, connecting, decorative and protective;
- fastening method - sealing, gluing, overlay.
Overhead corners for porcelain stoneware and tiles are almost never used.
Vinyl external/internal white corner is used to design corners between walls finished with MDF and PVC panels; it is not used for tiles. There are several names/designations for the profile in the documentation, in the slang of finishers:
- “corner” – according to purpose;
- “layout” - elements allow you to increase the decorative value of the layout of tiles on the walls;
- “trim” - comes from the transcription of the word trim - finishing.
Tiled compensation profile.
The expansion profile is mounted along the expansion joints separating large screed blocks in large rooms. It is never used in the bathroom. The connecting profile is mounted at the joints of different claddings in the same plane.
According to the requirements of SP 29.13330, the floor covering of the bathroom must be lower than the level of the finished floor in the adjacent room, or separated from it by a floor. But in practice this is inconvenient, so a connecting profile is usually used between the bathroom and the adjacent room.
Let's consider the classification according to the material of manufacture.
PVC profile
Among other structural materials for tile profiles, polyvinyl chloride polymer has the lowest production cost. PVC is easily painted in bulk, does not collapse, and does not fade from solar ultraviolet radiation or detergents. A vinyl corner can be used to cover tile cutting defects on external and internal corners.
Interior
Manufacturers produce two types of inner corner:
- one-sided - the tile is inserted into the groove on one side of the profile, the second side is pressed against the cladding on the adjacent wall;
One-sided PVC profile internal. - two-part - the fittings are embedded in tile adhesive along the inner corner, and later a strip with a flexible element in the middle is snapped into it.
Two-component PVC profile internal.
Important: A one-sided corner is always on sale and costs much less than a two-part profile. However, it is only suitable for acute and right angles; at obtuse angles, one of its edges protrudes above the cladding surface.
A two-piece trim is more expensive, but it makes joining ceramic cladding on surfaces at obtuse angles greater than 90 degrees easier.
Outer
The industry produces external PVC corners of several types:
- L-profile - one edge is put on the tile, the second is pressed against the first row of tiles on the adjacent wall;
Single-sided external corner PVC profile. - C-profile - both edges of the tile are tucked under the outer semicircular surface;
Double-sided PVC corner profile for external tiles.
In the first trim, the decorative surface has a semicircular sector of 90°, in the second, 180°. However, most often only the L-profile is on sale, which allows you to hide defects in the cut edge of only one tile.
The “layout” is held at the corner due to the fact that one internal strip is wide and perforated. It is recessed into the tile adhesive during installation; after the solution has dried, dismantling without damaging the cladding becomes impossible.
Metallic profile
The main differences between metal trims and PVC trims are:
- in addition to the semicircular shape of the front side, there are box-type profiles with two flat edges;
Rectangular corner for tiles. - the presence of additional elements for the junction of three planes (outer, inner corner);
External corner for three planes. - an assortment of two-piece profiles with a snap-on anti-slip strip, used for steps.
Metal profile for two-piece tiles
Metal profiles are made from steel (stainless steel), brass, and aluminum alloys. Manufacturers use decorative coatings matt/gloss silver, brush effect (worn denim), gilding, bronze, champagne, ground, polished brass, chrome, pewter.
Aluminum is a corrosion-resistant material with fairly high decorative properties. We use our own metal texture, plating with copper, gold, silver, and film lamination to obtain the texture of wood.
To separate areas of different colors, three types of metal profiles are used:
- C-shaped border - has stiffening ribs on the reverse side, mounted on walls;
Decorative aluminum border. - U-shaped – for installation on the floor;
U-shaped decorative profile. - T-shaped - with a wide top bar.
Separating T profile for the joint between rooms.
In the bathroom, steps, podiums, and blind screens are sometimes made. The upper edge of these tiled structures is refined with a special F-shaped profile.
F-shaped profile for steps.
Unlike the outside corner corner, there is a shelf that additionally protects the riser at its top. It is in this area that tiles usually break off from concrete or masonry. Its middle strip is embedded in tile adhesive, and the upper tread tile is inserted inside the profile.
The Y-shaped outer profile looks very nice and neat. To install it, you will need to pre-cut the edges at 45 degrees.
The brass and stainless steel profiles have similar cross-sectional configurations. Options for finishing the front surface, its shape is similar to the aluminum corner.
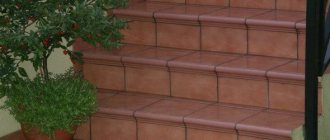
Ceramic profile for steps
For cladding steps, clinker is considered the most durable material. In addition to clinker tiles for treads and risers, manufacturers have developed additional elements - a corner for the outer edges of the steps.
Clinker tiles with corner for steps.
The same steps. For some collections of tiles, they are also made from porcelain stoneware.
Less commonly used is a ceramic corner, which has shades of red and brown. There are protrusions at the bottom to increase adhesion with tile adhesive.
Ceramic stepped profile
The best offers for tile profiles in your city:
The solution to all problems: corner tiles
When dealing with the question of how to lay tile corners, it is worth paying attention to the tile lines that the manufacturer produces taking into account the presence of corner tiles. Then the problem is completely removed, since such ceramic corners can not only be easily laid, but will also even out uneven corners.
Many manufacturers offer a wide selection of corner tiles for both external and internal orientation. Such corners are laid out first, and the rest of the tiles are joined to them. Creating solidity and external integrity of the finish, the choice of such a design looks very harmonious, although such a finish will cost a little more, but not so significant as to refuse it.
Quantity calculation
If you plan to lay tiles with patterns, then draw a sketch and check your calculations with the store sellers to be on the safe side.
An interesting solution would be to combine both the tile itself and its layout.
If you plan to lay tiles on the wall right up to the ceiling, and the ceiling will be suspended, there is no need to lay the tiles all the way to the top. Having calculated the required amount of tiles, buy them with a reserve of 10% more than necessary.