Ceramic tiles have long been a popular floor covering. Strength, wear resistance and moisture resistance have made ceramics a sought-after material.
A rich range of colors and a variety of textures allows you to create an interesting design and bring something new and original to the interior of the room. But these are not all the possibilities to revive the flooring.
There are different options for laying tiles, and laying tiles in a herringbone pattern will be the topic of our article. It makes sense to lay ceramics in a herringbone pattern only on the floor, so today we will talk about floor coverings. Dense and durable porcelain stoneware is most often used as a floor covering.
Options for laying herringbone tiles
When choosing your installation, consider the size and shape of the room. The horizontal arrangement of the slabs will expand the room. The consumption of materials will also differ depending on the type of installation. The direct type of installation is the most economical. More complex types will require more resources.
By combining shades with each other, you will create rich accents in the interior. You should not miss the opportunity to make your interior more original.
First, it’s worth considering what methods of laying tiles exist. The most common is laying in rows. They also choose diagonal laying, an option in which the tiles in each subsequent row are shifted by half.
You can combine options by laying diagonally and offset. Parquet laying and modular layout are also original options.
Layout drawings
Equal Neighborhood
Two colors of tiles can be present in the room in equal proportions. For example, the floor and wide wall are tiled with light tiles, while the rest are dark or the blocks are interspersed with each other. The main thing is not to mix and clearly draw boundaries.
Another example of juxtaposition is the horizontal division of walls. In a room with high ceilings, you can highlight the bottom of the walls with lighter tiles and the top with darker tiles. The opposite option will add “air” to the room.
Accents and division of zones
Tiles can be laid out in zones to solve specific interior problems. For example, tiles of a contrasting color or pattern can highlight the bath area or make one wall bright while decorating the rest in a calm manner.
The effect of highlighting a zone works if the tiles of the accent color are much smaller than the main one, and the contrast between them is noticeable. It is mainly used on walls and works with any layout option.
Chess
Traditional chess layout, which is familiar to everyone. If you move away from the usual black and white version, you can make a couple of interesting discoveries. Contrasting colors are usually used. The technique is suitable for the classic layout and for the diagonal one.
Lines and stripes
The magical property of stripes is to change the perception of space. Horizontal ones make it wider, vertical ones make it higher. The stripes can be narrow or wide, or there can be just one edging stripe as an accent. You can also zone a room with stripes.
Large inserts
In this method, symmetrical sections of one-color tiles seem to be placed on a base of a different color, reminiscent of floor mats or a scale grid. The larger the space, the larger the “rugs” can be. This pattern is used with a classic or diagonal layout.
Inserts
Contrasting tiles thrown here and there on a plain base look like splashes. The inclusions can be one color or multi-colored. The method is suitable for all types of layouts, except, perhaps, the Christmas tree. It will look much more impressive with small tiles.
Ornament
Small format tiles can be laid out with an ornament or create a pattern that looks like it is made of pixels. A couple of interesting ornament ideas:
Kaleidoscope
Tiles of different colors, laid out chaotically, create a kaleidoscope effect. The layout can be classic or offset, and the colors can either contrast with each other or present a soft gradient - in this case, some kind of system will appear. Small tiles and a classic layout are the best choice, since the complexity of both the design and layout can overload the space.
Now the “kaleidoscope” is used with tiles not only of different colors, but also of patterns. It turns out to be a reference to the “patchwork” style.
We hope this article helped you decide on your tile layout option. Don’t be afraid to combine different techniques and different sizes of tiles when coming up with your own designs, then you’ll get a truly individual interior!
And if after the renovation there are some extra tiles left, this is for you: “Creativity from leftover tiles.”
Photos: datacouch.net, silenciobarnes.com, homesph.net, eaglebrandtiles.com, design2ch.net, homedecorationtrends.com, dezinde.com, bodywart.com
bathroom, tiles, renovation
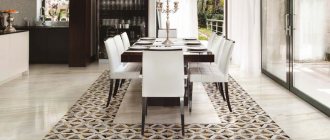
Herringbone styling option
This composition will imitate wooden parquet or natural stone flooring. You need to take a responsible and careful approach to this installation - the corners should be straight and the seams should not separate. The result should be the correct pattern of the Christmas tree.
- The entire work process can be divided into three stages - planning, marking the floor, and carrying out the necessary calculations.
- The second stage is laying the tiles, leveling them, and adjusting the joints.
The final point is to grout all the seams. Buy tiles in such quantities that there is a reserve of about ten percent. For the herringbone laying method, the percentage increases to fifteen.
Laminate
Laminate flooring comes in a huge variety of patterns. Externally, it can imitate parquet, solid boards and piece parquet, but in comparison with them it is more practical and costs less. Floors made of laminate planks are vacuumed or wiped with a well-wrung cloth. Specific stains: marks from felt-tip pens, wax crayons, shoe polish, glue, etc. - are removed with special laminate care products. They are offered by manufacturers of this type of coating. You should avoid using abrasive, alkali-containing cleaning products, or metal sponges, which will scratch and corrode the floor. It is undesirable to use compositions based on oils and waxes, which form a film on the surface that attracts dirt.
The cost of laminate flooring starts from 200 rubles/m² for products from domestic manufacturers and reaches 2850 rubles/m² for foreign ones. Photo: Parador
Joining of coatings
Threshold for creating a smooth transition between multi-level floor coverings. Photo: Coswick
Carpet threshold for creating a smooth transition from thicker to thinner coverings, such as carpet
T-shaped molding for designing the joint of single-level floor coverings when arranging technological gaps or solving decorative problems
Marking tiles for laying in a herringbone pattern
Correct floor markings will show you the options for tile placement; you won’t have to cut the tiles near the walls. First, determine the center of the room and draw a line through the entire room.
- Tiles for laying in a herringbone pattern should be oblong.
- If its length is fifty centimeters, divide 50 by 1.41.
- The resulting number is the distance to the next line.
- Mark the third line even further - the seams located diagonally are less than the width of the seams of adjacent tiles.
- Lay the tiles in a herringbone pattern; they should be at an angle of forty-five degrees.
Observe how the tiles are positioned in relation to the walls; you can move the tiles to avoid unnecessary trimming of the slabs. You can start laying the material from the outer corner of the room.
Surface preparation
Before laying tiles on the floor, the base must be prepared, otherwise the coating will not be of high quality.
Where to begin:
- All furniture, plumbing fixtures and baseboards must be removed from the premises;
- dismantle the old coating;
- remove debris and dust.
This type of coating is more convenient to lay on a concrete screed, and not only on wood, chipboard, old tiles. Each type of foundation has its own preparation requirements.
Concrete
It is necessary to remove all irregularities, stains, paint, and roughness using a scraper.
Check for cracks, deformed areas, dents, if any, you need to make a screed
It is important that the floor is level, otherwise the tiles will quickly crack or fall off altogether. Vacuum the floor, wash it, then cover it with a layer of primer and let dry for 3-4 hours
Floor primer Source ytimg.com
If the coating is uneven, it must be filled with a leveling agent and wait until it dries. A deviation of no more than 5 mm per 2 linear meters is allowed.
Old tiles
This is a good solid base on which you can also lay tiles. If the old tile is in good condition, it does not wobble, and there are no chipped parts. Otherwise, the floor will need to be leveled.
Preparation takes place in the following order:
- the surface needs to be sanded using sandpaper, or a machine cable, for better adhesion to the adhesive mixture;
- vacuum and wash;
- prime, if desired;
- After 2-3 hours, apply the self-leveling mixture.
Please note that if you lay tiles on a heated floor, the system must be turned off. You can use it in 2-3 days
After decorative finishing of seams. Use high-quality glue to avoid further deformation of the base when heated.
Wooden floor
This type of surface also has its own requirements. The floor must be checked for rotten, deformed boards. There should be no cracks. Otherwise, over time, due to an unstable base, the tiles may burst or fail. Knots, protruding nails, and nail heads can interfere with laying the tiles evenly.
Please note that if the board is playing it is better to fix this problem immediately. You can simply change the fasteners, nails, or replace with a new one
There is another option, laying tiles on plywood sheets, chipboard.
The tiles do not allow air to pass through, so you need to take care of ventilation Source gidpoplitke.ru
The material must be moisture resistant.
An important point: when laying the sheets, there should be a small distance between them, 5-9 mm. Due to humidity, they can expand over time, and without a gap, the coating becomes deformed. This coating is fixed with self-tapping screws and then coated with a primer for better adhesion to the cement mixture.
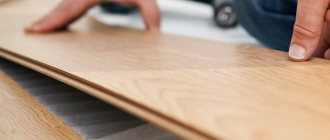
Laying process
First of all, apply glue to the base. Work carefully, the markings should not be smeared.
- Use a spatula to work, peel off from the base.
- This way you apply glue only to the back surface of the slab, the best adhesion is achieved.
- Now apply glue to the porcelain tiles, using a comb with eight-millimeter teeth to remove excess mortar.
- After three adjacent slabs have been folded, proceed to work on the adjacent strip.
Adjust the distance between seams. Next, work through each row in turn.
general information
Tile is an excellent choice for the kitchen, toilet and bathroom. Low moisture absorption, resistance to temperature fluctuations, high mechanical strength and wear resistance make it a clear leader in consumer qualities.
There are several general rules for laying the material we are considering.
- The base should be as level as possible. Large differences will have to be leveled with tile adhesive, which is undesirable: if a person with extensive experience can create a pillow of variable thickness with a flat surface from it, then a beginner can hardly do so.
- The tile adhesive should fill the entire space under the tile. Large voids are not allowed. Under heavy load, they can damage the ceramics, and it will be easier for the tiles to come off.
- Laying without seams is unacceptable. Gaps of 3-4 millimeters filled with grout are not only expansion joints. They also compensate for the inevitable slight variation in the linear dimensions of products, which is inevitable even in one batch - simply due to the firing technology and the heterogeneity of the raw materials.
- If for walls it is permissible to use universal adhesives, sealants and even polyurethane foam, then on the floor tiles are laid only with cement adhesives. The instructions are again related to the need to create a reliable pillow without voids. The only exception is installation on wooden substrates, on which cement-based adhesives simply do not adhere.
- In rooms where a significant amount of water is likely to get on the floor (showers, bathrooms and toilets), waterproofing is highly desirable. It can be coated, penetrating or rolled.
Coating waterproofing with liquid bitumen.
Of course, its price is noticeably higher: thermal energy consumption increases nonlinearly with increasing firing temperature.
Features of working with the solution
The glue sets after twenty to thirty minutes. During this time you need to have time to distribute it. If you do not yet have experience in quickly laying tiles, dilute the solution in small portions.
Glue that has begun to harden must be stirred with a mixer without adding water. Remove any adhesive that gets on the face of the tile, and also clean the grout from the seams.
The influence of shape on the creation of ornament
Standard ceramic shapes include rectangle, square, hexagon and octagon. You can diversify the basic styling design by using decorative elements horizontally and vertically.
It must be taken into account that the use of hexagonal or octagonal tiles implies the use of colored elements. And, if you decide to buy ceramics with rounded or wavy edges, you will have to use all your efforts and ingenuity.
Choosing an ornament
As we have already said, before you start facing work, you should carefully consider the pattern. What it will be like depends only on you and your taste preferences. In addition, its clear presentation will help you accurately calculate the required amount of materials. Here are some cladding methods:
Don't forget about the accompanying details. You should not leave seams on the surface in their rough state. Use grout. It will not only give the “canvas” completeness and a neat appearance, but will also complement the drawing and complete your idea. So, if you want to highlight the resulting ornament, use contrasting filler colors. If you need to combine the resulting pattern into a single whole, then grout in an identical tone will do.
Grouting process
To work, you need to select a special grout mixture for the floor covering. Consider the color of the material, do not choose light colors, they will instantly get dirty and lose their original appearance.
The color should match the tile, or be a couple of shades lighter and darker. A rubber spatula is not a suitable tool for working over a large area. Better take a rubber grater.
Distribute the compound evenly over all seams. Do not leave areas unfilled. At the end of the work, thoroughly wipe the floor covering and remove stains.
Recommendations for placement based on tile shape and size
Some basic tips:
- Products with a diamond shape will look better in a more spacious bathroom. By using this shape in a variety of colors, you can create a three-dimensional effect on a plane. This design is often used on the floor or to highlight small accent areas.
- An excellent option would be a laying pattern in the form of vertical stripes of large rectangular or square tiles in the middle of a large wall.
- A particularly interesting result can be achieved by combining the hog or brick model with other tile types. Thanks to this solution, you can not only avoid problems with decorating corners, but also achieve zoning of space.
Laying with inserts
A method called a Christmas tree with an attachment. It is interesting because the inserts have contrasting colors, which makes the composition livelier and more original. At the same time, the texture of the materials is the same, only the color scheme differs.
You can purchase the attachments ready-made or make them yourself by cutting them into squares of the required size. You embed elements when laying rectangular tiles in a herringbone pattern.
- Among the many ways of laying, the herringbone is one of the most complex and original.
- It is necessary to correctly follow all stages of work, starting from marking and choosing materials.
- It is accuracy and creativity that will help create a new and vibrant image in your interior.
A combination of colors, adjacent or contrasting, will help you adapt to any style in the interior and realize any design ideas.
Other invoices
In the “parquet” format you can find tiles “like concrete” and stylized like fabric, covered with colored glossy glaze and imitating metal. Moreover, both wall and floor.
In the photo: Block 5.0 porcelain tiles from the Iris factory, laid in a herringbone pattern. Please note: tiles with different patterns also vary in size.
In the photo: tiles laid in a herringbone pattern with the texture of concrete from the Cir & Serenissima factory.
Photo laying tiles in a herringbone pattern
Traditional
This is the most common method of laying tiles on the floor. Provides for the placement of ceramic tiles parallel to the floor and close to each other in even rows. The key to quality cladding is evenness. Typically, square tiles are used to create this pattern, but rectangular tiles will also look good.
Features of the drawing. Traditional masonry will have an unusual and original look if you use tiles of different colors. This is the simplest and fastest way to lay tiles, but some important points should be taken into account:
- with the slightest manufacturing defect in the tiles or careless installation, all the irregularities and inaccuracies will be immediately evident;
- The cladding with this option looks a little monotonous;
- This method is optimal only for seamless ceramic tiles.
Laying technology. It is important to maintain uniformity of laying, as well as the horizontal and vertical dimensions of the seams. Does not require professional training or skill.
Diagonal
This is the most beautiful and complex option for laying tiles on the floor, despite the fact that the diagonal method is based on basic laying skills. The difficulty lies in the correct marking of the diagonal axes along which the floor tiles are located. Mandatory cutting of tiles requires certain skills, significant expenditures of material and time, which also creates difficulties when tiling using this method.
The advantage of diagonal masonry is the ability to perfectly hide the curvature of the surface. It is most often used for cladding non-standard and small-sized surfaces.
Features of the drawing. When laying, the pattern grid should be located at an angle of 45 degrees to the floor. Square tiles are ideal. The pattern looks very interesting even when using plain ceramic tiles.
It is necessary to remember that there is a large amount of waste, since the tiles adjacent to the walls must be trimmed. This is the best option for laying floor tiles, hiding all the errors of an uneven floor. The room visually expands.
Laying technology. It is important to remember to accurately calculate the diagonal pattern. Before laying, you should thoroughly clean the floor surface from paint, linoleum, and wood particles, then prime it. Ceramic tiles are much easier to lay on a perfectly flat floor, and a minimum of glue is consumed.
The first row is laid in the traditional straight way using rectangular tiles, the length of which is equal to the diagonal of the main square tiles. The second row is laid from pre-cut tile triangles (hypotenuse down). All subsequent rows can be laid in horizontal rows, observing the principle of diagonal layout.