Drywall is the most common material used for interior decoration. Its environmental friendliness, ease of installation and perfectly smooth surfaces have won the recognition of many consumers. In order not to spoil the material and not to spend a lot of time on repair work, it is important to know how to properly line the ceiling with plasterboard.
Lining the ceiling with plasterboard: preparatory stage
First, you take measurements of the ceiling, this will allow you to know exactly how many profiles and drywall you will need. Always leave at least 5% as a reserve, this will prevent you from having to fly to the construction market later for the missing element.
Ceiling markings:
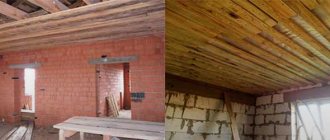
How to cover a ceiling with plasterboard in a wooden house
Everything for installing a plasterboard ceiling - https://goo.gl/v22oWt How to cover a plasterboard ceiling in a wooden house!…
- You should measure the ceiling height in each corner of the room;
- From all the results obtained, select the smallest one, find the angle corresponding to this value;
- From the top of this angle, move down 5-10 cm;
- At this height, place marks on both sides of the corner;
- After this, you should draw a line to the next corner, this is done using a cord and a level;
- The level of all other angles is measured in the same way.
Be sure to check the markings after you've done them. This is done either by a level or by simple mathematical calculations. From each of the marks in all corners you need to measure the distance to the floor. The heights will match if you did everything correctly. If an error is found, again draw the desired line using a cord and a level.
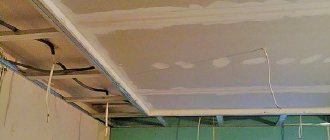
Puttying seams in drywall
Having completed the installation of plasterboard panels, you cannot immediately proceed to decorative work. The owner is first required to fill the seams remaining between the panels. A little putty is needed. The main thing is to rub it well, and then grind it over the applied composition. In this case, it will not protrude above the surface of the plasterboard sheathing.
It remains to carry out decorative work. Here the owner can choose what is best for him. This could be wallpaper, paint, ceiling tiles.
Why is ceiling lining required?
People who have just purchased a new home or have completed renovations have a question about why they need to cover the ceiling with plasterboard. Not every person who is far from the construction industry is able to immediately understand the need to spend additional funds and their own efforts on organizing an auxiliary parallel plane in the house.
Ceiling process
In this case, the financial issue is not taken into account, since drywall is affordable. As a result, the ceiling is much less expensive than alternative options, including plastered, putty or even painted surfaces. Here we are talking about the simplest designs without complex shapes or levels.
Can't do it without an assistant
Attention! A suspended plasterboard ceiling is a great way to do the job yourself and save money. You can additionally mount various lighting options, including starry sky and neon type.
Covering the ceiling will eliminate the need for leveling the surface, careful preparation or putty. There is no need to call a specialist if you are creating a frame for drywall. This will lead to certain expenses, but they are much less than other types of finishing. It is recommended to pay attention to the video, which will allow you to do everything correctly and eliminate errors.
One of the ceiling design options
Among the advantages are the following:
- Leveling the ceiling surface, hiding defects in the main coating behind plasterboard.
- Hiding utilities, electrical wiring, ventilation and exhaust hoods behind sheets of drywall.
- Excellent chances for sound insulation, additional insulation of the ceiling. For this purpose, auxiliary material is placed in the niches.
- Creation of multi-level design structures, installation of various lighting options.
- You can hem the ceiling in any room, regardless of humidity levels.
- Installation is easy to do yourself.
These advantages of using drywall sheets make you think about purchasing the material. You will definitely like the result of the finished design, which is important. Remember that a ceiling made of plasterboard sheets is not a tribute to fashion. This is an opportunity to add functionality to the interior and highlight the zest.
Ceiling markings
It must be performed in order to correctly orient the frame of the future suspended ceiling. Properly marked overlap will allow you to achieve a high-quality result. Only professional specialists with many years of practice behind them can begin installing the ceiling without preliminary marking. Beginning masters should not skip this point and pay special attention to it.
Marking is done by drawing lines both on the ceiling and on the walls.
- Draw a baseline around the entire perimeter of the room. It will be the main level of the future ceiling structure. The distance that must be retreated from the base floor to the future finishing is determined by the presence of communications that need to be hidden. The most optimal size is considered to be 10 centimeters. To make the line as even as possible, you need to use a laser level for marking.
- Next we move on to marking the grid on the ceiling. First you need to draw lines that serve as a guide for attaching the longitudinal profiles, after which we move on to calculating the places where they intersect with the transverse guides.
Preparatory work and selection of materials
The primary stage of work is to develop diagrams and projects that will allow you to select the desired type of ceiling. Consider the design, style of the room, dimensions, perimeter of the room, additional decor. If you have decided on your own wishes, take the dimensions of the perimeter of the room and start creating a diagram. This can be done on a regular sheet of paper using a pencil or in a computer program. The use of the latter is recommended if a multi-level structure is planned.
One of the options for creating a diagram
The required materials include the following:
- Finishing and starting putties.
- Drywall sheets.
- Various types of profiles. The profiles themselves are purchased according to the measurements taken.
- Fastening elements.
- Joint tape.
- Primer.
- Tools: marking tools, screwdriver, hammer drill, construction knife, spatula.
Additionally, you need to purchase different types of fixtures, wiring, ventilation and decorations if required for the design. The luminaires can also be mounted in a ready-made profile, which simplifies installation.
To prepare, do the following: get rid of the old finish, clean the ceiling of dust and dirt. All equipment and materials are placed nearby.
Preparing the surface for plasterboard sheathing
The classic suspended ceiling is mounted on a metal frame made of metal profiles. Sometimes wooden slats are used for this purpose, but they are quite heavy and difficult to use.
There are two types of metal profile:
- UD – placed around the perimeter of the room and attached to the walls; to determine the required quantity, it is enough to calculate the perimeter of the room;
CD - also called the main profile, since the direct installation of plasterboard sheets already takes place on it; The longitudinal guides are fixed so that the profile fits at the junction of the two sheets.
It is necessary to take into account the fact that in large rooms the transverse profile is strengthened by the longitudinal one, while the step of the first is 40 centimeters.
In addition to profiles, to finish the ceiling with plasterboard sheets you will also need:
- connecting parts;
- hangers, which are brackets for profiles, allowing you to install the frame at the required distance from the base to the plasterboard sheathing;
- crabs, namely, four-way connectors used for fastening profiles that intersect at right angles;
- fixation elements – dowel-nails and self-tapping screws.
After you have prepared all the necessary materials, you should proceed to marking the working plane.
Filing and process features
After the frame is finished, the question arises of how to hem the ceiling with plasterboard correctly, doing everything yourself. The video will help with this. Viewing will clearly illustrate the features of the work and help eliminate possible negative details. The filing itself on the ceiling surface and walls is oriented towards compliance with the following rules:
- Avoid cross-shaped joints; they do not guarantee quality; in addition, you will have to mount the material on the walls.
- It is worth starting with solid pieces of material or with the largest ones.
- It is preferable to avoid placing mechanical stress on individual pieces of drywall.
It is recommended to choose self-tapping screws as fasteners. With their help, attaching sheets to a frame made of profiles will be an easy task. Additionally, maintain a certain distance between screws to ensure strength and reliability. Pieces or sheets of material are sequentially attached to the frame, sheathing the ceiling without affecting the surface of the walls.
The final stage of work is finishing. It begins with sealing the joints between the sheets and between the material and the wall surface. After this, they glue the solutions on top, prime and putty the surface. At the end, finishing putty and grouting are carried out with sandpaper. It is necessary to approach the work qualitatively in order to achieve effectiveness and aesthetics.
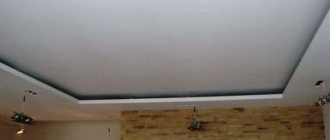
Final view of the plasterboard ceiling
Now you know how to sheathe a ceiling with your own hands. Everyone can do the job, even if you haven’t encountered it before. It is recommended to act carefully and according to the algorithm, double-checking the actions. To make sure it's correct, watch the video. It will help you understand how to work independently.
Before you start covering the ceiling with plasterboard, you need to take into account all the characteristics of the room in which you will make a gypsum plasterboard ceiling. Otherwise, you won't be able to admire the results of your work for long. To create the ideal ceiling for many years in the bathroom or kitchen, give preference to moisture-resistant gypsum boards and metal profiles for the frame. Due to the simplicity and convenience of installing a plasterboard ceiling, most people take on the work themselves, without the help of a professional.
In order to install a beautiful and original ceiling with your own hands, it is better to choose a single-level design. Materials and tools, algorithm of actions - everything is the same as if you were making a ceiling with an assistant.
Option with attic ceiling
In order to mount a plasterboard ceiling, it is necessary to draw precise markings. To do this, it is better to use a laser level.
In order to highlight as many nuances as possible of finishing a plasterboard ceiling with your own hands, we will give as an example the installation of gypsum boards on the ceiling of an attic room. Once you understand how to do it correctly, you can handle simpler options on your own.
The first thing you need to take care of is accurate marking. The first measurements are aimed at marking lines of a horizontal nature. The most convenient device for this purpose is a laser level. A laser level can be replaced by a water analogue or a painting cord. Using these tools, initial marks are applied, and then subsequent markings. It will be needed for high-quality and accurate fastening of the guide elements.
Based on the preliminary markings, it is necessary to install a guide type profile. For this purpose we use fasteners called dowel-nails. The fastener spacing should be no more than 1000 mm. And the choice of fasteners, or rather its type, directly depends on what material the walls in your house are made of. Despite the inclined position of the ceiling in our example, the fastening of the guide profile will also be carried out in places with a slope.
Scheme for measuring the dimensions of a plasterboard sheet.
Please note that if you need to connect two parts of a profile, then commercially available special brackets that act as connectors are ideal for this.
Now it’s time to mark the already mounted profile based on the multiple of half the size of the drywall sheet. Next, the ceiling type profile will be installed using these marks. This is the method that will allow you to connect two sheets in the middle of a profile for the ceiling.
I would like to note that the size of the plasterboard sheet, or rather its width, corresponds to 1200 mm. Another part of the ceiling profile must be placed exactly in the center. So, we can achieve a result in which the location of the ceiling profile will be done in increments of 600 mm.
The connection between the ceiling-type profile and the guide must be made using self-tapping screws designed for working with metal.
Scheme of the main types of metal profiles for fastening drywall.
Please note that due to the peculiarities of our room (attic), where the transition of the ceiling surface from inclined to flat is located, another part of the ceiling profile is being installed.
The following steps involve marking the middle of the ceiling profile using a marker. They will make it easier to navigate further work when installing gypsum boards. You just need to connect the marks and sheets, and then fix them.
Next, you can install all the remaining parts of the ceiling profile. The pitch is the same - 600 mm.
At the end of this stage, we proceed to the markings necessary for further fastening of the transverse profile. Thus, you will subsequently have to form cells.
Lining the ceiling with plasterboard: step-by-step instructions
Drywall is the most common material used for interior decoration. Its environmental friendliness, ease of installation and perfectly smooth surfaces have won the recognition of many consumers. In order not to spoil the material and not to spend a lot of time on repair work, it is important to know how to properly line the ceiling with plasterboard.
- Many people prefer to twist gypsum board sheets directly to the beams, but in this case there may be inconvenience with laying insulation. The gap between adjacent beams is also of great importance. If it exceeds 50 cm, it will not be possible to mount the sheets to the beams.
- As a way out, you can install a sheathing of 40*50 cm timber, where you can lay mineral wool. And make a frame from metal profiles on top. The beam is fixed in increments of 50 cm.
Before assembling the sheathing, a layer of vapor barrier must be attached to the supporting beams. For these purposes, it is better to use a construction stapler. With this approach to work, first you will have to carefully prepare the rough ceiling: eliminate all flaws, putty and treat the surface with a primer. The ceiling in a wooden house is also hemmed to the beam structure. But then you will need to install the sheathing.
You will need a beam 40*50 mm.
Frameless fastening of gypsum boards to the ceiling
With this approach to work, first you will have to carefully prepare the rough ceiling: eliminate all flaws, putty and treat the surface with a primer.
Next, start attaching the sheets according to this pattern:
- Mark the points of future fastenings on the ceiling surface.
- Attach the sheet, drill it at 8 points.
- Remove the gypsum board and make holes in the ceiling through small holes, where you insert dowels or wood chips.
- At the holes, glue small pieces of foam rubber to all sheets, which will act as adjustable springs.
- Screw each sheet to the ceiling with screws. Adjust the horizon with a level or level.
- At a distance of 3 mm from the head of each screw, drill holes with a diameter of 5 mm, which are filled with mounting foam. It will fix the material more reliably.
- After the foam has hardened, remove the screws and fill the holes.
You can move on to finishing.
Lining the ceiling with plasterboard - how to make repairs in the house with your own hands
Lining the ceiling with plasterboard is a simple and effective way to renovate an apartment with your own hands. The material is lightweight and easy to work with, which allows you to create a variety of configurations of suspended structures. It will not affect the health of residents in any way because it is made from environmentally friendly products.
Another advantage of a suspended ceiling is that electrical wiring, pipes, and ventilation ducts are hidden in it. The room loses a little height, but in a modern apartment this is almost unnoticeable. There is an opportunity to get rid of chandeliers hanging overhead and collecting dust. Instead, they install recessed lamps or lay LED strip.
It looks modern and beautiful. GKL slabs are attached to the frame and it seems that a wooden house is an ideal building for installing a plasterboard ceiling. It is much easier to make lathing in it than in a room with floors made of concrete slabs. This is true, but provided that some nuances are taken into account.
Wood is very mobile, it moves over time and cracks form. The following will provide tips on how to take this feature into account in order to perform the installation correctly. There are six types of plasterboard, but only ceiling plasterboard is used for ceilings.
Its difference from a regular wall one is in thickness: 9.5 mm versus 12.5 mm. Due to this difference of 25%, the weight is lighter, which creates additional convenience for work. In addition, the material has acquired greater flexibility, which is required to create multi-level structures: they make waves, arcs, and curved elements.
The filing technology is simple and, after studying the step-by-step instructions, even a person who has never done anything like this can do it.
Practical advice
Benefits of drywall
GCR is used more often than others when repairing ceilings, due to its advantages:
- Environmentally friendly.
- Availability.
- Ability to pass air.
- Possibility of choosing material taking into account specific conditions.
How to properly hem ceilings with plasterboard: useful tips
To properly install gypsum board ceilings, you must follow a few simple rules:
- Do not place the material on its edge, place it only in a horizontal position, since gypsum plasterboard can easily become deformed.
- If you are puzzled by the question of how to line a plasterboard ceiling in a room where there is often high humidity, use material marked moisture-resistant.
- To create shaped elements, purchase regular plasterboard, it is more flexible.
- For curly cutting of drywall, use a special tool - a jigsaw. If the line is straight, there is no need to cut the sheet, it breaks easily.
We hope that our recommendations will help you in your work.
How to hem a ceiling with plasterboard: instructions from a master
Drywall for interior work, both in an apartment and in a private house, is used more and more often as it goes on. This is not surprising, because it is an environmentally friendly material that can easily be laid with your own hands, creating perfectly smooth surfaces. In order for the consumption of sheets during repair to be optimal, you need to know how to properly line the ceiling with plasterboard.
More on this and much more below.
- single-level, when profiles are mounted directly on the ceiling surface;
- two-level, when the first frame is mounted directly on the ceiling surface, and the second - on the existing frame.
Before you line the ceiling with plasterboard, you need to decide how many levels it will consist of. Thus, suspended structures come in two types: Installation of the frame must begin with the installation of guide profiles. They are fastened directly under the drawn line with dowels along the entire perimeter of the room. This is where a hammer drill comes in handy.
The further sequence of actions is as follows: Having prepared everything you need, you can proceed to the first stage of work - marking for metal profiles. First you need to inspect the ceiling. If there are large defects on it, they must be repaired. It is also necessary to pre-conduct electrical wiring and, if necessary, other communications. It is advisable to cover the surface with a primer mixture, and all communications with compounds that will prevent corrosion and mold.
Transverse inserts are mounted from profile pieces. Their main purpose is to strengthen the structure in places where a large chandelier or other heavy objects will be hung. The connection of the transverse inserts and the main guides is carried out using special fasteners.
- a line is drawn with a marker;
- an even long strip is applied to it;
- several movements are made with a stationery knife;
- drywall is placed with a cut on the edge of the table;
- the sheet breaks off along the line;
- the paper is cut on the other side.
The profiles are secured with self-tapping screws of the “metal + metal” type along the cord line, and the height of their lowering is adjusted using plumb lines. The CD profile is inserted into the opposite UD profile, the sheathing elements are connected to each other with self-tapping screws. After all ceiling profiles have been installed, they should be checked for evenness using a large water or bubble level. The corner is usually processed with an edge plane. Just do it so that the corner is cut at the same level along its entire length.
After completing the sheathing, cover the entire area with a special primer; this is necessary for subsequent good adhesion of the finish.
Features of the installation of ceilings on beams
Contents of the material
As floor beams, beams with a section of 150x150 or 150x200 or boards 50x150 or 150x100 sewn together are usually used. These materials provide sufficient strength and allow you to make the lining from almost any material.
How to hem a ceiling on wooden beams
The ceilings can be interfloor or attic. In the first case, they separate the heated rooms, so only sound insulation is required. It is performed using mineral or basalt wool, which additionally have heat-insulating properties. A sufficient layer of thermal insulation is required in attic floors.
To protect the insulation from moisture vapor and liquid leaks, vapor and waterproofing is also necessary. It is made using special films made of non-woven material. The ceiling pie is shown in the figure.
Ceiling installation on beams
Purpose of the elements of the ceiling pie:
- vapor barrier film prevents the penetration of moisture vapor from inside the room;
- sheathing made of slats, onto which the finishing sheathing is later mounted;
- sound or heat insulation in the form of mats or slabs;
- waterproofing is a vapor-permeable diffusion membrane.
With this arrangement of floors, the decorative finishing of the ceiling will be protected from deformation, moisture and condensation, regardless of the material chosen.
There are two ways to hem a decorative ceiling covering:
- completely sewing up and hiding the beams under the trim;
- using them as a decorative element.
In the case of hemming from below, insulation and sound insulation are laid between the beams. A vapor barrier and a finished ceiling are hemmed underneath, and a waterproofing membrane and the floor of the upper floor or attic are placed on top. This method is used when the ceiling height is sufficient, when there is no need to save space.
When using beams to decorate the ceiling, the finishing finish is laid on top of the beams or hemmed to the bars attached to their side surface. A vapor barrier is laid over the beams, floor joists are placed on top, and insulation is laid between them. A layer of waterproofing and floors are laid on top.
Options for lining the ceiling on beams
In this case, the beams can be additionally covered with boards and painted in a suitable shade. Using this technique, you can create a stylish ceiling without reducing its height - it will not put pressure and visually reduce the space.
Lining the ceiling with plasterboard - recipes from the masters
Next, run a knife along the level along the drywall from the front side. Then slide the sheet off the table and break it. Then turn it over and cut the cardboard on the other side. Please note! Before attaching drywall, it must lie in the room for at least a couple of days. However, its storage is possible only in a horizontal position. Most often, straight universal U-shaped suspensions are used, which are attached to the main ceiling, and the main profiles are already attached to them. The pendants have frequent holes in the sides. This allows you to screw the profile to them at different heights, adjusting it.7.
We attach the main secondary profiles to the main profiles. They are attached in places where it is planned to join sheets of drywall. The result is a kind of metal lattice, which is a single-level frame. It is best to cut sheets 120x250 or 120x125 cm. The main thing is that the ends of the sheet fit exactly on the supporting frame laths.
The sheets should lie horizontally on a flat surface (preferably a table).
Additional information on the topic:
- Walls with patterns that can be made from plasterboard
- Technology for installing plasterboard on the ceiling, two layers
- Two-level ceiling made of plasterboard and tension with lighting photo for the kitchen
- How to glue ceiling plinth to a plasterboard ceiling
- Installing a plasterboard ceiling on a wooden ceiling video
Drywall is the most common material used for interior decoration. Its environmental friendliness, ease of installation and perfectly smooth surfaces have won the recognition of many consumers. In order not to spoil the material and not to spend a lot of time on repair work, it is important to know how to properly line the ceiling with plasterboard.
Continue working: features
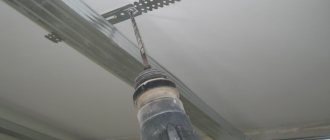
The following actions will be aimed at installing the hangers necessary when fixing the ceiling-type profile to the working ceiling, as well as walls that have a slope. The spacing of these fasteners (hangers) is no more than 1000 mm.
Scheme for attaching profiles for plasterboard to the ceiling.
For ease of use, a cord is pulled between the profiles located along the edges. It will help carry out the procedure for leveling the ceiling profile. This means that in the end you will get a flat, horizontal surface that does not have differences.
Alignment of the ceiling profile is carried out after the installation of the suspensions to the inclined wall is completed. After which hangers are also attached to it.
Self-tapping screws for working with metal are suitable as fasteners. The protruding (unnecessary) parts of the suspension are bent to the opposite side.
And one more important point, in order to fix the transverse profile, you need to purchase special brackets, which are also called crab. Only with its help you will get a connection that meets the requirements of strength and reliability.
It happens that some places do not allow the use of a convenient crab-shaped fastening. For example, a profile located at the very bottom of a wall with a slope. It is almost impossible to do this there. This is due to the fact that one side of the profile is located quite close to the wall. It was precisely these difficulties that were discussed at the very beginning.
To fasten profiles on a slope, use brackets.
If you have noticed, construction stores have brackets for special purposes; it is with their help that it becomes possible to connect the profile in different planes, at any angle. Their cost is quite affordable, to say the least, but they are usually forgotten about, and they may not be at hand at the right time.
So, experienced experts advise the following. It is necessary to use a small section of the guide type profile in order to fasten it between it and the transverse profile. Since during the work we cut the guide profile, a certain amount of it was used up, so that it does not go to waste, you can use it as described above.
Read more: Glue for PVC pipes. Glue installation of PVC pipes. Recommendations for choosing adhesive
Ceiling markings
Fastening the material and its types
Drywall can be hemmed to a wooden ceiling in one of several ways.
On a ceiling hemmed to the beams
The structure of a false ceiling is represented by a horizontal plane made of different types of boards, mounted from below to the beam ceiling.
Finishing gypsum plasterboard on such a surface without a pre-installed frame or sheathing is permissible when the ceiling is flat and has no flaws or slopes.
Installation of plasterboard sheets is carried out using standard self-tapping screws from 32 to 51 mm long in a checkerboard pattern. It turns out that the corners of adjacent sheets will not touch each other. The screw caps should be recessed into the gypsum board by a millimeter.
On wooden sheathing
The ceiling in a wooden house is also hemmed to the beam structure. But then you will need to install the sheathing. You will need a beam 40*50 mm.
The procedure will be as follows:
- Attach the timber to the beams using long self-tapping screws. The depth of penetration of the self-tapping screw into the beam should not be less than 5 cm.
- The step between the beams that make up the sheathing should not exceed 50 cm. If possible, reduce the distance to 40 cm.
- For perfect levelness, use a building level. To adjust the height, place plywood or wooden pieces under the beams, which will act as adjustable hangers.
On a note! If there is a large distance between the beams and the mounted sheathing, it is better to use special profile hangers. They're inexpensive, so they won't break your budget. But the design will be more reliable.
- If you did everything correctly, the sheathing will coincide with the joints of the two sheets of drywall.
- Now fasten the ceiling gypsum board in such a way that the junctions of adjacent sheets fall on the beam.
For galvanized profiles
GKL ceilings in a wooden building with beamed ceilings can be hemmed onto a lathing made of galvanized CD profile, the dimensions of which are 60x27 mm. A UD profile is installed on the wall surfaces in a perimeter position.
To fix it to the beams, hangers are used.
The sheathing must be assembled as follows:
- Along the perimeter of the room on the wall surface, using a level, draw a base line, and attach a guide profile to it.
- Suspensions are attached to the beams at the same distance. For each, use two self-tapping screws 45 mm long.
- The edges of the CD profile are carefully inserted into the guide bar and secured with hangers.
- To ensure that the sheathing is in one plane, nylon threads are pulled between perpendicular beams.
- Each profile strip is lowered to the threads using hangers and secured with nine-millimeter screws (four pieces each). Those parts of the hangers that remain free are bent upward, higher than the base of the plasterboard ceiling.
- From CD profile scraps, transverse inserts are installed at the junction of adjacent sheets of material.
- The gypsum boards are mounted as indicated in the previous methods.
Pros and cons of technology
Metal or wooden sheathing facilitates the installation of building and finishing materials on a horizontal surface. Leveling ceilings using gypsum boards is painless for spaces whose walls are higher than 2.6 m. In small-sized housing, the parameters often do not exceed 2.5 m. After installing drywall on the box, the room becomes uncomfortable and cramped.
Frameless technology is a suitable option for tiny rooms. GKL is not attached to the sheathing, but directly to the ceiling. This design takes up no more than 2 cm of usable space overhead. The height will drop by the thickness of the construction and finishing sheet and fasteners (screws, mortar). After installation, the surface is covered with putty, painted or wallpaper is glued.
Finishing a wooden ceiling with plasterboard
In this case, the frame for the ceiling is first installed, then the plasterboard sheathing is attached. However, there are a couple of nuances here:
- Many people prefer to twist gypsum board sheets directly to the beams, but in this case there may be inconvenience with laying insulation. The gap between adjacent beams is also of great importance. If it exceeds 50 cm, it will not be possible to mount the sheets to the beams.
- As a way out, you can install a sheathing of 40*50 cm timber, where you can lay mineral wool. And make a frame from metal profiles on top. The beam is fixed in increments of 50 cm.
Before assembling the sheathing, a layer of vapor barrier must be attached to the supporting beams. For these purposes, it is better to use a construction stapler.
Important! In wooden structures, when attaching profiles, it is permissible to use special screws, and never nails.
The frame is assembled as follows:
- Draw a horizontal line around the perimeter of the room, identifying the bottom corner in the room.
- Screw the hangers and fix the ceiling profile to them.
- Leave a gap of 1 cm between the wall surface and the profile.
- Install the guide from the end of the ceiling profile.
- Fix the crossbars with crabs.
At the last stage, sheathe the gypsum board frame.
Fastening gypsum boards to the ceiling using mastic
This is not the most commonly used method and with its help you will not be able to create a multi-level structure, as well as hide electrical wires and communication systems under it. But in some cases, gypsum mastic can be a good solution.
The main thing is to follow the important rules:
- Cut the sheets into several equal parts for ease of fastening.
- Apply mastic in small portions, first at the edge of the sheet, then in the middle.
- Before starting work, carefully prepare the rough ceiling.
How to hem a ceiling with plasterboard
You can install a suspended plasterboard ceiling with your own hands not only in a private wooden house, but also in an ordinary apartment. The main thing is to perform all stages efficiently.
Preparing for work
First of all, you will need to prepare the ceiling surface for work. We are considering installing the ceiling on a frame, so careful leveling and puttying will not be required. It is only necessary to clean off pieces of old plaster and treat the ceiling with a primer to protect it from the possible appearance of fungus and mold.
Draw a preliminary drawing of the future ceiling on a piece of paper. This will make it easier for you to navigate when applying markings to the ceiling.
Marking
It is as follows:
- Find the lowest level in the room and mark a dot with a pencil.
- Using a building level, place points in the remaining corners to determine the perimeter, focusing on the first mark.
- Now you need to mark with upholstery cord in the form of a horizontal straight line along the entire perimeter.
- Next, transfer the drawing from the paper to the ceiling, mark the places where the pendants and lamps will be attached.
Installation of a metal profile frame
It starts with installing the guides. They are placed exactly along the line that outlines the perimeter of the room. The whole process looks like this:
- Using a drill, drill holes in the profile, attach it to the wall, and place marks on the wall surface.
- Using a hammer drill, punch holes for fastening the guides in the walls, and fix the profiles with self-tapping screws every 25 cm.
- Mount hangers for supporting metal profiles according to the marks on the ceiling. The distance between them is 60 cm.
- Place the supporting profiles so that they are at the junctions of two sheets (distance 60-100 cm).
- To ensure that the ceiling is even, use the tip with nylon thread. And level the profile using hangers according to its level.
- Secure the guides to the self-tapping screws.
- Install the supporting profiles in a perpendicular direction using “crabs”.
Installation of plasterboard sheets
Before installation, drywall should lie for several days at room temperature.
The sheets must be fastened in a checkerboard pattern, starting from the corner of the room with self-tapping screws.
After the last sheet of gypsum board is screwed to the ceiling, use a knife to trim off all the irregularities.
What is required for installation?
To create such a structure, you need plasterboard, materials for the frame and a finishing coating that will give the ceiling a beautiful appearance.
First, decide what the frame will be like:
- wooden;
- metal.
In the first case, bars are used - they are attached to the base using hangers. In the second case, as you probably already guessed, metal profiles are used.
Important ! The elements of the ceiling frame are basic and load-bearing. In the case of the metal version, only load-bearing elements are used, but in a wooden frame both main and load-bearing elements are used. Such profiles are produced from galvanized steel and are designated PNP 28/27, PP 60/27. You may also find products under the foreign labels CD and UD.
In addition, the frame will need fastening elements, such as hangers, “crabs”, anchors, dowel-nails, self-tapping screws (special ones intended for drywall, and “kids” with a gimlet for metal).
Drywall hanger
But still, the main finishing element is drywall. It comes in different types; when choosing one or another, it is necessary to take into account the microclimate and specifics of the room. More specifically, this material can be:
- grey . Used in ordinary rooms where there is normal humidity;
- pink . Fire-resistant material, designated by the letters GKLO. Used for covering areas near fireplaces and stoves;
- green . Drywall, which is designated by the letters GKLV, is suitable for kitchens and bathrooms;
- blue or dark gray . This is GKLVO, characterized by fire and moisture resistance. Suitable for finishing walls in the kitchen.
Expert opinion
Sergey Svistunov
Specialist in the design of buildings and sewer systems. Knows everything about construction and renovation.
There is also an arched material, gypsum plasterboard, which is characterized by high ductility and has a thickness of only 6-7 mm. This type of drywall is intended for curved structures.
the standard gypsum board material is often used , which is explained by its cost, optimal weight and lack of fire safety requirements. The sheet sizes are usually as follows: 1500/2500x600x1200x9.5 mm. To calculate the number of sheets per room, you don’t need any online calculators - knowing the dimensions of the material and the area of the ceiling, this is easy to do.
Video - Types and criteria for choosing drywall
Combination of mop and lifting mechanism
Such a device for installing drywall on the ceiling is more difficult to make, but it is more convenient to use. The device consists of two parts: a rectangular frame and a vertical stand. The structure is assembled from wooden slats. A shorter one is screwed to a long stick at a right angle to form the letter “L”, reinforced with a slope. Two such supports are connected by transverse jumpers into a rack.
The frame is made a little longer and narrower than the plasterboard sheet. A transverse rail is mounted on one side just above the main level. The gypsum board will rest against it. The second part is attached to the rack with a swivel joint (bolts).
The sheet must be placed on the frame and lifted from the side opposite the rack. Support it from below with a mop or a regular stick. Due to the protruding strip, the drywall does not adhere tightly to the ceiling, making it easy to adjust the position. Then pieces of penoplex or other soft material are placed under it on the frame. The gypsum board is pressed tightly against the ceiling.
Ceiling installation
Let's start creating a frame for future finishing. Its installation begins from the perimeter.
- Set the UD profile to the baseline. It must be fixed with dowels with a plastic or metal sleeve, which are best suited for concrete and brick walls.
- To make it easier to secure the guides, you can connect the profiles with a thread along the entire perimeter of the room. You can also use a cord for this. Thus, we get a level.
- Next, we begin to install the hangers along the grid drawn on the ceiling. They must first be bent, and only then attached to special hangers. The profile is connected either with connectors or crabs.
So, the frame is ready for covering with plasterboard sheets.
What is it about?
Suspended ceilings made of gypsum plasterboard are one of the most commonly used ceiling solutions in apartments, rivaling in popularity only, perhaps, stretch ceilings. In KNAUF terminology they are called “element-assembled suspended ceilings”.