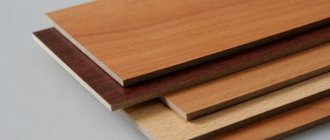
Among the frequently used building materials used for decorating premises, dry gypsum plaster – plasterboard – is very popular. It has earned its popularity due to its high performance characteristics: sufficient flexibility, ease of processing, environmental friendliness and accessibility. In order for finishing a balcony with sheets of plasterboard to give the expected result, it is necessary to become more familiar with the features of using the material and the technology of its application.
Possible finishing options
There are many ways to transform your balcony:
- corrugated sheeting;
- plastic lining;
- PVC;
- plaster;
- drywall.
Why do we stop at the last option and not use something else? It's all about the price and simplicity of the work performed. Moreover, after using gypsum plasterboard, the walls can be finished with any finishing coating. The price of gypsum plaster sheets is lower than that of other decorative finishing materials. And not everyone is able to install the same lining or the same PVC panels with high quality. If some kind of jamb comes out of the gypsum board, it can always be hidden by the finish.
What is better, plaster or drywall on the balcony? This question is more complicated. The fact is that plaster can also be redone to an ideal state, but not everyone can do it. After this method, you will have to spend a long time cleaning. Moreover, crooked walls cannot be leveled with plaster without special skills. And the insulation cannot be hidden under it.
For a better comparison and selection of materials, it is necessary to analyze their pros and cons.
How to properly insulate a loggia with mineral wool
Loggias and balconies have long ceased to function as storage rooms. Now more and more owners are seeking to increase the usable area of their apartments by combining a room with a loggia, or by arranging a small room directly on the balcony. In both cases, before proceeding with the design of the room, it must be insulated, since the developer did not initially envisage the role of the loggia as a living room. And the best raw material for insulating walls, floors and even ceilings is mineral wool.
The use of such material to ensure the preservation of room temperature has both a lot of advantages and disadvantages. It is important to take into account both the pros and cons of mineral wool, as well as the features of insulation technology, even before starting repair work.
Positive and negative aspects of using gypsum boards on the balcony
Many people believe that plasterboard sheets should only be used in a heated room with constant temperature and humidity. The balcony clearly does not fit this definition. However, things are somewhat different. You should figure out what the pros and cons of this material are when finishing a loggia. Let's start with the positive aspects.
- The environmental friendliness of the material makes it harmless when used. The sheets are 99% gypsum and pressed paper.
- The material has some thermal insulation properties, which reduces the amount of additional insulation required.
- The sheets are easy to trim, making them easy to work with in small spaces.
- The light weight of the material makes it possible to decorate the balcony with plasterboard yourself without the involvement of an assistant.
- Non-flammability does not seem to be a particularly important point, but very often a cigarette butt from the upper floors flies onto the balcony, causing a fire. Using gypsum board will not prevent this, but at least it will prevent the fire from flaring up.
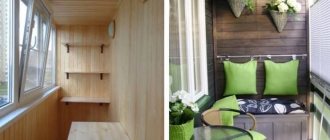
- You can create a frame in which communications will be hidden. It can also be used for laying thermal insulation materials, which is extremely important in an unheated room.
- The same frame will allow you to straighten curved walls.
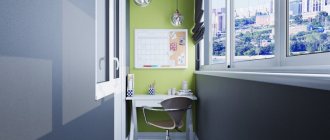
- You can make built-in lighting, which is extremely important for modern loggias.
As for the negative aspects, there are not so many of them:
- high humidity is the worst enemy of gypsum boards. If the balcony is not glazed, then this material should absolutely not be used . Special moisture-resistant sheets are good to use in cases where they will not be exposed to water. It may be necessary to lay an additional layer of waterproofing;
- When finishing a loggia with plasterboard, it is necessary to foresee in advance all the places where the shelves will be installed. GCR is a fairly fragile material, so hanging heavy structures may require the use of mortgages;
- the already small balconies become even smaller due to the frame created for the work. The drywall itself, the thickness of which is usually 12.5 mm, also takes up a little useful area;
- with dimensional sheets on a small balcony there is no place to turn around. Bringing them into a small room is not very convenient. You will have to cut them in advance, and then trim them in place. It will not be possible to cut all the sheets to the required size in advance.
One could talk about the fragility of the material, but the balcony is not a place where the walls can be subject to significant mechanical stress. To cover a balcony with plasterboard yourself, you may need special antiseptics and vapor barriers to prevent excess moisture from accumulating and causing mold to form. But the same can be said in relation to other finishing materials.
Resistance to wet environments
Plasterboard walls also have their pros and cons when installed in wet areas
It is important to choose the right material here. There are at least 3 types of drywall available for sale, depending on possible operating conditions:
Moisture-resistant drywall
- moisture resistant;
- refractory;
- ordinary.
Each of them has its own advantages, as do the designs made from it. If the sheet does not burn from fire, then from direct exposure to water and gypsum board it will become completely unusable. But this will only happen to a lesser extent than with conventional material for dry rooms. Gypsum is gypsum, you can add hardeners and hydrophobic components to it, but it will not change its main property - hygroscopicity, as a result of which it swells.
This is another of the few disadvantages of drywall and structures made from it. Therefore, due to the possibility of flooding by neighbors above, it is not recommended to build partitions and ceilings from ordinary plasterboard. This can lead to additional financial and nervous waste. It is better to use materials that are more moisture-resistant, for example, foam blocks, and it is better to make the ceiling suspended or suspended without the use of plasterboard.
Drywall walls also have pros and cons in terms of versatility and practicality. By creating a structure from this material using frame technology, it is possible to perfectly hide communication elements without much difficulty. Pipes, wiring, ventilation ducts. But again, if there is a threat of flooding, it is better to use gypsum board sheets. They have a distinctive feature - green cardboard.
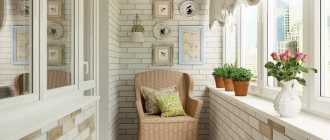
Decorative plasterboard partitions
But the main advantage of drywall is that only from it can you make entire works of art and unique compositions:
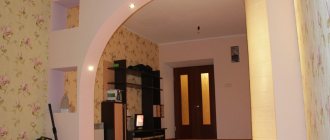
- arches;
- bar counters;
- decorative designs in Art Nouveau style;
- huge massive columns.
Which drywall should you choose?
The peculiarities of the balcony room are such that it is worthwhile to carefully approach the choice of materials used. High humidity and winter frosts make it necessary to understand the types of gypsum boards.
- Moisture-resistant drywall (GKLV) is exactly what needs to be used in this situation. On sale it is easily recognized by its green color. It is this that should be used to decorate the loggia so that new repairs do not have to be made in a couple of years.
- Standard wall gypsum board is gray in color and is not suitable for use in rooms with high humidity.
- Other types of material (fireproof, arched, ceiling) are also not recommended for use. In this case, the plasterboard ceiling on the balcony should be made using plasterboard. A suspended structure with moisture-resistant sheets will be heavier, but the ceiling area is so small that this weight will not play a critical role.
You don’t have to worry too much about sheet sizes. You should choose something that is cheaper and easy to transport. The sheets themselves have a standard width of 1.2 meters (sometimes 0.6 meters), and a length of 2.5 meters or 3 meters. The thickness should be 12.5 mm.
You can immediately calculate the weight of all the necessary sheets
Installation technology
Well, now you can tell us how to decorate a balcony with plasterboard yourself. The technology consists of several stages, presented in the diagram below:
Diagram of installation of drywall on the balcony.
Now I will tell you about each stage in more detail.
Preparatory stage
As is usual with good craftsmen (of which I dare to include myself), let's start with preparing the room. Here's what I do:
- I am dismantling the old finish. If the balcony was wallpapered or tiled, they should be completely removed and the surfaces should be cleaned with a spatula. In the case where the walls were painted with facade paint, it is enough to simply clean off the peeling pieces, and the layer of paint that adheres firmly can be left. Since we will use EPS for insulation, it will not bring us any harm.
Before starting work, you need to dismantle the old finish.
- I clean surfaces from dust and debris . To do this, I first clear the balcony of foreign objects, after which I use an industrial vacuum cleaner (you can use a regular household one) to clean the concrete walls from dust. This promotes better adhesion of adhesives and makes work easier.
The walls can be cleaned with a grinder.
- I carry out repairs of defects in enclosing structures. We are talking about cracks, depressions and protrusions that may be present on the walls or parapet. Through them, water can penetrate to the drywall, which will lead to damage to the finish. There are several repair methods:
- Small cracks need to be slightly sawed with the disk of an angle grinder, and then filled with foam using a gun. After this, the protruding parts of the foam should be trimmed so that there are no problems with gluing the extruded polystyrene foam.
- Large cracks must be freed from crumbling concrete using a chisel and a hammer drill, and then filled with a specially prepared cement repair mortar.
- Recesses in which the reinforcement is visible should be sealed with special care. First, metal parts should be cleaned of traces of corrosion and coated with a rust converter. And then fill the defect with a solution.
Cracks and defects need to be repaired.
- I am waterproofing balcony surfaces. This can be done using mastic or pasting material (the easiest way is roofing felt). Not long ago I devoted a separate article to this topic. If you are interested, you can contact her for the missing information.
Waterproofing the balcony floor.
- I prime the surface. Those surfaces (usually walls and ceilings) that have not been waterproofed must be primed. For this I use a primer for mineral surfaces with antiseptic properties. The active substance included in such a liquid prevents the appearance and development of mold and mildew on the enclosing surfaces of the balcony.
The walls and ceiling are primed with an antiseptic primer.
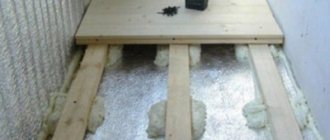
- I insulate the balcony using penoplex.You can, of course, use another building material for this, but I prefer this due to the ease of working with it. The EPS installation diagram is as follows:
- I glue pre-cut foam sheets onto the walls and ceiling using cement glue. If work is carried out in the cold season, it is better to replace cement adhesive with polyurethane adhesive.
- I seal the seams of the insulating material with polyurethane glue or polyurethane foam. If this is not done, islands of cold may form in the insulating layer, which will negate the effectiveness of thermal insulation.
- I additionally fasten the insulation using plastic “fungi” dowels with wide caps (I described the entire process of insulation using penoplex in more detail in one of the articles, which you can read before starting work).
The balcony must first be insulated with extruded polystyrene foam.
- I install foil reflective insulation. The material, as you already understood, will be penofol - foamed polyethylene with aluminum foil. It is attached to the penoplex using self-tapping screws, staples or double-sided tape. The joints are sealed with metallized adhesive tape to ensure maximum tightness.
Balcony after installation of penofol.
This is how simple and easy it is to prepare the walls and ceiling of a balcony. However, I will be fixing the drywall to the sheathing, so the next stage is its construction.
Lathing construction
To achieve complete mutual understanding, I want to explain why I install drywall on the sheathing rather than gluing it to the wall:
- in this case, there is no need to make significant efforts to level the walls; all unevenness can be leveled by correctly placing galvanized profiles on the brackets;
- Heat and sound insulation can be easily installed under the lathing layer, which you could verify for yourself if you studied the previous section in detail;
- a false plasterboard wall allows you to hide utility lines that would otherwise have to be laid in pre-made grooves;
- profiles allow you to create walls of any shape (but it’s up to you, here I will describe the simplest technology).
I see only one downside - a slight reduction in the usable area of the room. However, the advantages, in my opinion, outweigh this disadvantage.
I'll tell you how to install the sheathing:
- I install the upper UD profile. To do this, I draw a line on the ceiling in such a way that there is a gap of at least 4-5 cm between the penofol and the drywall, which will help remove moisture from the insulating layer. After this, I secure the profile with plastic dowels and screws, making holes with a puncher directly through the insulating pie.
Installing a UD profile.
- I'm installing the lower UD profile. To do this, using a plumb line, I tap out landmarks on the floor (to create a vertical line), along which I draw a line and secure the galvanized part. In this case, you will be 100% sure that the rack profiles will stand strictly vertically. The parts are secured with screws, the distance between which should be no more than 30 cm.
More detailed profile fastening diagram.
- I install guide profiles at the corners of the balcony. You need to act in the same way. By the way, a laser construction level, which can be rented at a construction supermarket, greatly simplifies the work of installing the frame. Ceiling, floor and wall profiles are connected using a cutter.
- Installing rack CD profiles. They serve to strengthen the plasterboard structure. The distance between adjacent parts is no more than 60 cm. They are screwed to the ceiling and floor guides using small self-tapping screws.
Profile connection diagram.
- I am installing additional brackets for the guides. They are screwed to the wall using screws and dowels, after which the side legs are bent and screwed to the profile. Be careful not to bend the guide piece in one direction or another, tilting it away from the vertical. The pitch between fasteners is from 40 to 50 cm.
Installation of perforated brackets.
- I install the cross members. These are galvanized parts mounted between adjacent guides at a distance of 40 cm from each other. This is done with the help of “crabs” - special fittings for arranging cross joints.
After securing all the parts of the sheathing, you need to take care of the utilities. In the simplest case, we are talking about electrical wiring, which is needed to illuminate the room, as well as connect heating and household appliances.
I prepared a separate article dedicated to balcony lighting, so you can get detailed information from there. Here I would like to remind you of a few important points:
- for a balcony it is necessary to use special equipment (sockets, switches, lamps) that can be used in a room with a high level of humidity;
- All electrical wires should be laid in polymer cable ducts, which prevent fire in the event of a short circuit in the system.
General view of the sheathing with utility lines inside (there is no insulating layer in the photo, as the illustration is from another object).
Instead of galvanized sheathing parts, you can use wooden beams. However, it is susceptible to destruction in humid air, so I still recommend choosing the technology described above.
Well, now you can move on to installing drywall.
Installation of plasterboard sheets
The process of installing gypsum boards on the sheathing is as follows:
- I mark and cut slabs. To cut a sheet of drywall, you can use a regular carpenter's knife. First, a cut is made on one side (more than half of the sheet), after which the product is broken and cut on the reverse side.
Cutting drywall using a utility knife.
- I cut holes for installing electrical appliances. To do this carefully, you can use a drill, into which a special skirt is inserted instead of a drill.
Making a hole for the socket.
- Installing sheets of drywall. There is nothing complicated here, you just need to follow a few important nuances:
- The wall panel should be raised above the floor level by a distance of 1 cm to avoid moisture getting into the cladding.
- The drywall is secured using self-tapping screws, which are screwed into the galvanized profile at a distance of 20 cm from each other. The caps need to be recessed into the material so that they do not protrude later and interfere with the puttying.
- The truncated (cut) edges of the drywall must be installed against the walls and close to each other. If for some reason a gap more than 4 mm thick has formed between them, it should be sealed with cement adhesive for gypsum boards.
- The rounded edges of the drywall should be spaced about 5 mm apart from each other.
Installation diagram of plasterboard sheets.
- I am processing the seams between sheets of drywall. To do this, you will need putty and serpyanka - fiberglass tape, which is used to reinforce the seams. The sequence of actions is as follows:
- I'm preparing putty. To do this, I rush the dry construction mixture with water and mix the solution with a mixer until smooth. The finished composition must stand for several minutes so that the additives and plasticizers included in it are activated.
- I fill the seam with putty, then glue the serpyanka onto it, and then apply a new layer of putty on top. Then all this needs to be leveled, and then left until completely dry (the exact time is indicated on the package with the putty).
You need to additionally apply sickle tape to the seams.
- I putty the recesses formed by the heads of the screws. This is done using the same putty composition and a small spatula. Do not apply too much solution so that bumps do not form on the surface of the gypsum board.
- I putty the balcony surfaces with finishing putty. This way I prepare the room for final painting or wallpapering. After the putty has dried, the surface is sanded with floats until it is perfectly smooth.
Finishing
Painted drywall.
I won’t talk long about the finishing touches. If only because I don’t know what decorative material you will use.
If we are talking about paint and wallpaper, then the scheme is as follows:
- puttyed drywall is coated with a primer, which improves the adhesion of the surface, removes dust and reduces the consumption of glue or paint;
- the surface is painted in several layers with water-based emulsion or covered with wallpaper.
Preparing tools and materials
If covering the balcony with plasterboard is carried out after similar repairs in the rest of the apartment, then there should be no questions regarding the necessary tools and materials. Otherwise, it wouldn’t hurt to find out what is useful in your work besides the drywall itself.
- Fasteners This includes self-tapping screws for gypsum boards, metal screws for profiles and dowels for mounting the frame.
- Elements for the frame. This includes hangers, crabs and galvanized metal profiles. The classic profiles are UD and CD; they are used to create a frame.
- Insulating materials. We are talking not only about mineral wool or other insulation, but also about vapor barrier materials .
- Tools include a tape measure, level, knife, screwdriver, drill, hacksaw, etc. There is no exhaustive list of tools, because some fasten profiles together with self-tapping screws, while others use a cutter, some cut the profile with metal scissors, while others use a grinder.
A typical set of tools
It's worth thinking about everything you need for finishing. Some people will want to put up wallpaper, while others will want to finish it for painting.
Need to work correctly
Finishing a balcony with plasterboard sheets consists of a number of successive stages. The step-by-step instructions below will help you deal with them. Just follow it and everything will work out for you. Let's consider this option when the frame is mounted from the inside:
- First, we begin installing the frame around the perimeter of the working surface. To do this, we attach a guide profile to the floor using dowels;
- since the greatest load will be placed on the frame around the perimeter, we use a frequent fastening step (10-15 cm);
- Next, when the profiles are fixed along the floor, we insert vertical profiles into them and fasten them to the walls. Here we also use a frequent step;
- after that we carry out the internal lathing. To do this, we insert the rack profiles vertically into the guide floor profile and secure them with metal screws;
- The installation step of the rack profiles is determined based on the length of the balcony itself. The longer it is, the more often you should take a step. This will give the entire structure greater rigidity and strength;
- After this, we fix the upper profile, closing the entire structure.
Frame for balcony
Upon completion of the installation work, you can begin almost the final stage - installing plasterboard sheets. The sheets here are attached to the frame using self-tapping screws. The process itself is not difficult, since the most difficult thing here will be cutting the drywall into pieces.
Then we cover the cracks with sickle and putty the joints and screws with putty. After that we prime. Now you see that there is nothing complicated about covering a balcony with your own hands.
Making plasterboard lathing correctly Plasterboard ceilings on balconies, stylish and practical
What are the main steps to follow?
Let's briefly look at what step-by-step instructions for finishing a loggia with plasterboard look like. Obviously, it can also be applied to the balcony.
- Surface preparation. At this stage, it is necessary to dismantle the current finishing so that it does not interfere with us. You need to make sure that the base is strong and the old plaster is not crumbling.
- Carrying out markings. Using a level, plumb line, tape measure and other auxiliary tools, markings are made for the future frame.
- Frame assembly. Using properly selected profiles, a sheathing is made to which the drywall will be attached.
- Heat and vapor insulation. Thermal insulation material is inserted into the frame, and then a vapor barrier is made. Some believe that it is possible to insulate a balcony with plasterboard, but polystyrene foam, mineral wool or other insulation will give an even greater effect. Therefore, they need to be used in conjunction, and not rely on gypsum board alone.
- Installation of drywall. At this stage, it is necessary to cut the gypsum board to the required size and attach it to the sheathing.
- Finishing work includes priming and puttying of previously laid sheets.
This is what the main stages of work look like. Next we will look at them in more detail so that there are no more questions about the process.
Features of insulating a loggia with your own hands
It is worth noting that due to the difference in designs, insulating a balcony with mineral wool differs from the same type of work in a loggia. In the first case, the main attention is paid to the extremely low weight of all components, in order to avoid collapse. In the second, there are more opportunities for combining a loggia with an apartment or arranging a full-fledged room in it.
Important! Having decided to arrange a separate room in the loggia, you should take care in advance about the correct location of electrical outlets according to the planned arrangement of furniture.
When starting to insulate with mineral wool with your own hands, you should strictly adhere to the technology of the work. The sequence of actions in this case will be as follows:
- Preparatory work.
- Carrying out glazing.
- Work on covering floors, ceilings and walls.
- Installation of electrical wiring.
- Premises finishing works.
In addition to the main insulation, you will need: wooden beams (joists), roofing felt, mounting adhesive, construction stapler, self-tapping screws and a screwdriver. You also need a tape measure and a building level.
Before starting work, you need to prepare the balcony for insulation
Surface preparation and marking
Everything that disappears must be removed.
This work can be done quickly or efficiently. In the first case, nothing is cleaned, and the installation of profiles is carried out according to the previous coating. The surface is not prepared at all, because it will be hidden by drywall, so who cares if there is old wallpaper or peeling paint.
Obviously, before starting work, you need to remove all objects from the balcony. Skirting boards and baguettes, if any, are also torn off.
By removing the old finish, you can make sure there are no defects on the wall. We are talking about a balcony, where there may well be cracks through which air blows in from the street. Therefore, it is recommended to clean the wall to the base. If there are cracks, they need to be filled with foam. Small cracks are sealed with sealant.
If you do not get rid of all wall defects, then finishing the balcony with plasterboard will not be of high quality. It is on the balcony that defects such as cracks and crevices occur most often. Before correcting the builders' mistake, you need to clean the base from grease and dust particles.
The prepared base must be marked for attaching the frame. You need to draw lines on the floor along which the guides will be attached. These lines can be made either with a pencil or with a paint cord. In most cases, a rectangle will be drawn on the floor of the balcony along its walls. Similar lines are made on the ceiling, where guides will also be installed. Markings are also made on the bottom of the window sill in those places where the drywall will be attached under the window.
There is no need to make any markings on the walls themselves to attach the hangers.
Why should you use drywall for a loggia?
So, the selection of such material as drywall for a loggia is not made by chance. What is a building material such as drywall? This material has cardboard on both sides and plaster in the middle. Here are the following qualities that a sheet of drywall has:
- The material is very convenient for installation - cutting, installation and transportation. And this is a wonderful advantage, since in this way you can realize all the ideas when facing the loggia.
- Material such as plasterboard sheets is environmentally neutral because it can be used indoors without fear for the health of children. For balconies and loggias this is the best option.
- To keep your loggia warm, even a small crack is enough. It is also necessary to add that there is sound insulation during the service life of the product.
- Such a product can be classified as non-combustible building materials and complies with GOST.
Please note that building materials are very fragile if they are not handled very carefully, and even more so with large sheets.
In addition, it should be added that plasterboard can be used to level the surface of the walls near the loggia and prepare them to a high-quality finish using wallpaper, plaster or paint.
Sheathing a balcony or loggia using plasterboard is easy and quick. That is why it is almost always chosen by developers. Next, we propose to consider the entire process step by step.
Assembling the frame on the wall
It is very convenient to assemble the frame of walls on a balcony from ceiling profiles.
For a beginner, it is best to start working on a wall where there are no windows. Having mastered the basic aspects of working on a simpler area, you can move on to creating a frame under and above the windows.
UD 28*27 mm guides are installed along the marked lines on the floor and ceiling. The profile is attached to the base using dowels, which are inserted through guides into the drilled holes. You may have to make the holes using a hammer drill rather than a drill.
You need to drill the profile simultaneously with the surface to which it will be attached. Before attaching the profile to the surface, you need to stick a sealing tape on it.
Now you need to insert the CD rack profile 60*27 mm into the guides. The length of the inserted profile should be 5 mm less than the height of the balcony. It should not fit rigidly into the frame, because then covering the loggia with plasterboard will not be of good quality. The post will bend under pressure and pull the drywall.
The CD profile is installed in increments of 60 cm. The distance can be reduced by 5-10 cm so that the racks are equidistant from each other, and there is no situation where the profiles go in increments of 60 cm, and in the very corner a step of 25 cm is made, since there is little space. Installation of the rack profile is carried out using a level.
Since CD profiles extend to the entire height of the balcony, they need to be additionally fixed to create a strong frame. The following fixation options can be used:
- hangers are used that are attached to the wall, and then fix the rack profile. This is exactly the method that should be used.
- using jumpers. This option is undesirable, because for a loggia there are simpler and less expensive options for creating a rigid frame;
- someone may mistakenly believe that fastening the profiles with self-tapping screws will be a good idea, but this is not the case. This fastening does not create additional rigidity, but because of it the drywall will lie crookedly, because it will rest against the heads of the screws.
Two hangers will be enough to mount the rack at standard ceiling heights. The hangers are attached to the wall with dowels, and then the rack profile is screwed to them with self-tapping screws. In this case, the stand does not need to be pressed excessively so that the drywall can then lie flat on the frame.
Advantages and disadvantages of finishing a balcony with plasterboard
Previously, glazed balconies were covered with clapboard or plastered. It took a lot of effort to finish, and it wasn't cheap.
Read more in the articles “Clatking a balcony with clapboard” and “Finishing a balcony with decorative plaster”!
Compared to conventional finishing materials, plasterboard or plasterboard has a number of advantages:
- Low weight - the sheet is light, so it does not create additional load on the balcony slab and walls.
- High soundproofing qualities.
- Excellent ductility - the sheet material bends easily; if desired, you can make an arch of complex shape.
- Simple installation - you can do the work yourself, without resorting to the services of builders.
- Environmental safety - manufacturers use environmentally friendly materials for production. In the event of a fire, no hazardous vapors are released during combustion.
- Under the frame on which the sheets are attached, you can hide wiring and other communications.
- The ability to level walls without applying thick layers of plaster.
- Compatible with any type of finish - you can apply plaster or paint on top, glue tiles, wallpaper.
Drywall also has disadvantages. First of all, it is not designed for high humidity. Sheets that have absorbed moisture lose their shape when they dry. Over time, fungus may begin to grow on the surface, and the wall will become covered with a greenish coating. Read more in the article “How to get rid of fungus on the balcony.” Unlike a brick wall, a plasterboard structure cannot support much weight. Therefore, to install wall cabinets (read more in the article “cabinet for the balcony”) or shelves, you will have to strengthen the frame.
As a result, it turns out that this building material has more advantages than disadvantages. If installed correctly, the finish will last at least 30 years. And the low price of the material will be an additional advantage.
Installation of insulation and vapor barrier
When it comes to repairing a balcony, it would be a big mistake to ignore the need for insulation. In other areas of the apartment this is not so critical. There are a huge variety of insulation materials, the most popular of which are:
- polyurethane foam insulation;
- penoizol;
- expanded polystyrene;
- foamed polyethylene;
- ecowool;
- glass wool;
- ceramic wool;
- mineral wool.
When finishing a loggia with plasterboard with insulation, mineral wool is usually used. It is sold in rolls or slabs.
This insulation is placed directly into the assembled frame. It is fixed due to the fact that it will be held by drywall. However, before this, the insulation must be fixed somehow.
First of all, the insulation is cut to such a size that it fits tightly into the frame between the profiles. It must be attached to the wall, which is done using special glue and disc-shaped dowels. Don't forget about the hangers to which the racks were attached. They have ears that can be bent so that they prevent the insulation from falling out.
Now you need to make a vapor barrier. To do this, a special vapor barrier film is laid on top of the insulation. It is best to attach the film using glue and a stapler.
Reflective thermal insulation prevents significant heat loss by preventing infrared rays from leaving the loggia. When finishing a balcony with plasterboard using reflective thermal insulation, there is no need to additionally use a vapor barrier. Reflex insulation consists of foamed polyethylene and 1-2 layers of polished aluminum. This material can be laid directly on the wall before installing the frame.
The insulation can be inserted not into the frame, but before it is installed
Ceiling and wall cladding work
Just as in the case of floor insulation, a frame of logs is installed on the ceiling and walls to evenly and firmly secure the mineral wool. A wooden beam measuring 0.5x0.4 cm is suitable for such purposes.
The logs are installed with the same frequency - half a meter, and are connected by transverse strips, and installation begins from the junction of the ceiling and wall. If insulation is carried out for the purpose of further arranging a separate room with your own hands, after forming a frame from beams, electrical wiring is carried out.
Next, using a special mounting adhesive, mineral wool is glued into the cells formed on the surface of the ceiling and walls, just like in the case of the floor, cut into pieces. In this case, you should be careful and ensure that the insulation layer is not pressed through. This way the side walls, parapet and ceiling of the loggia are insulated. The wall bordering the living space does not need insulation and is best suited for installing electrical sockets and switches.
It is important to securely fasten the mineral wool to the walls
Which is better: heated floors or radiators?
Warm floorBatteries
The final stage of insulating a loggia with your own hands is the formation of insulation from steam and condensation, which are destructive for both mineral wool and timber. For this, sheets of polyethylene are used, which, using a construction stapler, are attached to the frame of the ceiling and then the walls.
The insulation has been completed, now finishing work awaits, which will give the room a more comfortable and habitable look. It is worth starting the finishing from the ceiling - it can be sheathed with clapboard, plasterboard or other finishing material. Then the final covering is laid on the floor, and, lastly, the walls are covered. When working with wall decoration, it is important to remember the need to leave holes in the places where sockets and switches are installed.
Sheathing with plasterboard - step-by-step instructions
- Sheets of moisture-resistant drywall are left on the balcony for a couple of days to acclimatize. Otherwise, the gypsum board may begin to swell after installation, because it will fall into conditions with high humidity.
- The sheets are fastened in a vertical position. Their width is 1.2 meters, which means that the edges of the sheet will fall on the racks, which are installed in increments of 60 cm. The sheets can be cut to the required sizes in advance, or directly during the installation process.
- Scraps (small pieces) of gypsum board are placed on the floor so that large sheets can be placed on them. This creates the necessary gap with the floor, which will subsequently be sealed. Also, there is no need to rest the sheets against the ceiling; you need to leave a gap there (5-10 mm is quite enough). Such gaps prevent the drywall from absorbing moisture from the floor and ceiling.
- Before attaching drywall to the balcony, you need to chamfer the joining side of the sheets. There is no need to touch the factory edge, and the chamfer is cut only where the gypsum core is visible. This is necessary so that the joints of the sheets are properly puttied and do not crack in the future.
- The sheets are attached to the frame with self-tapping screws in increments of 20 cm. It is necessary to install the sheet from bottom to top or top to bottom so that the drywall is leveled and internal stress is not created. If you fasten the sheet along the edges and then go to the center, it may swell a little.
Attaching the sheets to the frame is almost the simplest thing in the entire process of finishing a balcony with plasterboard.
Preparatory work
The goal of this stage is to completely cleanse the space. So, you need to completely rid the loggia of furniture, remove old wooden floors or other floor coverings. Then the old window frames, if any, are dismantled.
After the loggia is freed from everything unnecessary, all its surfaces are treated with a primer. Then, if chips or cracks are identified, they are repaired (using foam glue or putty).
It is worth doing glazing yourself if you have considerable experience in this procedure. Otherwise, it is better to entrust this stage to professionals.
You can find out what the floor on the balcony is made of from the material published on our website.
You can read how to make a cabinet for a balcony with your own hands in this article.
Problem areas on the balcony - working with windows
The loggia does not consist of only solid walls, the work with which was described above. There are also windows that are problem areas. The windows that lead to the street are installed under the ceiling, so you only need to cover with plasterboard the part that goes under them.
Under the window, the frame is assembled a little differently than on the entire wall. The guide profile is attached to the floor and below the window sill. In fact, it needs to be attached directly to the window sill using self-tapping screws. Here you need to be very careful and calculate the thickness of the window sill so that the screw does not come out from the back side.
The racks are also inserted in increments of 60 cm, but a suspension for additional rigidity is not always required. The standard height from the floor to the window sill is 1 meter, and in this case you can do without a suspension. If the windows are installed at a higher height, then the rack will have to be secured with an additional suspension. Also, direct suspension may be required in any case if a thin steel profile is used. The frame under the window is sheathed in the same way as on the wall.
Certain problems can be caused by covering with plasterboard the space above the window that goes from the kitchen or room to the balcony. To understand the nuances of this work, we recommend that you watch this video.
Types of drywall
Drywall is a non-flammable building material and has the following varieties:
- Standard (GKL marking) - intended for finishing rooms with a humidity level of no more than 70%. Used for installation of partitions, suspended ceilings, wall cladding. The color of the sheets is grey.
- Moisture-resistant (GKLV) - green sheets contain fungicidal and hydrophobic impurities. Suitable for use in high humidity conditions.
- Fire-resistant (GKLO) - fiberglass is added to pink or red plasterboard, which increases the material’s resistance to fire and temperature changes.
- Moisture-resistant and fire-resistant (GKLVO) - sheets of impregnated cardboard, additionally reinforced with fiberglass, will protect against weather disturbances and fire.