Corners in plasterboard construction - external corner
The external corner is assembled from PS (CD) rack profiles. Let me remind you that the abbreviation PS is used by the KNAUF company, and CD by the Giprok company.
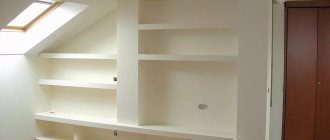
Let's look at the outer corner of a simple partition. In the diagram we see how two rack profiles are installed and fastened in a plasterboard structure. The design, different from the partition, does not have an internal lining (as in the photo), so the same fastening can be used in their construction. I note that often the rack profiles are not connected to each other. This is an acceptable violation of technology if the ceiling height is less than the technological length of the profile.
Note: PS marking refers to Knauf profiles, CD marking refers to Giprok profiles.
In the next photo we see that the profiles in the corner are installed offset. This is either an unfinished design or a mistake. With this installation, the drywall will sag at the corner, which is unacceptable.
Find out how to connect vertical posts. Now, how to fasten vertical and horizontal profiles that are installed on ceilings and/or floors. From the bottom and top of the structure, the corner rack profiles are attached to the guide profile (PN or UD) of the partition. The connection is secured with two self-tapping screws (on each side of the profile) or with a cutter in two places.
Preparation: first stage
In order to seal the corners, you need to do some preparation. It will look like this: you should take care of having a set of tools and materials, choose a putty and prepare it according to technology. As for the last step, you need to take into account that in the absence of experience, the solution is mixed in a small amount to eliminate the possibility of overuse. The development of the composition must be carried out before polymerization begins, otherwise lumps and unevenness will form on the surface, and the result of the work will not live up to expectations. Sealing drywall corners requires the use of convenient tools. For example, when gluing tape, you will need a plastic trowel.
Tools
Before sealing the corner of a plasterboard wall, you should prepare a set of tools, namely:
- metal scissors;
- grinding block;
- brush;
- spatulas.
The latter should have different sizes.
Materials
In order to seal an outer corner, you will need the most important device - a corner. It should be purchased taking into account the height of the wall, but some reserve should be included. You can pre-prepare the surface with a primer. It will reduce the ability of drywall to absorb, remove dust from the surface and increase adhesion. Putty is used to level the corner and the entire wall. You may prefer, for example, “Vetonit”, which is flexible and therefore easy to apply.
Choice of putty
Sealing the outer corners of drywall and removing the surface is done with putty. It is offered for sale in two forms - ready-made and powdered. The first option does not have to be prepared; it is immediately ready for application. Whereas the powder still needs to be prepared by mixing it with water in the required proportion, and also eliminating lumps.
You can calculate the amount of material based on the fact that you will need to form three layers of putty. The first is applied while leveling the seams and removing the corners, the second will form the main layer, while at the third stage it will be necessary to correct the surface by laying putty up to 2 mm thick. One more layer may be required - the 4th layer, which is necessary to remove errors that arose during the work.
For corners, a polymer mixture is best suited, but it is better to avoid gypsum or cement at this stage. A layer of putty will be applied up to 3 mm thick, and ready-made compounds are not designed for this. For the first layer, a dry mixture is suitable, which will need to be prepared in advance. An excellent example of such material is Weber-Vetonit KR.
Internal corner in drywall frame
The internal corner in the frame is assembled differently. There are two ways to make an inside corner.
Method 1
In this method, two rack profiles are twisted in the inner corner.
- An internal corner is made from rack profiles (PS or CD).
- The profiles are cut to the size of the frame and twisted together. Moreover, the side part of one rack is screwed to half of the shelf of the other rack (photo below).
- For twisting, LB19 mm type self-tapping screws are used. The twist pitch is 25-30 cm.
- After twisting, the structure is inserted into guide profiles (PN or UD) and screwed to them with 19 mm metal-to-metal screws. The distance between the screws is 20-30 cm.
“the side of one rack is screwed to half the shelf of the other rack”
Method 2
This method is recommended in the Knauf company technological maps. In this method, the second guide profile of the adjacent wall is attached to an already installed sheet of drywall. Moreover, the self-tapping screw that fastens the profile cuts through the sheet and is fixed in the adjacent rack profile (see photo).
Forming corners
This stage is the main one and is often accompanied by errors that cause unsatisfactory results. For example, beginners often hold the spatula unevenly, which leads to sagging and different layer thicknesses along the entire height of the corner. If these defects are not corrected, painting the surface will hardly be possible, because the outer corner will have irregularities, depressions and bulges, which will immediately appear on a thin layer of finishing. If wallpaper was chosen as the lining of the drywall, if the outer corner is formed incorrectly, in this place it will not bubble or move away from the wall, and repair errors will be immediately noticeable.
External corners
In order to seal the outer corner, you should first coat the surface of the drywall with a primer. It is left until it dries, and only then can you proceed to strengthening the perforated corner, which is additionally fixed with a layer of putty. The first layer should be formed using a coarse-grained starting mixture, after drying, cleaning and applying a primer, it is covered with another layer of putty - this time finishing.
Adjacent walls connecting at an angle must first be treated with putty to a width slightly larger than the shelf of the perforated element. It is applied immediately, slightly pressed over the entire surface so that the putty protrudes on the sides and appears in the holes. A little more putty is applied along the entire length of the corner, and its excess is removed from the ends. After the mixture has dried, the surface is treated with fine-grained sandpaper. At the final stage, finishing puttying is performed.
An alternative solution to sealing an external corner is to use a plastic corner. In this case, putty is prepared in smaller quantities. The corner must be attached to the wall and secured with staples. A layer of putty is applied to both sides of the corner and leveled with a narrow spatula. Excess mixture at the ends must be removed before drying. Before the putty dries, you should make sure that there are no flaws. The already dry corner is treated with sanding tape. At the final stage, the work looks the same as in the case described above - you need to apply a finishing layer of putty.
Internal corners
It will be much easier to seal the inside corner. To do this, take a little mixture onto a spatula and apply it to one side of the corner, then to the other. Alignment should be carried out based on the building level. If there is a gap between the sheets, it is filled with the same composition, and its excess is removed with a spatula.
It is necessary to guide the tool by setting it at an angle of 30˚. Sanding will also be needed, after which the fine dust is shaken off with a rag. The next step will be to apply the reinforced tape. It would be better if it had a self-adhesive surface.
Attention! The tape can be replaced with serpyanka, but it is glued to putty.
Unevenness at this stage must be monitored, guided by the rule and the building level. Once the solution has dried, it is sanded again. For convenience, the sandpaper needs to be secured to a block. Sealing internal corners of drywall may be required not only on walls, but also on a multi-level ceiling system. Working in this case is somewhat more difficult, since the position of the corner will not be very convenient for the master. Knowing that such work is coming, you should prepare a stepladder.
Corner sealing errors
- In order to seal the corner, and after a while not notice the rust that has appeared through the finishing, you should make sure that the heads of the screws are recessed in the layer of the compound. Sometimes it happens that the fasteners are driven too deep into the material, and then pits appear. They can affect the formation of unevenness on the putty layer. To solve this problem, you need to remove the old screws and install new ones, only slightly recessing the fasteners.
- The preparatory stage, before applying putty, is one of the most important. If during this process it was noticed that the top layer is coming away from the sheet of drywall, it must be carefully removed by cutting it with a knife. The resulting area is cleaned with sandpaper and then leveled with putty. If all this is not done, the loose paper will begin to bubble when exposed to moisture from the putty, which will cause cracks in the leveling layer and decorative finish.
- Even if the corner's evenness was checked using a level before applying a layer of putty, you need to make sure that the perforated corner is in the correct position once it is on the wall and pressed into the liquid mixture. Some craftsmen neglect this advice, but the layer of putty may have been applied unevenly along the height of the wall.
Fastening drywall in corners
Fastening drywall in corners has its own characteristics depending on the method of constructing the corner.
With single-sheet sheathing of the frame, adjacent sheets of the outer corner seem to overlap each other. The end of the sheet in the corner should be cut to the plaster. That is, there should be no cardboard edge at the end of the corner sheet. It will interfere with puttying the corner. The inner corner sheets are also cut down to plaster. When making a T-shaped joint, the end of the sheet is cut at 45⁰ for better puttying.
With two-layer sheathing , the sheets in the corners alternately shift. This is clearly visible in the presented photos. Also look carefully at how the screws alternate in the corner.
The final part is finishing
Compared to the installation part, the finishing process is quite simple - treating drywall with putty can be done even by an inexperienced person. But before this, it is necessary to prime with an adhesive composition that penetrates deeply into the material - this will increase strength and will not allow moisture to penetrate into the plasterboard sheet.
The primer is applied using a wide brush or roller. Puttying should begin after the sheets have dried.
Sequence of actions for puttying:
- After using self-tapping screws, indentations from them remain in the corners - you need to fill them with a spatula.
- The joints must be covered with reinforcing mesh, gluing it in strips over the connecting line. Any glue, including PVA, can be used as an adhesive base.
- When the glue has dried, it is applied in as even a layer as possible, but you should not try to create a perfectly smooth surface - this is unnecessary.
- For the outer corner, first check the verticality using a level, and then grind the surface. If a deviation from the vertical is detected, then to eliminate it it is necessary to apply a small amount of putty in the right place.
- When the putty has completely dried, you can begin sanding the surfaces using sandpaper with a small grain, thus eliminating various smudges and other irregularities.
The angular joining of structural elements made of gypsum plasterboard is traditionally the most difficult part of the installation, because obtaining an ideal joint is hampered by the rather high fragility of the building material. But at the same time, the corner is the most noticeable part - it literally “catches the eye,” which forces us to pay increased attention to the arrangement of such elements and to be as careful as possible when performing work and selecting high-quality materials. But the result can be truly flawless-looking surfaces.
Installation diagrams for the corners of a plasterboard partition
In the diagrams below you can see how the external and internal corners of a plasterboard partition are mounted, during industrial installation, over large areas and using a PS profile from 75 mm. Installation of the corners of a plasterboard partition according to the Knauf technological map. Partition types C111 and C112.
©Gipsokart.ru
Other articles in the section: Plasterboard partitions
- Tall plasterboard partitions
- How to make a doorway in a plasterboard partition
- Interior partition made of plasterboard with a door
- Installation of a plasterboard partition
- General information about plasterboard partitions
- DIY plasterboard partition
- Partition made of two layers of plasterboard: technology of covering 2 layers of plasterboard
- Rules for installing plasterboard partitions
- Profile for plasterboard partitions
- Calculation of a plasterboard partition
conclusions
To create a strong metal base, you need to proceed step by step, constantly using a level. The rigidity of the structure depends on how tightly the screws are fixed. To strengthen the frame, reinforcements are installed and correct angles are created from profiles.
Comments: Comments on the entry Drywall corner: how to make are disabled
Drywall has always been particularly popular among the entire range of finishing materials. With its help, you can create surfaces of any geometry and complexity, and the work takes a minimum of effort and time. But to get the perfect result, you need to learn how to make even corners from drywall. This is necessary not only from an aesthetic, but also from a practical point of view. Today we will talk about how to make a plasterboard corner with your own hands.