Stunning three-dimensional paintings on the floor, which have gained immense popularity all over the world, appeared thanks to the development of 3D self-leveling floor technology. You can decorate the floors in an apartment in an unusual style with the help of specialists, but not everyone can afford such expenses, since wages for qualified craftsmen should be added to the prices of materials and tools. The question of how to make 3D floors with your own hands worries many adherents of self-renovation of their homes, and professionals have begun teaching those interested with the help of detailed lessons in which they willingly share their secrets of craftsmanship.
Achieving the desired effect is quite difficult: you need to buy building mixtures, finishing materials and tools from the list, choose a three-dimensional drawing or make one, process it in a graphics editor and print the photo, carefully study each stage of the work, watch how specialists make 3D floors with their own hands (video ).
Step-by-step instructions for making self-leveling 3D floors with your own hands from A to Z with drawings and a video lesson will help beginners complete all stages without unnecessary problems.
Tools and materials for self-leveling floor 3D
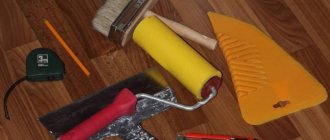
When installing a self-leveling floor yourself, you will need:
- wide spatula;
- rule;
- needle roller;
- regular roller;
- wide brush;
- grinding machine or grinder with a disk with a diameter of 18 cm;
- sand;
- cement;
- water;
- construction mixer;
- perforator;
- respirator;
- gloves;
- protective glasses;
- paint shoes (shoes with spikes);
- construction laser level;
- water level;
- primer;
- wallpaper knife;
- drill with attachment;
- containers for mixing the composition;
- two-component polymer composition;
- photo or drawing in 3D format on a vinyl basis;
- clear varnish;
- industrial vacuum cleaner.
concrete-area.com
In order to create a beautiful and modern interior in a room, you can use various types of flooring (it can also be solid boards and parquet). But now a very interesting and stylish option has appeared - this is a 3D floor. Making it yourself is quite possible. Therefore, if you want to know the answer to the question of how to make 3D floors with your own hands, then the article on the site will tell you about it in full. Also in this article you can watch an interesting video on this topic.
What is 3D floor
This flooring is a liquid polymer mixture that is poured onto the floor surface. The result of this work is a layer with an attractive 3D pattern. After the layer has completely hardened, a very hard coating is created on the floor surface, which is not exposed to any external influence. It has excellent adhesion to the main base of the floor. And if you need to dismantle the polymer layer, it will be separated from the floor along with the concrete. Many people believe that 3D flooring is expensive, but this is not true. It is possible to make a 3D floor on your own. But when carrying out this work, it is necessary to use the advice of professionals in this field. Otherwise, you will not be able to quickly and inexpensively correct poorly done work. A more reliable method is to clearly perform all necessary actions.
3D floor installation
In order to make a beautiful three-dimensional layer, you first need to prepare the following tools and materials. So, for work you will need:
- A squeegee or trowel needed to apply the solution to the floor;
- A container for mixing mixtures in it and a construction mixer;
- Roller with a needle-like surface;
- Vacuum cleaner;
- Brushes;
- Scissors;
- Special shoes with spikes;
- Base layer;
- Two-component primer mixture;
- A special composition intended for decorating 3D floors;
- A protective varnish of a certain type for final application to the surface of a 3D floor (matte or glossy).
How to prepare the base for a 3D floor
In this publication we talk about how to build 3D floors with your own hands. There are step-by-step instructions and interesting tips here. 3D flooring cannot be laid on an unprepared base. Therefore, we will talk about how to prepare the base for a 3D floor below.
- In order to prepare the base, you need to level the floor and, if possible, seal all cracks and potholes as much as possible.
- After leveling, the floor surface should dry.
- Next, we clean it from dirt and dust.
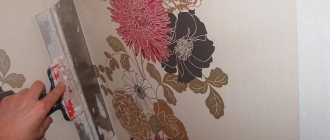
The next step in our work will be covering the surface with a primer mixture. This procedure will not only help improve the quality of application of the polymer layer, but will also increase the adhesion of the applied coating to concrete. Priming the surface will help give the base excellent characteristics.
The first layer is the base - the base. The very first layer of a 3D floor is the base layer, which creates the necessary foundation for the next job.
The main thing is that only good quality materials are used. They should be applied very carefully and carefully follow all the techniques of the work performed. The temperature when applying the base layer should be at least 10 degrees, and humidity – up to 55%. The base layer should be applied according to the previously made marks on the walls, so that the thickness of the layer corresponds to the norm. It will take 7-8 days for the polymer layer to dry completely. But until the layer has completely hardened, the floor should not be decorated. Maybe you will find time to read the article on the site: How to cover walls with non-woven wallpaper Creating a three-dimensional layer In order to obtain a three-dimensional effect, you can use all kinds of materials. Typically, you can use several solutions to decorate the floor surface, such as: Use the floor surface as a canvas. To create the decor, it is necessary to invite specialists in this field: artists and designers. Using paints, they can create beautiful pictures on the surface of your floor. This work is by no means cheap, but the result will be very beautiful and effective. After the polymer transparent layer is poured, you will get a real masterpiece of art. To be able to create a three-dimensional effect, you must use special stencils when performing work. They can be purchased to order from special companies. After you have decided on the choice of the required ornament, it is printed on film of the required size. You can choose any ornament: for the bathroom, a pattern with fish or shells is most often used, and for living rooms - all kinds of flowers, beautiful lawns or a city panorama. Before choosing an ornament, you should remember that its resolution must be of excellent quality in order to obtain a clear and unblurred design. And in order to get the effect you want, the following materials are used: beads, sparkles, special chips, as well as pebbles and various bulk substances. Before you create this effect, you need to come up with a pattern. After this, begin applying it to the floor surface carefully, using a special scheme. In most cases, a combination of colored areas on the floor surface is used. In this case, filling materials of various colors are used. Thanks to this, beautiful stripes and interesting patterns of various geometric shapes are obtained. Surface of the base layer. The 3D design should be applied to the dried surface of the base layer. For film, some experts advise using a thin layer of PVA glue so that the former cannot move while pouring the last polymer layer. This method is trusted to be carried out by specialists, since it will be very difficult to do it yourself without a lack of personal experience.
Finishing coating In order to make 3D floors with your own hands, you need to work hard. In addition to two layers of 3D flooring, it needs a finishing coat. The final coating of the 3D polymer layer is a transparent layer, which is leveled over the surface using a spatula to avoid the appearance of various air bubbles. After laying the film on the floor surface, they begin to do the finishing work. For this purpose, completely transparent two-component mixtures are used. They are applied at a thickness of 3.5 -4 mm. The application of the polymer layer must begin from the far corner. In this case, the mixture should be poured onto the floor, carefully distributing it using a needle roller. This layer must be applied according to pre-drawn marks on the walls, using a building level or body kit. When carrying out this work, you must wear special shoes equipped with spikes. During the period when the coating dries, it is not recommended to walk on it. To fill the floors yourself, you need to use a combined type coating using a certain technology. First of all, you should try to create soft and smooth transitions between various materials to achieve an elegant and harmonious look. After filling the floor surface, it is necessary to cut a groove at the junction of this coating, measuring 5 mm (width and height). This groove should be cleared of debris and dust and filled with a primer mixture. The latter must dry completely. Next, you need to fill the adjacent area with a colored polymer layer, remove the tape and treat the entire floor surface with a transparent polymer. After completing this work, the floor covering should dry completely. Polymer 3D coating should be treated with colorless varnish. It can be either matte, glossy or anti-slip. The number of layers should be 2 pieces. The polymer must be applied using a roller. Next, you need to let each layer dry completely.
Expert advice
In order to make a floor with a 3D effect yourself, you need to use the following tips:
- Before purchasing a dry mixture, you need to opt for a better quality material. When carrying out the required volume calculation, be sure to take into account all future consumption rates of the selected mixture. After this, another 6-10% of the mixture must be added to these standards. This procedure is necessary so that the ready-made polymer composition can be sufficient to complete the work of coating the layer. The floor surface should be filled in its entirety at once. Under no circumstances should this work be interrupted.
- In the process of producing a polymer mixture by diluting it with water, it is necessary to follow all the points described in the instructions. If the technique is violated, the floor covering will turn out unsightly.
- It’s tedious to choose a drawing, focusing on your overall interior of the room. In this case, the 3D coating will come out very elegant and attractive.
- When pouring, you need to monitor the allotted drying time, and also comply with all the conditions specified in the manufacturer's instructions.
- In the process of applying each subsequent layer, you should make sure that there is no debris or various foreign objects on the floor.
conclusions
3D floors have now gained enormous popularity among the population. They are made not only in commercial enterprises, but also in residential buildings and apartments. 3D floors with a three-dimensional effect are considered the most beautiful and original. This effect is obtained due to the application of special decorative elements and polymers to the surface of the base layer. After the 3D floor has completely hardened, a very hard and rigid surface is obtained, which creates a wonderful effect of depth and makes the room incredibly beautiful.
Useful articles
- How to make a leveling floor screed and pour...
- Types of industrial floors
- Budget technology for laying laminate flooring with your own hands...
- Construction of a stone house. How to make a concrete floor
- Self-leveling industrial floor: advantages of coating
- Quartz-vinyl tiles and its main technical properties
Stage one - preparing the base
How to make a self-leveling floor? First you need to prepare the base for it:
- remove all furniture, remove baseboards, doors along with frames, dismantle old flooring down to the screed, remove dust and debris;
- lay waterproofing material in rooms with high humidity;
- make a concrete screed on top of the waterproofing layer or cover the surface with a mixture of cement and sand;
- Treat the completely dry base with a grinder or grinder;
- remove nicks and irregularities with a hammer drill;
- fill the cracks with a mixture of cement and sand;
- check the horizontal surface of the screed using a rule or laser level;
- After drying, thoroughly clean the room - it is advisable to use a construction vacuum cleaner. Particular attention should be paid to greasy stains, which must be removed using solvent and acetone.
USEFUL INFORMATION: Waterproofing floors in an apartment under a screed
You can begin further work on decorating a self-leveling floor with your own hands only after the concrete screed has completely dried, which can last up to 30 days.
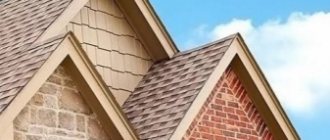
What are 3D floors
Application technology allows you to bring to life the most daring design ideas, from simulating marble and wood coatings to creating realistic three-dimensional images.
Self-leveling volumetric floors have increased strength properties and consist of several layers:
- concrete screed;
- primer with a polymer-based composition;
- the basic two-component polymer coating has 12 colors;
- image on self-adhesive film, banner fabric, surface painting with the addition of three-dimensional elements;
- finishing transparent epoxy or polymer coating.
The depth of the image depends on the thickness of the finishing coating. At the same time, when applying a layer, you need to take into account that it will be problematic to lay several layers efficiently without experience. The optimal layer thickness is 3 mm.
Stage two - primer
For high-quality adhesion of the polymer self-leveling coating to the base, it is necessary to cover the surface of the screed with a primer in two layers:
- pour the primer and spread it evenly over the entire surface with a spatula, roller or brush, leaving no gaps at the joints between the floor and the walls;
- Apply the second layer of primer when the first one has dried and carefully level it;
- Leave for at least 24 hours for the final coat of primer to dry.
Pour the finishing layer
The finishing layer is an important element when creating 3D floors. It is very thin - its thickness should be up to 1 millimeter. For the finishing layer, it is better to purchase a ready-made compound mixture, which is based on epoxy glue and resin. You should not prepare a large amount of the mixture at once, as it will thicken very quickly and will be impossible to work with. Using a notched spatula, evenly distribute the transparent mass over the top of the design and begin to carefully roll the polymer with a needle roller.
As soon as you feel that the mixture has begun to thicken, you must stop rolling immediately. And we continue this way until you have covered the entire design or the entire floor area in the room with transparent varnish. Do not allow dust or debris to enter the finishing layer. It will take about a week for your floor to completely dry. While drying, do not expose the floor to direct sunlight.
Stage three - filling the base layer
At this stage of installing the self-leveling floor, you need to perform the following steps:
- Prepare the polymer composition for the base layer by mixing the components with solvent in a container in a ratio of 2:1. It is necessary to use a construction mixer, since it is almost impossible to mix the composition to a homogeneous consistency by hand due to the many small lumps and the rapid hardening of the polymer.
Important! Do not immediately mix the composition in one large portion, as it will harden and become unsuitable for use. It is better to cook in small batches at a time.
- Pour the prepared mixture for self-leveling floor onto the base, quickly and very carefully spread it with a needle roller in a thin, even layer over the surface. Make sure there are no bubbles.
Advice. In a large room, the self-leveling floor should be poured in strips, starting from the corner opposite the entrance. Smooth out the borders with a wide spatula. Make sure that no overlaps form when pouring. We should try to spend no more than 10 minutes processing each strip.
Materials
- Cement
- PVA based solution. 1 liter of PVA per 10 liters of water.
- Decorated material, 3D printed image on high quality vinyl films.
- If you want to paint the floor by hand, you will need acrylic paints.
- The compound is a ready-made mixture based on epoxy resin.
After you have acquired all the materials and tools, you need to carefully consider the stages of work and clearly visualize what you ultimately want to get.
Stage four – installation of 3D images
When the base layer of the self-leveling floor has hardened, you can begin laying the decorative layer:
- dilute the polymer composition with a solvent and apply a thin layer to a dry surface;
- Place a pre-prepared drawing or photo on a vinyl base on the treated surface, align the edges, which should protrude beyond the perimeter of the base and lie on the walls;
- press the image element to the self-leveling floor with a dry roller and, starting from the center of the room, roll it over the surface so that there are no air bubbles left between the base and decorative layers, which will subsequently lead to cracking of the decorative layer;
- when the decorative layer sticks to the base layer, carefully trim off the excess with a sharp wallpaper knife;
- Carefully clean the treated surface from dust and grout residues.
USEFUL INFORMATION: How to properly dismantle the screed
Historical background on 3D graphics
Surely, you would be interested to know where this art of depicting three-dimensional drawings came from. So, the idea dates back several centuries ago.
One day, one count, preparing to receive guests, decided to play a little joke on them. He ordered drawings of doors and windows on the walls of his house from an artist he knew. It is worth noting that the artist coped with the task perfectly. Arriving guests could not distinguish real doors and windows from painted ones.
This is how a new direction in fine art appeared, which was called “Mannerism”. It was embodied on the walls of houses.
- This trend gained great popularity thanks to street artists.
- They began to paint the walls of houses and various buildings, completely filling them with fairly realistic images.
- Later, mannerism flowed into a new style. Now not only walls were painted, but also asphalt roads.
At a certain distance from such a drawing, one could see a three-dimensional object, when, moving away to a much greater distance, the miraculous drawings turned into elongated absurdities.
A little later, designers came up with the idea of using this trend inside houses.
Stage four - finishing of the self-leveling floor
The last stage of designing a 3D self-leveling floor is applying a finishing layer, which will help emphasize the effect of a three-dimensional image and preserve the coating for a long time from scratches, dents, and deformation. To fully comply with the technology you will need:
- using a construction mixer, mix the transparent polymer composition with the solvent in the same proportion as when combining the components of the base layer of the self-leveling floor;
- pour the composition and carefully spread it over the surface with a roller so that the layer thickness does not exceed 0.3 mm;
- The polymerization process will take about 30 minutes, after which it is necessary to coat the self-leveling floor twice with colorless varnish.
You shouldn’t actively use the room immediately after finishing, dragging furniture in there and placing it on the newly made self-leveling floor. We must wait until all layers dry evenly and the polymerization processes are completed, which depends on the temperature and humidity, time of year, and weather. If you managed to make 3D self-leveling floors in your apartment with your own hands in all the rooms, you will have to ask to stay with relatives, friends for one or two weeks, or go to the country. It is better to do the self-leveling floor in stages - first in one room, then in another and so on.
Important! At each stage of working with self-leveling coating, one should not neglect a respirator, gloves and safety glasses, since dispersed dust and vapors of polymer compounds settle on the skin, mucous membrane of the nose and mouth, get into the eyes and throat, causing skin irritation, a feeling of sand in the eyes, runny nose, cough.
The technology for making a self-leveling floor in 3D format with your own hands involves the use of shoes with spikes from the moment the polymer composition is poured until the end of the work.
3D floor: technology from A to Z
So, 3D floor - step by step!
Stage I. Selecting a picture
So, first, select the 3D image that you want to pour into the floor of your house. Yes, at first it will be the most ordinary photograph or painting, which you will make illusory and voluminous. Have you chosen? Now you need Photoshop. Look at our step-by-step photos to see exactly how such illusions are created, and follow the step-by-step instructions provided. 3D pictures must have high resolution – at least 300 dpi. And there are plenty of them on a variety of online photo banks – take your pick!
So, the most effects are 3D drawings with the effect of depth: water, an abyss, a descent. Especially the marine theme, where, thanks to a special airbrushing technique, truly impressive realism of such images is achieved.
But here’s what we highly recommend that you do not use as a 3D picture for the floor:
- All images where dynamics are felt. That is, the illusion of movement. For example, something falls, or a wave covers.
- Aggressive, predatory and evil. True, sharks do not belong here - if you have never encountered them in your life and you associate them exclusively with comedy-adventure horror films. After all, it’s really funny when a guest suddenly notices an absolutely natural toothy fish near the pool in the bathhouse. But it’s better not to use monsters, things that really frighten you - this will not have the best effect on the subconscious.
- Too bright, bulky, with an abundance of red elements. For the reason that it is a strong irritant for the psyche. In such a room it will be difficult for you to concentrate, unmotivated aggression will arise and you will have trouble falling asleep.
- Small objects enlarged to awkward shapes. A huge tangerine in the kitchen, thanks to an optical illusion, comparable in size to the table - it is not only tasteless, but also quickly boring. On the first evening.
Stage II. Changing Perspective
Step by step process:
- Step 1. So, the picture is selected, let's get to work. First of all, take a photo of the room where the 3D floor will be made - naturally, from the “right” angle. But remember that many cameras seem to slightly distort the perspective - try to choose the distance so that the photo shows exactly what you see from the threshold with your own eyes.
- Step 2. Now, in Photoshop or a similar graphics program, overlay the picture you like on the photo of the floor - exactly how you want to place it in reality. So you have already created that 3D illusion for which construction companies charge such fabulous money! Now pin these two images into one - now you should see an image of your room with a real 3D volumetric floor.
- Step 3. Now cut out everything in the picture except the floor itself with the picture. You will get something like a trapezoid: widened at the bottom (in front), narrowed at the top (behind) - after all, this is how we see the room according to all the laws of perception.
- Step 4. Using the Perspective tool, correct the trapezoid into a perfectly straight rectangle. If you can’t cope with this function, just stretch its narrow part in a regular editor.
- Step 5. Now you see exactly how you will need to print the image for the floor. Another option: load the image into Photoshop, click the Vanishing Point filter responsible for correcting perspective and the Create plane tool. Drag the center markers with your cursor as needed. Export the image. Save the file with the extension *png.
This is what it looks like:
This is exactly how Madonnari artists paint on the asphalt. They print out a distorted picture, divide it into squares with a pencil, and then divide the asphalt with chalk. Then it’s a matter of technique: each of the squares is carefully sketched according to the original.
Take a closer look at the process itself:
If you are experiencing difficulties, or do not know how to use graphic editors at all, contact any designer you know, or find one on freelance portals. Yes, this is also a waste, but in the end you will still spend at least 4-7 times less money on the production of such a floor than if you contacted a specialized construction company.
Stage III. We print the image on banner fabric
So, once the required file is already on your flash drive, contact any outdoor printing agency. Why exactly there? Firstly, they have experience working with similar graphics, and secondly, you will need a material for filling the floor that will not lose its properties and color when in contact with varnish or transparent polymer. And this is a canvas banner, which is designed for both rain and its impurities, and snow. By the way, such a banner is not at all expensive – about $20 per m2. And companies today most often actually print such images on vinyl self-adhesive film and on ordinary banner fabric.
Advice: just first, be sure to print out the same image for a small fee, but on plain paper and in black and white - in order to put it on the floor and evaluate whether the distortion angle is correct and whether the same dolphin really seems three-dimensional and alive. Adjust your perspective if necessary. And only after that, pay for a real banner canvas in color.
The companies themselves that produce such floors print their images on a two-layer polymer fabric and fill it with a transparent polymer layer. Let us note that you will not find exclusivity from such companies: although their catalog contains many images, they are not willing to work with new ones. After all, as you already understood, calculating the desired distortion angle is a little difficult, although everyone can do it.
Please also pay attention to this point: printing on the banner or paper that you order must be done with non-fading inks. After all, the sun will constantly shine on your floor, plus, when using polymer solutions, they heat up a little due to mixing.
Stage IV. Preparing the foundation
So, the foundation. On our website there are already many articles on how to pour a polymer floor. And here is the same polymer floor, but with a picture and a transparent finishing layer:
The most important thing that you should not miss is any stains on the old concrete base from machine oil, grease, detergent or bitumen. And it is actually possible to remove oil stains to their full depth - this is precisely why there are methods such as milling, grinding or cutting.
Stage V. Paste the picture
Photo fabric or special paper with a pattern is glued onto the base polymer layer, after which it is filled with a so-called super-transparent plastic lens and a final wear-resistant layer. A special volumetric effect can be achieved using special super-transparent lenses - you can order them from an advertising agency.
Stage VI. Finishing layer
So what base should you fill your drawing with? We recommend the most suitable polyurethane varnish PUR Aqua Top (M or SG), which is the most abrasion resistant of all known, and therefore your 3D will never fade. Pay attention to the letter in the name: M is a matte layer, SG is a silky-gloss layer. Another option: fill it not with varnish, but with Eneklad CFS, one layer under the image, the second on top after three hours. This coating will dry in 4 hours. Choose what suits you best and what fits within your planned budget.
As for the transparent layer on top of the 3D image, give preference to imported brands - such floors are much more difficult to scratch, and they please with their appearance much longer.
Decorative options for self-leveling floors
How to make self-leveling floors original and unique? The technology of pouring floors in 3D format provides many opportunities for bringing your own ideas to life. It is extremely popular to use natural objects and materials as a decorative layer instead of photos and three-dimensional images:
- decorative pebbles;
- multi-colored sand;
- decor made of wood and stone;
- coins and bills.
USEFUL INFORMATION: How to insulate the floor on a loggia with your own hands
Advantages
Self-leveling floors are durable
Self-leveling floors are not only beautiful, but also have many advantages:
- High durability of the coating. When using the pouring technology, the 3D self-leveling floor will not lose its properties during long-term use.
- Easy maintenance due to the fact that the coating is even and smooth and has no pores where dirt can accumulate. Does not lose its gloss and shine even when exposed to abrasive substances.
- Environmentally friendly, completely safe.
- Durability over 20 years.
Appearance and service life depend on the quality of installation work.