DIY marble floor in the garage
Most often, a concrete floor is made in the garage, which is characterized by increased strength and wear resistance. The only drawback of a concrete floor is extreme dustiness. During operation, a lot of dust rises, which greatly interferes.
There are several ways to solve this problem. For these purposes, many people iron the floor, or treat it with special materials that will prevent the formation of dust in the future.
The “recipe” discussed in this article from a construction magazine will help not only get rid of dust on a concrete base, but also make it look like marble.
see also
Comments 64
Otherwise, the concrete is dusty, and this washed away the dirt and everything from the path, the only thing is the sun and frost, how does this affect the coating? I’m also thinking about whether it’s worth the trouble or not, but the option is to open the concrete paths on the street with such a thing
Who will write something that is harmful?
In a closed civilized room - normal. I have floors without waterproofing and the moisture that accumulates in my neighbors through my concrete sponge tends to tear and swell this coating. AN 511 paint for road markings... I will be testing it soon. And so this hat has been lying in my garage for two years, but I say I’m tired of treating these wet cracks.
Yes, I read that too, I wanted it, but it’s kind of harmful for the premises
How does the floor feel? please take a photo
It's okay, hang in there!)
This is not entirely normal... It gives away schizoy.
This method sucks.
crazy... see a psychiatrist urgently
I had it like this for half a month. and then it cracked and everything fell off.
5000r?! It makes sense to make such a floor if it costs 300 rubles. This color is water soluble. I think it greatly reduces the strength of this substance. A methyl methacrylate self-leveling floor for this area will cost a little more, but the quality is incomparably better.
This is an experiment. The essence of which is “it’s worth it, or you shouldn’t bother!”
it means it's fake, we'll know
Right. I decided to conduct an experiment personally to see if it is as shown on many videos. A five-liter can and a piece of foam plastic, as in the video, are clearly not enough.
Paint in a respirator? The respirator protects against mechanical impurities and suspensions. It will not protect you from chemicals. Either paint in a filter gas mask or in a hose
Will it be slippery in winter?
I thought the surface was slippery. But I don’t seem to be skating on it.
Having read something about solvent and polystyrene foam, I immediately didn’t think about paint at all...
Of course it’s a plus for the experiment! Damn, but on the other hand, why all this crap? I filled 24 square meters of garage with a two-component epoxy kit for 5 rubles. So it dried in a day, with “chips”, does not stink, does not absorb gasoline oil, stuck exactly without bubbles and has been holding on for 4 years like new. And with this xylene foam, it is not yet known how it will affect health in a year. So this is some dubious savings... plus how much time was spent on all this...
You don't get -35.
Of course it’s a plus for the experiment! Damn, but on the other hand, why all this crap? I filled 24 square meters of garage with a two-component epoxy kit for 5 rubles. So it dried in a day, with “chips”, does not stink, does not absorb gasoline oil, stuck exactly without bubbles and has been holding on for 4 years like new. And with this xylene foam, it is not yet known how it will affect health in a year. So this is some dubious savings... plus how much time was spent on all this...
What tools and equipment will be required?
To prepare polystyrene foam varnish, you will need the following raw materials and equipment:
- polystyrene foam (there should be a lot of it);
- dissolving liquid (one of the types or a combination of them);
- dishes for dissolving (any large glass, tin or polyethylene container with a wide neck will do);
- wooden stick for stirring;
- filter for straining (you can use a plastic strainer, gauze, a piece of tulle or old nylon tights);
- storage container with a hermetically sealed lid.
In addition to equipment, you need to stock up on a respirator, safety glasses, rubber gloves and long sleeves. Contact of solvents on the skin, and their vapors on mucous membranes and lungs, is undesirable, since they contain toxic substances. When foam bubbles collapse, they also release gases, the inhalation of which can cause poisoning. Work should be carried out in a well-ventilated non-residential area (garage, workshop) or outdoors. If this is not possible, then the solution is prepared on an open balcony.
Practical guide to preparing glue (instructions)
Before preparing the glue, prepare a container, wash it and dry it, drying it in the sun is optimal. It is permissible to start gluing only after the process of release of gas bubbles is completed.
The first option is mixing polystyrene foam with gasoline. First of all, pour out the 10th part of the thinner and part of the prepared foam. The components are thoroughly mixed; there should be 3 times more foam balls than the liquid substance. Mixing is done until all the material is dissolved, then you can add small portions first of the balls, then of the solvent. As a result, you need to achieve a viscous substance similar in consistency to jelly. Allow the solution to stand until gas bubbles are released.
Mixing is done until all the material is dissolved.
Necessary materials
To prepare coatings, you will need two main components: polystyrene foam (expanded polystyrene) and solvent. The latter can be acetone, xylene, orthoxylene, butyl acetate, and there are also recipes based on gasoline. Additionally you should take:
- unnecessary capacity;
- wooden stick;
- a piece of gauze.
The easiest way to dissolve polystyrene foam is in xylene, orthoxylene; it is much more difficult to do this in other solvents. In addition, homemade gasoline-based varnish turns out to be jelly-like and is only suitable for applying a fairly thick layer to surfaces. It is better to use it not for painting products, but as glue.
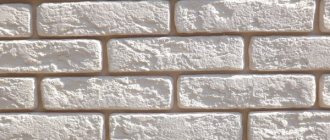
Do-it-yourself marble concrete floor in the garage
The owner of a garage with concrete surfaces is familiar with one tricky nuance of inspecting or cleaning the garage space. This is an unpleasant moment. Few people want to talk about him. We are talking about a concrete field. More precisely, about its properties. No matter how you sweep away dirt and dust, it will accumulate the very next day. Of course, today's garages are equipped with advanced technology. They use doors with automatic opening, sensors for continuously adjusting temperature and humidity, and energy-saving lighting. But the concrete coating, due to its strength and wear resistance, remains an unchanged element of the garage. The author of the article had a chance to correct the situation by improving the concrete coating with a layer that resembles the characteristics of a strong and elegant finish. The natural scientist hopes for the forbearance of readers by calling his invention a marble floor.
How to make varnish from foam plastic
Do-it-yourself polystyrene foam varnish
For painting wood and concrete floors, you can make a fairly effective and inexpensive polystyrene foam varnish. And although today there is a large assortment of modern painting products in stores, homemade varnish, the main components of which are polystyrene foam, gasoline or acetone, is no worse than factory-made.
You can coat the walls and concrete floor of a garage with foam plastic varnish; this composition is applied to the wood to protect it from damage and decor. How to make varnish from polystyrene foam with your own hands will be discussed in this article from the construction magazine samastroyka.ru.
And finally the most important thing...
You can find other methods and other compositions for garage flooring. However, in any case, the floor must first be prepared. Remove all the dirt, sweep away that unfortunate dust as much as possible. Remove or cover items in the garage with film to protect them from dust and paint splashes. Eliminate floor defects - chips, cracks, unevenness. Check for moisture. No paint will last long on wet concrete, so in case of high humidity it should be dried.
You also need to take care in advance of the place where the car will temporarily live. Not all coatings dry at the same speed. For liquid glass, this period is a couple of hours, but for polyurethane enamel – up to two weeks.
Tell us in the comments if you have struggled with this problem? Perhaps this will be very useful to readers in the future. Also subscribe to our channel at
What is needed for cooking?
Homemade tips are oversaturated with variations of components suitable for preparing inexpensive homemade acetone glue. Some of what is written on the Internet is fiction (for example, the fact that glue is “free”. Inexpensive - yes, for gasoline or solvent stored in the garage, you still once had to pay at least a small amount of money, but they use unnecessary foam for it, from leftovers, they don’t buy it on purpose), something that is really suitable for use.
Which foam to choose
The base of the glue, as is clear from the topic of the article, is foamed plastic or polystyrene. Most of it is gas, which will be released during the dissolution process, so you will need a lot of foam.
Useful: at home, almost everyone has pieces or scraps of polystyrene after insulation, or packaging foam or crumbs from it after purchasing household appliances. This is what is usually used to prepare the adhesive.
Types of foam suitable for making glue:
- Bespressova. This type of foam is used as a shockproof layer when packaging equipment. The leaf easily crumbles into many small balls of which it is composed.
- Press. It is the same as pressless foam: a large number of balls. Only during manufacturing is the foam mass pressed, which increases the density of the material.
- Extrusion. During its production, high temperature is used, so it has a solid, homogeneous structure.
How to dissolve polystyrene foam to make glue?
The solvent element is directly a solvent suitable for foam, or gasoline.
Liquid components use different:
- acetone;
- petrol;
- solvent 646 or 647, xylene.
Marble flooring technology
After some thought, the decision arose to cover the surface with a protective layer. The idea, like the technology, is not new. To implement it you need:
1. Surface with a high degree of adhesion.
2. A composite material that, when applied in liquid form, will harden to form a glossy, strong layer.
The first condition as a concrete screed meets the stated requirements. But with composite compounds it’s not so simple. After all, there are ready-made epoxy mixtures for pouring floors. They are also called liquid floors. But it has one quality that is inferior to homemade liquid. It's expensive. Of course, this is where the pettiness of the garage owner comes into play. Or maybe practicality. It is up to those who dare to repeat it to decide. Fortunately, there are cheap and almost traditional ways to fill a marble floor in a garage with your own hands. The composition of the components is simple. But those who like to spend time in the garage are the kind of people who will spend time on the final result rather than preparing it. Therefore, a story about technology first precedes it. It involves applying a liquid polymer to clean concrete. The drying of the layer depends on the composition of the polymer prepared by hand. Therefore, the components are selected accordingly.
The choice fell on two materials:
However, xylene was added next. The experimenter has the right to choose the color scheme, or more precisely, its color. Because it turns out a thick liquid like a colorless varnish. If the marble pouring technology is satisfactory, then it is necessary to draw up an estimate for the production process.
Precautionary measures
All solvents are flammable, flammable liquids. In addition, they are toxic and emit an unpleasant odor. It is advisable to work with them not at home, but in a workshop with good air circulation, or, in extreme cases, on the balcony. When making and applying varnish, you should use a respirator and gloves. The smell disappears only after complete drying, and then the item becomes safe.
Modern adhesive compositions, of which there are many in construction stores, with all the variety of names and brands, are not much different from each other. All of them are united by a high price and average gluing quality. Most often, universal construction adhesive is a polyurethane or polystyrene viscous mass in an organic solvent. Foamed polystyrene, also known as foam and solvent, can be found in almost every home. Following the same logic, you can quite simply make foam glue with your own hands based on a simple recipe.
Method 2. Painting
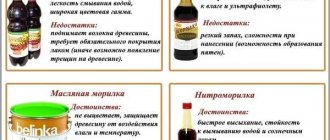
Concrete paint is a quick, convenient option, and you can choose any color that will please the eye for a long time. Such a floor will be waterproof, durable, and smooth. It is recommended to use paint for applying road markings - if it can withstand thousands of wheels and weather changes daily for a long time, then it will definitely cope with one car in the garage. The floor can also be covered with latex, polyurethane, epoxy, alkyd, or oil paint. The difference is in price and drying time; select based on your own capabilities and preferences.
Why is it important to treat the concrete surface with soil?
Many people mistakenly believe that protecting a concrete foundation is not necessary.
However, despite the fact that concrete itself is a very durable material with a long service life, it is also susceptible to various aggressive environments and loads.
What does priming a concrete surface provide:
Considering the above, we can conclude that treating the floor, walls, ceiling, and other concrete bases with a primer is necessary. Requirements for materials for protecting concrete are set out in GOST 31384-2008 “Protection of concrete and reinforced concrete structures from corrosion.”
What you need to pour a marble floor
Below is a list of components and tools for work. The material was calculated based on the area of the garage. It is 15 m2.
- Two liters of acetone for 250 rubles.
- A liter of xylene for 200 rubles.
- Black and blue colors for 40 rubles each. In principle, you can do without color scheme. Here you need to think creatively.
- It is not necessary to buy polystyrene foam. After all, it, being a packaging material, is available to any motorist.
- Plastic container for dissolving foam. The main condition is resistance to chemical environments.
- Stirring tool. Simply a small stick.
- Paint brush.
Types of primers
When choosing a primer composition, you should evaluate the following factors:
Let's figure out which priming agents for concrete foundations should be used in various situations.
Depending on the effect on the concrete surface, the compositions are divided into:
Primer "Nova" for impregnation of porous, fragile concrete surfaces, which contains acrylic resins, silicone emulsion, biocides, suitable for external and internal work. It forms a matte film on the concrete surface that is resistant to atmospheric influences (except ultraviolet radiation).
Apply at temperatures exceeding +5 degrees in 1-2 layers with a brush, roller or spray with an average composition consumption per layer of 0.15 kg/sq.m. The price of a 5 kg canister is 700 rubles.
The use of penetrating primer "Toiler", made on the basis of acrylic dispersion, allows to reduce water absorption of concrete and improve adhesion to finishing materials. The average consumption of the composition is 0.15 l/sq.m. It is recommended to apply this deep penetration primer for concrete in 1 or 2 layers. The cost of a 10 liter canister is 380 rubles.
An example of such a composition is the Eunice Concrete Active soil. It is suitable for application to smooth, low-absorbent concrete surfaces indoors and outdoors. It contains a mineral filler that improves the adhesion of the base and applied finishing coatings (wallpaper paste, plaster, tile adhesive), as well as antiseptics that protect concrete from the appearance of mold and mildew.
Work on applying this quick-drying (drying time does not exceed 4 hours) composition should be carried out at a temperature of +5...+30 degrees.
The average primer consumption for concrete is 0.3 l/sq.m. m. The cost of a 10 liter can is around 600 rubles.
Based on their chemical composition, the following types of primers are distinguished:
Requirements for compositions are formulated in GOST R 52020-2003 “Water-dispersion paint and varnish materials”.
The quick-drying (within 2-3 hours) water-based composition has excellent penetrating ability.
Acrylic primer does not smell, and therefore it can be safely used for finishing work indoors. Such primers provide excellent adhesion to finishing coatings. From an economic point of view, these primers are the most optimal.
There are many acrylic-based compositions produced: primer Betonit VD-AK-020, primer “Beton-Kontakt” from, “Akrial-Grunt”, produced or composition “ST-19”, produced by the Henkel concern.
Primers for concrete ST-19 are used for treating smooth surfaces indoors.
They are environmentally friendly, vapor permeable, and contain crushed quartz sand, which helps ensure good adhesion to concrete. The soil dries in 4 hours, its consumption is 0.3...0.7 ml/m2. A package weighing 15 kg costs 1000 rubles.
Polyurethane primers fill small cracks and pores in concrete, provide high-quality adhesion of finishing coatings and the base, remove dust well and increase the wear resistance of the surface. The characteristics of the soils make it possible to use them for treating industrial floors.
“Polybetol” is a one-component composition, odorless, since it contains no solvents, is resistant to chemicals, and can be used as an independent coating. Consumption per 1 m2 is 0.1 kg.
The primer is applied at temperatures exceeding -10 degrees. The disadvantage of these compounds is the high price. A jar weighing 10 kg will cost 4,000 rubles.
Epoxy primers perfectly protect concrete from moisture and chemicals.
They can be applied to damp surfaces. They tolerate mechanical stress very well. Primers can be used as stand-alone coatings or under epoxy paints.
“Epoxol” is an environmentally friendly coating that perfectly fights concrete dust, strengthens the surface, increases resistance to cracking and frost, and protects it from corrosion and chemical influences. The composition can be applied to wet concrete.
The primer is produced in the form of a two-component composition, the components of which are mixed and diluted with water. It is applied to a clean surface at an air temperature exceeding +8 degrees, its consumption is 200 g/m2. 7 kg of primer will cost approximately 2300 rubles.
Alkyd primer is resistant to abrasion, penetrates deeply into the structure of concrete, is durable, and can be applied at sub-zero temperatures. However, it dries for at least 12 hours and its durability is lower than that of its analogues.
The red-brown Lakra composition is suitable for work indoors and outdoors.
It has good anti-corrosion properties and ensures excellent adhesion of materials. Average material consumption: 0.1 kg/sq. m.
It is applied in 1 or 2 layers. Drying time is 24 hours. A can weighing 20 kg costs about 2,000 rubles.
Polystyrene primers dry quickly, but have an unpleasant odor, so they should be applied outdoors or in well-ventilated areas. It is recommended to use such toxic compounds in production or for treating facades. They are practically not used for application to surfaces in residential premises.
Such compositions are used for subsequent application of PVA-based paint or glue. They are used only for indoor surface treatment. Polyvinyl acetate primers dry instantly, within an hour.
Steps for pouring a marble floor
The actions of mixing components and applying coating are carried out by experienced craftsmen without instructions. It's a matter of experience. But the proposed filling option does not suffer from errors.
The first step is to prepare the concrete space. It must be freed from foreign objects and thoroughly swept away from dust. There is no need to additionally moisten with water or treat the surface. Next comes the preparation of the component composition:
1. Take a plastic container that is resistant to acetone. A 5 liter bottle is ideal.
2. Cut off the neck of the bottle for more convenient pouring of reagents.
3. Fill the container with two liters of acetone.
4. Dissolve the foam in the amount necessary to form a cloudy slurry.
5. Add a liter of xylene.
6. Add color.
7. Apply the resulting thick liquid to the surface of the concrete.
8. After 2 hours, re-coat the floor.
It is important to carry out work in a ventilated area, regardless of the time of year. For convenience, it is better to open the garage door. Because the substances emit harmful fumes. You can apply three layers. No one forbids experimenting with colors. The cost depends on the size of the garage and the design preferences of the owner. Although the average amount of 500 rubles is unlikely to become unprofitable. But it will save time on cleaning the room.
When can the surface be used and how to care for it?
Foam-based varnish is applied in several layers and allowed to dry. After complete drying, it forms a dense waterproof film that is resistant to abrasion, sunlight and temperature changes. A concrete floor coated with this varnish stops generating dust and does not absorb liquid contaminants. Surfaces are kept in good condition using normal dry and wet cleaning.
Some people are concerned about the fact that this varnish contains flammable substances. However, they evaporate as it dries, and only a polystyrene film remains on the surfaces. It does not ignite upon contact with fire and is therefore not a fire hazard. At first, after painting the floor or walls, there may be residual vapors of flammable liquids in the air; to remove them, it is recommended to ventilate the room well for several days.
Advantages of Acetone Foam Marble Flooring
An alternative to the proposed composition is liquid glass. But it shows much worse performance characteristics. When marble is poured from acetone and polystyrene foam dissolved in it, it has a number of advantages:
- The surface is so strong that it cannot be scratched with a nail.
- The glossy sheen creates volume of space.
- Almost any color range is available.
- Quality at minimal cost.
- The protective layer is easy to clean with wet cleaning.
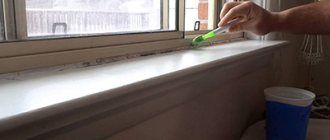
Applying primer to concrete base
The video in this article will help you get more information.
The process of treating a concrete surface with soil with your own hands is quite simple, and anyone can handle the work, even those who have never taken part in finishing work.
Elimination of concrete surface defects. Applying a primer to the concrete surface
As can be seen from the article, a primer for concrete surfaces is an indispensable condition for the installation of a high-quality and durable coating and protection of the concrete base. There are many types of compounds on the market, so when choosing, you should carefully study their characteristics to ensure they meet your requirements.
Foam Varnish for Concrete Floor Note: This will cause the gasoline to bubble and splash out of the can.
Painting concrete with homemade varnish (acetone+xylene+foam)
The floor in the garage is concrete and very dusty... absorbs, etc... after searching for a solution to eliminate this shortcoming, I was advised this method... I tried it in the summer of 2022 and now I am writing a review in the summer of 2021. To prepare the varnish you will need: 1- Acetone 2- Xylene
4- Bucket, brush, respirator
We pour 2 liters of acetone into a bucket and begin to dissolve polystyrene foam in it (any foam will do, I dissolved the one I found from household appliances, and when it was not enough, I bought the one that is used for insulation) until a thick slurry forms in which the foam plastic practically does not dissolve... It looks like like this:
When a thick mass has formed, pour in 1 liter of xylene and stir, it will thin out this mixture, making it less thick and similar in consistency to varnish... Then everything is simple... Take a brush and apply a thin layer to concrete or other surface... Before applying it, you need to sweep it, or even better blow it out with a compressor (that’s what I did) The varnish itself turns out transparent:
But... for the sake of experiment, I added a regular color to it for 40 rubles from the paint department...
For a garage of approximately 21 sq/m it took 2 buckets (that’s 4 liters of acetone + 2 liters of xylene + polystyrene foam, I didn’t count)
I was faced with the choice of treating the floor with liquid glass or this solution... Since we had liquid glass, I decided to try filling the floor with it first... mixed it with distillate and filled half of the garage and left it to dry... it dried for several days... In the end, the difference I had an untreated garage, but not as I would have liked... And I still decided to follow the advice and make “varnish”...
Making varnish: instructions
To prepare paint and varnish, you should take 70-100 ml of xylene, pour it into a container, occupying approximately 1/3 of its volume. To further reduce the cost of the material, you can combine xylene and acetone (gasoline) equally, or then dilute the thick ready-made varnish with inexpensive solvents. Afterwards the procedure will be as follows:
- Take polystyrene foam and break it into small pieces. The finer the crumble, the faster the dissolution process will occur. The approximate amount of foam is 0.3 cubic meters. dm.
- Press down the foam with a wooden stick so that the pieces are immersed in the liquid. The material will immediately begin to dissolve and gas bubbles will appear on the surface.
- You can add more polystyrene foam so that the consistency of the product resembles sour cream or liquid honey. High-quality varnish flows from the stick like a thread and does not separate into drops.
- Cover the varnish with a lid and leave for 20-60 minutes to infuse. The color should remain transparent.
- Strain the container through cheesecloth. Pour the clean composition into a new container that has a stopper and lid.
Brushes or spatulas are used for varnishing. You can simply pour the paintwork onto the surface and smear it with movements in different directions. The drying time for this product is 5 minutes after application at room temperature. The product can be used after an hour, when complete curing is achieved.
It is recommended to use the finished product for the following purposes:
- varnishing of wooden products;
- increasing the moisture resistance of concrete;
- coating of any painted objects.
You can also make other paints and varnishes using foam varnish. For example, if you introduce small wood shavings into it, you will get a reliable putty for holes, chips, and cracks. You can also make a conductive varnish. To do this, special fine-grained components are introduced into the composition, which, after polymerization, form a film with excellent electrical conductivity. They are usually used on metal, glass, plastic, and wood.
For 100 g of finished paintwork material, add 15 g of powdered silver and fine-grained graphite. Mix the product well until a dark, thick liquid is obtained. Before use, the varnish should be shaken thoroughly so that heavy particles do not settle down.
Ironing of concrete
Ironing concrete with cement or liquid glass will help make the floor surface as wear-resistant and moisture-resistant as possible. In addition, during the operation of the concrete surface, dust will not accumulate on it, and this is the most important thing.
To independently iron the screed you will need cement, a mixer for mixing it, and a metal spatula. There are two types of reinforced concrete: dry and wet.
When dry ironing, the cement is distributed onto the screed that is not yet completely dry, after which it is leveled with a long metal spatula. This method of reinforced concrete is only suitable for horizontal surfaces.
In wet ironing, dry cement is mixed with water to form laitance. Next, the mixture is poured onto the surface with a ladle and leveled on it using a metal spatula. The wet ironing method is suitable for both vertical and horizontal sections.
Proportions of foam and solvents
To prepare the required amount of polystyrene foam, you need to know at least the approximate proportions of the components of the future solution. To obtain the desired consistency, the ratio of liquid to foam should be 1:3. For example, 100 g of gasoline will require about 300 g of dry foam.
Different brands of foam have different densities. Depending on the density, the weight of a foam cube with sides of 10 cm can range from 15 to 28 g. This means that about 20 such cubes will be required per 100 g of liquid.
Since the foam is added to the liquid gradually, you can visually check when the solution reaches the required viscosity. To do this, a stirring stick is immersed in the mixture and then raised above its surface. It is most convenient to work with semi-liquid varnish, which flows in a thin, thick stream. A mixture of this consistency is easily applied to concrete using a brush or roller.
Dissolved polystyrene foam in a solvent as a coating agent for concrete
DIY polystyrene varnish
You can coat the walls and concrete floor of a garage with foam plastic varnish; this composition is applied to the wood to protect it from damage and decor. How to make varnish from polystyrene foam with your own hands will be discussed in this article from the construction magazine samastroyka.ru.
DIY polystyrene varnish
The main components of polystyrene foam varnish are gasoline, grade 92 and higher, and, in other words, the foam itself. To dissolve the foam, you can also use acetone with a solvent, however, these chemicals dry very quickly, which negatively affects the performance of the varnish.
However, foam and acetone make a very reliable adhesive that can be used to glue glass and plastic products. In addition to numerous advantages, acetone and foam glue has decent water-repellent properties, as well as good tensile strength.
To make varnish from foam plastic, you will need to take an empty container, just not a plastic one, pour a little gasoline into it (depending on how much varnish you need), and then dissolve the foam in it. When the foam dissolves, the gasoline will begin to bubble and may even splash out of the container. This is a normal phenomenon, so the container should have high sides, in other words, deep.
All this time, you should stir the gasoline with a wooden stick and add polystyrene foam to it until the liquid becomes thick enough. You can leave the container alone for a while so that the foam completely dissolves and forms a clear sediment at the bottom.
To change the color of your foam varnish, you can add some plastic from old vinyl records. This will make the varnish darker in color and can be used as a wood stain. If the varnish thickens, it will be enough to add a certain amount of gasoline to it before use, stirring thoroughly with a brush.
Scope of application of acrylic protection
Concrete varnish containing acrylic filler is in demand for decorative finishing while simultaneously providing protective properties:
- concrete floors with decorative mosaics;
- natural stone;
- artificial materials;
- brickwork;
- borders;
- decorative paving stones.
As a result of application, the material creates the illusion of wet stone. It is used for treating concrete floors in warehouse complexes, shopping centers, and manufacturing enterprises.
During the processing process, the concrete is deeply impregnated with an acrylic composition, allowing further priming, if necessary. The use allows you to remove dust from the surface of a concrete mass that does not absorb significant forces.
Make your own glue from polystyrene foam and solvent
It couldn't be easier. To do this, you need to take the solvent and pour it into a bowl, the size of which depends on how much glue you need to make. Gasoline is often used as a solvent. The foam is then lowered into a basin and waited until it melts into a viscous slurry.
This adhesive is used for gluing different elements. To apply glue, take a brush. As mentioned above, this glue works well if it is necessary to repair damage to the roof, as well as gluing the joints of the roofing covering. After the glue hardens, it turns into glass.
The second method of making foam glue involves performing the following steps. In the place that you need to glue, crumble the foam, then pour it with solvent. Such actions lead to the fact that the material begins to melt, spreading over the surface. The mass begins to fill all the gaps and cracks, providing a reliable seal.
Note. Foam glue can be used to process roofing felt joints.
Before you start using glue, you should make sure that it has the desired consistency. Too liquid a mass is not suitable for gluing objects. Therefore, pour out the polystyrene foam without sparing it.
What type of foam can be used to create glue?
Foam plastic is a group of materials that are foamed masses. Most often they are used for thermal insulation of premises. Depending on the production method, they are divided into 3 main types:
- Pressless. Such products look like a lot of interlocking balls. When such products are physically impacted, the balls are easily separated from each other and the product begins to crumble. This type of foam is most often used to create glue. It easily dissolves in gasoline and acetone and turns into a stretchy mass.
- Pressed. This foam is more durable and does not crumble like the previous type. This is explained by the fact that during production the products are pressed.
- Extrusion. This material has a more uniform structure, since during production the temperature of the products increases. The result is foam plastic, which has a solid structure.
Features of the composition
When making glue from foam plastic, it is necessary to follow safety rules and carry out all work away from open flames, since such a mixture not only ignites well, but also burns for a long time.
The glue must be well mixed, because if it is not uniform, the objects being glued may not be securely connected to each other. Foam glue can be used to join various materials.
Some people use similar compositions as a protective coating. But the consistency of such a composition should be more liquid. When creating an adhesive composition from polystyrene foam and gasoline, you must remember that it hardens after a few days. The thicker the applied layer, the longer it takes to dry.
Typically, such glue is used when there is no adhesive on hand or it runs out at the wrong time. Some people use various plastic products instead of foam. For example, table tennis balls or disposable cups. To make it more convenient to work with the material, you need to cut it into small pieces or crumble it in advance.
To make the glue dry faster, you should choose acetone solvents for its preparation. After hardening, the composition is able to withstand both low and high temperatures. That is why they can be used to seal cracks in the roof and not worry about them starting to leak moisture again.
Operating procedure
Before you start working on the floor, it should be put in order. The space must be cleared of everything and cleansed. When you sweep, do not use water to settle the dust. It is better to take a brush with soft bristles and slowly walk over the entire surface of the floor.
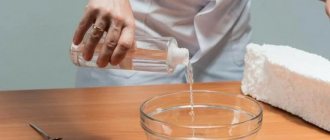
Now take acetone and pour it into a working container. We only have two liters of this liquid. We lower pieces of foam into it until the liquid becomes cloudy. Next, add xylene. For the amount of acetone that we have, we only need one liter.
The next step is adding color. Just pour and stir. The composition is ready for use on the floor.
Apply the liquid from the container to the floor using a brush. Do not slow down your work, the composition dries quite quickly. Just two hours after we applied it to the floor, it was already dry. We covered the floor with another layer. We had enough prepared material for this.