The construction of a pediment requires preliminary calculations, specialized knowledge and, at a minimum, basic mason skills. Errors during design or construction can lead to bending of the rafter system, cracks in the masonry, and even collapse. How to make a pediment out of brick, avoiding common mistakes, will be discussed below.
Advantages and disadvantages
Brick gables have the following advantages:
- High strength characteristics;
- Long service life;
- Brick without any additional treatment does not burn, does not rot, bugs do not appear in it and mold does not form;
- A wide range of materials for construction, including a lot of affordable products;
There is only one significant drawback: stone structures differ from others in their significant mass (with the exception of aerated concrete, foam concrete), which inevitably affects the requirements for the supporting structure and foundation. Also, the disadvantages include less versatility compared to frame analogues, which are applicable to almost any building.
What it is?
The pediment (from other Greek: Front - forehead) is a natural continuation of the end wall of the building. It is located above the cornice, which coincides in level with the ceiling between the top floor and the attic. Usually this is a plane limited by the roof slopes. More often they are simple triangular or polygonal broken in shape, sometimes semicircular or bow-shaped (reminiscent of the bend of a stretched bow). There are also other configurations, for example, in the form of a trapezoid.
The pediment is a natural continuation of the end wall of the building
Since the ancient times of Ancient Greece and Rome, the pediment began to be used as an additional independent architectural element decorating the building. In this capacity, it was widely used in palace and temple buildings, small architectural forms - rotundas, triumphal arches, etc. Coats of arms, wreaths, emblems, cornucopias, allegorical figures of Muses or Geniuses of glory were placed in its field.
Which brick is suitable
When choosing a material for a brick pediment, it is necessary to take into account its weight and the appearance of the building. If the construction of the walls was carried out using face masonry, using high-quality material, then the pediment structure is erected in the same style, except in situations where it is necessary to implement specific design solutions.
If the house is built with rough masonry and subsequent finishing is expected, the decisive factor in choosing the material will be its weight (of course, without sacrificing strength). On aerated concrete buildings, you should not build massive structures made of denser and heavier stone, such as solid brick or cinder block. It is possible to implement this technologically, but it is difficult to call such a solution rational.
The most correct would be to use porous or hollow products - foam concrete, cellular bricks and similar materials. This will significantly reduce the load on the load-bearing walls and foundation of the building; moreover, such products cost slightly less than monolithic products, the manufacture of which requires more raw materials.
Articles on the topic
Brick foundation for a wooden house - types, instructions, advice from masons
Repairing brick houses - how to do it, causes of destruction, instructions, advice from masons
Repair of the basement of a brick house - major, partial, instructions, advice from masons
Mosaic with bricks - preparation, masonry features, instructions, advice from masons
Cladding a house made of aerated concrete with bricks - masonry, disadvantages, instructions, advice from masons
Brick columns for joists - preparation, how to make them, instructions, advice from masons
Brick sides - what they are called, characteristics, instructions, advice from masons
Brick foundation - step-by-step instructions, pros, cons, instructions, advice from masons
Reviews ()
Calculation of gable dimensions
The geometric shape and dimensions of the pediment for a brick house should be worked out during the design process. When drawing up a project, such points as the purpose of the attic space, features of the rafter system, climatic and mechanical effects on the roof structure are taken into account. In addition, knowing the area of the pediment, it is possible to calculate its mass as accurately as possible in order to include it in the calculation of loads on the wall frame and foundation.
Pediment height
The height of the pediment is considered to be the distance from its base (eaves) to the ridge of the roof. This value primarily depends on how the space under the roof will be used. If you plan to equip a living space, you should not make the height of the gable less than 2.5 m. An ordinary attic for storing household items will be quite convenient and functional at a height of 1.5-2 m.
In addition to the use of the under-roof space, the height of the gable affects the appearance of the building and the roof in particular. If the vertical dimensions of the gable superstructure are more than one and a half times the distance from the foundation to the top of the wall, the roof creates a visually overwhelming effect. The disproportionately low gables look even worse, even though there is no suppression. Such structures make the building excessively squat. Houses in which the pediment and walls are approximately the same height look most harmonious.
Corner at the base of the pediment
In fact, this is the angle of the roof slope relative to the horizontal plane. When determining this value, you can either start from the height of the pediment, or calculate the height relative to a given angle.
The pediment of a gable roof, the slopes of which are the same, is an isosceles triangle. To determine the angles of the base, it must be divided into two right triangles by the median emanating from the apex (ridge). The resulting rectangles consist of a hypotenuse, which is the slope of the roof, and two legs. One of the legs is the height of the pediment, the second is half of its base.
The calculation of the angle at a given height is as follows:
tan A = 2H/L. Where A is the angle of the base, H is the height of the pediment, L is the length of the base. For a pediment with a six-meter base and a height of 4 m, the angle will be equal to: tan A = 8/6, which results in an angle of 53°.
Calculation of height if the angle is known:
H=1/2L* tg A. For a base (L) of 6 meters and an angle of 60°, the height will be equal to: H = 6/2 * tg 60° = 3 * 1.73 = 5.19 m.
Gable area
The calculation of the area of the pediment depends on its shape, which on modern buildings can be triangular, trapezoidal, pentagonal and even oval.
- The area of a triangular structure is calculated using a formula familiar to many from school: the height of the triangle is multiplied by half the base. The area of a pediment with a height of 3 m and a base length of 4 m will be equal to: S = 3 * ½ * 4 = 3 * 2 = 6 m².
- To calculate the area of a trapezoidal structure, you need to add the lengths of the bases of the figure (top and bottom) and divide by 2, after which the result is multiplied by the height.
- The area of the pentagonal pediments is calculated by adding the areas of the triangle that forms the upper part of the structure and the lower trapezoid. Calculations are carried out using the methods described above.
Main loads on gable walls
Incorrect construction of the pediment can lead to a number of negative consequences: the appearance of cracks in gable walls and even their collapse. In most cases, the cause of such accidents is errors made at the design stage, namely: the fact that in the event of wind the pediment will be subject to increased horizontal loads and for this reason needs additional strengthening is not taken into account.
Find out what the valley rafter system is and how to calculate it.
Read all about the features of soft tile roofing here.
When drawing up a project, the following points need to be taken into account:
- average wind speed in the region and type of roof;
- the height of the building above sea level;
- climatic features of the region in which construction is taking place;
- the degree of resistance of the house to gusts of wind.
When determining these parameters, changes in the geometry of the building during construction should be taken into account. At different stages, the area of individual structural elements that are subject to wind load changes.
For a finished attic structure, the aerodynamic coefficient is considered to be 0.7.
During construction, the gable walls have triangular fragments that flutter in the wind like sails. This means that during design it should be taken into account that for the finished building the aerodynamic coefficient will be 1.4-1.6, and not 0.7.
Material calculation
In most cases, determining the area of a structure is required to calculate the material for construction or subsequent finishing. The amount of brick depends on its dimensions, type of masonry and size of the mortar joint. The standard brick size is 250x120x65 mm, the approximate thickness of the masonry joint is 1 cm.
If the masonry is done in half a brick, then when calculating the quantity, you should use the side area (250x65), adding half the thickness of the seam (5 mm) to each side. Thus, the actual area of each brick in the masonry will be equal to: (250+5) * (65+5) = 255 * 70 = 178.5 cm², therefore, approximately 56 bricks will be needed per 1 m².
When to build a rafter?
The rafter system is installed either before the construction of the pediment or after:
- After the construction of the pediment. The most popular option among experienced builders. When choosing it, it is necessary to carry out a detailed calculation of the height and area of the pediment structure. This is important even when building simple rectangular houses with symmetrical gable roofs, since errors in calculations are likely to result in a distorted structure.
- Before the construction of the pediment. In this case, the rafter system is mounted without a pediment and there is no need to carry out any calculations of height and area, which suits novice builders. However, subsequent masonry work must be carried out in the cramped conditions of the attic space, and some manipulations are quite difficult to perform.
Video description
The video contains a detailed description of the features of finishing work using vinyl siding:
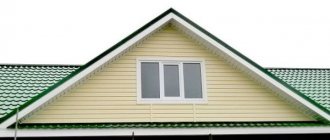
Installing vertical siding on the roof gable requires additional labor costs, because with this installation method it is more difficult to achieve an ideal result.
Vertical installation of vinyl siding should be done in the following order:
- Corner strips are fixed along the edges of the gable wall .
- A plumb line is lowered from the top of the rafter system, necessary to indicate the central axis .
- is installed along this line .
- With a predetermined step other plates are attached parallel to the central one.
- the installation of panels begins , with the first segments installed in the corners of the structure.
The end result should be a vertical cladding like this Source bg.decoratex.biz
Construction stages and pediment laying diagram
First of all, it is necessary to carry out preparatory work for the correct installation of the future rafter system. As a rule, the lower part of the rafter leg rests on a longitudinal beam (mauerlat), which is mounted on a load-bearing wall. Depending on the roof design, the mauerlat is either hidden behind the pediment or protrudes beyond it, forming an overhang. In any case, the size of the support beam, and sometimes the rafters, should be compensated by laying an appropriate number of courses of brickwork at the base of the gable.
Laying a brick pediment for a symmetrical gable roof includes the following steps:
- Marking. A rail is installed in the middle of the supporting wall, perpendicular to the base, the upper part of which determines the location of the ridge. A cord is pulled from the top of the slats to the corner of each of the side walls, resulting in the formation of a triangular outline of the future pediment.
- Masonry and reinforcement. The laying is carried out in the usual way, without protruding beyond the triangular contour formed by the cord. To prevent the structure being built from becoming jagged, the outer bricks are trimmed. Trimming is carried out after preliminary marking; for this, the brick is laid without mortar and the corner is marked along the cord. When marking, you should take into account the thickness of the masonry seam, for which it is convenient to use a template of the appropriate size. Every 4-5 rows are reinforced with reinforcing mesh, which is placed in the mortar joint to increase the strength of the structure.
- Alignment. Irregularities formed on the side edges of the pediment are sealed with cement mortar.
It is advisable to further strengthen tall structures, since exposure to external factors can lead to collapse. To increase the vertical stability of the pediment, a partition is built inside the building, which serves as additional support. If the pediment is excessively massive, pilasters are laid on the outside of the walls to compensate for the load on the base.
Installation of the rafter system
In order for the pediment from the blocks of a gable roof and its rafter frame to form a complete structure, their shape must match. If mistakes were made during the installation of the rafters, then the roof simply cannot be combined with the previously created pediment. Of course, simply adjusting the elements in this case is not enough - the geometry of the roof is already damaged, and significant effort will be required to restore it.
A mauerlat made of thick wooden beams laid on the top of the wall is used as a support for the rafter frame. If the design was carried out correctly, then the Mauerlat will allow the rafters to be brought directly to the pediment. The presence of errors in the project will certainly lead to discrepancies in the sizes of structural elements.
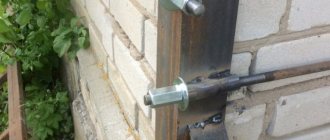
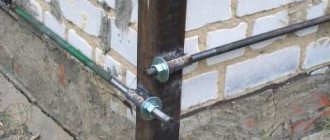
To lay the Mauerlat, you need to pre-fill a reinforcing belt of reinforced concrete. Such a belt will provide rigidity to the upper frame of the walls and prevent tensile loads coming from the rafter legs. In the absence of an armored belt, the walls will move apart - and this is a serious problem that must be solved.
Pediment finishing
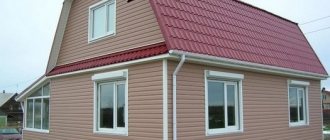
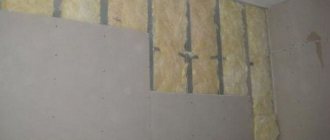
Finishing is required in cases where the masonry was made with rough materials, such as cinder block, foam concrete, aerated concrete or ordinary brick. The most affordable option is plaster followed by coating with facade paint. In addition to cement coating, it is possible to cover the pediment with brick, siding, clapboard, plastic or sheet materials. To ensure that the front decor is harmoniously combined with the overall design, the finishing of the pediment is done in the same style as the walls of the building.
It should be remembered that it is advisable to start finishing work, especially plastering, after the house has settled. Ideally, the structure should stand for at least two winter periods. By waiting this time, you don’t have to worry about the appearance of cracks, paint shedding or deformation of the typesetting coating.
Video description
If you are planning to build a house with a pediment, then you will be interested in this video about the features of siding:
When arranging the pediment of an attic roof, the board is not drawn out with an accuracy of millimeters: the excess section should simply be sawed off after installation in its place. Any openings and openings in the wall can be cut after the structure has been arranged. But still, most craftsmen are confident that it is better to do this first, before installing the sheathing. If the roof structure is of an insulated type, then the door frames should be inserted before the pediment frame is sealed.
To prevent atmospheric moisture from getting into the joints of the sheathing boards, they are spiked on both sides. In this case, the outer tenon should be turned down. The best protection from rain is provided by the horizontal direction of the cladding. If lining or tongue and groove boards are used, the middle tenon should be turned upward.
The horizontal direction of the sheathing boards provides maximum protection from rain and other precipitation Source popgun.ru
Wooden pediment in a brick house
The most common version of a wooden pediment is a frame-type structure covered with a facing covering. Such a structure, as a rule, is cheaper, easier to manufacture and faster to implement. This makes it popular for do-it-yourself or low-budget construction.
The supporting beam of the frame pediment is attached to the mauerlat, ridge, rafters and base. After this, the sheathing is installed (a lath of a suitable cross-section or a galvanized profile). If you plan to have windows or doors, additional supporting elements of the openings are included in the frame. The finished structure is insulated, insulated from moisture, and then sheathed with a typesetting or sheet covering.
A wooden pediment in a brick house is a relevant solution for those cases where the rafter system has already been assembled or the weight of the structure is critical. A frame pediment will be lighter than almost any stone structure, including those made of hollow or porous materials.
Video description
This video was shot specifically so that you have an idea about installing the panels on the frame:
Two ways to install PVC panels
In order to cut slabs of the desired shape, special templates are used, which are made based on the angles of inclination of the roof and its shape. The material for them can be thick paper or cardboard.
This picture shows the most convenient way to cut siding panels Source yandex.kz
When cutting panels according to templates, always maintain the temperature reserve, and do not adjust them flush with the edges of the pediment. At the very top row of panels, the entire nail strip is cut off, and holes are drilled at the top of the slab for installation.
The point for drilling is determined after applying the segment to the seat. But the hole should be located no closer than 3cm from the cut edge of the plate.
The installation of the panels itself proceeds in a vertical direction from bottom to top. Installation begins with fixing the starting profile and continues with the systematic fixation of slabs and connecting elements.