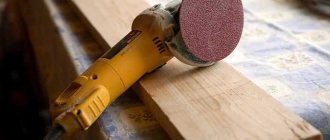
Screeding a house with reinforcement
To perform this type of work, certain skills and abilities in welding are required, and you should also correctly calculate the required amount of reinforcement and its diameter. These parameters are determined depending on the area of the entire building and the damaged areas.
You can carry out these activities yourself, but it is better to contact a specialized organization. The company's professional staff also take into account the degree of destruction of the building, the number of floors, the type of foundation and type of roof, as well as the characteristics of the soil and territory.
In some cases, in places where the walls are not particularly damaged, it is recommended to lay out new masonry, and in areas with an increased degree of destruction, tighten them using reinforced and more durable reinforcement.
General provisions
A wooden building is not a static structure
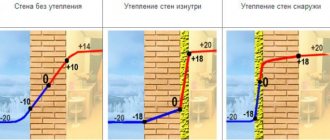
Why is screed usually not poured onto wooden floors? The thing is that wood is a moving material. The slightest changes in the humidity coefficient or temperature cause an increase or decrease in the volume of the floor structure, its elongation or contraction in any linear direction, as well as shrinkage.
A concrete slab, after its complete hardening, is almost completely static, and “living” wood in close contact will first cause microcracks to appear in it, and subsequently more serious deformations up to destruction. Therefore, usually the boards along with the joists are simply removed so as not to endanger the new floor.
If for some reason the option of eliminating the wooden covering is not suitable for you, then it is necessary to exclude contact of the wooden base with the cement monolith. In this case, a kind of concrete “tray” will then simply “float” above and between the wooden elements.
One of these reasons may be, for example, the desire to install a “warm floor” system. Then the diagram of the entire floor structure will look like this:
Floor screed in a house with wooden floors over heating elements
| Designation | Name |
| 1 | Finish floor layer |
| 2 | Heating cord |
| 3 | Temperature sensor |
| 4 | Polyethylene film serving as a separator between layers |
| 5 | Thermal insulation |
| 6 | Cement strainer |
| 7 | Moisture protection |
| 8 | Thermal reflective layer |
| 9 | Fire retardant layer |
| 10 | Reinforcing mesh |
| 11 | Wooden floor |
Advice: Do not start pouring cement earlier than four years after laying the plank floor. During this period, the wood is overly active, and even a layer of plastic film will not save you from negative consequences.
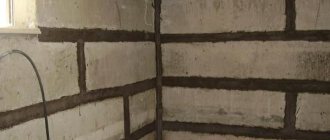
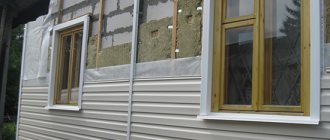
It is noteworthy that if you need to screed the walls of a wooden house, then the task looks somewhat different, and you need not so much to isolate two layers as to combine them. To do this, a special sheathing is first applied to the boards.
Photo of lathing a wooden wall before applying a cement layer
Required materials for screeding with reinforcement
For screeding with reinforcement, the following materials and tools are required, which include:
- Fittings;
- Hairpins;
- Washers and nuts.
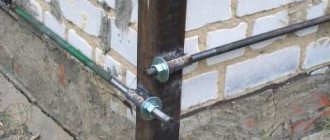
The technology of screeding with reinforcement is not complicated and consists of the following: special corners are attached to the corners of the house, into which studs are threaded and washers and nuts are screwed on. The house is held together using nuts, which are regularly tightened depending on the condition of the building.
Conclusion
Pouring screed onto a wooden base has some peculiarities, but is quite possible on your own. The most important point is to create an intermediate layer between the wood and the cement, which will prevent them from further destroying each other.
Poured cement floor in a wooden house
The video in this article will provide additional materials. Follow the recommendations above and you will succeed!
Source
Characteristics of fittings
Reinforcement is elements that are connected to each other through concrete and are reinforced concrete beams that carry tensile stress. It is also used to impart increased strength and rigidity to various structures. Its components can be rigid (various angles, channels and rolled I-beams) and flexible (grids, frames and profile rods).
There are several ways to connect reinforcement to concrete, which include:
- Interaction by friction;
- By shift method;
- Bonding during concreting of a reinforcement element;
- Connection at the electrochemical level;
- Compression with concrete after shrinkage.
How to make a smooth cement-sand floor screed with your own hands: working steps
Despite the presence of several methods for constructing a floor surface, the procedure for its formation is almost the same and consists of the following points:
- preparation of the rough plane;
- layer level marking;
- preparation and application of the working mixture;
- finishing treatment.
Preparatory work
If the rough base consists of concrete, then it must be primed. In most cases, the procedure includes work on the following transitions:
- cleaning the base;
- elimination of cracks and other defects on the rough surface;
- check the integrity of the surface with a hammer;
- thoroughly clean the floor with a vacuum cleaner;
- treat the surface with two layers of primer (alternately after drying).
Classification of fittings
Today, reinforcement has the following classification depending on various characteristics.
Depending on the area of use:
- Strained;
- Unstressed.
Depending on the intended purpose:
- Working;
- Assembly;
- Anchor;
- Constructive.
Depending on the location in the structure:
- Transverse;
- Longitudinal.
So that there are no cracks
If you think in advance about how to make a screed so that it does not crack, you can avoid the hassle of repairing it. To do this, several conditions must be met.
- The thickness of the screed at its thinnest point should be at least 20 mm, and if the base is sand, expanded clay or insulation boards - at least 30 mm.
- When installed on a weak or shrinkage-prone base, the screed must be reinforced.
- The screed must be poured over the entire area at once, without taking long breaks.
- If this is not possible, arrange expansion joints at the junction of the dried and fresh mortar.
- Observe the proportions exactly when mixing the solution, taking into account the brand of cement and the moisture content of the sand.
- If, after leveling, puddles of water form on the surface, it means there is too much of it in the solution; it is better to immediately redo this area.
- Avoid drafts during the first days of drying the solution.
- As soon as the screed sets, cover it with film.
- If the air in the room is dry and hot, periodically moisten the surface with water so that the concrete dries evenly.
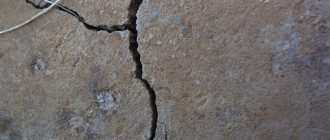
Features and description of the collapse of the structure
Mostly, the collapse of the house leads to the formation of cracks in the upper corners of the openings, and the walls are deformed by waves or separated by the entire surface.
This type of destruction can be complete or partial. Complete involves changing the condition of all load-bearing walls of the structure, and partial - only some partitions.
In these cases, it is recommended to screed the house from cracks on all sides in order to avoid its further destruction. Conventionally, it is divided into light, medium and strong.
Stage II. Determining the curvature of the existing base
A linear level, plumb lines or more modern devices such as optical or laser levels will help you. There is only one goal: to determine the topography of the base, mark the zero mark, find the highest point of the floor and calculate future costs - how much will need to be bought to make such a floor screed.
The simplest device for measuring floors is a level. They don’t need any special skills to use - it’s a simple glass flask with an air bubble, which they use to navigate. The flask is mounted in a wooden ruler, which we pick up.
Easy house collapse
The main signs of such destruction include cracks in half the corners of the openings, deformation of the heads of walls up to one third of the height in the normal state of the foundation.
The reason for the occurrence of such processes may be the significant weight of the roof, the construction of an additional floor, as well as the lack of a reinforcing belt. In order to eliminate this, it is necessary to use a steel clip on the corner supports.
The rods run along the facade of the external walls, and to complete the work you will need steel corners, a pipe, studs and nuts, a steel rod, subsequent welding and painting.
Related works
The screed can significantly spoil the appearance of the wall, so after completion of the work we recommend a final finishing. Since we are talking about a wooden house, we would like to draw your attention to the fact that despite the abundance and variety of materials for interior decoration, there are several rules for working with wood.
- 1. Use materials that allow air to pass through. Otherwise, a “greenhouse effect” will be created, which has a detrimental effect on the wood.
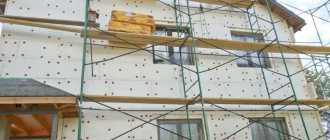
- 2. Pre-carry out wall insulation work. This will not only help maintain the desired temperature in the house, but will also help stop the process of wood destruction under the influence of the external environment.
- 3. Protect wood from mold and mildew. There are various impregnations for this, and a specialist will help you choose the right one.
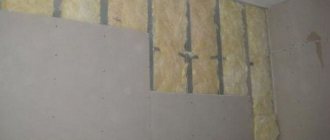
The main types of materials that are used for finishing in modern construction: lining and wall panels. They, in turn, are divided into types, differing in color, texture, and types of fastening. It is worth noting that the complex of finishing works affects not only the street part of the house. It is also often necessary to additionally finish all the interior spaces of the house, especially when it comes to vertical reinforcement of the structure.
An additional insulation device also helps a lot. Screeding walls through walls creates additional cold bridges, and therefore you need to be able to deal with them effectively. When choosing insulation, you can choose basalt wool, or polyurethane, which is sprayed in the required quantity onto individual elements.
Average camber
The main signs of such destruction are the same reasons that are observed with slight collapse, but with a probability of up to 80%.
The reasons for the appearance may be insufficient reinforcing belt, significant overload and lack of connection between walls and corners during the initial construction of the building.
In this case, it is recommended to screed along the entire perimeter of the house in three layers of steel belts to ensure better and more reliable fixation of the walls. In this case, the steel circle can be replaced with a strip, and the welding seams must be of excellent quality.
Causes of problems
There are a number of reasons why wood deforms, walls shift and other consequences occur. In fact, to eliminate them, a thorough screed is required. It is important to know about them, since it is often this feature that varies the method of carrying out repair work. Our specialists, when traveling to the client’s suburban area and inspecting the house, pay attention to the following features:
- Use in construction of wood exceeding the maximum percentage of humidity;
- Blockage of the beam with waterproofing or antiseptic;
- Excessive moisture in wood due to improper installation of waterproofing or its absence;
- Moisturizing wood from masonry or roofing;
- Incorrectly organized or completely absent ventilation;
- Damage by fungus, mold;
- Exceeding the permissible design load;
- Poor quality building materials.
Whatever the reason why you have to tighten the walls, you need to start work as soon as you suspect a violation of the geometry of the walls. Timely screeding will prevent the process of wall divergence from developing; it will cost you much less and is less difficult than working with obvious changes in the structure. In advanced situations, the question of complete dismantling of the house becomes a question.
If you do not have experience in this matter, contact specialists at the first “symptoms” - it is better to play it safe and strengthen the house at the initial stage, since if there is severe deformation, it will be very difficult to correct the situation. We promise to solve your problem efficiently for a reasonable price.
Strong collapse
The main signs are the appearance of noticeable cracks in the walls and foundation of the building, as well as a combination of other reasons that are characteristic of light and medium destruction. The cause of the appearance may be destruction of the foundation of the house.
To avoid complete destruction of the building, continuous support and corner clips, as well as a retaining belt of the foundation, are used.
To strengthen the foundation, reinforced concrete is laid along the entire length of the base.
Main types
Screeds are classified according to several criteria:
- by appointment;
- by installation method;
- according to the composition of the material;
- according to the coupling method.
According to the coupling method
The adhesion method is how the screed layer is connected to the floor slab. Screeds are distinguished:
- Related. When the layer is laid directly on top of the ceiling or base, i.e. There is no heat or sound insulation between them. Cohesion occurs through adhesion. This method is chosen in the following cases. First, you need to keep the thickness to a minimum to ensure the doors open. Secondly, the large surface area of the layer. Thirdly, when the surface should be light and the base should be fairly level.
- On the separating layer. The separators are polyethylene film, which provides vapor or waterproofing. In this case, the screed layer does not have direct contact with the base surface. This design is installed on the first floors, in bathrooms, basements, roofs, etc.
- Floating. This type is similar to the previous one: the layer is not applied to the base, but to an additional layer. Often this role is played by thick thermal insulation material. This base is suitable for laminate, tiles, parquet boards and linoleum. This design is used when good heat and sound insulation is needed, as well as when people plan to make heated floors.
According to the method of adhesion, a distinction is made between tied, on a separating layer and floating screeds.
By installation method
The installation method is the way the work is done. There are 4 types:
- Solid. The most classic and famous method. It uses a cement-based liquid mortar, which is poured by hand and then leveled along the beacons. The disadvantages are the following: high labor intensity, long process duration, weight of the resulting structure.
- Semi-dry. This screed contains much less water, and fiber is also added, which acts as reinforcement. Pouring is done not manually, but mechanized, which is faster and more convenient. The advantages of such a layer are its ability to withstand heavy loads, reduce the risk of cracks, and fast pouring speed.
- Self-leveling. This type is represented by a composition with increased fluidity, which is applied to a sealed base and, under the influence of its own weight, turns into a flat surface. The method is quite expensive, so it is used if a layer 1-2 cm thick is required.
- Dry. It is also called the team. Leveling is carried out by backfilling with fine material, such as expanded clay, followed by laying special slabs. The base must be rigid. This method is suitable in rare cases.
According to the composition of the material
Another classification of construction is by composition. The following types are distinguished:
- Cement-sand. This is the most commonly used and simplest mixture. It is durable, strong and versatile. It is advisable to put hydro- and sound insulation under it, because... moisture from the solution can be absorbed into the floor slab.
- Plaster. This material is more environmentally friendly and lightweight due to its low density, so it is also gaining popularity. Due to their high porosity, such screeds improve the indoor microclimate. They also have good heat and sound insulation. The material dries quickly and does not require additional leveling.
- Industrial. High strength concrete solutions are used here. In industrial production there are always large dynamic and static loads, so it is necessary to reinforce the floor.
Depending on the composition of the material, there are cement-sand and gypsum screeds.
By purpose
Based on their purpose, they are divided into a leveling layer and a leveling-thermal insulation layer. The first type is used to make the floor surface smooth. To the second, the function of limiting heat loss is added.
Description of the collapsed house
A blockage involves the collapse of walls inside a house, which can be complete or partial. In all cases, welding work is performed in the middle of the premises, which, as a rule, requires major repairs in all rooms of the building.
Complete blockage is characterized by blockage of three walls to varying degrees. The reasons may be impaired house construction technology and insufficient reinforcing belt. To eliminate this, a rigid steel frame with a through fastening is used.
A partial collapse is characterized by the obstruction of two walls, which may be caused by the negative effects of moisture or precipitation. For repairs, a partial holder is used according to the principle of continuous installation.
What to do if trouble occurs on the masonry?
The reason for the formation of holes between the bricks, if the base of the building is not affected, is the incorrect laying of the stone itself. The correct solution would be to demolish the wall and rebuild it, but if you cannot afford to tear it down and rebuild everything, then there is also a solution. Let's look at it step by step:
- Determine the place where the fault began. It was on this row that a mistake was made in the construction.
- Install threaded holders on one and the other side of the wall that will hold the reinforcement that creates tension. Do not forget that the thread should also be on the reinforced rod.
- Pass the reinforcement through the holders and secure it. Pull the rod as tight as possible to create tension. Do not overdo it, as you may tear out the outermost brick.
If the split in the wall is small, then you can use ordinary dowels along the entire crack.
Annex department
In most cases, a combined separation of the house extension occurs. The main sign is a crack at the joint with the main house or at an internal corner.
The main reasons for such destruction are the lack of connection of the extension to the house during its construction, as well as a poor foundation and possible overload of the additional room.
We recommend watching the video:
The screed of a house from cracks is eliminated by a set of measures, including the use of through, semi-through, anchor clips and supports. In this case, supports can be located along the entire perimeter of the foundation or clogged in individual places.
Is crack repair always necessary?
Even experienced craftsmen cannot always guarantee that the cement screed will retain its solidity and integrity, since, despite its hardness and strength, it is a fragile material that is completely unable to adapt to environmental changes and withstand excessive loads.
In addition, having an impressive weight, the poured concrete slab under the final coating will not go anywhere, even if it cracks. It is not necessary to repair it if:
- the cracks are small and rare, not prone to expansion;
- when tapping with a mallet or walking along the edges of cracks, dust does not rise from them;
- the base does not vibrate under the weight of a walking person;
- Laminate, linoleum or other covering will be laid on the screed without rigid adhesion to it.
But in the case of finishing the floor with ceramic tiles, the diverging edges of the cracks can transfer stress to the tile adhesive and to the tile itself, hopelessly ruining the expensive coating.
A weak screed is the reason for cracking of tiles Source agromat.ua
Solution preparation technology
In this video you can follow the technology for preparing clay mortar:
More homemade products: What do the numbers on hair dye mean - step by step
The use of clay in the construction and repair of stoves is a traditional method. This material has universal qualities: plasticity, viscosity, and when fired, strength, fire-resistant properties, and durability. Sand acts as a fixative; it protects against cracking and spalling of the hardened mortar from the masonry.
The oven will be completely dry in a month. Only then can it be whitened with lime (preferably in several layers) colored in any color.
First you need to determine how serious intervention the cracked surface requires. If it is a network of small cracks, but for the first time you can get by with surface repairs: remove the layer of finishing and plaster down to the brick, cover it well and plaster the stove. If the tiled cladding or the masonry itself is seriously damaged, then it will need to be dismantled and restored. In any case, you need to master working with clay.
Easy to apply, soft and elastic, also requires additional putty. Used for interior finishing.
After laying the main layers of plaster, the surface is rough and grainy; therefore, in order to obtain an even background, it is necessary to apply a finishing putty.
Filling instructions
To achieve maximum uniformity and durability of the coating, it is necessary to carry out all work in one room in one go, with a difference of up to 2 hours. Otherwise, at the joints of different sections that harden faster, an area with reduced strength will form due to different moisture content. Manufacturers indicate mixing proportions on the packaging of their products.
The mortar is laid behind the doorway up to several centimeters. Along the boundary of the expansion joint, excess composition is cut off. Once the mortar has been laid, a grout trowel is used after 8-10 hours. If a pneumatic pump was used, the time is reduced to 3–4 hours, since grouting is done before the composition completely hardens.
When laying tiles, grouting with a trowel is not done.
The moisture content of the poured layer is maintained for 2 weeks after installation. In order not to reduce the strength of the layer, it is necessary to maintain the required level of humidity; the floor is covered with plastic film. It is spread over the entire area of the room with daily spraying from a spray bottle.
The film is removed after a week and the room is ventilated so that the humidity comes into equilibrium with the external environment of the room. When laying tiles on a surface, it is advisable to begin work after 3–4 weeks, and if you choose other types of coating, no earlier than 1 calendar month.
How to choose the right aerated concrete block
Compliance with documents and acts, as well as timely work and support from highly qualified specialists - these are all the necessary conditions that must be met for aerated concrete production.
What blocks are used and where?
- First of all, you need to select a foam block according to the type of structure. After all, they eat differently and each one is suitable exclusively for its own job. The photo above shows a table on this matter.
- The main indicators in this process are strength, density, size and, of course, frost resistance. These indicators are basic, therefore they are all indicated in the passport data on checking the quality of an aerated concrete product.
- Also, the certificate or passport must have a specialized blue seal, which must be supplied by the manufacturer. In some cases, quite frequent, an additional mark from the organization that conducts the tests is required. Quality indicators must be fully suitable and consistent with the requirements of the project.
Separately, you should pay attention to the fact that a good quality block is distinguished by a light color shade, smooth corners and edges, as well as a uniform structure. Therefore, if there are stains, stains or oily films on the surface of the block, you must refuse to purchase it. If all the rules of the technological operation have been followed, then the pores of the block will always be only closed, round and even
They will be distributed evenly over the block area. Also, when purchasing, you should pay special attention to the cut of each block. If there are pores that differ greatly in size and are not round in shape, this indicates that the rules and parameters of thermal conductivity were not followed. This may also be a sign that the block has poor sound insulation properties. If a monolithic aerated concrete block is used, special attention should be paid to the surface level of the mixture. If there are watery compartments, this indicates that the required recipe was not followed when creating the block.
Subscribe to updates in our groups and share.
Well, as they say, if you want it done well, do it yourself!
6-7. The armored belt and mesh hug the entire foundation around the perimeter, forming a closed loop.
1. To clean the old foundation, it is better to use a high-pressure washer. We not only clean the surface of dirt, but also knock out all the crushed stone, which weakly adheres to the old concrete, which means it will not provide good adhesion.
Having dug up all three foundation strips along the perimeter, we discovered an unsightly picture. Almost two-thirds of the tape's volume simply disappeared, turning into a pile of small pieces.
You can learn more about the technology of stove restoration from the video:
To increase the strength of the clay solution, it is saturated with ingredients of natural origin. As a rule, this is horse manure and seedings or chopped straw (chaff).
Over time, cracks may appear in the furnace masonry. This is due to uneven heating of the material from which the oven is made. As a rule, this is a refractory brick held together with a solution of fireclay clay. Such masonry can withstand extreme temperature loads, but it does not last forever.