In the construction business there are several topics where each master has his own understanding of the problem. So, for example, when asked what comes first, screeding the floor or plastering the walls, some argue for the need to pour the screed first, while others argue for plastering the walls. The current situation does not interfere with the work of professional builders, as well as with the quality of the work performed (at least a satisfactory rating). But for those who do the work themselves, the incessant discussion of what is being done ahead brings confusion into the head, which is not at all helpful in the work. Let's try to understand the issue. First, let's look at the arguments of the parties.
Plaster first
For interior decoration, many specialists adhere to the “top to bottom” rule. This means that you need to work on the ceiling and walls first, then the floor.
Some craftsmen say that during plastering and other operations too much dirt appears below. With this order of work, they will be under the screed.
The plastered surface must dry for some time - around 7-10 days. When the coating becomes sufficiently durable, work at the site continues. Before final drying, many operations are performed. The operations are carried out in the following order:
- Run wiring along the ceiling and floor
- Heating and water supply installation in progress
- Plaster the walls and ceiling.
- Fill the screed.
- Installing socket boxes and distribution boards
- Lay ceramic tiles and porcelain tiles
- Carrying out cleaning work.
If the ceiling is not plastered, then the work is often performed in the following order:
- Plastering the walls
- Electrical installation, installation of heating and water supply systems is carried out
- Fill the screed.
- Laying tiles
- Carrying out cleaning work.
Which technique should you choose in your particular case?
When choosing one of these methods, you need to start only from the type of partitions that you plan to build between the rooms. If the partitions will be erected from tongue-and-groove slabs or gas block, then in this case the partitions are first erected, plastered, and after that the floor screed is done
If the partitions are made of plasterboard on a frame, then in this case the floor screed is first made, and the partitions are installed on the even floors, that’s all
And if this article was useful to you, and I was able to answer the question: “what to do first, screed and walls,” then give a thumbs up and subscribe to the channel. See you in the next articles
Screed first
Many builders consider another sequence of actions to be the most correct - first do the screed, and then plaster. Here are their main arguments:
- The screed takes a long time to gain strength, dries for about a month, during which time you can plaster the walls and perform other operations.
- It is easier to mark the position of sockets, lamps, heating devices.
- Wiring can be routed along the ceiling
It takes about three to four weeks for the floor to dry. Some craftsmen prefer to pour it first and then work on the walls, so that there is no downtime in using it.
But these arguments are easy to dispute. Due to this order of work, it will not be possible to reduce the total duration of work. The thickness of the screed can be calculated in advance taking into account the different types of flooring. This is how the starting point for marking, laying tiles and other operations is determined. When installing electrical wiring on the ceiling, the cable consumption will be greater than with combined (floor and ceiling) installation.
Thus, you always need to take into account the condition of the object and the nature of the operations to be done. But the top-down rule almost always applies. If you need high-quality mechanized plaster, contact plastering.rus.
Full problem analysis
As for whether to do the floor or walls first, experts recommend this order. After the exact design of the room to be finished has been completed, the old partitions, floors and communications are dismantled (if required).
In the future, you need to strictly adhere to the established procedure, otherwise during finishing there is a possibility of damaging one or another element of the finished interior.
Still, it’s better to start with wall decoration
In this case, everything will depend on the type of materials used, the chosen installation technology, the amount of work, but in any case it is advisable to start with finishing the walls . Only after the installation is completed can you start working on the floors.
However, opinions differ; there is an option that it is first recommended to construct the rough work, carefully level it, and only after that proceed to finishing and laying the finishing decorative material.
Moreover, the latter method is the most optimal for a situation where repairs are carried out in one room, and not in the same apartment. In this case, the partitions are already ready, you only have to level the surface for plaster or wallpaper.
If we talk about floors, then after the horizontal relationship of their plane is checked, you can make a decision: lay the floor covering or do a major repair of the surface. What do professionals do in this case? They lay a layer of hydro- and thermal insulation, make a subfloor or pour a screed. After the layer has hardened, the walls are finished. Only after this the finishing coating is laid on the leveled floor. For an expert's opinion on this issue, see this
In any case, you need to be extremely careful and careful, as there is a real chance of damaging or staining the finished surface.
If you decide to turn to professionals, and they claim that they first complete the floor, and only after that the walls, ask them if the finished surface is damaged, will the craftsmen compensate for the cost of the damage caused from their own pocket? Only after such formalities have been resolved can an agreement be concluded with them.
Plaster and screed
Everything here is strictly definite. If the walls are fairly smooth and do not require special treatment, then proceed immediately to the concrete screed. If the partitions leave much to be desired, then the first step is to plaster them.
After installing windows, there are often holes left on the slopes that need to be properly repaired. For this purpose, you can use not only cement mortar, but also sheets of drywall. Therefore, before you begin preparing the partitions, you will first need to work on the window opening.
After this, you need to start plastering the walls . The first layer (rough) can be made using a cement-sand mixture. Next, puttying is carried out and checking that the plane meets the building level.
What comes first: screed or plaster the walls?
When performing complex types of work, performers are often guided by a universal rule that simplifies the sequence of performing component operations - from top to bottom. However, with the development of technology, following this generalized methodology is not always a rational decision. In particular, when leveling the enclosing structures of an apartment, plastering the walls is often performed after screeding, and the arguments in favor of such a sequence are not without persuasiveness.
For an objective assessment, we will consider both scenarios - screeding before plastering and screeding the floor after plastering the walls.
Some additional services
The work performed on mechanized plastering of walls and laying semi-dry floor screed includes a number of additional services. In particular, before signing the contract, a surveyor goes to the site. He clarifies the upcoming volume and cost of work, taking into account the architectural and other features of the structure.
A preliminary estimate of the cost of finishing for a specific object can be obtained from the company manager remotely by contacting the PetroStroy office in a convenient way.
Upon conclusion of the contract, the team begins the planned work within the agreed time frame. Equipment, fixtures, and the required amount of construction and consumable materials are delivered to the site. We also provide urgent delivery of equipment and materials within 24 hours.
Upon completion of the preparatory and main work (plaster laying, screed installation), additional services are provided, which, in particular, include the removal of construction waste by our own transport for disposal and general cleaning of the premises.
Plaster after screed
With a variety of finishing technologies that affect the sequence of preparatory work, there are situations when the screed must be done before plastering:
- When finishing a room with an earthen floor . Plastering involves splashes of mortar and water, which is why even a compacted earthen floor will quickly turn into a slippery mess that will be impossible to walk on. For the same reason, it will be impossible to collect and reuse the plaster solution that fell off when painting the walls.
- If it is necessary to backfill a significant thickness (in order to raise the floor level). First, backfilling is done to the required level, so as not to plaster the excess area and reduce the height of the work. Then you need to screed so that you can walk on the hard surface, and also reuse the excess mortar collected on the floor.
If the floor is a floor slab , then when performing a rough screed before plastering the walls, the sequence of work should be as follows:
- Removing old plaster from walls;
- Priming walls and floors;
- Floor waterproofing (optional);
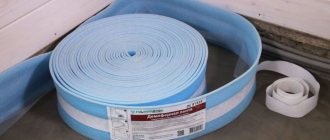
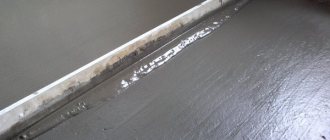
- Installation of damper tape at the junction of the future screed with the walls;
- Floor insulation (optional);
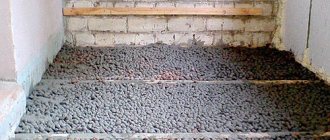
- Rough (load-bearing) screed - with or without reinforcement;
- Protect the coating with plastic film and suspend all work in this room for a week ;
- On the 8th day after installing the screed, remove the plastic film and lay the protective cardboard covering;
- Plastering;
- Upon completion of plastering, remove the cardboard protection from the floor;
- Technological break - waiting for the plaster to gain strength and dry (for cement - at least 28 days from the date of completion, for gypsum less - according to the instructions for use).
Option 2. You should start with the screed, and only later - plaster
This order of work also has many advantages.
The screed dries slowly, and waiting for it to gain sufficient strength is wasting precious time. On a set screed that you can already walk on, you can continue doing repair work after 7–8 days. The plaster will absorb water from the fresh screed, which will make it more difficult for it to dry, and this is an additional risk of fungus.
The finished screed will help with a clear definition of the places where electrical installation products will be located - sockets and switches.
Simply cover the technological gap with a damper tape between the wall and the screed with plaster. In general, this argument is not sufficiently conditioned: all the shortcomings will then still be covered with skirting boards.
Plaster mortar is easy to remove from the floor.
Screed after plastering
When finishing according to the traditional method - from top to bottom, the sequence of operations will be as follows:
- Removal of old coatings – plaster and screed;
- Installation of electrical wiring and heating systems;
- Primer and starting plaster of walls;
- Floor cleaning and priming;
- Installation of damper tape on plaster;
- Making a starter screed and covering it with film for a week;
- Technological break for 2-3 weeks (during the first 5 days the screed is moistened, in the first week it gains 70% strength);
- Finishing putty of walls;
- Final leveling of the screed.
Upon completion of the entire amount of preparation, finishing is done from top to bottom.
Advantages of the technique
There is no risk of damage to the screed during finishing of the walls - it is not there at this stage, therefore there is no need to construct protection.
Comparison with previous technology shows that installing a screed before starting plastering simplifies the work. In addition, in this case, using a gypsum-based leveling mixture, for example, “Rotband”, you can reduce the period of technological downtime by 1-2 weeks, and this is a significant “plus”.
Pros and cons of the 2nd method
If you first build interior partitions and walls, and then a floor screed, then after their construction you need to create plastering. But when plastering the walls, the mixture will certainly fall on the floor, and if you do not immediately remove the fallen plaster from the floor, then in this case it will dry out and will have to be knocked down, and from time to time even with a hammer drill, which can lead to damage to the floor screed
Therefore, it is even more correct and logical to first erect the partitions, plaster them and after that set up the beacons and carry out the floor screed. And in order to maintain the markings of the heights of the beacons for floor screed, the markings must be applied not only to the walls, but also to other elements that will not be plastered, for example, window openings, pipes, and so on
Interesting read: DIY 3d self-leveling walls
What comes first: screed or plaster the walls?
When performing complex types of work, performers are often guided by a universal rule that simplifies the sequence of performing component operations - from top to bottom. However, with the development of technology, following this generalized methodology is not always a rational decision. In particular, when leveling the enclosing structures of an apartment, plastering the walls is often performed after screeding, and the arguments in favor of such a sequence are not without persuasiveness.
For an objective assessment, we will consider both scenarios - screeding before plastering and screeding the floor after plastering the walls.
Plaster after screed
With a variety of finishing technologies that affect the sequence of preparatory work, there are situations when the screed must be done before plastering:
- When finishing a room with an earthen floor
. Plastering involves splashes of mortar and water, which is why even a compacted earthen floor will quickly turn into a slippery mess that will be impossible to walk on. For the same reason, it will be impossible to collect and reuse the plaster solution that fell off when painting the walls. - If it is necessary to backfill a significant thickness
(in order to raise the floor level). First, backfilling is done to the required level, so as not to plaster the excess area and reduce the height of the work. Then you need to screed so that you can walk on the hard surface, and also reuse the excess mortar collected on the floor.
Pros and cons of the first method
The main advantage of the first method, which consists in screeding the floor first, is the very fast and simple marking of the heights of the beacons for screeding the floor using an axle builder (laser measuring device). And in order to speed up this process even more quickly, most often one template is made from a wooden batten, which is installed on one beacon at the highest point of the floor, applied to the wall and using a regular marker, the height from the beacon to the laser beam is measured. You can naturally set the level of any beacon using a regular tape measure, but this method will take even longer
If the apartment you got does not have built partitions from the developer, then in this case it will be even easier to level all the beacons into one even plane than to smooth them out in each individual room with built partitions
If we first erect all the partitions, and then create a floor screed, then in this case we will have to transfer all the marks for the beacons from one room to another and the height error in all this can be tangible, in other words, the difference between the floors, for example in the living room and the corridor can be several mm. In this case, the difference between floor levels can be eliminated using a self-leveling floor
The screed with the first method comes out the most even, because the floor is smoothed in the shortest possible time, while it is unnecessary to transfer all the marks for the beacons from one room to another than the screed, which is done at different times in different rooms. But in any case, when using a self-leveling floor, the surface of the floors in all rooms will be level, which will eliminate all differences
Screed after plastering
When finishing according to the traditional method - from top to bottom
the sequence of operations will be as follows:
- Removal of old coatings – plaster and screed;
- Installation of electrical wiring and heating systems;
- Primer and starting plaster of walls;
- Floor cleaning and priming;
- Installation of damper tape on plaster;
- Making a starter screed and covering it with film for a week;
- Technological break for 2-3 weeks (during the first 5 days the screed is moistened, in the first week it gains 70% strength);
- Finishing putty of walls;
- Final leveling of the screed.
Upon completion of the entire amount of preparation, finishing is done from top to bottom.
Advantages of the technique
Comparison with previous technology shows that installing a screed before starting plastering simplifies the work. In addition, in this case, using a gypsum-based leveling mixture, for example, “Rotband”, you can reduce the period of technological downtime by 1-2 weeks, and this is a significant “plus”.
Requirements, rules and regulations that must be followed
Before starting this or that type of work, it is necessary to consult with specialists and analyze what the work procedure should be. All requirements must be studied in SanPin. This applies not only to the choice of building materials, but also to the quality and order of finishing work.
The most important thing in choosing a repair stage is compliance with standards and GOSTs. As a result, the owner will be able to achieve some results:
When repairs are carried out strictly according to the correct stages, the owner of the house can be sure that such a room will be used for as long as possible.
Plastering walls
Stages of plastering walls:
- Surface preparation. Primer.
- Applying plaster.
- Grout or putty.
Preparation for plastering work:
- Cover the floor with cardboard.
- Clean the wall surfaces with a stiff brush. What to do if a layer of plaster or paint was previously applied? You can remove it with a punch.
Preparing the walls
- Remove all accumulated debris.
- Check the vertical level of the walls and, if necessary, level them.
- Clean defects with sandpaper.
- Pour the primer into a container and shake. Apply primer to the walls with a roller. Use a brush in the corners of walls and under the ceiling.
Primer
- After 30 - 45 minutes, check the quality of application. Sometimes a second layer of soil is required.
It is allowed to start plastering within 24 hours. The solution can be made from one part cement and three to four parts sand. Water is gradually added until the consistency of sour cream is obtained.
- To install beacon profiles, apply small portions of M75 or Rotband mixture to the walls (they dry faster). Install beacons from floor to ceiling. Check their vertical position using a building level. If the surface of the walls is loose or very uneven, then it is recommended to apply plaster to the reinforcing mesh.
Guides
- Wet the surface of the walls. Apply the plaster using a spatula or paint bucket, gradually moving from the floor to the ceiling. The rule is to level the layer.
Alignment
- Apply a second coat of plaster after 24 hours, in the same way as the first. The solution should be more liquid.
- After another 16 - 24 hours you can start grouting. First you need to check how dry the plaster is. If it crumbles a little, then you can proceed. The solution should be completely liquid. It is spread over the surface with a special grater.
Important! Instead of grout, you can use putty.
Stages of repair work
Let's go through the main stages that must be implemented when performing various types of repairs and design.
Project preparation
A renovation project is a diagram that describes all the details and nuances of the repair. It provides for the future design, quantity of building materials, their quality, size, and company. In general, the preparation of the project will be based on several significant stages.
It should be noted that the presence of every part, any equipment and even accessories will allow you to avoid mistakes in calculating the amount of materials and costs.
So where to start first?
Experts recommend starting with dismantling. First, the walls and partitions are freed from old building materials, then it comes to the floor. There is another opinion on this matter: sometimes they start by preparing the floor (tearing off the old coverings). But, this is only in cases where the materials on the partitions are too old and it is not possible to remove them immediately (you have to wet the walls and let them soak in moisture to make dismantling easier). In order not to waste time, at this moment they begin to work on the floors.
As for the start of repairs, the situation here is a little different. For example, if the floors are not very level and there is no horizontal plane, then a concrete screed is made to level the surface. This is done immediately after dismantling work and only after complete hardening do they begin to level the walls. In case the horizontal is still respected, then the initial work is carried out on the walls.
Dismantling
Dismantling work should also be carried out in a certain sequence, observing the rules of your own safety. The entire dismantling process is based on the following steps:
Remember that dismantling partitions in a room should be done carefully, after first making sure that they are not load-bearing structures. Otherwise, not only the room in which the renovation is being carried out will be at risk, but also the entire structure.
Padding
After all the dismantling work is completed, the question again arises, whether to do the floor or the walls first. Here it is recommended not to start leveling the walls right away. It is advisable to use a primer and treat its ceilings, slopes, and walls for better adhesion of starting finishing materials.
If the floors are in critical condition (there are potholes, unevenness, or chipped concrete), then the floors are also treated with a primer at this stage.
Plaster and screed
Everything here is strictly definite. If the walls are fairly smooth and do not require special treatment, then proceed immediately to the concrete screed. If the partitions leave much to be desired, then the first step is to plaster them.
After installing windows, there are often holes left on the slopes that need to be properly repaired. For this purpose, you can use not only cement mortar, but also sheets of drywall. Therefore, before you begin preparing the partitions, you will first need to work on the window opening.
After this, you need to start plastering the walls. The first layer (rough) can be made using a cement-sand mixture. Next, puttying is carried out and checking that the plane meets the building level.
Installation of window sills
The installation of window sills must be approached only after making sure that the plaster in the window area has already completely dried. This is especially true in cases where the window sills are wooden, because they tend to strongly absorb moisture.
When installing plastic Euro-window sills, it is recommended not to remove the mounting film until all repair work is completed, since the risk of debris, building materials, drops of plaster and putty getting in, which can leave stains, is quite high.
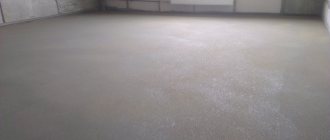
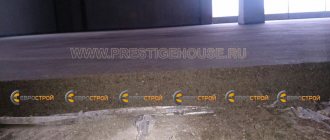
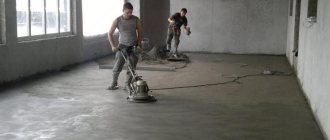
Floor screed
When all the preparatory work has been completed, the walls are perfectly leveled and prepared for finishing, you can safely begin to implement the concrete screed. To do this, you will have to purchase special construction cement, which has the appropriate markings M400 D0, D5.
After this, you need to leave the floor for several days so that the concrete hardens and dries well. Then you can begin to carry out finishing repair and construction work.
Installation of doors and leaves
Doors are installed in the openings when the plastering of the walls is completed. Immediately before this type of installation, all wet types of work must be completed. There should be no humidity at all, since doors made of wood and MDF absorb it well, and accordingly, they can swell in the future.
Note! That at this stage only doors are being installed. Door frames must be installed before plastering the partitions and leveling them.
Preparing the base for finishing
Before you start finishing the floor with decorative material, you need to make sure that the base is level, regardless of what type of finishing will be used in the future. To do this, you need to perform two steps: for a concrete floor, pour a self-leveling layer of liquid cement; for a wooden base, the quality of fastening of the boards is checked (creaking, mobility, cracks - all this should be absent). Below are a few basics on which to base your floor leveling. For monolithic coating:
For a wooden base:
If the plank flooring has just been laid, then it is necessary to sand it, since the presence of roughness and nicks is extremely undesirable. Since they affect the ideal smoothness and plane of the base.
On a note! After the rough work has been completed, you can begin to carry out finishing and decorative finishing.
Cladding of vertical coverings
Having completed the rough work, the question of whether to do the walls or the floor first comes up again. Of course, the answer in this case is clear - you need to start finishing the walls.
If these are living rooms in which the walls are covered with wallpaper or painted, then they are dealt with first and only after finishing the facing work do they begin laying laminate, parquet or linoleum.
For example, in a toilet, bathroom or kitchen, it is allowed to change the finishing algorithm. You can lay several rows of tiles on the walls first, without adding the lowest row. Then lift the floor using tiles, and then finish the final row of cladding on the wall.
Finishing the base with coating
When using parquet or linoleum to finish the floor, you will have to first prepare the material. He needs to stay indoors for two to three days to get used to room temperature. Otherwise, there is a very high risk of the seams between the parquet boards coming apart.
how to repair cracks in the floor
It is better to roll out the linoleum on the floor after laying out the underlay. The material should also lie in this position for at least a day or two. If this is not done, the linoleum will go in waves, stretching it immediately on the day of installation and fixing it will be problematic.
On a note! In order for linoleum to better adapt to the conditions, it can be glued to the substrate using double-sided tape.
If parquet laying is planned for the floor, then they do it first and only then start wallpapering the walls. This is due to the excessive formation of wood dust, which is obtained when joining the coating elements.
Screed
Layers of concrete floor are created in the following order:
- Underlying layer. Flooring on the ground begins with removing the top layer of soil and creating a layer of sand and crushed stone or concrete. The floor on top of the ceiling in the apartment is made without an underlying base.
Floor preparation
- Waterproofing. It is created from film, membrane, roofing felt. Concrete can be coated with bitumen mastic.
- Thermal insulation. For floors on the ground it is required. For floors on ceilings, insulation is laid only in unheated rooms or in rooms located above basements or arches. The heat-insulating layer is created from expanded clay, polystyrene foam, mineral wool, polyurethane foam or other insulation. The same material serves as sound insulation, which is necessary for flooring.
- Then a reinforcing mesh is laid. If a heated floor is provided, then the heating system pipes are attached to it.
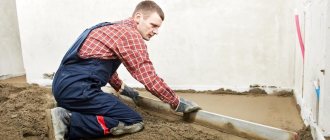
The next stage is pouring the screed. It is performed as follows:
- To obtain a flat surface, beacons made of metal profiles or wooden blocks are installed. If the area is large, then formwork will be needed, since it will not be possible to pour concrete at one time.
Lighthouses
- Concrete is poured in a layer up to 8 cm thick with a shovel. Align it using the rule, moving it along the guides.
Alignment
- The formwork and beacons are removed after pouring is completed. The voids left behind are filled with concrete.
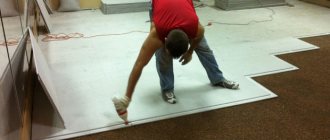
- The surface of the new floor is covered with film for several days.
Designs of partitions and their purpose
Partitions for zoning a room can now be very different. Specialists conditionally divide them into two types - stationary and mobile. Further, designs can be divided into two more categories: solid or decorative. Let's continue to figure out whether to do partitions or floors first. Let's talk about partitions in more detail.
Stationary partitions
A stationary solid partition is needed when there is a need to fence off space in a room and create two autonomous rooms. Often, such zoning is used when one room has a large area.
Stationary decorative partitions
This option is the most popular for the children's room section. This type of partition does not have a continuous surface. These can be shelves, racks, etc. But there are times when decorative partitions are installed to separate the kitchen from the dining room.
Movable partitions
Movable partitions can be installed across the entire room or through part of it.
Their advantage is ease of movement. This means that, if necessary, it can be moved to another place. At the same time, it also has light weight.