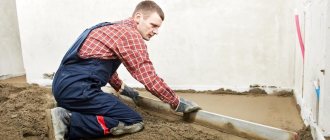
Complete replacement of floors in a private house or apartment is quite rare. In this regard, repairs should initially be approached competently. This will help you complete it flawlessly, and the dream of smooth floors that are strong and durable can be easily realized by pouring the floor with expanded clay. This screed is considered the simplest, but very effective option for leveling floors for any modern covering.
Pouring a floor with expanded clay
It is important to follow the recommendations exactly.
Pouring the floor with expanded clay. Positive traits
To begin with, you should know that the distinctive qualities of expanded clay are lightness, porosity, and environmental friendliness. It is made of baked clay, very durable, and has excellent soundproofing qualities. Another plus is low thermal conductivity.
Expanded clay
Expanded clay concrete is superior to other types of screed in many ways:
- noise absorption level;
- weight;
- thermal insulation properties;
- breathability;
- durability;
- ease of transportation;
- Expanded clay is suitable for any floor covering.
In order to make maximum use of all these qualities, it is important to carry out the entire process of pouring a floor with expanded clay correctly and step by step.
Preparation of the solution
First of all, expanded clay is hydrated. It is soaked in water for several hours. Expanded clay granules have the ability to absorb water. If the hydration process is not carried out, the expanded clay will absorb all the moisture from the screed, as a result of which it will not be strong and will begin to collapse.
The second stage - hydrated expanded clay granules are placed in a concrete mixer. Then add sequentially in the required proportion :
- cement;
- quarry sand;
- water;
- plasticizer additives or liquid soap.
After adding the components, begin the process of mixing them until a homogeneous mass is obtained. With the correct proportion of concrete, expanded clay granules will not have brown spots.
What will you need when working?
- Container for stirring the solution.
- Level (any).
Level
- Rule.
- Stirring device (mixer or stirrer).
- Net.
- Lighthouses.
- Polyethylene.
- Master OK.
- Scotch.
- Large needle roller.
- Expanded clay.
- Cement, sand or ready-made mixture.
- Mastic.
- Water.
- Plaster or alabaster.
Preparing to pour a floor with expanded clay
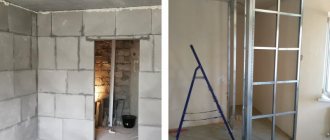
To begin with, the entire surface must be cleared down to the slab.
Preparing to pour a floor with expanded clay
All baseboards are dismantled, debris is raked out, and all existing holes and cracks are cleaned as much as possible. If there are any necessary wires on the floor, care should be taken to protect them from moisture. Sometimes polyethylene is enough, with which the wire is wrapped and then secured with tape. For greater reliability, a cut corrugation is also put on.
Scope of application
The scope of application of expanded clay is multifaceted:
- to reduce screed pressure on concrete bases;
- to reduce the load on the screed, for example, when the floor is subject to significant weight loads (garage, industrial premises);
- for installation of heated floors (convenience of placing warm water communications directly on the expanded clay layer);
- for leveling surfaces when it is necessary to reduce concrete consumption due to bulk material.
Attention
Medium and large fractions are used if it is not necessary to create a solid foundation on the surface. Granules are used when installing self-leveling floors or when covering with gypsum fiber sheets.
How are beacons placed?
The highest point is chosen as a reference point. The “main” beacon is placed on it, at least 6 mm high. Others should be compared to him. They are fixed with cement mortar or alabaster. If only they stood securely. In this case, everything should be done quickly enough.
How to make markings using a hydraulic level
Using a level of any kind, the expected edge of the screed is marked on the walls. Lines are drawn along the marks, usually using dyeing thread. Connecting the lines is important! The entire base-floor is divided by beacons into parts 1 m wide with a guideline on the line. It is easy to use them to later level the expanded clay layer.
Beacon installation
Installation of the beacon on a support screw on sand-cement mortar
When marking, you should take into account the height of the finishing coating in other rooms. This is necessary to avoid unnecessary thresholds. You should also take into account the presence of wires, podiums, etc. For a more reliable installation of beacons, expanded clay can be shed with a mixture. From two bags (50 kg) per 1 m2 you will get a layer of 4 cm.
Video - How beacons are placed
Types of filler filling
Expanded clay screed is carried out using granules of all fractions. Pebbles have different sizes, volumes and weights.
| View | Fraction, mm | Weight, m3/kg |
| Expanded clay sand | up to 5 | 500-600 |
| Expanded clay fine gravel | 5-20 | 300-450 |
| Expanded clay crushed stone | 20-40 | 200-350 |
It is recommended to use several types of filler for the screed. This will ensure high performance properties of the coating. In stores, the material is packaged in bags weighing no more than 20 kg, which greatly simplifies transportation. The higher the density, the more the filler weighs. The prices for lifting the pillow depend on this.
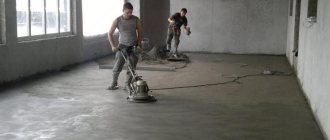
The easiest way to screed a floor with expanded clay
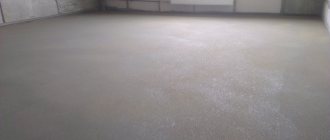
There are many known methods for arranging screeds. Let's consider the simplest, but time-consuming one. Even one person who is not very knowledgeable in construction can do it. After the surface is ready, it is covered with dry expanded clay.
After the surface is ready, it is covered with dry expanded clay.
What should be the thickness of the fill? At the top point - 5 - 6 cm. Laying expanded clay depending on this. Its consumption will be different in different areas; its overall uniformity is important. This is facilitated by drawn lines and installed beacons.
We must not forget about the level.
The leveled expanded clay is poured with a liquid solution of sand and cement (milk) so that the top layer sets.
The leveled expanded clay is poured with a liquid solution of sand and cement (milk) so that the top layer sets
What are the proportions? There is no exact recipe. In order to select the appropriate solution, the usual mixture is made, but 3 times more water is added. A small area is filled with this liquid. A mixture that does not remain on the surface and does not seep through the granules without a trace is considered normal. The solution is made “by eye”. The main thing is that no water seeps in when applying it. The resulting film should become a kind of insulation for the expanded clay. The fill dries in about 24 hours.
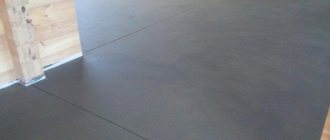
The final stage includes the final pouring of the prepared solution.
- Mortar: Portland cement 400 (1) + sea (construction) sand (3), or take a ready-made dry mixture and dilute it, as recommended by the manufacturers. River sand is not recommended.
- Do not knead everything at once, but only a few buckets at a time. After each “sending” to the floor, knead again.
- The mixture is mixed for 5 minutes, then settled for 5 minutes and mixed again for 2 minutes.
- The solution is applied to itself using the rules laid on the beacons.
- The screed can be reinforced with a mesh with 50x50 mm cells.
The screed can be reinforced
- The beacons are removed, the holes after them are sealed.
DIY floor screed with expanded clay
Ready. Let it dry. You will be able to walk in a couple of days. It will take about a month for complete drying; periodically it is necessary to spray the surface with water.
Video description
The entire process from backfilling to laying the coating is shown in the video:
Advice! It is better to start backfilling from the far wall and move towards the exit, and laying gypsum fiber boards in the reverse order. But you can carry out the installation in small sections or move along a temporary gypsum fiber board flooring thrown onto the expanded clay.
Combined method - type-setting screed
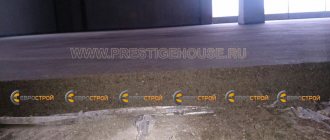
Something in between the described options is a screed on expanded clay, poured onto the base in a thick layer. To ensure effective thermal insulation, the thickness of the backfill layer must be at least 100 mm and consist of gravel of different fractions. If only leveling with raising the floor level is required, the layer of dry expanded clay may be smaller, and the backfill may consist of fine crushed stone and sand.
Installation of a wet screed over a dry screed Source www.baurum.ru
So, screed with expanded clay – the technology for its production with all its variations:
- as usual, the first step is to mark the level and prepare the base;
- expanded clay is poured and distributed so that there is room for a cement screed (usually at least 20-30 mm);
- so that the backfill does not float up into the screed, the expanded clay layer is filled with cement laitance - a liquid solution that should seep between the granules and hold them together;
- a day later, beacons for a wet screed are installed on the set layer;
- Between the layers you can lay a reinforcing mesh, which is important for large areas, or a thick polyethylene film, which will prevent the expanded clay from sucking water out of the solution. In this case, there is no need to spill the backfill with liquid solution.
Two-layer screed - method No. 2
In this way, the screed is formed in two layers. The procedure, despite its apparent complexity, is quite simple and takes little time.
How is the work done?
- You should pour expanded clay with a solution into a special pre-prepared container, add water until the granules are completely wetted, mix using a mixer, and add either cement and sand or a purchased mixture there. Mix everything well again.
- Place the resulting mixture in a card in a strip along the wall about 60-70 cm wide and level it to a level of 20-25 mm from the floor.
- The layer (wet and thick) along the wall is leveled with a trowel.
- Without waiting for the bottom layer to dry, you should fill the finished strip with a second sand-cement layer, i.e. the 1st bottom layer is with expanded clay, the 2nd is made of sand and cement.
- Fill the entire area with such stripes in two layers, moving from the wall to the doorway.
Floor screed with expanded clay
If you find that bubbles, holes and gaps appear, they must be filled with solution. Pull together until completely level. As in the first case, the surface will be ready in a month, plus or minus a few days. To retain moisture, you can cover it with a polyethylene film while drying.
expanded clay
Concrete
The surface is cleaned of old finishing. Remove protruding metal parts. These are fittings, large fasteners, etc. A jet of compressed air or a brush with hard bristles removes dirt and small abrasive particles. Further work is carried out in the following order:
- Inspect the surface for greasy stains. They worsen the degree of adhesion. Severely ingrained stains are degreased with purified gasoline or acetone.
- Strongly protruding concrete parts are removed. They are knocked down with a thin, sharp object. You can speed up cleaning using a hammer drill with a chisel installed.
- Tap the surface with a hammer, identifying poorly secured elements. In places where voids form, a dull sound will be heard.
- Existing cracks are filled with a repair compound. They are first embroidered with a hammer drill or an angle grinder with a stone disc. Large cracks are reinforced with metal rods. This increases the strength of the rough fabric.
Further work is carried out after the repair composition has completely hardened. If external application of a waterproofing layer is envisaged, it is possible to treat the floor slab with soil. Preference is given to liquids with an antifungal effect. They increase the degree of adhesion and prevent the development of microorganisms.
Good to know
In order to have the most successful floor renovation, you can follow the tips below.
- Half an iron barrel (200 l) can be used as a mixing container.
- The ratio of sand and expanded clay is as follows: 1 bag of sand concrete – 2 bags of expanded clay.
- A profile in the form of corners is used as beacons in a small room. It is screwed to parallel walls. I put the rule on them.
- 1 cm of floor screed with expanded clay takes a week to dry.
- For 1 cu. meter goes 20 bags of expanded clay, 50 kg of M300 cement.
- The more cement in the solution, the less thermal insulation.
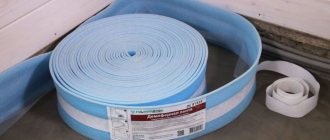
- The use of damper tape is mandatory.
The use of damper tape is mandatory
- Expanded clay fraction: 5-10, 10-20 mm.
- Coating waterproofing will increase the cost of screed.
- The mixture is poured into water, and not vice versa.
- A ready-made mixture for the dry method is considered correct if, when clenched in a fist, it does not release liquid, and when it is opened, it does not fall apart in the hand.
How to level with your own hands in a house or apartment?
Preparatory work
Before leveling the floor, you need to carefully treat it.
- Clean all irregularities and existing cracks, clean well with special tools.
- Remove all construction debris, dust, dirt with a broom or vacuum cleaner. If there are no cracks on the surface, then you can simply use a brush, and if there are, then go with a vacuum cleaner.
- The surface is washed and dried well.
- Apply primer. After the primer layer has dried, proceed to the next work.
Base waterproofing
To prevent leaks and damage to the screed, waterproof the base. To do this, purchase bitumen, ready-made mixtures and rolled materials from a hardware store. The latter are overlapped with a large margin (at least 15 cm), and additionally secured with adhesive tape.
You can also use a thick film (the thickness should be at least 100 microns). In this case, it is important that the entire piece is applied to the entire room. It is not advisable to take several parts for normal strength.
Attention
Film or other insulating materials are applied to the wall with a height margin of 10 centimeters, the excess is cut off after completion of the work.
Installation of beacons
To achieve a flat floor surface, it is necessary to calculate and maintain the level of the screed throughout the entire work process. To do this, they use the installation of beacons throughout the level.
- The levels are marked with a laser level and the corresponding marks are made. They will show the height limit of the future floor. Where the marks intersect, a horizontal line is drawn.
- Beacons begin to be placed at these marks. The expanded clay dry screed should be located at a noticeable distance from the floor to the profiles.
- Then pre-prepared dies are taken (can be made of plywood or wood) and placed on them.
- When all the beacons are placed and checked for correct location, they are secured and fixed with mortar.
Expanded clay cushion and cement screed
- The prepared base is filled up and leveled with a layer of expanded clay.
- Then you need to compact the surface. It is important that the layer does not reach the surface of the lighthouse by about 2.5 cm. To check the evenness of the pillow, you need to prepare a level in advance.
- After checking the smoothness and evenness of the diagonals, the solution is applied to the insulation. To prevent shifts and possible deformation, a mesh is placed on top of the granules or filled with expanded clay milk (the granules will set well, and the pillow will not sag over time).
Advice
In a few days, a floor made using this technology will harden. On the basis it will be possible to carry out basic work. A strong, even layer can withstand moderate loads.
In what cases is a floor screed with expanded clay needed?
In what cases is a floor screed with expanded clay needed?
There are situations when pouring a floor with expanded clay is the only right solution.
- The height of the filled space is 10 cm and above.
- Weak wooden floors.
- Savings on cement and expensive mixtures are required.
- The presence of a heating system in the floor.
In the first case, this is due to the fact that if the screed is made only from cement or only from a mixture, it will be very heavy, which can negatively affect the floor slabs.
In the second, there is a clear need to lighten the entire structure. In the latter option, safety plays a big role.
A properly executed screed allows you to not think about floor repairs for a long time. The unevenness of the base is easily eliminated, and the topcoat receives strong, long-lasting support. Any heated floor is excellent on such a basis, the motto of which can rightfully be the words “cheap”, “high quality”, “fast”!
Advantages and disadvantages
This type of flooring has the following positive qualities:
- When used in private houses on the ground, expanded clay allows you to raise the floor level to the required level, as well as protect the room from the cold that comes from the ground.
- This option can be installed on top of reinforced concrete structures that cover unheated rooms, for example, basement floors or starting floors on the ground.
- Expanded clay can be used not only for insulation, but also for sound insulation.
- Its comparative cheapness allows it to be used for leveling surfaces with large differences.
- The mass of the material is small, so it is easy to work with, and the finished structures do not exert significant pressure on the floors.
- Under such a floor covering you can disguise utility lines, including a “warm floor” system, electrical wiring or pipelines.
- Small clay particles of various shapes, grain size 0.1–5 mm. The product is heat treatable.
- Foamed clay gravel. It can have an oval or round shape, the size ranges from 0.5 to 4 cm.
- Crushed stone of irregular shape with sharp corners, which is made from clay, grain size no more than 4 cm.