The technology of semi-dry floor screed largely repeats the well-known techniques of pouring a floor with concrete or cement-sand mortar. It can be used to level a rough base, form a foundation slab from it, and after sanding it can serve as an industrial floor. But since the formula of the mixture is somewhat modified compared to the usual one, this led to an adjustment in the technological principles of pouring. It will be important to understand what the main differences between the modernized method and the traditional one are, as well as why home craftsmen and professional builders liked it.
What is a semi-dry screed? Its pros and cons
The expression “semi-dry screed” quite eloquently explains the essence: here significantly less water is added to the solution. When such a solution is prepared, exactly as much water is added to it as is required to hydrate the cement, that is, so that the molecules form strong crystalline bonds.
Advantages of semi-dry screed
A mixture devoid of excess moisture, which turns into stone as a result of the hardening process, becomes not only lighter, but also less labor-intensive to use. It also has other advantages:
- Higher density, which allows you to increase the strength of a construction object or structural element. Since, during the preparation of the mixture, excess water does not enter it, which is excessive for the hydration of cement, the subsequent long process of its evaporation will not be observed, and at the same time the appearance of pores, cavities and voids. And the fewer pores there are in the monolith, the stronger it will be.
- The absence of pores in the hardening mass also leads to the absence of shrinkage.
- The absence of the process of evaporation of excess moisture greatly accelerates the rate of maturation of the screed.
- When a semi-dry screed is used, the technology for its use turns out to be much cleaner than the traditional one - without dampness and sticky dirt.
- When working with a semi-dry screed, the humidity in the room does not increase, which allows you to simultaneously carry out finishing work here.
You can walk on a semi-dry screed within 12 hours after its formation, and in order to do finishing work in this room (except for laying the topcoat), it will be enough to wait only one day. It will also be possible to begin final finishing of the floor surface much earlier than with traditional technologies.
Disadvantages of semi-dry screed
Of course, semi-dry floor screed also has disadvantages:
- The thickness of the screed brings not only advantages, but also disadvantages: the material does not spread well, which is why it is difficult to form clear angles in places where walls meet the floor or between each other; instead, rather smooth transitions are obtained.
- The difficulty of manual work with semi-dry screed when it comes to fairly large areas (more than 75 sq. m.).
- It is impossible to use a layer thinner than 3 cm; the optimal value for it is 4-5 cm.
When a semi-dry screed is used, they try to correct its shortcomings using various tricks. For example, excess thickness is compensated by adding plasticizers. A clear dividing line in the corners is obtained in the most primitive way - immediately after laying the leveling mass, it is tamped.
Screed device over 100 + m2:
For volumes up to 100 sq.m (mainly in apartments) it is carried out using a portable mortar mixer, the mortar is mixed directly in the room where the work is being done, a ready-made sand concrete M300 composition is used to prepare the semi-dry mixture. For more information about the work, go to the page - screed in the apartment.
Price per sq.m - Semi-dry screed for volumes greater than 100 m2:
from 101 – 300 m2
m2 from 550 ₽
- all inclusive up to 6 cm
- more than 6 cm +1 cm + 50 rub.
from 301 – 499 m2
m2 from 500 ₽
- all inclusive up to 6 cm
- more than 6 cm +1 cm + 50 rub.
from 501 – 999 m2
m2 from 460 ₽
- all inclusive up to 6 cm
- more than 6 cm +1 cm + 50 rub.
from 1001 – 5000+ m2
m2 from 440 ₽
- all inclusive up to 6 cm
- more than 6 cm +1 cm + 50 rub.
Semi-dry screed thickness
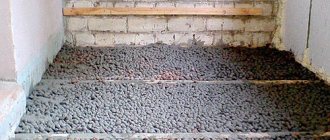
Since the leveling mass contains almost no free water, it hardens at an accelerated pace. If the thickness of the screed is too small, it will dry before it adheres to the base material. As a result, it will peel off from the base and crumble quite quickly under the influence of feet stepping on it. On the other hand, a thick (5-7 cm) screed will be too heavy, because every centimeter of its thickness will add 90-120 kg of weight per square meter of floor. Therefore, if the task is to raise the floor, then first you need to pour a layer of expanded clay on the base or fill it with expanded clay concrete, and only then use the mixture for a semi-dry screed.
The thickness of the semi-dry screed is limited to a fairly narrow frame (4-5 cm).
Therefore, the design of its structure is predetermined - a floating floor, which is not attached to either the base or the walls. It is rational to separate such a screed from the subfloor with a layer of waterproofing, and separate it from the walls along the entire perimeter of the room with expanded polystyrene tape, which also serves as sound insulation. But thanks to the floating structure, such a screed will not be subject to stresses that arise when it catches on the walls and can break it.
general description
A floor screed based on a semi-dry method is a kind of replacement for an ordinary wet one. We will look at the pros and cons of dry mortar a little later. This technology is used in cases where they want to speed up the process of complete drying for laying the finishing material. In general, this technique is designed to work with the use of special equipment, but you can easily do without it, relying on your own strength. In principle, laying screed using a semi-dry mortar implies exactly the same composition as that of a traditional batch, i.e. cement, sand and water. However, in this case, significantly less water is used. The solution is mixed in exactly the same way, only liquid is added until the moment when the resulting solution can be molded into a stone. Therefore, such a composition will need to be backfilled rather than poured.
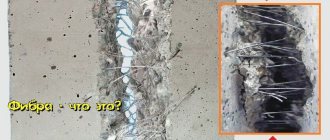
To ensure that the resulting solution is strong enough and does not crack on the base when it is laid on the surface, it is necessary to add a special product - microfiber. Fiber is a kind of polypropylene fiber. They are small enough and serve as a reinforcing element that prevents the structure from collapsing. When using the semi-dry screed method, it is necessary to consider all the nuances in advance. Such as the height of the mortar layer to be poured. For example, if you plan to lay any communications in the floor, then the screed layer should be much thicker. The same applies to those cases when the existing floor does not have a level or there are depressions and hills.
Reinforcement of semi-dry screed
To prevent cracks from appearing in a semi-dry screed, fiber is added to it, which is increasingly displacing conventional reinforcing mesh from the screed preparation technology. There are several reasons for this:
- it is much easier to mix fiber fibers than to transport them to the site and spend a lot of time and effort on laying more expensive mesh reinforcement;
- thin threads of polypropylene are located chaotically in the hardening mass, and therefore bind the structure of the stone in all directions;
- the fibers prevent cracks from appearing in the monolith, while the mesh begins to resist once a crack has already occurred.
You can continue to use reinforcing mesh, but it will be less effective. Those home craftsmen who definitely want to use mesh reinforcement of semi-dry screed will have to go through three rather labor-intensive processes:
- Lay 2-3 cm of the base layer according to the classical rules.
- Lay out the reinforcing mesh on top, connecting its parts with wire.
- Cover the top of the reinforcement with two centimeters of the top leveling layer.
pros
What is important in the work carried out in the apartment for the tenant. This is quality, speed and the absence of problems with neighbors.
Speed of work completion
Fiber screed technology involves mechanized production of mortar using special equipment. This speeds up the work process. The solution is made in large volumes and delivered to the site via pipeline. This allows you not to interrupt the screed device and complete all the work in 1-2 days. This is a definite plus.
The technology also involves a minimum amount of water in the solution, which reduces the time from the end of laying the screed to the ability to walk on it. This is 10-12 hours. However, floor finishing can begin no earlier than 5-7 days for laying tiles and 2-3 weeks for laying other floor finishing materials.
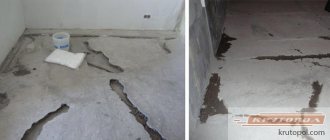
Surface preparation
- Carefully inspect the floor: tap with a hammer to find loose areas of cement, remove them using a hammer drill, and fill the resulting voids with cement mixture. Expand and restore cracks, knock down noticeable bulges.
- The interface lines between the floor and walls must be treated with cement mortar, even if there are no cracks in these places.
- After this, remove stains of oil paint and grease from the base and vacuum it thoroughly.
Materials used
Before performing a wet leveling cement screed with your own hands, it is necessary to calculate the necessary materials and ensure their availability at the construction site. The composition of the working mixture can be as follows:
Sand. Well-screened quartz construction or gully sand can be used. In this case, sand is a filler in the working mixture.
Clinker brick- Barrel sauna and its features
Apartment renovation
Cement. Portland cement M400 is usually used. Cement in the working mixture is the binding material. The proportion of sand and cement ratios is selected so that the strength grade of the finished screed is at least 100 kg per square meter. Typically there are three parts sand to one part cement.
Water. As a rule, industrial water is added to obtain a solution that will have the required consistency and mobility. It serves as a solvent for the binder material in the working mixture.
The workability of the working mixture directly depends on the amount of water. Excess water will significantly reduce the strength of the future screed and slow down the achievement of the design strength of the mortar.
Preparation of semi-dry mixture
First you need to calculate the semi-dry screed, and then purchase the following in the required quantities:
- Portland cement (preferably grade 400 D20);
- washed quarry or river sand;
- additives that improve the fluidity of the mixture.
It is recommended to rent a concrete mixer, otherwise you will have to do it the old fashioned way, using a trough, a shovel and a lot of physical labor.
The components for preparing the solution have their own requirements:
- Sand will be required with a fineness modulus of up to 2.5. The sand should contain no more than 3% of fine clay inclusions, and should be completely free of any random plant remains and peat veins. Natural humidity is allowed, which in practice can fluctuate over a wide range, so the amount of water added to the mixture may be different.
- You need to buy cement with an unexpired shelf life and in undamaged original packaging. If Portland cement 400 D20 is used, the result will be a solution corresponding to the M200 cement brand, and in the case of the original Portland cement 500 D20, the cement mixture will be M350, which can be used in places with difficult operating conditions.
- You cannot take water from untested reservoirs, as it may be contaminated with biological or technical waste. But tap water is fine.
Proportions of the dry mixture: 3 parts sand x 1 part cement x part water in the amount required for the given case.
- In the middle of the container for preparing the mixture, you need to build a slide, pouring in portions of 3 shovels of sand and 1 shovel of cement in the required quantity.
- Then mix all the components dry, and then begin to slowly pour in water with the fiber fiber added there.
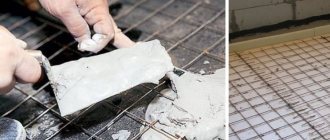
- A semi-dry cement-sand screed should be diluted with water to the consistency of sandy loam - like clay sand that sticks together into a lump, but when compressed, no moisture is released, and the lump itself retains its given shape.
- Since the moisture content of the original sand can be different, water has to be added “by eye”, which often ends in overflow. If moisture begins to ooze from a lump of semi-dry solution, then you need to add the dry components to the mixture in the same proportions.
- Polypropylene fiber should be added to each bucket of water so that it disperses more easily through the mixture. Approximately 80 g of fiber is added to each bucket, but the manufacturer’s labeling indicates how much fiber fiber should be added per cubic meter of mixture.
- If a pneumatic machine is used for semi-dry screed, then with its help you should simultaneously prepare such an amount of semi-dry mixture that would be enough for the entire thickness of the screed. If the mixture is prepared manually, then it must be laid out in layers: first the lower part, followed by tamping, then the upper part, which is leveled by the rule and at the same time sanded.
The solution begins to lose the properties necessary for the leveling mass in an hour or even earlier, so you need to plan all operations in advance and work on the screed at an accelerated pace.
- Some craftsmen recommend starting to lay the mortar from the periphery, but this option is possible if the general leveling layer can then be applied in no longer than an hour. If this takes more time, the laid mixture will be covered with a hardened crust, resulting in an extra seam that will open the way for the penetration of cold.
Preparatory work
The process of laying semi-dry screed itself is simple, although very labor-intensive. Such a coating requires a carefully prepared surface; the quality of further work depends on this stage.
Surface cleaning
The first step is to completely remove the old coating to the base and clean the surface with sandpaper or a grinder to remove the remaining fragments of the old screed. This will remove dust and debris. If there are cracks or potholes in the coating, they are sealed with putty or cement-sand mortar. Protruding elements are removed with a grinder. Then you should carefully treat the entire surface with a primer, it is better to do this 2 times with an interval of 4 hours.
Step-by-step preparation of the surface for laying screed
Taking measurements
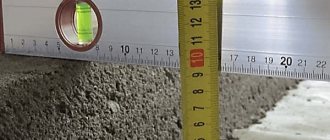
If you have a laser level, then taking measurements is quite simple. It is necessary to place it on the floor and turn it on, and screw a self-tapping screw into the floor opposite the wall so that it rises 10 cm above the surface. Install a rule on its head, and make a mark on the tool at the intersection of the beam and the rule. Then you should do the same operation on the opposite wall. If the mark on the rule does not correspond to the new intersection with the beam, you need to adjust the height by screwing in or unscrewing the screw. As a result, 15 self-tapping screws should be installed; they will be located at different levels, reflecting the curvature of the surface. You need to fill the screed along the self-tapping screw located above the rest, so all the unevenness will be smoothed out.
If you don’t have a laser level at hand, you can use a hydraulic level. Essentially, it is a small diameter flexible tube that is filled with water. It is necessary to measure a certain distance from the floor to the wall to make it more convenient to work, say, 1.5 m. Attach one end of the tube to this mark so that the water level corresponds to the point, the other end must be brought to the other wall and set at a height of 1, 5 m. If the water level does not reach the mark, then it is necessary to change the height so that the liquid completely fills the tube, make a mark. Thus, you should mark all the walls relative to the first point. The more points there are, the better. After this, you need to determine the lowest point.
Example:
- Let's say the value of the lowest point is 147 cm. From this number we subtract the thickness of the layer, for example, 5 cm. We get: 147 - 5 = 142 cm.
- From the previously arbitrarily marked height, we set aside the resulting distance (142 cm) and draw a horizontal line, this will be the level to which the screed should reach.
Waterproofing and insulation
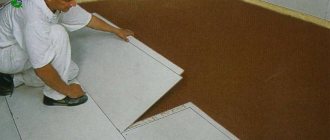
For waterproofing, roll or coating materials are used. The simplest is plastic film. It needs to be laid on the floor, not secured to the walls. If one sheet is not enough to cover the entire area, you need to lay the strips overlapping 15 cm and seal the joint with tape. If the base is in good condition, you can use coating materials; they are applied and distributed over the surface with a roller or brush and wait to dry.
Insulation is laid on the waterproofing layer. Extruded polystyrene is considered the best option. It must be laid tightly and secured with special locks or adhesive tape. Mineral wool is less commonly used. It loses a little in terms of thermal insulation, and also requires the installation of an additional membrane to protect against moisture from the solution.
Laying waterproofing and insulation
Next, damper tape is applied to the lower parts of walls, columns, stairs and other structural elements. During drying, the concrete will either expand or contract, which can lead to the formation of cracks on the screed itself or on the walls. After drying, the tape is cut with a stationery knife.
Installation of beacons
On a note! Beacons are metal or plastic profiles that serve to level surfaces.
So, you need to step back 20 cm from the wall and, using a marker and a building level, draw a straight line, and draw the same lines every 60 cm. Then prepare a regular cement-sand mortar and apply it along the drawn lines in small portions, then install one beacon on the mortar. When pressing or pulling out the product, it is necessary to place it on a level. The following beacons are installed according to the previous one.
Installation of beacons on the solution
More experienced craftsmen make beacons themselves from mortar. In this case, you need to screw in several self-tapping screws along the lines and align them. After this, apply the solution to the markings, and glue a piece of tape over the screws. Then, using the rule, raise the height of the portion of the solution to the level of the tape and let it harden, then remove the tape. Such beacons do not need to be removed from the coating.
Making the solution
The modern market offers a huge number of different building mixtures that can simply be diluted with water and used. But if you decide to prepare the solution yourself, then it is important to take into account the standard proportions: 1 part cement and 4 parts sand. As for fiberglass, it must be added at the rate of 600 g per cubic meter of solution. In some cases, a plasticizer is included in the mixture at the rate of 1 l/100 kg of cement.
Manufacturing sequence: load 160 liters of sifted sand into a concrete mixer, add 180 g of fiber fibre, 500 ml of plasticizer and 50 kg of cement, mix the components thoroughly, then pour in 15 liters of water. After mixing, you need to check the quality of the solution: take a small amount of the mixture and squeeze it in your fist. If no moisture is released, then everything is done correctly.
VIDEO: The process of making semi-dry screed mortar
Pouring semi-dry screed
- Cover the subfloor with waterproofing, roofing felt or polyethylene in such a way that the waterproofing strips form a kind of pallet with sides extending 15 cm onto the walls, and the strips themselves are laid with an overlap and then secured with tape.
- Secure polypropylene electrical tape vertically along the perimeter of the walls, which must first be cut into strips of suitable sizes. It is recommended to use isolon 10 cm wide and 8-10 mm thick.
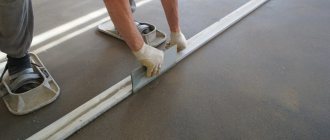
- On the walls, you need to mark in advance the required height of the screed using a simple or laser level. After this, on top of the waterproofing, in accordance with the given level, it is necessary to build rail beacons from beds of mortar, on the ridges of which guide profiles should rest. Linear beacons must be positioned so that the rule rests on two adjacent rails, with 20-30 cm remaining between the guide and the wall.
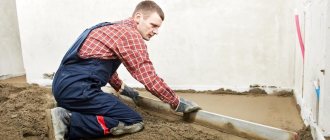
- Then you need to spread the mixture with a shovel so that its level is below the level controlled by the beacons. The mixture must be compacted immediately (it is advisable to involve assistants for this).
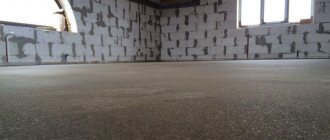
- Place the semi-dry mixture on the compacted surface, but above the level of the beacons, after which the screed is simultaneously compacted and leveled.
- Immediately sand the formed screed.
- In rooms whose area exceeds 12-15 m2, after 24 hours it is necessary to cut expansion joints along the walls, the depth of which is a third of the leveling layer and the width is 3 mm.
- After this, the semi-dry cement screed should be covered with overlapping sheets of polyethylene and left for some time (from 1 day to 1 week, if the conditions for hardening are normal). In hot weather, the screed will have to be moistened with water for several days so that hardening proceeds normally, without the formation of cracks and deformations.
Video about semi-dry screed technology:
Technology and step-by-step instructions
To install a classic floor screed using semi-dry technology, you will need a cement-sand mixture, reinforcing material, damper tape and waterproofing. The tools you will need are a level, a rule, beacons, a spatula and a mixer. Plus, you need a machine with a grinding disc to compact and level the mortar. An alternative for manual grouting is a regular trowel. However, labor costs with it will increase significantly; it is better to automate the work at least a little.
The process of creating a screed is as follows:
- The foundation (interfloor ceiling) is being prepared.
- Sound and waterproofing is laid out, and then beacons are installed.
- The damper tape is laid and the solution is mixed.
- The mixture is poured and leveled.
If it is necessary to lay pipes for a warm water floor, this is done before arranging the beacons.
Carrying out screed laying work
Preparing the floor surface
As part of the preparation, the floor under the screed to be laid is cleaned of the finishing coating and baseboards, as well as any debris and oil stains. Next, cracks, if any, are sealed, and the base is treated with a primer.
Installation of beacons and waterproofing
Beacons for screeds are made of concrete or a U-shaped profile for drywall. The first option is simpler and faster to implement, and the second is more technologically advanced and accurate. You can also use professional pin tripods. With them, the floor will be perfectly level, but it is hardly worth purchasing this tool for one-time work.
Profile installation is done in two ways:
- For concrete mortar.
- Self-tapping dowel.
The first takes time for the concrete to set, and the second will require drilling a lot of holes in the base. The holes for the dowels will need to be made in increments of 40–60 cm. When dry, the floor screed expands slightly. To prevent it from cracking, a damper tape made of foamed polyethylene should be laid along the walls around the perimeter of the room.
How the work is performed
Preparation of the solution
In order not to miscalculate the proportions, it is best to take the cement-sand mixture immediately ready-made in bags. If you need to mix it manually, then when choosing the sand/cement ratio you should proceed from the grade of the latter and the required grade of concrete. For example, a semi-dry M75 concrete screed is 1 kg of M300 cement and 3 kg of sand. Fiber fiber for reinforcement is usually added at 0.7–0.8 kg/cubic meter of solution. And the sand for it should be with a grain size of 2–3 mm and sifted without impurities.
Add enough water so that when you squeeze the solution with your fist, it does not come out. In this case, the concrete mixture itself should be sufficiently moist and easy to level. Usually this is 0.4–0.5 liters per kilogram of cement, but much depends on the moisture content of the sand.
Preparation of mortar for screed
Fill
If the floor screed is done on a wooden floor, then it must be dried and after complete shrinkage. It is recommended to pour the solution onto such a base only after 2–3 years from its installation.
Immediately as the solution is poured, it is compacted, leveled and polished. It will take from a couple of days to a week to dry completely, depending on the thickness. But after a day, it is necessary to make expansion joints in the resulting screed along the walls and columns, in doorways and in the middle of the room (if its area is more than 50 square meters). These cuts are made in concrete 3–5 mm wide and a third of the layer thickness. The distance between them is from 3 to 6 m.
How to make a screed yourself
After the solution has set, you can remove the profile guides and rub in the resulting grooves. While it is drying, the floor should be covered with plastic film. But if there is extreme heat, then the polyethylene will have to be lifted every 2-4 hours and the concrete slightly moistened with a flower sprayer. If this is not done, the semi-dry screed may crack due to drying out.
Semi-dry screed in the house
How long does it take for a semi-dry screed to dry?
Since a semi-dry screed does not shrink the surface, its grouting can be done immediately after leveling according to the rule. After this, you need to wait until the screed is completely dry. The advantage of the new technique is that after just 12 hours you can walk on the freshly prepared floor, and after the same amount of time, you can safely continue further finishing work in the room. It will also be possible to begin laying the final floor covering much earlier than was permissible with the old pouring technology.
However, there are some nuances here too. Although the technology of semi-dry floor screed is considered a modernization, it is also imperfect, so not all work after it can be started at the same time. It all depends on the properties that certain floor coverings have:
- tiles or porcelain stoneware that are not afraid of moisture can be laid already 2 days later;
- linoleum flooring will be possible in 1 week;
- but the installation of laminate or parquet can only be done a month later - and this is already the same period as for a standard cement-sand filling.
Would you use a semi-dry screed to level the floor? Maybe you already had experience working with it? Tell us about your experience and impressions in the comments - other readers will be interested!
Minuses
Now the cons, let's start with the inconveniences.
To install a fiber screed, a completely free apartment is required. As I said above, the screed is done immediately and in the entire apartment in 1 day; partial installation options are not suitable.
To prepare the solution, a place is required to install the equipment. This is usually done in the yard. A pipeline is laid from the car to the apartment through which the finished solution “flows.” In some, especially lived-in homes, this may become a bit of an inconvenience.
Screed strength
There is an opinion that a semi-dry screed is less durable compared to the wet version. There are two reasons for this: difficult compaction and high porosity. The consistency of the semi-dry mortar requires serious efforts to compact it, which is easily solved by the professionalism of the workers.
The porosity of the screed may be the reason for its weakness. However, porosity is solved not by the manual grinding method, but by the use of helicopter-type grinders.
Technological process for performing wet screed
When considering step-by-step recommendations for making a leveling cement screed with your own hands, you should establish the following procedure:
The first step is to prepare the necessary tools, calculate the area of the room and the amount of materials.
Clean the floor surface from dirt and construction debris. Install beacons from dowels, creating the required slope.
Preparation of mortar of the required consistency and grade by mixing manually or in a concrete mixer.
Apply the solution between the beacons and, using the rule, level it with confident hand movements, creating a masterpiece of construction skill with your own hands. Now you can admire your creativity. It is advisable to leave the finished surface for some time for the solution to harden.