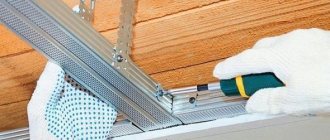
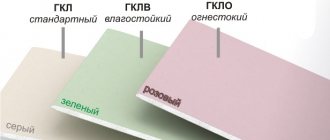
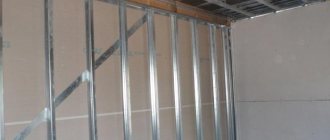
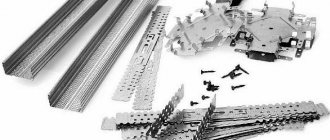
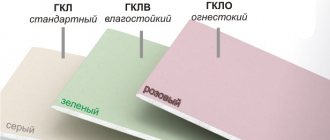
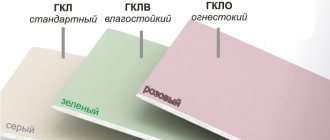
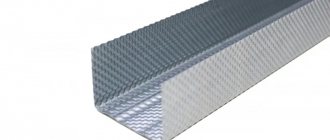
In addition to the frame, the reliability of fastening the plasterboard ceiling depends on the hangers. The more high-quality fastening points, the stronger the ceiling. It will be smoother and will not bend under the weight of the sheet. In addition, with the help of a ceiling suspension, the height of the attachment point of the supporting profile, and therefore the position of the ceiling plane, is adjusted.
Types of suspensions
Depending on the calculation of the load on the ceiling and the quality of the materials used, the installation step changes - the distance between the suspensions and profiles. The more often you install them, the stronger the ceiling.
Features of ceiling hangers for plasterboard
Ceiling hangers are a universal product, the functional purpose of which is to provide reliable fastening of drywall and perform certain decorative functions for the coating.
These elements not only help to obtain a perfectly flat surface of the ceiling covering, but also give the structure special stability and strength, significantly improve heat and sound insulation characteristics, and help in creating a design of any complexity.
General rules for installing a frame under gypsum boards
Before starting work, you need to create a diagram of the future structure, as well as calculate the required amount of materials. The parameters for attaching drywall depend on the purpose of the structure: applied or decorative. If you need to make a partition or sheathe a wall, and there will not be a large load on it, then additional reinforcement of the structure is not necessary. In this case, the fastening is performed on a simple frame. If you plan to hang furniture on the wall, then the thickness of the frame and the gypsum board sheet itself will necessarily increase. To improve heat and sound insulation, a layer of insulation is laid between the panels. With the help of such a partition you can hide all communications. To bring out sockets and switches, holes are cut in the drywall. Then the entire surface is puttied. If you plan to finish both the walls and the ceiling at once, then start with installing the ceiling.
Distance between hangers on plasterboard ceilings
When installing drywall, you must first determine how many hangers will be needed. This value directly depends on the load-bearing capacity of the part. It should be taken into account that a standard sheet of drywall with dimensions of 1200x2500 cm will weigh around 22 kg.
According to the stated characteristics, various types of parts can withstand this level of load:
- straight – 40 kg;
- anchor – 25 kg;
- vernier – 40 kg;
- vibration suspension – 12-50 kg;
- butterfly – 40 kg.
The optimal amount is calculated based on the load-bearing capacity and weight of the drywall. They should be located at a distance of 60-70 cm from each other. In some situations, this value can be increased to 100 cm, but no more.
Dimensions of drywall hangers
As practice shows, the choice of a suitable suspension depends largely on its dimensions and purposes. The most popular type is direct suspension, with standard dimensions of 12.5x6.3 cm. It should be used in a situation where the consumer plans to insulate the ceiling or level it. These dimensions are quite enough to hide the wiring between the base of the ceiling and the plasterboard structure.
If there is a need to create a ceiling with complex geometric shapes or plan to install volumetric elements (ventilation cabinet), then you need to use a wire rod. The length of the wire-type plasterboard hanger is 50 and 100 cm.
Types of drywall hangers
The building materials market offers a wide range of suspensions, which differ in shape, technological nuances and methods of fastening. Drywall hangers vary noticeably in size and type. Each type of product has its own characteristics, advantages and disadvantages.
Direct hanger for drywall
The most common and popular option. In appearance, it is a rectangular plastic made of galvanized steel. The main reason for the popularity of this option is that, thanks to a slight mechanical effect, the suspension can be modified, as a result of which it will receive a U-shape.
Despite its small dimensions, the galvanized steel part can withstand significant loads (up to 40 kg). It is not susceptible to the negative effects of corrosive activity and has increased protection from moisture. The standard dimensions of a direct hanger for drywall are 12.5 x 6.3 cm.
The design features make direct suspension indispensable when it is necessary to install plasterboard sheets to concrete, brick and stone bases. Thanks to this, it can be used in premises for various purposes.
Often direct suspension is used for:
- frame assemblies for cladding wall and ceiling surfaces;
- preparing a frame base for subsequent lining with plasterboard (this option has become an ideal solution in rooms where there are serious ceiling defects, including an uneven base, cracks, etc.);
- leveling any surface.
Extended drywall hanger
This device is used in cases where a metal profile needs to be installed at a distance exceeding standard parameters. Often such parts are 52 cm long and are produced to order.
If there is a need for an elongated profile, it is possible to create it from a direct suspension thanks to simple steps.
Drywall anchor hanger
This option is also known as a clip hanger. Its main purpose is the installation of plasterboard structures and the fixation of suspended ceilings. The anchor helps create the required space under the ceiling. This means that thanks to the use of this design, the user will be able to independently adjust the height of the assembled ceiling.
Height adjustment is carried out using a wire rod. The anchor design includes a rod and an anchor element with a clamp. It is inserted into the profile, after which the location is fixed with a clamp located at the bottom of the structure.
Important! Unlike direct suspension, the anchor has a weaker load-bearing capacity (no more than 25 kg).
Suspension rod for drywall
Often, when installing a plasterboard ceiling, it becomes necessary to change the height of the structure by up to 0.5 m. There can be many reasons for this, the most popular ones include the need to lay utility lines, install a ventilation duct, or install a multi-level ceiling.
In this case, you need to use a drywall sliding hanger, also known as a drywall hanger. The diameter of the suspension is approximately 4 mm. On one side it has a special eye for anchoring to a reinforced concrete floor, on the other there is a clamp made of galvanized steel.
The height of the ceiling structure can be adjusted by increasing or decreasing the length of the wire rod. They are produced with standard length parameters, there are two types - 50 and 100 cm. When changing the height of the ceiling structure, the excess draft is cut off.
Vernier suspension
A special device that provides additional rigidity to the structure. The vernier suspension consists of the following elements:
- The lower part is presented in the form of a clamp, a fastening part with protrusions. For ease of fastening in the required position, this part has many holes.
- The suspension itself, the length of which is in the range of 40-100 cm.
- A fixing element in the form of a fastening bracket, due to which the suspension is secured in the desired position.
Important! The standard load-bearing capacity of a vernier is 40 kg. During installation, it is necessary that the distance between the hangers be at least 60 cm.
Vibration suspension
A special type of adjustable drywall hanger, which is designed to impart soundproofing functions to the structure. It is not used so often when installing plasterboard ceilings. This can be explained by its excessive cost and the ability to muffle extraneous sounds using other methods.
As practice shows, the use of this device in combination with a seal allows for maximum sound insulation. This type of design is available in several variations:
- standard suspension;
- polyurethane vibration suspension with high sound suppression capabilities;
- design with anti-vibration mounting, externally resembling a standard anchor;
- removable vibration platform. This is an adjustable design, thanks to which profiles can be fixed at different lengths.
Stage 1. Drafting
To work you will need a project.
To create it, you can use one of the special architectural programs that allow you to obtain a ready-made diagram and the required volumes of consumables. If you do everything the old fashioned way, you will have to spend much more time and effort. Step 1. Using a special formula, the perimeter is determined. It looks like this (if the room dimensions are, for example, 5x4 m):
(5 + 4) x 2 = 18 m (P)
It turns out that the length of the guide profiles will be 18 m. Then the obtained data is displayed on graph paper.
Step 2. After this you need to start calculating the frame profile. The work will use 6x2.7 cm profiles - they will be fixed in increments of 0.6 m
It is important that the length of each profile is equal to the width of the room. To calculate the number of slats, the width of the room (400 cm) must be divided by the pitch (60 cm)
As a result of simple calculations, we get: 6.66 (the amount is rounded to 7.0).
The first and last slats are attached 10 cm from the surface of the walls, and all the rest - according to the above step.
The mounting locations for the slats are transferred to the project.
Step 3. Next, you should determine the number of hangers (they will also be attached in increments of 60 cm).
400/60 x 7 = 47 pieces.
The first and last suspension is attached 30 cm from the surface of the walls. The attachment points are indicated in the diagram by crosses. We also note that it is preferable to use spring suspensions, while straight ones are acceptable only in two cases:
- with a completely flat ceiling surface;
- with a structure height of more than 12 cm.
Step 4. After this, you need to determine the number of jumpers that will add rigidity to the structure.
((400/60) – 1) x 7 = 40 pieces.
Types of fasteners
Step 5. All that remains is to determine the required number of screws and plasterboard sheets. Given the known area of the room (20 m²) and the sheet (3 m²), this is quite easy to do - you will need almost five sheets of material.
There shouldn’t be any difficulties with self-tapping screws either:
- “thirtieth” self-tapping screws will be used to fix the drywall (step length – 25 cm);
- 60x6 products will be used for walls (step length - 30 cm) and ceiling (60 cm);
- LN11 screws will be used for fittings: 4 pcs for crabs and profiles, 2 pcs for hangers and profiles.
You also need to note the number of lighting devices and determine the length of the electrical wiring.
Ceiling markings. Guide, profile, straight suspension, crabProject
How to extend a straight drywall hanger
Direct suspension is a universal mount, presented in the form of a narrow perforated strip of galvanized steel with increased flexibility. When using these parts, it is recommended to fix them on the ceiling at a distance of 50-70 cm from each other.
If there is a need to lengthen the profile, for example, to create a multi-level ceiling structure, you can purchase a special hanger for the plasterboard profile. However, due to its high cost, it is often cheaper to enlarge a standard straight part.
The simplest extension option is to screw small pieces of another part to the existing hanger. They can be secured using small screws (it is recommended to use at least two fleas for each plate).
Another popular way to increase the length of a straight part is the use of a UD guide element. You can cut a suspension from it to the required length.
Pros and cons of metal profiles
Metal profiles are used not only in the construction of gypsum plasterboard structures, but also for fastening other finishing materials.
The advantages of steel profiles include the following:
- Thanks to the galvanized coating, the slats are reliably protected from corrosion, so they can be installed in rooms with high humidity. They will even withstand direct contact with water when flooded from above.
- If a metal frame is compared with a wooden sheathing, then its service life is much longer. It does not deform over time, metal elements do not lose their technical characteristics.
- The material is not spoiled by microorganisms, insects and rodents, which cannot be said about wooden sheathing. Thanks to this, the strength of the frame is maintained and its service life is extended.
- Steel is a fireproof material. This is its main advantage over wood.
- A plasterboard ceiling will not crack over time because the frame elements do not deform due to changes in humidity and temperature.
- Steel slats are convenient and easy to install. They cut easily.
We can say that metal profiles have practically no disadvantages. It is much more profitable to make a frame from galvanized slats than to construct a wooden sheathing, which deforms over time, cannot be used in conditions of high humidity and has low fire resistance.
How to attach ceiling hangers for plasterboard
The fastening of ceiling profiles for plasterboard is carried out during the process of assembling the base for gypsum panels along the entire length of the part. If for guide-type profiles it is enough to select fastening material that matches the material of the wall ceilings, then with ceiling slats the situation is somewhat different.
The main nuance of attaching ceiling suspensions is that it is necessary to connect several different parts to form a single structure. Therefore, you will have to use special devices for this.
In most cases, the fixation of most metal parts of the profile occurs thanks to self-tapping screws. This is a special group of hardware products. To create an effective fastening, you need a large number of hardware of various types:
- press washers and bugs (flea beetles). Two similar types of hardware for working with metal parts. The first option is characterized by a wider cap and larger size. The second option has small dimensions (length no more than 10 mm). For the installation of ceiling structures and drywall, it is recommended to use “flea beads”, since they do not create difficulties when installing the sheathing;
- dowel-nails. Externally, this hardware is practically indistinguishable from standard plastic dowels. The difference between them is manifested in installation technology. If a classic dowel needs to be screwed in, then the dowel-nail must be driven in using a hammer or impact drill.
Important! Dowel-nails guarantee a strong fastening in the thickness of the ceiling, however, due to its structural features, this option is not suitable for a ceiling base that has a fragile structure (buildings with clay and wooden ceilings).
Preparing the wall
To install a profile frame on a wall, no complicated preparation is required. The most important thing is that the screws or dowel-nails hold firmly in the wall. It is important that the foundation is strong. Do not attach the frame to loose and swollen plaster or tiles. It is better to completely dismantle such a coating.
If the base is solid - concrete or brick with strong plaster, wood, plaster, then no surface treatment is needed.
There is no need to prime the walls!
On the Internet you can find recommendations to coat the wall with a primer. When installing a metal frame using dowels and nails, such processing is meaningless.
DIY installation of plasterboard hangers on the ceiling
Installing profiles for drywall is a simple procedure; any user with minimal knowledge of installation technology can handle it. Despite this, you need to know that the process has some features that should be foreseen in advance.
The technology for laying and fixing the ceiling profile is carried out according to a strict procedure:
- The metal strip must be cut according to the required dimensions. This task should be performed using a hacksaw or metal snips. You should absolutely not use an angle grinder. This is explained by the fact that due to high speeds, the angle grinder will cause irreparable damage to the anti-corrosion coating of the profile.
- Markers are placed on the ceiling, according to the location of which the installation takes place. This operation must be treated with special attention. The pendants should be positioned as evenly as possible to avoid any distortions. Otherwise, problems may occur when attaching the slats, as the structure will be deformed.
- Suspensions for drywall guides are installed in special grooves. They are mounted according to previously established marks on the plane. The profiles need to be attached to the guides using fleas. In this case, it is necessary that at least 2-3 fasteners be installed on each side.
- After completing all the above steps, you need to level the structure. To do this, the free ends of the hangers are bent at right angles to the slats. So that they touch as tightly as possible, they are fastened with “fleas” (2-3 pieces on each side).
Important! When cutting the required length of the strip, you need to make the workpiece a few millimeters shorter than necessary. This will make it more convenient to place parts in the grooves without deforming the ends.
Finishing work
After covering the entire frame with plasterboard, the structure is left to stand for two days. This is necessary for the material to acquire the humidity and temperature of the room. After this period, finishing work can be carried out.
Step 1. It is necessary to apply a primer to the sheets, which will give them additional protection from moisture
It is important to ensure that the primer penetrates into all joints, since they will be the most vulnerable points during operation of the ceiling
Step 2. Using a spatula, the seams between the sheets are puttied, for which a quick-drying gypsum mixture (“Knauf Fugenfüller” or its analogues) is often used. It is mandatory to glue a reinforcing mesh to all joints. If there are two factory edges at the junction, then a reinforcing mesh 80-100 mm wide is used. If one or both edges of the drywall are chamfered at an angle of 45 degrees, then the mesh is cut lengthwise so that it does not go beyond the plane, or a mesh of standard width is used, but then you will have to putty the entire surface of the drywall to a thickness of 1-2 mm more.
Prices for gypsum mixtures
gypsum mixtures
Finishing plasterboard ceiling
Step 3. Recesses for screws. The same “Fugenfüller” is used to seal the recesses from the screws. Use a narrow spatula (no more than 60-80 mm) to apply it in several directions so that the putty fills the entire recess. When the Fugenfüller dries, it will retract - this is normal. The recesses can already be sealed with regular finishing putty (Knauf Satengips, Knauf Finish, etc.).
Step 4. After drying, apply finishing putty. Here you can use a larger tool and putty, which has a longer drying time and increases the strength of the joint. The heads of the self-tapping screws are also filled with putty solution.
Step 5. At the end, all irregularities are rubbed out using sandpaper.
If the design layout requires it, after puttying and leveling the surface, you can begin painting, whitewashing or applying wallpaper to the ceiling. If you plan to install a multi-level ceiling, then you can begin arranging its subsequent levels.
Expert advice
Despite the fact that installing hangers is not considered an unnecessarily difficult task, not all users are able to complete the installation work efficiently. During the installation process, great attention should be paid to such criteria as weight and thickness of the material. Based on the available information, make a choice of fasteners.
Experts also recommend paying attention to the following points:
- Before installing fasteners, you need to mark the fastening points on the surface. At the same time, they should be as close as possible to the joints of the profiles; ideally, the distance between the hangers on a plasterboard wall should be 60-70 cm. When fixing plasterboard, it is necessary that there are small gaps between the sheets of building material.
- To ensure maximum density of the suspensions and guides, you can stick a special spacer tape between them.
- The supporting profiles should not adhere too tightly to the surface; the heads of the screws should not be left below the level of the drywall.
- The easiest way to check the strength of the fasteners is to pull it with a little force. If all the components remain in place, this means that the fixation is as strong as possible and the fastening was done correctly.
- To fix the structure you need to use galvanized fasteners. They will help not only prevent corrosion, but also increase the fire resistance of the structure. Nylon-coated dowels are best used for attaching guides to wall surfaces.
- It is necessary to determine in advance the places where lamps, wall cabinets and decorative elements will be located. This will avoid subsequent partial destruction of the plasterboard coating.
