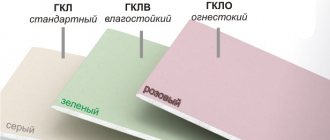
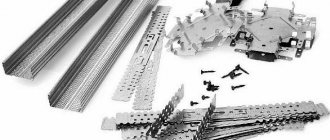
What kind of plasterboard profiles can there be?
In 1980, a paper mill owner named Ostug Sackett had the idea of creating a new building material from gypsum. At first, plasterboard sheets replaced plywood and chipboard in small houses. It was then that the interesting properties of this material were discovered. The joints of smooth and even cardboard are very easy to seal so that when painting or other types of finishing, they will be completely invisible. Breaking a marked sheet instead of sawing it is much easier. Constancy of dimensions eliminates cracks in joints... Drywall has proven itself in the construction market for a long time and has remained an integral part of repairs to this day.
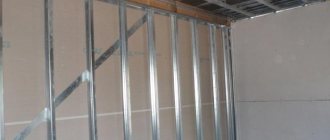
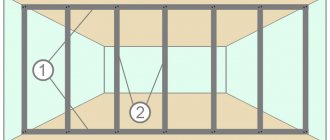
This or that plasterboard structure must be supported by a frame made of strong and stable parts. These are guides and profiles of various shapes, which are connected to each other using special fasteners. They differ in purpose and application, as well as in size and quality. It is very important to make the right choice when purchasing, the result of the work will depend on it. After all, if you take a bad or simply unsuitable profile for a certain type of work, the design will eventually have to be redone. For example, a sheet on a partition will bend or “move” to the side, gaps at the joints will become visible, or a noticeable “wave” will appear on the wall itself. In order to avoid mistakes during repair and construction, you need to thoroughly study the types and sizes of drywall profiles. Find out exactly what material is needed to build a particular structure.
Length value
For large areas of structures being built, they try to buy a profile for plasterboard, the dimensions of which in length make it possible to mount the frame without splicing the guides. This approach speeds up the assembly somewhat, but does not make much sense.
Extension cord Source ogipse.ru
With the help of improvised means, the profile is perfectly spliced. At the same time, the overall strength of the structure does not suffer. The only rule that must be followed is that the connection points must be “scattered.” If you do not make them on the same line, then the quality of the frame will meet all technological requirements.
The main gradation of profiles in length starts from 2.4 meters and ends at 6 meters. This allows you to solve almost any problem without splicing the guides.
Ceiling profile for plasterboard. Sizes and types.
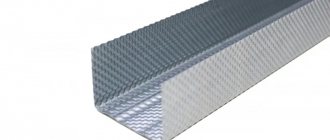
Rack profile (designated as: CD or PP).
Perhaps one of the most popular profiles for installing plasterboard on the ceiling. This type provides reliable fastening of the sheets. And if you choose the dimensions correctly, the work space will be used as economically as possible, leaving almost no waste.
CD or PP sizes:
- Profile length - from 2.5 to 4 meters
- Width – 60 millimeters
- Shelf height – 27-28 millimeters
Guide (UD or PPN).
Profiles are used for the construction of suspended ceilings. These elements are mounted over the entire area of the work, because when securing sheets of cardboard, the drill passes directly through them. It is advisable to purchase guides that already have cut holes (perforated profiles). Then it will be much easier to carry out installation.
Dimensions:
- Thickness – 0.55 millimeters
- Length – 3 meters
- Width – 27 millimeters
- Height – 28 millimeters
Profile (UW).
This type is very similar to the UD described above. It is used in the same way, but has different dimensions:
- Length – from 3 to 4 meters
- Width from 5 to 10 centimeters
- Shelf height – 40 millimeters
- Metal thickness – from 0.4 to 0.6 millimeters
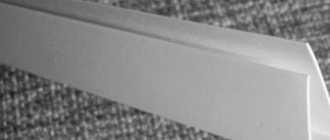
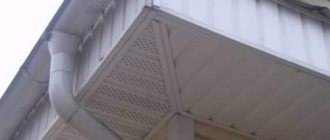
To protect outside corners
Marked PU. This type of gypsum board is intended for covering corners from various mechanical influences (impact) of a plasterboard product. The profile has perforations for better fixation to the surface when using putty. Has the following dimensions:
| Designation | Thickness, mm. | Shelf width, mm. | Material of manufacture | Profile length, mm. |
| PU 20-20 | 0.22-0.25 | 20 | aluminum | 3 |
| PU 25-25 | 0.4 | 25 | Cink Steel | |
| PU 30-30 | 0.4 | 30 | ||
| 0.5 | ||||
| PU 35-35 | 0.5 | 35 |
Arched profile (PA) for drywall. Sizes and types.
This profile has cuts along the edges, thanks to which the metal product can be evenly bent and adapted to the construction of almost any complex structure. For example, make an arch or shelf in the wall of an unusual shape. There are both concave and curved types of arched profiles.
Dimensions of concave arched profiles:
- Radius from 500 to 5000 millimeters
- Length from 2600 to 4000 millimeters
Convex profiles can be:
- Radius from 1000 to 5000 millimeters
- Length from 400 to 2600 millimeters
Calculating the required quantity
Knowledge of form factors and types of profiles for drywall are useful, but not sufficient. In order not to purchase unnecessary parts, you need to be able to accurately calculate the number of parts for the planned structure frame. To simplify the task, a small diagram is drawn indicating the sizes and types of profiles.
Wall
When finishing walls with plasterboard, the calculation of the required number of elements begins with measuring the height and length of the covered area. The resulting value is multiplied by half and the required footage for guide-type profiles is obtained. If there are openings in the wall, their size along the perimeter is also summed up.
Installation of the profile on the wall Source obustroeno.com
Aluminum and galvanized profile for plasterboard. Sizes and types.
Profiles for drywall are made from different metals; let’s look at the most common types: aluminum and galvanized, as well as their characteristics.
Aluminum profile and its features.
This profile is not cheap, but it has excellent characteristics, so the high price is justified. Such profiles are good for constructing window frames or finishing household appliances. For example, if you need to make a niche for a washing machine in the bathroom. This product is distinguished by its long service life, durability and lightness. It does not weigh down the entire structure and is very easy to install. Plastic and resistant even to low temperatures. Builders recommend buying aluminum profiles for wall and ceiling cladding.
Profiles of this type are available in both cold and warm aluminum. Cold-formed is made of metal 4 millimeters thick, and bends without heating. It varies in shape (P, W, T, H - shaped). Withstands loads of up to 1.5 kN per 1 meter of wall.
Galvanized profile.
A galvanized profile is not inferior in price to an aluminum one. It is used to construct the base of the frame in rooms with high humidity - in the kitchen or bathroom. This is because it is resistant to rust and does not require additional treatment with anti-corrosion agents. Like aluminum, the profile is light and soft; screwing self-tapping screws into it will not be difficult. Galvanization is also used to create additional stiffeners if the plasterboard sheets are thicker than 12.5 millimeters.
There is also a plastic profile. Its purpose is to cover the joints of plasterboard sheets at the outer corners, giving a beautiful finish. And also, they cover the transition of drywall and other materials, for example, wood.
Manufacturing materials
The main materials for making profiles for drywall are steel and aluminum. As a rule, there are steel profiles, galvanized, as well as ordinary ones, although they are quite rare. As for aluminum profiles, they are quite expensive, although they have very good characteristics.
These are the main types of profiles for gypsum boards
Steel profiles can be not only galvanized, but also ordinary ones, which are used in rooms with normal operating conditions. As for rooms with high humidity, it is better to use galvanized profiles in them, although they are somewhat more expensive than conventional steel profiles.
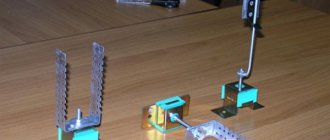
Additional accessories for fixing drywall.
In order to assemble the sheathing, you will need auxiliary parts:
- Two-level connector for CD profile. This part is sold in an unfolded, flat form and before starting work it needs to be bent in the shape of the letter P. It is used to connect rack-mount parts perpendicular to each other.
- Single-level connector for CD profile or “Crab”. They connect perpendicular CD profiles in exactly the same way. If the load is more than 20 kilograms, then you will need two self-tapping screws for fastening. Otherwise, the seals are simply bent.
- Direct suspension for a rack (supporting) profile. This is a bracket, the standard length of which is 12.5 cm. It looks like a strip of aluminum or galvanized steel with holes. Withstands loads up to 40 kilograms. It is attached to the wall with two dowel nails, then the edges are bent and the frame parts are already attached to them.
- Anchor suspension for ceiling carriers. Often called suspension with traction. Replaces the part described above if it is not long enough. Used on horizontal surfaces, for ceilings, for example.
- Extension. Needed to connect two carriers to each other. It has tubercles on the sides, this indicates where the profile joins. There are also two holes for screwing in self-tapping screws.
- Corner connector. It connects elements that do not form a cross. You can do without a connector. Cut the flanges of the profile that needs to be connected so that a tongue is formed, and screw it in place with self-tapping screws.
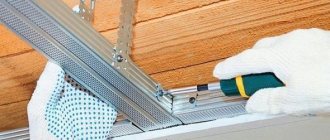
Procedure for installing a ceiling frame
- A frame marking diagram is made. To do this, mark a level on the walls around the perimeter of the room. An even mark can be obtained using a laser or water level or a level. Then the UD wall profile is attached to the finished level. It is secured with dowels every 50 cm.
- Next, markings are made on the ceiling where the CD guides will be located. They are placed in increments of 40-60 cm in accordance with the length of the drywall so that the sheets are connected by joints on one profile. Suspensions are mounted along these lines, which should be fastened in increments of 30 cm to 1 meter. It is better to place the pendants not in one line, but in a checkerboard pattern.
- At this stage, profiles are mounted. For even horizontal fastening, a strong thread is pulled between opposite walls. The guides are aligned along the thread and screwed to the hangers. The edges of the guide profiles must be inserted into the UD wall supports. The joints are connected with self-tapping screws using CD connectors. The assembled frame is checked for the level and evenness of the structure. Then additional mounts for the chandelier or other elements are installed, and electrical wiring for lighting is installed.
- Now the sheets of drywall are attached to the metal with self-tapping screws. They are screwed in increments of 20 cm. The self-tapping screw is carefully deepened into the drywall, but not pressed too hard so that the holding capacity is preserved. It is necessary to ensure that all joints are on the profile and do not subsequently sag. It is very important during installation to leave a gap between the sheets of drywall from 3 mm to 7 mm. This will give the structure mobility, i.e. will allow it to expand and contract slightly with changes in humidity and temperature, without compromising its integrity.
- To enhance the rigidity of the frame of a two-level suspended ceiling, cross members are installed along the structure of CD profiles, maintaining a gap of 30 to 60 cm in increments of 10 cm. When connecting the elements in this way, a crab is used, which is installed on top of the connection.
- The final stage of work is to putty the seams using reinforced tape.
For clarity, we recommend watching a video of the installation of a frame for plasterboard ceilings:
Accessories for fastening plasterboard.
Self-tapping screws are needed to connect all the frame parts and to install drywall. They also come in different types.
- Self-tapping screws LB9 (11, 16) and LN9 (11, 16). The numbers after the name indicate the length of the screw. Type LB is drilling, and LN is piercing. Builders call this type of product “bugs.” These “bugs” have a convex cap, and this prevents the drywall from fitting tightly to the frame.
- Self-tapping screws TN25. These screws are used to attach the sheets to the profiles. They have a flat cap so that when priming the wall, it can be easily hidden. There are also long self-tapping screws of this type; they are needed if, to increase strength, you need to screw two sheets at once.
- Self-tapping screws with press washer. Suitable for working with any materials. They can be either drilling or piercing types. Length from 9 millimeters to 10 centimeters.
- Self-tapping screws with dowels. The guides are attached to the enclosing structures. The range of these elements is large; which one to choose depends on the material of the ceiling or wall and the size of the profile.
- Ceiling wedge anchor. This fittings are used to attach anchor suspensions to the ceiling.
- Dowel nail. Product lengths range from 40 to 60 millimeters. Used to secure the frame to a brick or concrete wall. To make this easier, you can hammer the screws in instead of screwing them in.
Corner element PU
This element is attached to the outer corners of the walls, which protects them from physical impact and wear. Just like the arched profile, it has frequent perforations.
These holes serve not only for easier attachment, but also for better attachment of putty, plaster or other finishing materials. Its fastening occurs only after completion of the cladding of the metal frame of the gypsum board.
Tips on how to choose a profile and components for drywall.
- Please inspect the profile carefully before purchasing. If you notice rust, you should refuse to buy such material. Once corrosion has already begun, it is impossible to stop it!
- Check the thickness using a caliper. If it turns out to be insufficient, then during operation the screws will scroll.
- Do not take a profile with burrs. In the process of work, injure your hands.
- Take a closer look at the product from the end. If it was not stored correctly in the store, it may be bent. With such a profile, you will no longer be able to create a perfectly flat surface of the structure.
- Keep in mind that it will be difficult to screw self-tapping screws into a profile with a weak notch.
- Experienced builders advise double-checking whether the dimensions correspond to those stated in the instructions and in reality. Some manufacturers deceive buyers, especially regarding the length; it may be less than expected, by 2 centimeters.
- The quality of fastening fittings should also be checked. Very often you come across self-tapping screws with a broken tip or with screwdriver notches clogged with metal.
- Carefully inspect the plastic plugs of the dowels so that there are no sagging, otherwise it will be difficult to drive them into the hole, and sometimes even impossible.
- Give preference, however, to a profile with dot perforations along the strip - it is more rigid and resistant to loads. This structure prevents the screws from slipping and makes it possible to screw them in at any angle.
- Trust already proven manufacturing companies such as Knauf and Gyprok. But there are also our domestic manufacturers who produce profiles for drywall no worse.
- Some cunning sellers try to hide defects by painting the profile and adding shine to it. Take a closer look at these options; you may not be able to buy them at all.
- The product should not be flimsy and bend when pressed lightly.
And one last piece of advice at the end of the article. Do not skimp on high-quality profiles and components for them. As the famous saying goes: “The miser pays twice.” If you purchase a low-quality or damaged profile, then eventually, sooner or later, you will have to redo all the work. Somewhere the sheet will become a “bump”, somewhere the joints will become visible, and somewhere the structure will bend inward. Therefore, choose the material carefully; pickiness will not be superfluous here. Good luck and easy work!