Technology
Sequence of work. Before erecting a plasterboard partition, a screed or self-leveling floor must be laid on the floor, the walls must be plastered, and the wiring must be installed. All wet work must be completed. Laying the finished floor and finishing the walls occurs after installing the partition.
Frame type. Unlike a frame for a wall, everything is simpler with a partition. The frame consists of only two horizontal guide profiles on the ceiling and on the floor, as well as vertical posts with a pitch of 600mm, 400mm or 300mm, depending on the height of the walls. The guide and rack profile can be of different widths - 50mm, 75mm, 100mm and must match each other.
Doorway in a plasterboard partition
Read
One or two? One person can handle the installation of the partition frame. It’s easier and faster for two people to mark, cut and cover gypsum boards.
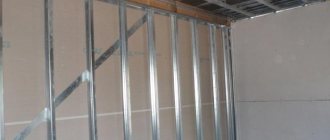
What does the frame consist of? The assembled frame for the partition looks like this:
Profile frame for partition
- Guide profile
- Rack profile
Nothing superfluous - no suspensions, crutches, jumpers. Only guide and rack profile.
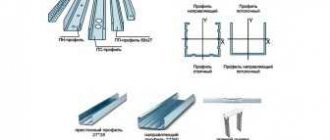
Selecting a metal profile for a gypsum plasterboard frame
What is it Types Manufacturers How to choose
Rare renovations inside an apartment are completed without drywall. With its help, you can bring to life various design ideas from interior partitions and arches to multi-level ceilings. All these structures are mounted on a lightweight, durable metal frame made of profiles. It is difficult for someone who is faced with this task for the first time to immediately understand the variety of their types. We will tell you what sizes and types of profiles there are for drywall, and for what purposes it can be used.
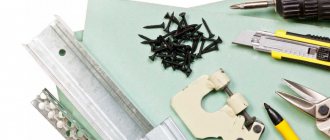
Tool
Basic list. Here is a minimum set of tools for installing the frame. It differs little from what we published in another article for a frame on the wall, except for the mandatory presence of a cutter and a square.
- 5 or 10 meter tape measure
- Pencil or marker
- Construction plumb
- Marking cord with pigment
- Screwdriver
- Hammer
- Rule from 2m
- Drill bits for concrete and wood
- Hammer
- Metal scissors
- Cutter
- Level from 1.5m
- Square from 40cm
68 tools for working with drywall
Read
The fact is that, unlike a wall frame, in a partition there is nothing to fasten the racks to except to the guide profiles - there are no hangers, and they cannot be fastened with screws - there is no need for extra bulges on the walls. The most correct option is to fasten the profiles with a cutter; it does not leave any irregularities on the outside and perfectly connects the parts.
Extended list. For professional teams, it is advisable to purchase a mechanized tool; with it, the work speed is higher and fatigue is less.
- Laser level
- Construction pistol
- Electric shears for metal
- Mounting belt
This is only what directly concerns working with a metal profile.
Division of partitions into types
From profiles you can create two types of structures that have approximately the same popularity.
- Stationary partitions have plasterboard sheathing. The sheets are fixed to all load-bearing elements.
- Mobile structures have elements that can move. To achieve the effect of mobility, various options can be used: rollers, a special profile, low weight and dimensions, movable slats.
Accessories
List of components. Let our partition divide the living room into two parts, we will choose the option with a thickness of 150mm, respectively, the frame will be 100mm thick. To build a frame for such a partition we will need the following parts:
- Guide profiles 100x40mm
- Rack profiles 100x50mm
- Sealing tape 95x3mm
- Dowel-nails 6x40mm or 6x60mm
- Self-tapping screws for metal, with a sharp end, with a cylindrical head or a press washer, at least 9 mm long
As you can see, the list of components is also modest. And then, screws are needed only if the partition is with a door. If there is no door, the only fasteners are dowel-nails and a cutter.
Quantity calculation. The thickness of the partition is 150mm, the thickness of the frame is 100mm. The width of the room is 3.6m, the height is 2.7m.
Calculation of the number of components for the partition frame
In the figure we see 2 horizontal guide profiles of 3.6 m each and 7 vertical rack profiles of 2.7 m each. Both are on sale in 3m lengths; the guide will have to be overlapped. Sealing tape must be used to seal all junctions of the profiles to the walls, floor and ceiling, this is 12.6 m, a coil of at least 30 m. The dowels are attached at a distance of no more than 1 meter from each other, but not less than 3 pieces per part; taking into account the joints of the guide profiles, the result is 22 pieces - 4 each on the right and left and 7 each at the top and bottom.
Profile for drywall - types, sizes, application
Read
Store list:
- Guide profile 100x40mm: 3pcs x 3m = 9m
- Rack profile 7pcs x 3m = 21m
- Dowel-nail: 22pcs
- Sealing strip 90mm wide: 30m
You shouldn’t save money and buy a profile thinner than 0.6mm, even 0.05mm. This is critical. The screws will scroll, the frame will turn out flimsy, which will subsequently lead to the appearance of cracks.
Marking
Right angle. First of all, we need to make sure that our partition has a right angle with respect to the walls. If you have a laser level with the function of marking right angles, this is easy to do; if you don’t have one, you only need a square and a rule.
Marking a right angle with a square and a rule
- Walls
- Floor
- Rule
- Square
The figure shows how to apply a square and a rule to the wall to obtain a right angle. Draw a line along the entire length of the rule:
The beginning of the marking line for the partition frame
The right angle is ready. We continue marking.
Marking for the guide profile. The length of the rule will not be enough to cover the entire width of the room, but the line will already be long enough to accurately extend it using a cord breaker or the same rule. As a result, you should have markings across the entire width of the room at right angles to the walls.
Having drawn the markings on the floor, we transfer the points to the ceiling using a plumb line or laser level.
Draw markings on the floor and transfer the points to the ceiling
Draw the second line.
Marking for partition guide profiles
The markings for the guide profiles are ready.
Marking for racks. All that remains is to draw the lines for installing the racks. When covering the frame with plasterboard, they will help not to lose the profile behind the sheets. There will be only seven racks in our wall, two of which are at the edges, close to the walls, and the rest are distributed in the middle in 60cm increments.
Markings for frame posts, top view
This completes all marking actions. We received two lines on the floor and ceiling, as well as five perpendicular lines of 10 centimeters each.
Marking for guides and rack profiles of the partition
The marking stage is completed, we begin the installation of profiles.
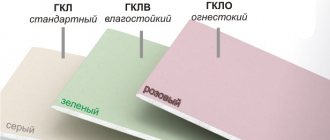
Requirements for drywall
The marking of plasterboard sheets accepted by SNiP standards is as follows:
- GKL - for construction in rooms with normal humidity (less than 70%) and temperatures from 5 to 30 degrees C. Available in gray color without special impregnations that resist moisture or heat. Recommended for designing structures in hallways, living rooms, bedrooms and other rooms;
- GKLV is a hygroscopic material with high resistance to moisture, painted light green. Used in damp areas (more than 70%). Thanks to impregnation with antiseptic substances and concentrates, it does not lose its linear dimensions and is not exposed to dampness. Designed as a finishing material in bathrooms;
- GKLO - has increased fire-resistant properties due to the presence of fibers and compositions that prevent combustion. Available in yellow sheets, suitable for covering a partition installed in the kitchen;
- GKLVO - plasterboard with improved fire and moisture resistance (up to 90%) in a soft pink color.
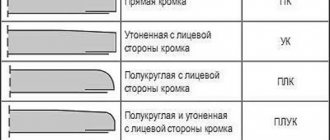
What formats of gypsum boards can be used
SP for 2000 allows the use of plasterboard formats with edges:
- UK - for sealing joints with putty;
- PC - suitable for the inner layer of multi-layer frame cladding without sealing seams;
- ZK - for sealing joints with plaster;
- PLC and PLUK - when sealing seams without reinforcing tape.
Installation of the guide profile
Noise insulation. Immediately after cutting, glue the outside of the back of the guide profiles with sealing tape of the appropriate width. You shouldn’t glue the hundredth profile with the seventieth tape, and even more so the thirtieth, the dimensions should be identical. Vibration isolation of the profile in a vertical section:
Noise and vibration insulation of guide profiles
- Wall
- Floor
- Guide profile
- Damper tape
If there is no tape, you can replace it with sealant; Knauf allows this. Why is damper tape important? Firstly, it is sound insulation, secondly, and most importantly, it dampens vibration from the walls and floor to the partition. If this is not done, then the noise insulation will be worse and the vibration will be higher. This can be felt if there is traffic driving outside or any work taking place; internal noise in the apartment is also well transmitted through the floor or walls.
Installation rules. We begin screwing the profile from the floor so as not to trample or cover the markings with dust. We align the side wall of the profile with the marking line and drill holes with a hammer drill, driving in a dowel-nail. If the floor is wooden, we immediately fasten it with self-tapping screws.
Dimensions. Depends on the thickness of the partition. In our case it is 150mm including the cladding, the frame is 100mm.
Profile dimensions - 100x40mm. The dowel pitch is 100cm, but not less than 3 pieces per part.
The distance between dowel-nails is no more than 1 m, but not less than 3 pieces per part. If there are voids in the ceiling and the dowel-nails do not hold well, you can replace them with anchor hardware.
Drywall fasteners
Read
Docking. The width of our room is greater than a single piece of profile, so it needs to be joined. The joining is done overlapping, according to the same principle as when mounting the frame on the wall.
Overlapping joining of partition guide profiles
The profile with an overlap of 10-15 cm is inserted into each other and secured to the floor with a dowel-nail.
Checking the plane. Due to the large width, the profile is not subject to bending as much as a 27x28mm profile. Therefore, you can check the plane using the rule only for your own peace of mind, just in case. If unevenness is still found, remove the dowel-nail at the defect site, level it and drill in a new place.
After installing the guide profile, our room will schematically look like this:
The guide profiles of the partition are screwed
All that remains is to install the stands.
Manufacturing companies
The most famous specialized company is the KNAUF plant. All manufactured products have the same thickness - 0.6 mm. In addition, it is distinguished by precise dimensions and high-quality raw materials. Each product is marked with a name and technical parameters. However, their cost is quite high. Gyproc is a worthy competitor. All the channels they produce are perforated, so even with a thickness of 0.5 mm they are stronger than smooth-rolled ones with their 0.6 mm. However, according to reviews from craftsmen, not everyone is comfortable working with corrugated ones due to the difficulties of inserting rack-mounts into guides. In the middle price segment, there is a Russian company that produces galvanized models. There are other manufacturers. The quality of their products may differ in the composition of raw materials and product configuration. Some have additional grooves added to enhance rigidity and holes for fastening.
Instagram @vkrovlya
Before purchasing, you need to check the quality of the products: compliance with the specified dimensions, evenness along the entire length, absence of damage to the galvanized surface.