Finishing ceilings with plasterboard is an affordable way to obtain a flat and smooth ceiling surface. In this case, you will not have to waste time and money on preliminary leveling of the base; the sheets will reliably hide floor defects. For the work to be successful, you need to know how to attach drywall to the ceiling, and what methods exist for this.
Why drywall
Plasterboard ceilings have long been widespread in interior decoration due to the following advantages:
- used to create even and smooth surfaces;
- mask wiring and communications;
- have heat and sound insulation;
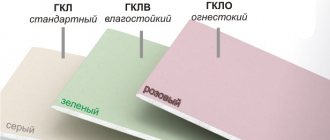
- suitable for finishing any room, regardless of operating conditions and humidity level. The main thing is to choose the appropriate gypsum board marking;
- mounted in different ways - on a frame base or special binders;
- with the help of drywall it will be possible to implement even the most complex design projects - multi-tiered structures, niches, arches, bends, any shapes, etc.
general information
By plasterboard sheet (GKL) we mean a rigid facing board, with which you can organize interior partitions and level the rough base on ceilings, walls, inside window and door openings, etc. GCR is also called “gypsum board” or “dry plaster”. The structure of the sheets resembles a pie, where a uniform layer of gypsum solid solution is placed between two outer layers of thick cardboard of small thickness.
Plasterboard sheets have a number of specific characteristics that must be taken into account during work:
- The presence of a uniform matte surface. This significantly facilitates the finishing of the base created in this way using putty, paint, tiles, wallpaper, decorative plaster, etc.
- Cheapness. The cost of gypsum plasterboard is an order of magnitude lower than that of other wall materials - brick, monolithic concrete, aerated concrete.
- Ease. The light weight of the material makes it possible to avoid a significant increase in the load on the building foundation and simplifies the fastening procedure during installation of a plasterboard ceiling. This explains the wide popularity of gypsum boards in interior construction.
- Fire safety. The mineral layer is a completely non-flammable material. The components included in its composition do not contain toxic substances harmful to health, which allows you to safely use plasterboard cladding in children's rooms and bedrooms.
- Good rigidity due to the use of a composite board structure. At the same time, they are characterized by some flexibility and elasticity. The combination of these qualities makes it possible to sheathe large rectilinear bases using gypsum boards and create interior compositions with a curved configuration. We are talking about decorative bay windows, cornices, counter-laced lighting, etc.
- The presence of a certain distance between the plasterboard surface and the rough base. Electrical cables, ventilation ducts, television wiring, etc. are often laid inside the resulting void. From the outside, these communications are completely invisible.
- Reducing the area of the room. Ceiling and wall plasterboard structures are mounted on a supporting metal frame of some thickness. This leads to a reduction in living space (from 5 cm on each surface), which should be taken into account when decorating small rooms.
- Fear of moisture. Gypsum plasterboards are not a moisture-resistant material: under its influence, the material gets wet and gradually collapses. You should avoid using gypsum boards in damp areas, such as a bathhouse, bath or shower.
Methods for attaching drywall to the ceiling
The chosen method of attaching the material depends on what function the plasterboard structure will perform:
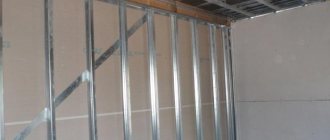
- frame made of metal profile - reliably masks utility lines, ventilation, and wiring under the ceiling. Correct assembly of the frame consists of several stages: marking, installation of guides and ceiling profiles, suspensions. The advantage is the possibility of constructing complex multi-level structures, the disadvantage is the loss of height in the room;
- frame made of wooden slats. Installation is carried out by analogy with the construction of a metal frame base. A wooden structure will take up less height from the room, but it is also less resistant to adverse factors;
- using a frameless method, gypsum plasterboard sheets are attached directly to the ceiling. This does not reduce the height of the room, but the preparation of the base ceiling must be carried out carefully.
All three methods have advantages and disadvantages. When deciding on the method of fastening gypsum boards, take into account the purpose of the room and the climatic conditions of the room. For example, in a bathroom it is better to install a metal frame base, since high humidity has a negative effect on wood. The same applies to adhesives used for fastening sheets.
Common Mistakes
Improper fastening of plasterboard in the bathroom can cause swelling and deterioration of the material.
Installation of plasterboard sheets is often accompanied by a number of errors, which subsequently cause defects in the lined surface. The most common among them are:
- wrong choice of profile;
- violation of profile installation technology;
- poor quality profile cutting;
- extension of the profile walls;
- fastening the gypsum board with the back side facing out;
- violation of the rules for fastening gypsum boards.
Defects arising from errors appear only during operation. It is almost impossible to eliminate them without compromising the integrity of the cladding.
How to attach drywall to a ceiling without profiles
Attaching plasterboard to the ceiling without a frame requires careful preparation of the rough surface:
- remove the previous finish;
- prime the ceiling, then level it with putty;
- After the composition has hardened, the surface is again covered with a layer of primer.
If there are unevenness and differences in the ceiling, you cannot do without installing a metal or wooden frame.
You cannot attach gypsum boards to the ceiling using glue if:
- the ceiling is made of wood. Natural material will quickly lose its shape when exposed to moisture or sudden temperature fluctuations;
- the surface is wet or painted with oil paint.
GKL sheets are glued to concrete ceilings only after notches are made on the surface.
How to attach drywall to the ceiling - glue installation
Fastening gypsum boards without preliminary construction of a frame is possible using special adhesive materials. For example, Perfix glue. The work is carried out in the following order:
- the composition, whose consistency resembles thick sour cream, is applied to a sheet of drywall using a spatula;
- apply the gypsum board to the ceiling and press it. To ensure reliable fastening, the sheet is additionally fixed with self-tapping screws. Drywall is laid in a checkerboard pattern;
- The evenness of the material is checked using a building level. To correct defects, use a hammer with a rubberized base, which is used to tap the sheets along the edges and in the middle;
For finishing use any gypsum board. If you are covering ceilings in a bathroom or kitchen, choose plasterboard marked moisture-resistant.
Instead of professional glue, homemade gypsum mastic is used, which is prepared as follows:
- 0.5 kg of dry bone glue is poured with 3 liters of cold water, left to swell for 10-12 hours;
- when the glue swells, add 1 kg of lime dough, mix the mass until the lumps are completely dissolved;
- simmer the mixture over low heat for 5-6 hours, stirring constantly;
- add 10 liters of water to the mass, stir the glue again with a construction mixer.
The result is a reliable composition that is capable of gluing plasterboard to any surface. Glue is applied to the sheets along the edges and in the middle, and stripes are applied at intervals of 40 cm from each other. The material is fastened, aligned along the corner, then gradually moved along the entire ceiling surface.
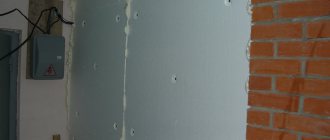
How to attach drywall to the ceiling without a profile using foam and dowels
As a result of attaching plasterboard to the ceiling using mounting foam, the surface will become smooth and the space of the room will be preserved. Installation of sheets is carried out as follows:
- the sheet is applied to the ceiling surface, and holes for dowels are drilled through the drywall every 50 cm;
- on the back side of the sheet, 10 cm from the holes, glue pieces of foam rubber, which will act as a kind of level and regulate the evenness of the skin;
- spacer parts of dowels are inserted into the ceiling holes;
- the sheets are again applied to the ceiling, secured with self-tapping screws, which are screwed into dowels. Washers are installed under the heads of the self-tapping screws;
- The level sets the position of the drywall. Thanks to the foam pads, gaps are formed between the sheets and the ceiling surface;
- holes with a diameter of 6 mm are drilled next to each self-tapping screw, into which mounting foam is pumped;
- using self-tapping screws and a hammer with a rubberized tip, level the general plane;
- after 24 hours, unscrew the screws, remove the washers, then screw the fasteners back into the gypsum board sheets. This way the design will be reliable.
To begin with, it is better to practice on one sheet of plasterboard, leave it for 24 hours, then check the quality of the work done. If everything is in order, you can cover the entire ceiling in this way. The drywall should be held firmly and not wobble from side to side. If there are defects, it is necessary to determine the reason for their occurrence.
Possible factors include:
- the sheet is swollen because a lot of foam was pumped in;
- movement - screws and dowels are not sufficiently fastened to the ceiling;
- low quality foam;
- the sheet has fallen off - this covering option is not suitable for a particular surface; it is better to choose another method of installing plasterboard sheets.
You don’t have to make foam pads, but immediately apply polyurethane foam to the gypsum board sheet. Then you will be able to control the uniformity of the distribution of the composition. The foam is applied to the back side of the drywall in “snakes” in uniform stripes. After 10-15 minutes, when the composition begins to expand, the sheet is applied to the ceiling and fixed with self-tapping screws.
The ceiling surface must be flat. Otherwise, in those places where the distance from the base ceiling to the gypsum board sheet is smaller, the glue will exert more pressure, and vice versa. As a result, the adhesive strength will be uneven.
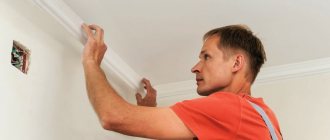
Sealing seams and screws
Now you know how to attach drywall to the ceiling, but that's not all. It is necessary to prepare the ceiling plane for puttying, since it is necessary to achieve ideal evenness of the ceiling in the places where the screws are screwed in.
The seams between the individual sheets are sealed with a special mesh tape on an adhesive basis. Putty is applied over the tape. The seams can also be sealed with fugenfüller, which is essentially a putty, but after hardening it is more durable and hard (pro
How to properly attach drywall to the ceiling on a frame base
The advantage of this method of installing drywall is that you do not need to carefully prepare the base for work. It is enough to remove the old finish and prime the ceiling.
Marking
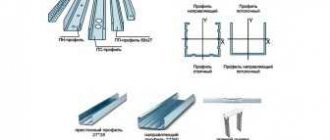
Work on arranging the frame begins with the installation of a supporting structure consisting of two types of profiles and a suspension system. But first, markings are applied, on which the evenness of the future ceiling depends, in the following order:
- determined by the number and types of lighting fixtures that will be installed in the decorative ceiling. If there are no built-in lamps, the frame is placed as close as possible to the base base;
- in the room, by measuring, they find the lower corner, step back from it down to the required distance, and put a mark;
- project the point onto other angles using a laser level;
- The resulting marks are connected to each other with an upholstery cord in a straight line outlining the perimeter of the room. A mismatch between the lines will cause the structure to skew;
- then on the ceiling, axes are marked for attaching the ceiling profile in increments of 60 cm. From the wall to the first line, 30 cm are retreated;
- along the drawn lines, dots are placed at the places where the suspensions are attached, also every 60 cm;
- Transverse lines are drawn at the same distance from each other to secure the profile.
As a result of marking on the ceiling surface, a pattern consisting of squares with equal sides is obtained.
Conclusion
Sheathing a ceiling with plasterboard is much easier and faster than, for example, plastering on beacons. However, in order to achieve a high-quality result, it is necessary to follow the technology described above and perform the work carefully and accurately.
See the video in this article for more information. If some points are not clear to you or you have additional questions about installing drywall on the ceiling, leave them in the comments, and I will gladly help you "width=”640″ height=”360″ frameborder=”0″ allowfullscreen=”allowfullscreen”>
Frame installation
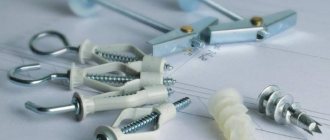
You need to screw the UD guide profile to the line drawn along the perimeter of the room so that the lower part of the plank coincides with the horizontal. A sealing tape is placed on the back side of the profile. For fastening, plastic dummy dowels with a diameter of 60 mm and self-tapping screws with a diameter of 4-5 mm are used.
Next, hangers are mounted along the lines to the ceiling. It is better to fasten the elements to the internal holes, and not to the “ears”, since due to the weight of the plasterboard sheets, the suspension attached to the “ears” can be pulled back by several millimeters, which will disrupt the evenness of the structure. Self-tapping screws and dowels are chosen of the same diameter as for fastening the guide profiles.
On a note! There are voids in concrete slab ceilings. To prevent fasteners from falling into voids, it is necessary to use special flared or impact dowels for attaching hangers, and choose stronger screws.
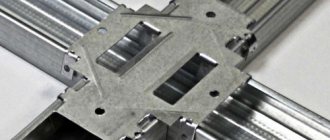
The CD ceiling profile is cut to the required length, the edges are inserted into guide strips screwed around the perimeter. To ensure that the profile fits freely between the walls, it is made 1 cm shorter than the distance from wall to wall. This leaves 5mm of free space on each edge. Under the ceiling, the ceiling profile is inserted into the hangers, but not twisted.
The next step is to check the evenness of the structure using a nylon thread stretched under the frame. Adjust the height of the future decorative ceiling with pendants. Each CD profile is leveled, screwed to the hangers with metal screws, and the protruding ends of the hangers are bent to the sides. In the same way, the ceiling profiles are fastened to the guides.
At the final stage of arranging the frame, wires are brought to the installation sites of the devices, a few centimeters of cable are left free for connection to the lamps, the remaining ones are placed in protective corrugations, which are attached to the ceiling.
More details on how to install a ceiling frame from a profile under plasterboard.
Installation of plasterboard sheets
The frame was mounted in such a way that the edges of two adjacent sheets of drywall fell on one CD strip. Therefore, the first sheet is not attached to the wall on a guide profile, but at a distance of 30 cm - on the ceiling. The remaining space is sheathed with pieces of plasterboard cut to the required size at the end of the facing work.
Before installation, the drywall is brought into the room, laid in a horizontal position on a flat surface so that the material takes on its characteristic shape and gets used to the climatic conditions of the room.
Then the material is cut out. First, an incision is made on the surface of the sheet on the reverse side with a stationery knife, then it is turned over to the other side and broken.
The edges of the sheets are chamfered using a plane, maintaining an inclination angle of 45° if the seams will be sealed using sickle tape. If the tape is not used, the angle of inclination is 22.5°. The edges are cleaned with fine-grained sandpaper.
Holes for lighting fixtures are cut before attaching the sheets to the frame. To do this, use a special cutter and drill.
Drywall is fastened in a checkerboard pattern using metal screws. The fasteners are screwed in increments of 25 cm, the caps are deepened into the material by 3-5 mm. The gypsum board should fit as tightly as possible to the frame base. As soon as the sheathing is completed, the wires are brought out under the lamps.
On a note! In order not to damage the drywall and avoid breaking through the paper, use special attachments for gypsum boards. They are equipped with lampshades, which, when tightening the screws, rest against the sheets and regulate the depth of recessing of the fastener head.
Finishing
The sequence of work is as follows:
- seams and recesses from screw heads are primed with a deep penetration compound;
- the putty is diluted according to the instructions indicated on the packaging;
- Using a narrow spatula, the composition is applied to the joints of adjacent sheets. When the mixture has set a little, sealing tape is applied to the seams;
- Apply another layer of putty mixture on top of the tape and immediately fill in the recesses from the screw heads;
- after 12 hours, cover the entire surface of the decorative structure with a thin layer of putty and leave to completely harden for 24 hours;
- At the end of the designated time, the ceiling is cleaned with a construction float and a layer of primer is applied.
Marking, important points
This operation is carried out with a standard set of tools.
You will need a level, plumb line, tape measure, rule and square. A laser level is very convenient, but it is not always possible to borrow it from acquaintances or friends, and buying it for one-time work is too expensive. The following points must be taken into account:
- Gaps remain between the ceiling, floor and sheets of drywall. They are made in case of shrinkage of the house and prevent warping of the plasterboard. The gap between the sheet and the ceiling is 3–5 mm, the distance to the floor is 8–10. At the top it is enough to draw a line marking the boundary of the drywall, and at the bottom it is more convenient to use spacers of the required thickness made of chipboard or plywood. After attaching the drywall, they are removed and the gaps are filled with foam.
- One sheet may not be enough vertically to cover the wall. In this case, an additional line is drawn indicating the boundary of the entire gypsum board. As a rule, cut pieces are placed on top, although craftsmen advise fastening whole sheets and halves in a checkerboard pattern.
- To correctly install the first slab, use a plumb line to draw a vertical line in the corner of the room. All other fragments of drywall will appear in a single plane with the first sheet, which is why its correct installation is so important.
How to attach drywall to the ceiling alone (methods for laying plasterboard)
If you have to work independently without the help of assistants, you can cut the sheets of drywall into small pieces. But this method is suitable for small rooms. In spacious rooms it is better to mount whole sheets of material. To do this, use the following methods that will help you cope with the work alone and raise the sheet to the ceiling:
- Two supports are constructed from wooden beams and a pole, which will hold the gypsum board sheet under the ceiling. In this case, the length of the pole is 8-10 cm greater than the distance from the floor to the ceiling.
The device is placed with the transverse crossbar up so that there is free space between the beam and the ceiling surface for the gypsum board sheet to fit in. Drywall is inserted into it at one edge. Using the second device, the sheet is gradually raised to the ceiling and supported;
- a frame is knocked together from wooden beams, the length is slightly less than the length of the room. Hinges under the doors are screwed to one edge. The hinges are attached under the metal frame. The result is that one end of the homemade frame will be under the ceiling, and the other on the floor. The sheet is laid on the frame and lifted to the frame, fixing the device on the other side with a support. Next, attach the drywall with self-tapping screws to the frame base;
- From thick bars and a sheet of thick plywood or MDF panels, they construct a device that looks like an ironing board. By moving the legs, you can adjust the height of the structure. The sheet is laid on a wide base and raised to the ceiling surface.
You can spend money and purchase a special mobile platform on wheels. But such a device is best used in very large rooms, and it is not advisable to buy it for one-time work.
Preparation
Preparatory work is an important stage of any construction project and determines the entire course of further installation. They include:
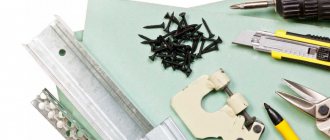
- Selection of the necessary tools and fasteners - a building level, a tape measure, a drill with a hammer drill and a cross-shaped bit, a jigsaw or a hacksaw with a small blade width, dowel-nails and self-tapping screws.
- Marking the ceiling. Taking into account the fact that in most cases the ceiling surface has some unevenness, the first step is to determine its lower limit. For this purpose, the distance to the floorboard is measured from each corner using a tape measure. Having determined the lowest point, it is worth securing a guide beam or profile around the perimeter of the intended space.
Correct marking of the positions of the guide elements is the key to the success of subsequent installation. It is worth remembering that the procedure described above requires a leveled floor!
How much does it cost to install plasterboard ceilings?
The cost of constructing a plasterboard structure depends on several factors:
- complexity of the work (number of levels, presence of decorative projections or niches, arches, etc.);
- number of lighting devices;
- number of layers of cladding.
The average price for installing a single-level plasterboard ceiling for a customer will cost about 500-600 rubles per 1 m², a two-level structure of a simple shape will cost 700-800 rubles per 1 m², complex curved shapes will cost about 800-100 rubles per 1 m².
Despite the fact that the adhesive installation method is quick and cheap, it is better to spend time and money by installing a metal frame under the drywall. This design is more reliable, which significantly affects the service life of the decorative ceiling.
Online calculator for calculating plasterboard ceilings.