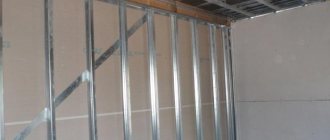
The ceiling, created from GC sheets, has a durable metal base. It is created from basic and additional metal elements and various fasteners. You need to purchase components for a metal frame based on the technical characteristics. This is a guarantee of a durable gypsum board ceiling and its service life. An attractive plasterboard ceiling is an integral part of the overall background of the room. Next, we’ll look at what profile you’ll need for a plasterboard ceiling.
Types of main profiles
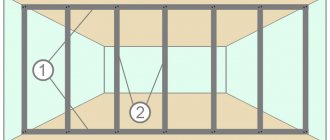
Installation of a single-level ceiling
Based on the calculations, appropriate markings are applied to the walls and rough ceiling. It is better to install the sheathing after the leveling of the walls has been completed, but before laying the floor covering. The room must maintain a constant temperature. The frame around the perimeter of the room is made using guide profiles and dowels. The ends of the ceiling (rack) profile are inserted into it. When installing a plasterboard ceiling, the instructions must be strictly followed.
Suspensions are installed in the right places, to which profiles running along the perimeter of the room are attached with self-tapping screws. In order to align the line of suspensions, the thread is pulled - it will act as a guide. After this, transverse bars are made from the same profile and the joints are fastened with “crabs”. To make transverse strips, the ceiling profile is cut into pieces equal to the distance between adjacent lines of racks (their ends inserted into the guides should not be adjacent to the wall). Be sure to leave a gap of 1 centimeter - this is necessary so that the frame does not deform due to temperature changes or for other reasons. The basis for a single-level ceiling is created simply if you understand the fastening system and the arrangement of elements, and a photo can help with this.
After this, sheets of plasterboard are attached to the frame. The rules for installing drywall on the ceiling are simple and easy to follow.
Installation of a plasterboard ceiling, watch the video:
Other mounting elements for creating a frame on the ceiling
To produce a frame on the ceiling, you will need the following components:
Direct hangers are made of durable metal and are perforated. The suspension must be strong, since it is a load-bearing element of the frame. Mounting length 12.5 cm.
Direct hanger for drywall frame
Suspension with traction. Applicable if the ceiling should be lowered to a distance from the draft greater than the standard. The product is fixed on the rough ceiling, the pin is threaded into the hole and the rest of the suspension is put on. The hairpin has a maximum size of 100 cm.
The use of direct hangers for drywall
Extension for profiles. It is used if the length of the room is greater than the length of the PP (CD) ceiling profile.
Extension for profiles
Crabs fix several profiles at one point at the same level. If necessary, crabs are used for several levels. The crabs are fixed using latches; self-tapping screws are used to achieve greater structural strength.
Crab for connecting PP profiles
Fasteners:
- Dowel-nails 6/40, 6/60. Fix the PP guide to the wall.
- Self-tapping screws for fastening profiles LB 9, 11, 16.
- The metal wedge anchor is designed for attaching suspensions to the ceiling.
Without these elements, creating a frame is impossible. All products are made from durable metal. Fasteners must be level and meet the GOST standard.
Multi-level frame - installation
There are many variations of a multi-level suspended ceiling, its shape, design, etc., and a detailed description of them is a good topic for a separate article. Here we also consider the ceiling, where both tiers and the sides between them are made of plasterboard.
Prices for ceiling lamps
ceiling lamps
Installation of two frames. The lamps are mounted in the second of them
Step 1. First thing - marking
Here, creating a drawing and transferring it to the ceiling is given twice as much attention as for a single-level ceiling - the complexity of the task is significantly higher
Two-level ceiling project
Step 2. Lines of guide profiles for the upper and lower levels are marked on the wall, and holes for fastening are drilled.
Ceiling frame outline
Step 3. The upper level guide profiles are attached to the wall. Details are described in previous instructions.
Step 4. Direct hangers are installed. The interval between them can be reduced (and, therefore, more hangers can be placed), since the load on the floor and frame will be higher.
Step 5. Top-level ceiling profiles are installed, as for a single-level ceiling. You can use either a transverse or a cellular structure.
Installation of CD profile
Step 6. The lower level guides are attached to the wall.
Step 7. One of the straight profiles is cut into many vertical posts, which will be the “sides” between the ceiling levels. Using tiered or T-connectors, the racks are attached to the upper level supporting structure.
Cuts on the walls of a metal profile
Step 8. An arched profile is attached to the bottom of the posts. It can be replaced with a guide profile with evenly applied cuts and bends in the right places.
Step 9. Bearing PP are inserted between the arched profile and the lower level guides.
An example of a multi-level plasterboard ceiling frame
Video - Installation of a multi-level plasterboard ceiling
This creates a frame for a multi-level ceiling, where the upper level bears additional load. In such work, the help of an experienced craftsman is very important.
Now, after reading this article, you know how the frame for a suspended ceiling works. All that remains is to acquire materials, tools, great desire and the help of relatives or friends.
Popular models
The profile of the EuroKraab brand is in demand. This is a Russian development, but during its creation all the nuances of foreign technologies were taken into account. The manufacturer carefully selects aluminum, which is what allows it to achieve an unusually solid effect. The created frame resists moisture very well; It also tolerates strong heat without problems.
What is important is that by default the profiles are made black, which ensures their visual inconspicuousness in the interval from the wall to the covering
All EuroKraab brand products have a standardized length of 2 m. Therefore, you can’t go wrong with their choice. The part fits into the wall frame. The polymer film itself is attached to it using a “harpoon”. Although there is a gap during installation, it is small enough that you can ignore it and refuse additional decoration.
Along with the EuroKraab profile, the system also includes corner parts and connecting parts. Special strips of various lengths, prepared in production at an angle of 45 degrees, will help speed up installation. But even if there is no product suitable for the parameters, it is not difficult to make it yourself. Docking devices are additional corners and strips that are placed in the upper grooves of the profiles for the ideal connection of the main elements. It is they who ultimately guarantee the perfection of the ceiling line around the perimeter.
EuroKRAAB is not so different from standard modifications. But differences from the usual ceiling will still be visible. Shadow clearance has been significantly improved.
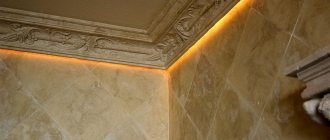
Flexy products are no less interesting and attractive. Since there is no need for decorative plugs, light transmission reaches 100%. The harpoon is completely invisible in this profile. Of course, it is possible to decorate the walls in a variety of ways. An ideal connection to wall surfaces is ensured.
You can install a simple LED strip or an RGB level lighting system. Installation is carried out on a special platform with a side. The result is a visually invisible tape, heat removal from which is not a problem. After preparation, the smallest radius is 0.15 m. Connection to the main part of the ceiling is made without the use of auxiliary devices.
Flexy supplies several types of profiles. One of them is designed for multi-level structures. Installation of such products is simple. Then you can quickly dismantle the canvas. To cover the gap, masking with a special insert is used.
There is a type of profile with backlight (often placed in 2 rows). This product has only one drawback - it is unsuitable for curved areas. But compatibility with bends at different angles is guaranteed. At the same time, the “floating” effect is still ensured.
Preparation and calculation of a project for installing a plasterboard ceiling
If you plan and calculate the project correctly, you will not only save money on the purchase of materials, but also easily answer questions from friends and relatives about how to install drywall on the ceiling. To create a design project, you will need to transfer onto paper an exact copy of the room on a reduced scale. Mark the locations of communications, if any. This will allow you to calculate the required amount of materials and depict the layout of the plasterboard.
To make calculations easier, you can use our table. It shows the average consumption of materials per 1 square. m. ceiling.
| Name | Consumption |
| PP profile 60x27 | 2.9 linear m. |
| Profile PN 28x27 | Matches the perimeter of the room |
| Sealing tape (30 mm) | Matches the perimeter of the room |
| Single-level connector for PP profiles (“crab”) | 1.7 pcs |
| PP profile extension 60x27 | 0.2 pcs |
| Vertical suspension | 0.7 pcs |
| Anchor dowel | 0.7 pcs |
| Dowel for fastening profiles PN 28x27 | 3 pcs |
| Screw TN 25 | 23 pcs |
| Reinforcing tape | 1.2 linear m |
Studying the ceiling design will allow you to accurately estimate the required amount of building materials, as well as avoid mistakes when constructing the frame. After all, the ease of laying plasterboard on the ceiling depends on its quality.
Rules for marking the base
First of all, markings are applied to the walls along which the guide profile will run in the future. A point is set from which a horizontal line is drawn using a hydraulic level. If everything was done correctly, the end of the line will close at its beginning. To mark the places where the hangers are attached, it is necessary to make preliminary calculations. They will allow you to understand how to optimally attach drywall to the ceiling.
Marking the base with a hydraulic level
To mark, you need to draw a series of parallel lines at a distance of 60 cm from each other. The distance from the extreme lines to the walls should be approximately equal. The supporting profiles will be attached to them. The mounting locations for the suspensions for them are determined by drawing perpendicular lines at a distance of 50 cm from each other. As a result, you will get a grid with cells 50x60 cm. At the places where they intersect, hangers are attached. For a better understanding, you can take a look at the video of installing drywall on the ceiling.
Installation of hangers for drywall installation
We have already indicated the mounting locations for the vertical hangers, so all that remains is to select the appropriate materials and secure them correctly. As we have already said, if the height of the frame is more than 12 cm, then it is necessary to use an anchor suspension. But in our case, we will consider the fastening of more common vertical suspensions. It is their use that most often implies the technology of plasterboard ceilings.
Ceiling frame with anchor suspensions
The suspension is a plate that is attached to the base using three dowels, which are screwed in strictly at right angles. After which special “wings” are folded down. They serve to secure the supporting profile. The length of the “wings” is 12 cm. If the profile is fixed at a level of 7-10 cm, then after installation the ends of the “wings” are either bent upward so that they do not interfere with work, or are completely cut off with metal scissors.
Now let's look at how to install the frame and drywall on the ceiling.
Profile installation
The guide profile (UD) is installed first. To do this, apply it to a line on the wall with the bottom to the frame and use a drill to make holes in the wall. The dowels are fastened at a distance of 50 cm from each other. One more condition must be met: the technology for installing plasterboard on the ceiling implies the use of at least three dowels per profile.
Then comes the stage of attaching the frame. To do this, be sure to use a level so that each load-bearing ceiling profile (CD) is fixed perfectly level. To attach the PP to the hangers, use 4 metal screws, two on each side. Crab connectors are used to attach jumpers. If all the profiles were aligned horizontally, then screwing the drywall to the ceiling will be easy.
Features of attaching the frame to the ceiling
Using a galvanized profile, you can install two types of frames: cellular and transverse. In both cases, you will need to make a reduced drawing of the future suspended ceiling, on which you will mark the locations of all the guides and load-bearing strips, as well as the fastening of hangers and other structural elements.
Installation of cellular frame
Installation of profiles will be carried out as follows:
- transfer the drawing to the ceiling surface using a pencil or upholstery cord. For accuracy, use a level and tape measure;
- make holes on CD profiles at a distance of 30-40 cm from each other;
- fix the guide elements along a horizontal line to the wall surface using anchor dowels;
- Having retreated 30 cm from the wall, attach U-shaped hangers every 60 cm with self-tapping screws or 6 mm dowels;
- Cover the back side of the CD with a sealant and attach the products to the hangers with self-tapping screws. If the length of the strips is insufficient, the size of the parts is increased by connectors;
- fix the jumpers with crabs in 60 cm increments in a checkerboard pattern.
Important! At the entire stage of work, it is necessary to constantly monitor the evenness of the future ceiling surface and adjust it using spring hangers.
Installation of a transverse frame for one level of the structure
The advantage of this method is that there is no need to purchase and install some elements. Specifically, jumpers and crabs. Due to the parallel fastening of profiles, this method is called rail.
The procedure will be as follows:
- in the same way as in the previous method, the drawing is transferred to the ceiling. In this case, the step between the transverse profiles should be 50 cm;
- a line is drawn horizontally along the entire perimeter of the room on the wall surface to which the guides will be attached;
- Next, the guide parts are installed, into the grooves of which the edges of the supporting transverse profile are inserted and fixed using self-tapping screws.
Checking the evenness of the future suspended structure must also be checked at all stages of the work.
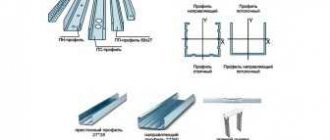
Main types of profiles
Products are classified into the following types:
- Guides or starting ones;
- Ceiling racks;
- Rack wall/partition;
- Reinforced;
- Arched;
- Beacons;
- Corner - protective and plastering;
- Guides.
Guides
Guides are types of profiles for drywall that form the perimeter of the frame frame. They are attached directly to the base covering and serve as a fixing base for rack-mounted wall and ceiling lengths. Can be made of steel or aluminum.
Starting ceiling guides for plasterboard - PPN or in the European marking UD. CD profiles for drywall are inserted into their grooves. They have smooth backs and a profiled shelf. May have factory-made holes for fasteners.
Basic parameters of the YuD profile:
- Length - 3 m
- Shelf width - 27 mm
- The length of each backrest is 28 mm
- Thickness - 0.4-0.55 mm
UW (PN) - wall, partition guides for drywall. Their purpose is to support CW. UW are available in a wide range of sizes:.
- 50×40 mm
- 75×40 mm - used as a lintel in frames
- 100×40 mm
The backs often have holes for 8 mm dowels.
Length - 2.75 m, 3 m, 4 m, 4.5 m and 6 m
SE profile for plasterboard, sometimes also used to create multi-level ceiling structures.
Ceiling racks
Ceiling - used for the manufacture of horizontal parts of ceiling frames. Each end shelf has 3 stiffening ribs. They are mounted on U-shaped hangers and fit into UD grooves, to which they are fixed, after which they are aligned using thread hangers.
Labeled as CD.
The standard size of the CD is 6 cm wide, back height is 2.5 cm. Running length is 3 - 4 m, but they also come in 2.75 m and 4.5 m. Steel thickness is 0.4-0.55 mm.
Rack wall/partition
Rack-mount carriers are the name given to channels whose upper edge is C-shaped. They are mounted in the gypsum plasterboard subsystem, as racks, the main “skeletal” elements of a vertical or bridge type, and also serve as a cavity area for laying heat and sound insulating materials and laying communications. European marking is CW, Russian marking is PS.
The PS is fixed along the length after 40-60 cm to the U-shaped hangers using self-tapping screws and to the guides with dowels.
Standard dimensions of a rack profile for plasterboard:
- Shelf length - 5 cm
- Back width - 50 mm, 65 mm, 75 mm, 100 mm
- Total length - 2.75 m, 3.5 m, 3 m, 4 m, 4.5 m, 6 m
But at the same time, the actual dimensions of the backrest may differ from those indicated by 1.5-2 mm.
As a rule, the racks have three longitudinal grooved sections along the entire length - the one in the middle is at the junction of the gypsum board sheets, on both sides of it - indicate self-tapping alignment.
Reinforced - UA, are used as racks of door frame systems, as well as when forming a frame for significant load-bearing loads, so the technical characteristics of the profile for reinforced plasterboard allow fixing with dowels, things with significant weight - shelves, cabinets, televisions, etc. Further. They have a significant thickness of 2 mm and increased resistance to corrosion.
The main dimensions of the reinforced profile for plasterboard:
- Length - 3 meters, 4 meters, 6 meters
- Shelf height - 4 cm
- Back width - 5 cm, 7.5 cm, 10 cm
Corner - PU, mounted on the corner parts of structures and are divided into:
- protective, 3 meters long and sections - 25×25, 31×31 with a thickness of 0.4 mm and 31×31 with a thickness of 0.5 mm
- plaster corner profiles for plasterboard with mesh, plastic, 3 meters long and section 35×35
The corner elements simultaneously perform a protective role and facilitate plastering, due to the perforated coating, as well as the mesh as in the second option.
Beacon profiles - PM, types of profiles for drywall, used as a level guide when plastering surfaces. They are made of galvanized metal - steel or plastic, and have high anti-corrosion properties. The length of the PM is 3 meters, their standard sections are 22×6, 23×10, and also 62×6.6.
This element is practically indispensable in places where perfectly smooth gypsum board plastering is required.
Arched profiles for plasterboard are flexible galvanized elements made of PP 60×27. Their scope is the creation of curved elements, arches, columns, and so on. They can have a concave shape (with a length of 3 meters, a bending radius of 0.5 m) or a convex shape (with a length of 6 meters, a bending radius of 1 m).
Instead of them, they often take ordinary PP, supplying them with cutting, using metal scissors, along the entire length to facilitate bending. However, it is better for beginners to start with specialized elements.
Creating a frame base under drywall
In repair work with drywall, there are 2 types of installation of the material: frame and frameless method. To level the ceiling with plasterboard, as well as to create multi-level ceiling structures, only a frame base made of plasterboard is used.
Frameless installation method
The sheets “sit” on the glue when leveling walls or creating a decorative structure.
The created framework allows:
- Level the ceiling.
- Hide electrical wires and create additional lighting.
- Create a multi-level plasterboard ceiling with lighting that will be durable, high-quality, and decorate the room. profile rolling method
The profiles used to create the sheathing for gypsum boards are made from cold-rolled steel strip.
When installing a plasterboard ceiling, the profile must meet all GOST standards in order to avoid rapid damage to the entire structure.
Types of profiles for drywall
Different types of plasterboard ceiling profiles are manufactured for specific purposes and therefore have different cross-sections. With their help, frames are assembled for all types of plasterboard structures.
When constructing a suspended ceiling from gypsum plasterboard, three types of parts are used:
- Bearing profile. Designated in the construction industry as “PN” or “UD”. The cross-sectional shape resembles the Russian letter “P”.
- The guide part, which is designated “PP” or “CD”. The cross section looks like the letter "C".
- Arched pendant. Designed for the manufacture of curved surfaces. The basis for its manufacture is ceiling guides “CD”.
In addition to these products, various devices are used during construction to secure steel guides to the ceiling, connect them and secure them together. Below we will go into more detail about the characteristics of these products.
Support profile UD-27
This product is the basis of the entire structure. It is installed on the walls around the perimeter of the entire room. The CD-60 ceiling profile is inserted and secured into the UD-27.
This supporting strip is screwed to the walls with self-tapping screws with a diameter of 8 mm. For ease of fastening, corresponding holes are made in the bottom of the products in increments of 25 cm. This distance is quite sufficient to ensure the strength of the frame. There are grooves on the sides of the walls of the parts, which facilitate the screwing process.
These parts have the following dimensions:
- width - 27 mm;
- height - 28 mm;
- wall thickness - 0.37-0.45 mm;
- length - 300 cm and 400 cm.
When working with curved surfaces, the supporting profile can be given flexibility. To do this, triangular cuts (cutouts) are made in its walls. After this, it can be bent in any direction.
Ceiling guide profile CD-60
Profile part for screwing drywall without damage
This frame element is used to accommodate sheets of drywall. In addition, it is these guides that are attached to the supporting plate using vertical steel hangers. The strength of these products is ensured by profiling of all surfaces. Curved edges provide good grip for connectors. This type of part is used not only to create smooth surfaces, but also to make three-dimensional figures and make multi-level suspended ceilings.
The dimensions of the ceiling profile for plasterboard are as follows:
- width - 60 mm;
- height - 28 mm;
- wall thickness - 0.38-0.45 mm;
- length - 300 cm and 400 cm.
The width of the guide part is sufficient to screw the edges of the gypsum board without destroying its edges.
Arched profile
You can make this material yourself, but it will take a lot of time, noise and dust. Each repair has its own cost and time. Such a perforated profile will allow you to create curved spatial forms quickly and easily:
- width - 60 mm;
- height - 28 mm;
- wall thickness - 0.38-0.45 mm;
- length - 300 cm and 400 cm;
- bending radius - 50 cm.
Auxiliary parts
The length of one fragment of a profile for a plasterboard ceiling is not always enough to place it between adjacent walls. In addition, it often becomes necessary to connect these products at different angles.
The following products are used to secure and connect ceiling carriers and guide rails:
- Vertical steel hangers. These parts are perforated “U”-shaped strips. Their task is to attach drywall guides to the load-bearing slab or to the first-level frame during the construction of multi-tiered structures.
- Longitudinal connector for ceiling parts. Thanks to its design, it provides a rigid and almost seamless connection of two or more parts.
- Universal connector. Designed to connect guides in places of their perpendicular alignment. Provides strong joining of parts without affecting the degree of evenness of the frame.
- Corner connector. Provides rigid fixation at the joints of the PP at various angles.
- Corner profile. This product can be made of aluminum or plastic. Used during finishing work to protect the corners of multi-level rectangular plasterboard ceilings.
- Beacon profile. Despite the fact that these products are mainly used for leveling walls, it is often used to repair sagging ceilings.
How to count the number of profiles
Knowing what type and type of profiles there are for drywall, their dimensions are not enough. It is necessary to calculate the quantity of each type. It will be easier to calculate if you draw a frame plan on a piece of paper, sign the names of the profiles, and put down the dimensions. This will not take much time, but will help you determine the quantity more accurately.
You need to have a clear idea of what the frame will look like
Calculation of the number of guides for one wall
If the walls are very uneven, you can level them using drywall. A parallel wall is erected, but set strictly according to the level. In this case, the calculation of the number of profiles for drywall will be as follows:
- Guides - PN. They are mounted around the perimeter. To find the footage of guide profiles for wall cladding, measure its length and height, add and multiply by 2. If there are windows/doors on the wall, the guide profile is mounted around the perimeter of these openings. To the resulting figure we add double the height of the opening and its width.
This is what the frame for the partition looks like - Rack profiles for gypsum boards - SP. As already said, they are placed in increments of 60 cm. Moreover, the outer opening cannot be more than 60 cm. Even if 10 cm remains, an additional stand is installed. First, we count the number of racks: divide the length of the room by 60 cm, add one more - a corner one. For example, the length of the room is 4.75 meters. 475 cm / 60 cm = 7.91 pcs - this will be 8 racks + 1 corner, total - 9 pcs. Next, we look for the footage - multiply the found figure by the height of the room. We get the required length for the racks: 9 m * 3.2 m = 28.8 m.
- Jumpers. Rack profiles are used. They are placed in increments of 60-80 cm, but at the same time, the vertical joints of the plasterboard sheets should also fall on such a partition. Here you will have to count depending on the chosen step, and then add the found figure to the one calculated in the previous paragraph.
If all the walls in a room are covered with plasterboard, a similar calculation is carried out for each wall, then the results are summed up.
Number of profiles for plasterboard for suspended ceilings - PP and PNP
The calculation here is a little simpler: the frame is assembled “in a cage”, so it’s easier to calculate it. Otherwise the approach is the same as described above. So we think:
- The footage of PP profiles for suspended ceilings is equal to the perimeter of the ceiling. We measure the length and width of the room, add and multiply by 2. This will be the desired figure. For example: a suspended ceiling will be made in a room measuring 3*4 meters. Calculation of the footage of PP profiles: 3m + 4 m = 7 m, 7 m * 2 = 14 m. For this room you will need 14 meters of PP profile.
First, guide ceiling profiles are installed - PNP profile footage. It is better to place load-bearing profiles along a short wall. In this case, divide the size of the longer wall by 60 cm: 400 cm / 60 cm = 6.66 pcs, round up - 7 pcs. There is no need to add a corner post, since there will be a guide profile around the perimeter and the posts are tucked into it. The carriers from the PNP profile are located along the short side (in this example it is 3 meters), that is, the required length of this type of profile is 7 pieces * 3 m = 21 meters.
- Next, we count the number of PP profiles for partitions - 60 cm long sections that are installed between two adjacent load-bearing profiles. In this case, the partitions will be located along the long wall. Therefore, we consider this: 300 cm / 60 cm = 5 pcs, and the total length will be 5 pcs * 4 m = 20 m.
In total, for a suspended ceiling in a room measuring 3*4 meters you will need 14 m + 20 m = 34 m of PP profile, 21 meter of PNP profile.
Option for using guides in the manufacture of plasterboard partitions
A simple and frequently used design is a plasterboard partition.
Table 6. Installation of plasterboard partition
| Illustration | Description |
| Step 1 | At the first stage, it is necessary to carry out markings, determining the location of the partition in the room. |
Step 2 | To do this, first mark on the floor the location for attaching the guide profile, which will form the frame of the structure. |
Step 3 | To do this, use a laser level or cord. |
Step 4 | A laser level is also used to transfer markings to the plane of the ceiling and walls. |
Step 5 | Or a plumb line. |
Step 6 | The location of the opening in the partition is marked on the floor. |
Step 7 | The guide profile is fixed to the floor, walls and ceiling, having previously glued a sealing tape to its lower part. This will improve the soundproofing properties of the partition and reduce the likelihood of cracks appearing in the finishing layer. When choosing a profile, take into account the height of the partition, its purpose, requirements regarding sound insulation properties and fire resistance. |
Step 8 | The profiles are fastened using dowels. In this case, it is necessary to maintain a step of 600 mm. |
Step 9 | One profile is secured with at least three fasteners. To fix the guide to the plane of the floor and walls, plastic dowel-nails are used. The profile is attached to the ceiling using metal anchor dowels. |
Step 10 | When choosing a rack profile, the height and purpose of the structure are taken into account. |
Step 11 | The doorway support posts are mounted from two rack profiles nested one inside the other. They are selected based on the weight of the door leaf. |
Step 12 | The installation is carried out with mandatory control of the vertical position using a building level. |
Step 13 | For the lintel of the doorway, a guide profile is used, secured with screws to the support posts. |
Step 14 | If the partition is to be subsequently insulated with slab material, then the distance between the posts where the insulation will be laid should be a couple of millimeters less than its width. |
Step 15 | Fix the rack profile. |
Step 16 | In the lower part of the structure, the rack and guide profiles are fastened together with a cutter. |
Step 17 | The shelves of the rack profiles should be directed towards the installation of the plasterboard sheets. |
Step 18 | Glue the separating tape on the ceiling and begin fixing the plasterboard sheets. The screw is screwed in at an angle of 90 degrees so that its head is immersed into the body of the sheet by a couple of millimeters, but does not destroy the plaster. The distance from the screw to the end edge must be at least 15 mm. |
Step 19 | Embedded parts made from fragments of the rack profile are mounted at the junction of two sheets. |
Step 20 | The sheets are not fixed to the guide profile on the floor and ceiling. The distance from the floor to the sheet is 10 mm. |
Step 21 | The joints between the sheets are spaced horizontally. |
Step 22 | Insulation is laid in the spaces between the studs and drywall is hemmed. |
Step 23 | The joints between the sheets on both sides of the structure should not coincide. |
Purpose of the ceiling profile for gypsum plasterboards
You can attach plasterboard to the base ceiling using frameless technology or to a load-bearing sheathing. In the first case, the sheets are glued to the ceiling using a special glue for gypsum boards. If frame technology is used, then a wooden sheathing or metal frame is first constructed, onto which the material is subsequently attached.
Frame technology has numerous advantages:
- Behind the suspended structure you can hide the imperfections of the foundation and passing utility lines, as well as thermal insulation materials.
- The base does not require preparation or leveling.
- You can build multi-level complex ceilings with lighting and built-in lighting.
- Even when installed on an uneven base, the new ceiling is perfectly flat and smooth.
On a note! Metal slats are made of galvanized cold-rolled steel.
The ceiling profile for plasterboard is intended for constructing a metal frame when creating false partitions, boxes, niches, leveling walls and ceilings, and installing multi-tiered ceiling structures. It is also often used for finishing with other materials (plastic panels, clapboard, siding).
Metal profiles for installation of drywall
Metal profiles for installing drywall are something without which the finishing material itself means nothing. Profiles are an integral part of any frame design for finishing surfaces with plasterboard: be it a suspended ceiling. walls, partitions, door or window slopes. Auxiliary elements for installation are made from thin metal strip by cold rolling on profile bending machines.
Six main types (markings) of metal profiles
To protect products from aggressive environmental influences, they are manufactured with a galvanized coating, which forms a reliable protective layer. Mechanical processing of metal profiles for installation of drywall is carried out using various devices, including cutters, electric scissors, hand scissors, etc.
According to their purpose, mounting profiles are divided into the following types:
- Rack profile (PS).
- Guide profile (PN).
- Ceiling profile (PP).
- Ceiling guide profile (PNP).
- Angular profile (PU).
- Arched profile (PA).
Rack profile (PS)
The appearance of the profile resembles the letter “C” and is intended for metal structures of plasterboard partitions. It is designated as follows: PS 50/50, PS 65/50, etc. and the first designation is slightly different from what is indicated. For example, in PS 50/50 the first size will actually be 48.5, which allows it to be joined to the guide profile without deformation.
Rack profile for making a frame when installing a plasterboard ceiling
It is worth noting that the dimensions are given for the Knauf joint venture, which differ from the Russian counterpart in that the Russian profile has a flange of 50 mm, not 35 mm. A 50 mm wide edge is the most practical and facilitates the installation of plasterboard sheets, since it is easier to get into a wider shelf with a self-tapping screw when attaching them. In addition, the Knauf profile has longitudinal recesses on the shelf, making it easier to center the screws when attaching gypsum boards. The size of the PS is selected depending on the dimensions of the partition and possible thermal insulation.
Guide profile (PN)
The guide profile also has a C-shaped configuration, but differs from PS in that it is unequal, that is, it has the following dimensions: PN 50/40, PN 65/40, etc.
Profile KNAUF PN 2827 3 m
NP "Knauf" are used as guide parts for PS and have ready-made holes Ø 8 mm in the shelf, which advantageously facilitates the process of constructing the frame. But if necessary, you can drill additional holes.
Ceiling profile (PP)
While not original in shape, the ceiling profile also has a C-shaped appearance and is used to construct a frame for plasterboard ceilings, as well as for finishing gypsum board walls. The profile dimensions are 60 x 27 mm; the shelves have three grooves for centering the screws and for imparting additional rigidity to the profile.
Ceiling profile and ceiling guide profile
The PP is mounted to the ceiling using special brackets (suspensions), which are fastened to the profile with self-tapping screws. The 60 mm shelf is very convenient when attaching plasterboard sheets to it.
Ceiling guide profile (PNP)
The ceiling guide profile is made in size 28/27 (in mm) and is used to place a PP profile in it when equipping a frame for a plasterboard ceiling. PNP is installed around the perimeter of the room under the ceiling along pre-marked lines, and in the case of constructing a frame for finishing the walls with plasterboard - at the top under the ceiling and at the bottom near the floor. In the PNP shelf there are holes Ø 8 mm at a distance of 250 mm from each other for fixing the profile to the PNP with self-tapping screws.
Angular profile (PU)
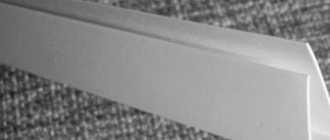
The corner profile (PU) is used to protect the joints of two plasterboard sheets from damage. For a tight fit, the PU has an angle of not 90 º, but 85 º, which creates tight contact with the gypsum board corner.
The corner profile is designed to protect the outer corners of plasterboard partitions and cladding from mechanical damage
The corner profile has holes (perforations) in both flanges Ø 5 mm so that during puttying, putty can enter the holes, which promotes reliable adhesion to the drywall. The profile size is 31 x 31 mm.
Arched profile (PA)
The arched profile (PA) serves as the base for all curved structures. made from plasterboard, and made from PP by bending.
Arched profile for drywall
The minimum possible radius is 500 mm. It bends both with shelves inward and shelves outward, depending on the shape of the ceiling.
Auxiliary fasteners
To reliably fasten the sheathing, there are many different auxiliary products that are used to install the frame. Some parts are limited in their functionality, while others can be used to assemble a system that will be sufficient to perform any type of work.
The main components and fittings include:
- two-level connectors for extending CD profiles. With the help of such special connectors, individual parts of a given profile are combined to give them the required length. Before use, the connectors are bent so that they take the shape of a bracket. For work, use self-tapping screws and place them on each side, 2 pieces;
- impact dowel. This auxiliary element of the frame received this name because of the specific installation, in which the screw is driven into it, rather than screwed in with a screwdriver. The dowel and screw set includes products of various lengths. When installing a plasterboard structure, it is recommended to purchase plastic dowels that will not fall through the impact into the void of the concrete floor;
- crabs are used as connecting elements of the CD profile at an angle of 90 degrees on both sides;
- suspension with a spring on which the CD profile is attached to the ceiling surface;
- direct suspension is represented by a bracket and is also used to fix the CD profile to the ceiling;
- dummy dowel. You will need a 6 mm sample with a small cap that will prevent the element from falling into voids;
- anchors or hangers with traction are used to mount the profile to the ceiling base when the length of the direct hanger is insufficient for installation. In this case, the suspension is fixed to the profile, and the rod is threaded through special holes in the adjustable spring. The technical characteristics of the parts allow the structure to withstand loads of up to 30 kg.
Before starting installation work, you will need to calculate not only the profile for the ceiling, but also the number of auxiliary fastening elements.
Methods of fastening the canvas
Stretch ceilings can be installed in different ways. Installation techniques largely depend on the fabric used: some methods are used for PVC film, and others are used for fabric ceilings.
The most popular fastening systems:
- harpoon, used for PVC films;
- clip-on, suitable for fabric ceilings;
- glazing bead or wedge - it can be used for low-density PVC films and fabrics.
Stretch ceiling fastening systems
To attach films using the harpoon system to a canvas cut exactly to size, a harpoon - a flexible plastic latch - is fused at the factory. The guides are attached to the walls or ceiling, the canvas is heated to 55-65 degrees and the harpoon is inserted into the groove until it snaps into place. The attachment point is covered with a decorative overlay. This system allows you to dismantle and reinstall the canvas, which allows you to drain water from it in case of flooding or repair the film if damaged.
Harpoon system
Prices for suspended ceilings
suspended ceiling
An example of a harpoon fastening of a stretch ceiling
To fasten fabric panels using a clip system, PVC baguettes with an elastic clamp - a clip - are used. The canvas is cut out with a small allowance, the edges are carefully brought inside the baguette, where it is clamped and held. By bending the clip with a spatula, you can remove the blade and adjust the tension, which is convenient during installation. However, after the stretching is completed, the excess fabric is cut off, so re-installation of fabric ceilings is almost impossible.
Clip system
Stages of attaching a stretch ceiling with a clip
The glazing bead system is used quite rarely; professionals consider this method to be artisanal and unreliable. With this fastening system, the canvas is inserted inside a U-shaped baguette and clamped there with a glazing bead. A plug is installed at the bottom to cover the attachment point. In this case, the tension of the canvas is weak, so this method is not suitable for large rooms and heavy films. It is quite difficult to dismantle such a system without damaging the canvas, so using this method without skills in working with canvases is not recommended.
Bead system