When making an important decision to level a ceiling or wall with plasterboard, you should study all the intricacies of the work. One of the important points is the choice of screws for profiles and drywall. They have distinctive differences in technical specifications as well as functionality. Screws for drywall and profiles are sold on the construction market and in supermarkets. But how do you find out what kind of screws are needed to fasten gypsum board sheets?
Types of self-tapping screws
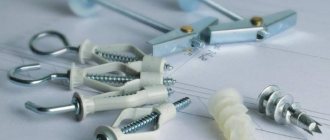
All fasteners used in plasterboard construction are conventionally divided into 2 large groups:
- Screws for profiles with and without drill.
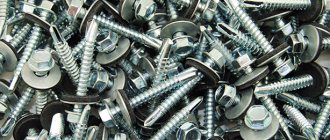
Self-tapping screws used for attaching profiles to hangers and crabs - Self-tapping screws for drywall are regular black.
1. screws for metal with fine threads. 2. wood screw
The importance lies in the fact that incorrectly selected screws will create flimsiness of the entire plasterboard structure. This will lead to rapid deformation.
Do not use self-tapping screws with a drill to fasten gypsum board sheets. Using a screwdriver, ordinary black screws with fine threads can be screwed into the profile perfectly.
To determine how many self-tapping screws you need to purchase, use the calculator.
Rules for choosing quality fasteners
The reliability and durability of a plasterboard structure depends, among other things, on the quality of the fasteners used in its creation.
The main features of quality products include the following:
- One size for all products in the batch. If there is even a slight discrepancy between the parameters of the length or width of the fastening element, we can talk about its defectiveness.
- The head of the screw must be level. There should be no creases or irregularities in the cross-shaped slot. The slot itself should be located clearly in the center of the cap. The service life of the power tool also depends on the quality of the fasteners - an incorrectly made screw head can cause the screwdriver to break.
- The anti-corrosion coating should cover the surface of the screw evenly. There are three types of material. Fasteners with black phosphatine coating are recommended for “wet” rooms. Black oxidized screws are used in rooms with a normal microclimate. Galvanized self-tapping screws are universal, suitable for indoor and outdoor use.
Self-tapping screws for connecting profiles and hangers
Let's figure out what screws are needed for the profile? Metal screws are divided into 2 types. Each is different in its technical capabilities and is designed to perform specific functions.
Difference in screw usage
It should be noted here that it is possible to use self-tapping screws with or without a drill. The choice will depend on the quality of the profiles. Screws hold better without a drill, but it’s a little hard to screw them through two profiles, but for fastening hangers it’s perfect.
Screw with press washer
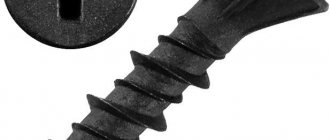
Among the craftsmen there are such names for screws as “seeds”, “bugs”. They are small in size, used for fixing profiles to each other and are the most popular.
The self-tapping screw for gypsum plasterboard is coated with either galvanized or oxidized coating. Despite the different tips, the functionality of the fasteners is the same. In order to install these self-tapping screws, no preliminary preparation is required. They are easily installed using a screwdriver or drill. The thin tip quickly makes a hole and by applying slight pressure on the screw, it is tightly fixed in the profile.
To save screws and quickly install, use a profile cutter.
With its help, such self-tapping screws are used to firmly fix the profile to the sheathing or fix metal hangers. It is allowed to work with a screw without pre-drilling holes. The thin tip pierces the base of the material, and the caps tightly fix the screwed elements. The most popular self-tapping screw sizes for fixing structures and conventional profiles with a length of 13-16mm.
Regular self-tapping screw with press washer
Self-tapping screw with drill and press washer
Dimensions, quantity and weight
Phosphated tapered screws
Phosphated self-tapping screw with a cylindrical head (bug)
Distinctive features of the head:
- If the tool comes off on the screw head, it is impossible to get hurt - it is rounded;
- It is convenient to press the self-tapping screw during installation with a screwdriver or screwdriver;
- With such cooking, in some cases it is possible to use a washer or gasket;
- The cylindrical shape guarantees reliable fixation.
Dimensions of hardware for profiled sheets
To indicate the size of the screws with which profiled sheets are attached, only two numbers are used. The first of them allows you to find out the diameter of the hardware by the outer edge of the thread. The second number indicates the length of the fastener.
For example, threaded hardware 4.8×35 has a diameter of 4.8 mm. Moreover, its length is 35 mm. The second size does not take into account the height of the screw head. In addition, the net length of the hardware to the head is indicated. In other words, the thickness of the rubber gasket and metal washer is not taken into account. This must be taken into account when selecting fasteners. After all, the gasket and washer reduce the length of the screw by about 4 mm.
Diameter and length of special fasteners Source kreptech.com
Important! The actual working length of the hardware is calculated by subtracting the longitudinal size of the tip, the thickness of the washer and the rubber sealing material.
When determining which screws are needed for a fence made of corrugated sheets, then they must take into account the characteristics of the specific place where they will be twisted. To be honest, take into account the thickness of the sheet material and the walls of the pipes from which the fencing purlins are made.
Now manufacturers produce fasteners with lengths from 19 to 250 mm. Moreover, their diameter can range from 4.8 to 6.3 mm.
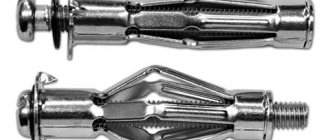
Dowel nails for fastening profiles to concrete walls, ceilings
Fasteners designed for fastening a profile to a brick or concrete wall. Special self-tapping screws with a screw thread are used complete with a dowel. Threaded screws are made of durable steel and coated with agents that protect the metal from corrosion. There is a cross-shaped pattern on the head of the impact screw, which allows you to install (dismantle) the fastener. The dowel has a spacer part that fixes the element in the wall (ceiling) when screwing the self-tapping screw into it. The safety part of the dowel prevents premature operation of the spacer during installation. Using dowel nails speeds up installation. The hole is drilled with a hammer drill (M6 drill) and a dowel is driven directly through the profile.
Divided by type of cap
Self-tapping screws with dowels for concrete surfaces are produced in 2 types: countersunk head, mushroom-shaped. The mushroom cap has an enlarged collar, which makes it possible to increase the area of attached elements. During installation, the hidden cap completely penetrates the material and does not stick out on the surface. This makes it possible to carry out additional work.
On the construction market, self-tapping screws for attaching profiles to concrete (brick) surfaces are offered packaged in packs.
| Name | Number of pieces in a pack, pcs. |
| Impact screw 6*40 mushroom head | 100, 200 |
| Impact screw 6*60 mushroom head | 100 |
| Impact screw 6*60 countersunk head | 100 |
| Impact screw 6*80 countersunk head | 100 |
| Impact screw 8*60 countersunk head | 100 |
| Impact screw 8*80 countersunk head | 50 |
| Impact screw 8*100 countersunk head | 50 |
| Impact screw 8*120 countersunk head | 50 |
For a concrete wall, use 6*40 dowels. This type of fastener firmly fixes the guide profiles to the base, which bear a large load of the entire metal frame.
Self-tapping screw with mushroom-shaped dowel 6*40
The cutter is an alternative to screws
Elements of the metal frame under the gypsum board structure are usually fastened using self-tapping screws. This method is durable, but requires a relatively long time to screw in the screw. This problem was solved with the advent of the cutter.
A cutter is a mechanism that works on the principle of ordinary scissors, but instead of blades it has a spike that pierces metal. To fasten two frame elements, you need to put them on top of each other, install the cutter in the right place and press the levers. Bonding occurs due to the fact that the metal bends into the hole and wedges itself.
When using a cutter, you don’t need to think about which screws to attach the profile for drywall, because they are completely absent there.
Advantages of the cutter:
- speed of fastening;
- does not require electricity;
- no protrusions at fastening points.
Its disadvantages:
- the strength of the connection is inferior to self-tapping screws, but sufficient to erect gypsum board structures;
- There are many low-quality fakes on the market that quickly fail.
Back to contents↑
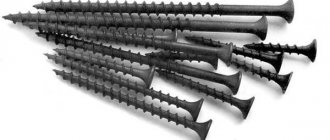
Self-tapping screws for attaching the profile to wood
The screws are distinguished by their length and section pitch. To attach the profile to wood, self-tapping screws 25 mm long are used. These screws are divided into 2 types: phosphated - black and universal - yellow. Both types of screws have a countersunk head with a cross-shaped pattern for proper installation of fasteners. And also the thread pitch is rare.
To install the screw, there is no need to make additional holes using a drill. They easily pierce the surface and enter the base, with a strong fixation.
Wood screws for fixing a plasterboard sheet to a frame or wooden base
In case of fixing drywall to wooden sheathing, special wood screws should be used. These screws have wide threads, which makes them easy to tighten and securely fixed. The sizes of screws used are different. But the softer the wood, the longer the screw should be.
Installation of self-tapping screws on wood
Screws can be sold in packs or in bulk. To calculate one guide profile 3 meters long, you will need to install about 20 pieces of self-tapping screws with this calculation of the distance every 15-20 cm.
Self-tapping screws for fastening drywall
Let's look at what screws are needed for drywall. They are different in appearance, size, and color.
Fastening drywall without chamfer to a metal frame with self-tapping screws
Sheets of drywall are attached to the created metal or wooden frame, as well as directly to the rough base. It can be concrete, brick, or wood. There are specially designed fasteners for each individual fastening. Self-tapping screws for drywall are made from durable steel with treatment against corrosion and oxidation.
A sheet of drywall, in most cases, is attached to a created frame made of metal profiles. The fasteners are driven into the sheet with a slight recess so that the surface remains even and smooth.
How to properly attach a sheet
For this process, self-tapping screws for gypsum boards with a fine thread pitch are used. The tip of the screw is sharp for good penetration into the metal. Self-tapping screws for drywall, sizes starting from 16mm. It is used depending on the thickness of the plasterboard sheet, as well as its quantity.
Basically, self-tapping screws measuring 3.5*25mm are used to fix one sheet of drywall. If you need to fasten the second layer of drywall, then you need 3.5*35mm screws, packaged in 1000 pcs. in 1 package.
The screw head for drywall is designed in such a way that when it is fixed, the top layer of cardboard remains unharmed, while the screw fits flush. For screwing, an electric or cordless screwdriver with tightening force control is used. Drywall screws are made to exacting quality standards and to specified dimensions.
Installation work
Everything you need is prepared, the tool is waiting in the wings. It seems that work can already begin. After all, the sooner you start, the sooner everything will end, but there’s no need to rush. First you need to decide what events will be held. Installation of the frame has features for different types of work.
The installation of a frame for creating partitions from gypsum plasterboard has significant differences from the installation of lathing for sheathing walls with plasterboard
Walls
In principle, working with walls is considered the easiest. This is where it is best to start, if this does not conflict with the stages of repair work.
Let's get started:
- Creating a frame begins with markings. It is best if the profile is as close as possible to the surface to be attached. But this rule does not apply when it is planned to carry out additional insulation or lay communications. The markings start from the floor and transfer the data to the ceiling. Now you can make marks on the side walls and directly on the main surface. Take into account that the pitch of the rack profile is 50-55 (up to 60) cm.
- Drilling is done for fastening elements. You can immediately install U-shaped brackets.
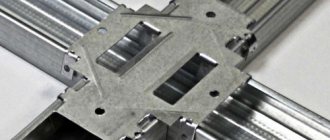
- The time has come to secure all parts of the structure. First, they install the PN - a closed structure is obtained, into which the SP is inserted. Using metal screws, screw them together (bottom and top). Rack elements are attached to hangers.
Suspensions have the peculiarity of extending beyond the profile. That is, protruding “ears” are formed. They need to be bent. This should be done inward so as not to interfere with the installation of gypsum plasterboards.
If it is necessary to give the frame under plasterboard additional rigidity, then horizontal ties are used for this. They are easy to make from the profile itself, which is cut to the desired size (with a small margin)
Pay attention to their fastening
Creating Horizontal Jumpers
They often do this:
- Using metal scissors, cut the ends of the profile along the edges.
- The ribs are bent. Through them, the ties are screwed to the racks. The central section remains without a self-tapping screw, otherwise you will end up with a bump.
Partitions
These structures are created to divide the room, as well as to completely separate one from the other. In principle, the work scheme is similar to that presented above, but there are some technical features.
- First of all, it should be understood that the partition requires sufficient rigidity. This is especially taken into account when the structure is not supported by two main walls.
- Work begins with securing the guides. To do this, use a dowel with a screw, taking into account the pitch - 45-50 cm.
- Now install the vertical posts. They are fastened together with horizontal ties. The racks are fastened with the front side to one of the walls. That is, it turns out that both sides of the partition have an edge for attaching gypsum boards. Therefore, if serious insulation or communication wiring is planned, then choose a profile of the required size.
- All structural elements are securely screwed together with metal screws.
- A wooden beam of a suitable size is inserted into the side elements (ends). This is necessary for reliability.
Features of creating door and window openings
A frame made of metal profiles for plasterboard often requires the creation of various openings in it. Doors are handled as follows:
- The door frame is being assembled. In which, first, the door leaf is hung. To set the necessary gaps (after all, the box is not secured), insert wedges from fiberboard or hardboard.
- Now they begin to place the racks that are adjacent to the doorway. They are placed vertically and reinforced with wooden beams. Apply polyurethane foam and tighten the box with self-tapping screws.
Scheme for creating a doorway in a plasterboard partition
When creating a skylight, there are the following features:
- It is necessary to install two horizontal jumpers (top and bottom).
- It is better to make vertical racks with wooden inserts.