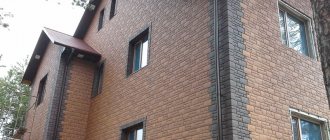
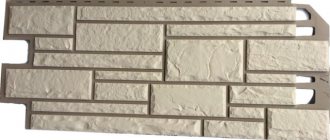
Clinker panels are a finishing material that will make the façade of a house attractive and meet the aesthetic requirements of modern times. They are blocks with layers of insulation made of polyurethane foam and clinker tiles. The decorative part is clinker tiles, which are produced in different shades and structures. Thanks to this, the consumer will be able to choose the desired option.
What are clinker panels
Clinker panels for facades are a material with a high degree of strength and moisture resistance. Such properties are ensured by inclusion in the composition of ceramics. Multiple layers provide additional strength. They come in two and three layers. The outer layer is ceramic tiles, and the rest are insulation. Polystyrene foam or polyurethane foam are usually used as a heat insulator. Due to the presence of a layer of insulation, ceramic panels are often called thermal panels.
The structure of the finishing material implies the presence of special holes and grooves for assembling the elements together and attaching them to the base.
Types of facade finishing
Thanks to a wide range of construction services, you can choose materials of any type to suit every taste. There are several main types of finishes:
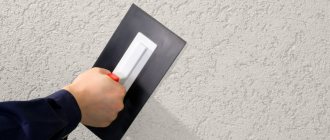
- decorative finishing with plaster;
- imitation brickwork, brick siding;
- clinker tiles and porcelain stoneware;
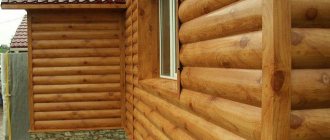
- wood siding;
- vinyl siding;
- facing the facade with stone (natural or artificial);
- cassette type of facade;
- double panels (sandwich) and others.
Production Features
The primary task for manufacturers is to ensure perfect joining of the ceramics with the insulating layer. When using polyurethane insulation, the production process of elements consists of the following stages:
- polyurethane foam foams;
- clinker tiles are laid in an aluminum mold in a certain way;
- sand quartz or marble chips are poured on top of the tiles, which serves to protect the insulation from moisture and sunlight at the joints of the tiles;
- mounting fixtures are laid out;
- filled with foam insulation composition.
After the polyurethane foam has hardened, the panel is removed from the mold. The panel is then finalized in the workshop by adjusting it to the required size and further checking the surface. Some manufacturers use particle boards as a layer between ceramics and insulation. In this case, the material is considered three-layer.
When extruded polystyrene foam is used as insulation, the production of clinker finishing is slightly different. To begin with, finished polystyrene foam slabs are processed. They are cut with great precision to the required standards. After this, using high-strength glue, the clinker is glued onto the prepared workpiece.
Using expanded polystyrene, it is necessary to produce closed perforation, which guarantees the necessary vapor exchange. But not all manufacturers can afford expensive equipment capable of coping with this task. When purchasing a material, you must familiarize yourself in detail with its technical characteristics.
Innovative technologies
Today, in the age of new technologies and the latest building materials, manufacturers of clinker tiles offer a completely unique variety called thermal panels. This is the tile itself, which is glued to a heat-insulating material, specifically to polystyrene foam boards. The latter are cut specifically to the size of several tiles in the form of panels, which, when connected to each other, form a sealed layer on the wall without seams or cracks.
Thermal panel is a clinker tile glued to a polystyrene foam board Source usproekt.ru
Today there are two types of thermal panels on the market:
- Already finished products, which were mentioned above. These are clinker tiles glued to an expanded polystyrene panel.
- Separate version, sold as a set . It includes separate insulation and clinker tiles . The first is panels of thermal insulation cut to a specific shape and size . In them, the places for installing stamping . It turns out that first the insulation is installed on the wall tiles are glued onto it .
Pros and cons of panels
Experts and consumers highly appreciate the benefits of clinker panels. These include:
- high degree of strength;
- duration of service;
- providing thermal insulation;
- quick and easy installation;
- a huge range of design solutions;
- high wear resistance;
- versatility.
Proper strength of the material is achieved by manufacturing and design features. It is not afraid of direct contact with moisture and temperature changes, the occurrence of mold, and does not rot. The outer surface of clinker tiles retains its quality in any conditions for quite a long time. Polyurethane foam allows you to provide additional thermal insulation for your home, which will significantly save costs on coolants.
A significant advantage is the installation process. The finishing of the facade using clinker panels is carried out in a fairly short time, using common materials and tools. They are attached using nails, screws, staples and glue. The material is light, so it will not overload the walls of the house. Therefore, there is no need to worry about old buildings. They can easily be restored using clinker panels and made modern and attractive. In addition, the low weight eliminates any difficulties with transportation.
A wide variety of color solutions allows you to embody any design whim and give the appearance of your home originality. The resistance of clinker to ultraviolet radiation prevents color fading and allows you to maintain the original appearance of the finish for many years.
Against the backdrop of a huge number of all the advantages of the material, there is only one disadvantage - the high price. But it is justified if we take into account all its advantages.
Advantages
What are the benefits of clinker thermal panels compared to competing solutions?
- Minimal hygroscopicity, characteristic of clinker. Due to the dense sintering of clay particles, ceramics have moisture absorption close to zero. It is the absorption of moisture that reduces the frost resistance of materials: crystallizing in the pores during freezing, water increases in volume and destroys concrete, plaster and other materials;
- Directly resulting from this property is a huge service life. More or less decent manufacturers provide a guarantee for their products for at least 25 years, but in reality the facade will last at least half a century;
- Durability and excellent anti-vandal qualities. The clinker lining can only be damaged with a sledgehammer. Contact with any objects softer than diamond will not leave the slightest trace on the surface of the thermal panel;
The facade will retain its appearance indefinitely.
Quick and easy installation using self-tapping screws and dowels. Of the “wet” processes when finishing a facade with your own hands, you will only have to deal with grouting the cracks. No preliminary preparation of the facade is required.
Facades without significant irregularities do not require preparation.
Specifications
The technical characteristics of clinker panels must fully comply with the quality and standard requirements. Therefore, manufacturers comply with the following parameters:
- The thickness of the element varies from 8 to 19 mm.
- There are from 32 to 64 pieces of clinker tiles per 1 square meter. Their dimensions correspond in width from 100 to 115 mm, and in length from 210 to 240 mm.
- The weight of the clinker panel ranges from 16 to 64 kg.
- The degree of water absorption is 3%.
- Bending strength is not lower than 23 MPa.
- Thermal stability corresponds to 30 minutes when the temperature reaches 1250C.
- Frost resistance – 300 freezing processes.
When purchasing, you should keep in mind that compliance with all of the above characteristics can only be guaranteed by large companies that are seriously involved in the production of finishing materials. Therefore, it is necessary to be interested in the origin of the purchased material.
Your home deserves to be warm
Main office: WEEKEND: from December 31 to January 5 From January 5 to January 8 - BY CALL Moscow region, State Farm Village Ramenskoye, st. Proizvodstvennaya 31 +7, Olga (Tue-Sat 9.00 - 18.00) +7, Sergey (daily 9.00 - 19.00)
Additional office: WEEKEND: from January 1 to January 8, Moscow region, Balashikha st. Yuzhnaya, 9 Opening hours from 10-00 to 17-30 (Mon-Fri)
Saturday and Sunday by prior arrangement! +7, Larisa
Additional office: WEEKENDS: from December 31 to January 5 From January 5 to January 8 - BY CALL Moscow region, Odintsovo st. Govorova 24B office 12 Opening hours by prior arrangement
Call us: +7 +7
Types of clinker panels
Facade panels for exterior decoration of a house are divided according to the number of layers:
- two-layer;
- three-layer.
Often, two-layer ones do not have an insulating layer, and the base is a particle board or cement-bonded particle board. Thermal panels are classified as three-layer panels.
Single-layer panels perform only a decorative function. They are based only on clinker based on rigidity. Such panels are attached to the surface using an adhesive.
In the case when, in addition to decoration, it is necessary to carry out additional insulation of the facade, it is better to use a three-layer version of the material.
Design of facade thermal panels
Ready-made blocks of thermal panels are intended for external decoration of buildings. But sometimes designers use them in interior spaces. Ready-made panels do not weigh down the walls and do not create excess pressure on the foundation.
Structurally, thermal panels have the appearance of a layer cake.
- The top layer is decorative. The layer pattern repeats brick or stone masonry. It also performs the protective functions of the main layer from the actions of nature.
- The main layer serves as thermal insulation. Expanded polystyrene and polyurethane foam are used for its production.
The panels are manufactured at the factory using the latest technology, using special matrices. High-precision connection of panels masks possible installation defects. Cold bridges are never created in the panels. The fastening is reliable and can withstand even the force of slanting rain.
Decorative panels with imitation stone or brick are in demand by consumers due to their decorative qualities. Imitation of natural stone is difficult to distinguish from masonry. And it is easy to care for - just clean it from dust once a year with a damp sponge. The panels have beveled hidden edges that provide a seamless finish. The type of stone finish is resistant to fading in bright sun. There are no scratches on it.
Brick-like thermal panels are popular and considered traditional. They are suitable for many structures and buildings. There are many proposals for choosing the color and texture of bricks. The color of the brick can be white, yellow, gray, red, terracotta. In appearance, aged or burnt, with a rough or smooth surface.
Areas of application
The direct purpose of ceramic cladding panels is to insulate and decorate the facade of a private building.
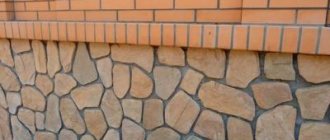
It is better to use material without insulation:
- when finishing frame buildings;
- when decorating walls already insulated from the inside on curtain facades;
- when covering buildings that do not require additional insulation, such as a garage, utility warehouse, etc.
Clinker panels are universal, suitable for finishing any building and in any climatic conditions. They are equally good both in hot countries and in regions with cold climates.
Installation of sheathing
Sheathing under clinker tiles must be done especially if the wall is uneven, and also if it is necessary to install a ventilated curtain wall.
The lathing should be done as follows:
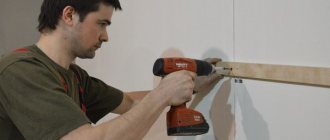
- The planks must be fastened in a horizontal position using self-tapping screws . It is not recommended to use brackets in this case;
- the pitch between the guides should be such that the panel is placed on three vertical guides ;
- the lower horizontal rail should be mounted 20 (up to 40) cm above the ground line;
- The gaps between the wall and the profile (bar) must be sealed with foam.
After attaching the sheathing, facing work is carried out with clinker tiles.
Step-by-step instructions for cladding
Finishing the facade of the house can be done with your own hands. Having read the recommendations of specialists in detail, the process will take no more than 2-3 weeks. It consists of several stages, a detailed description of which is presented below.
Preparation
The first stage is preparatory. Before finishing, it is necessary to treat the walls, which guarantees long service life. The process consists of the following steps:
- Inspection of the wall surface. If irregularities are detected, they are leveled.
- Shutters, air conditioners and other structures are dismantled.
- If there is old finishing, it is completely removed.
- Priming the surface to protect against the appearance of fungus and rot in several layers.
Frame
Clinker panels are installed on perfectly aligned walls using glue. But more often than not, the surface has some defects, which are reduced to zero by the construction of the frame. It is made of wooden or metal guides.
The construction of the sheathing is carried out according to the following plan:
- Determination of the vertical and horizontal levels of walls. To do this, just pull the threads and set the beacons.
- The lower fastening of the frame is parallel to the ground level. Markings are made, and then gradually move to other walls, leaving similar marks.
- A thread is pulled along the entire perimeter of the house according to the marks, and then I fix the beam or metal profile along it.
- Fastening is carried out using self-tapping screws if the base is wooden. Dowels are used if the surface is concrete.
- After installing the lower part, they proceed to installing the upper strip. After this, slats are installed around the perimeter of the windows and doors. It is necessary to take into account the finishing of the slopes. To do this, you need to make an indent from the corners.
- After installing the side slats, proceed to installing the slats over the entire surface. To simplify the process, use a plumb thread.
The frame is ready, you can begin installing the panels.
Panel installation
Forty clinker panels are reminiscent of the process of making children's pictures from puzzles. Not complicated, but requires some nuances.
- You need to start from the bottom corner of the first row. To ensure a tight fit, the edges of the tiles are filed at an angle of 450.
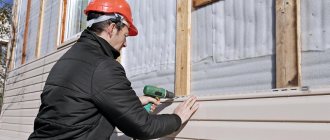
- The first panel is applied level to the sheathing and secured in specially designated areas with self-tapping screws. When finishing without a frame, dowels are used for fixation. A hole is drilled directly in the wall and a plastic base is inserted. The dowel is driven into it already with the panel.
- Upon completion of the first panel, proceed to install the next one. At the same time, they control that the elements fit tightly to each other.
- Installation is carried out around the perimeter of the building. First, assemble the first row in a circle, and then proceed to the next row. The general installation diagram looks like this: left to right, bottom to top.
- Upon completion of installation, the joints of the panels are treated with polyurethane foam.
- To avoid distortions, when installing each element, you need to check the level of its position. Otherwise, unevenness may occur, which will make it impossible to install the following elements and cause gaps to form between them.
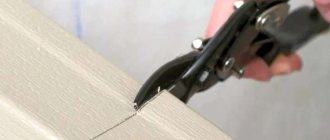
- Often when installing panels it is necessary to cut them. To do this, they apply it to the wall, make the necessary marks and then cut along them.
- After all surfaces are sewn up, they begin finishing the slopes. They are leveled using a plaster mixture, and decorative plastic corners are installed on the edges.
- Finally, all seams are rubbed with a special mixture.
Clinker panels can be installed at any time of the year. The only exception is grouting. They must be processed only at positive temperatures.
Stages of preparation of external walls
- The first stage of preparation is to inspect and clean the surface. To do this, you need to carefully inspect the entire facade of the house and get rid of all objects protruding from it (if possible), including removing the air conditioner, shutters and other removable structures on the walls.
- If your house was previously painted or whitewashed, then you should get rid of it; the walls of the house should be clean without coating. You can remove paint or whitewash using a metal brush.
- To prevent the occurrence of fungi, the surface of the walls should be treated with an antiseptic agent. Liquid antiseptic should be applied in at least two or even three layers. When the anti-fungal agent has completely dried, the wall must be coated with a primer.
Manufacturers and price of material
As already mentioned, clinker panels are an expensive material. But the cost depends on the manufacturer, as well as on the technical characteristics.
For example, material from a German manufacturer, which occupies a leading position in the market of facade finishing materials, costs around 10,000 rubles per 1 m2. Italian panels are priced between 7,000–9,000 rubles, Polish ones have the best prices among imported materials and amount to about 5,000 rubles.
Domestic panels are more affordable and can be purchased at better prices. In addition, the quality is quite decent. Estimated prices are:
- clinker without insulation – 520 rubles per 1 m2;
- thermal panels based on polystyrene foam - 1500 rubles, polyurethane foam - 2200 rubles per 1 m2;
- self-supporting without a thermal layer - from 1900 rubles per 1 m2.
Installation wallpaper averages from 300 to 400 rubles per 1 m2.
Popular options from domestic manufacturers:
- Nevaterm is the ideal combination of quality and price, from 200 rubles per 1 m2.
- Neotherm is one of the representatives of the economy option, the production of which uses European standards. Cost from 1700 per 1 m2.
- TermoKlinker - from a domestic manufacturer from St. Petersburg. Price from 1300 rubles per 1 m2.
- Europe – panels of different sizes are equipped with convenient fastenings, which greatly facilitates their installation. You can buy them for 1600 rubles per 1 m2.
- KamphaTherm is a high quality material with high quality and durability. Manufacturers have established a warranty period of up to 10 years. Cost – 1500 rubles per 1 m2.
- Cerrad – panels produced using the latest generation equipment, which guarantees high quality products. Price from 1300 rubles per 1 m2.
How to choose
The selection of thermal panels is carried out according to certain criteria. We decide on the type of insulation from which multilayer plates are produced:
- Expanded polystyrene (PSB) - expanded polystyrene panels provide low cost, but production should only be in factory conditions. This guarantees compliance with the linear dimensions of the thermal panels. Otherwise, problems may arise during installation, and the low quality of the PBS will also not allow you to obtain the expected result in energy saving.
- Extruded polystyrene foam (EPS) - is characterized by chemical resistance and durability, resistance to high temperatures. But such material does not allow steam to pass through.
- Polyurethane foam (PPU) - thermal panels on polyurethane foam must also be factory-made. In this case, they will be inexpensive, strong and durable. Handicraft products are characterized by discrepancies in linear dimensions, which in the future threatens the appearance of cracks and problems during installation.
The structure of a thermal panel on polyurethane foam