How to cut siding?
There are several options, a regular hacksaw, a circular saw, hand scissors and a sharp knife.
If you are using a circular saw, make sure the blade has fine teeth. If you are cutting vinyl siding, the saw needs to be set in the opposite direction; any other type of siding can only be cut in the forward direction. Using scissors, you can cut out elements of any shape and size. It is best to carry out cutting with safety glasses and start cutting from the fastening part upwards.
We recommend reading a detailed article about vinyl siding for exterior decoration; in it you will find information about the types, differences, pros and cons of such finishing.
Preparatory work
In order for the façade siding to be completed successfully, you must do the following:
- Clean the surface from dirt and dust, remove lime deposits, plants, and so on.
- Remove old plaster, paint, etc. if materials are peeling.
- Dismantle everything that might interfere: cornices, decor, drainpipes.
Old plaster should be knocked down only if it is peeling off on its own and there are voids underneath; it is not necessary to dismantle the cladding that is firmly in place; it is enough to remove the ebbs, window sills, etc.
Frame for siding
The frame can be assembled either from wooden blocks or from a metal profile, which is used to install plasterboard sheets. Today, some siding manufacturers offer ready-made frame elements that are sold complete with cladding.
The question of which frame is better: wooden or metal is asked by many novice home craftsmen.
- Lumber is cheaper, but for lathing facade finishing, bars of at least 1st grade are required. That is, dry, without a large number of defects: delamination, cracks, bluish spots, wormholes and eyes. They must be treated with an antiseptic and fire retardant. But keep in mind that under the influence of high humidity and then drying, the bars may warp, which will affect the quality of the finishing of the wall of the house.
- In this regard, metal elements are better. They do not change their size under the influence of changes in temperature and humidity. They do not need to be treated with anything, but they are more expensive.
Installation of sheathing
Before installing the sheathing to the wall, you need to prepare it.
- Facade elements are dismantled: drainage system, window and door frames, drains, etc.
- If there are defects on the wall, then they must be repaired with a repair mortar, for example, cement-sand with a ratio of 1:2. You can use ready-made facade putty or plaster.
- Since siding is primarily installed horizontally, this means that the sheathing elements must be installed vertically. Therefore, first markings are made on the wall, where vertical lines are drawn every half meter. In the corners, regardless of the specified pitch, lines are drawn without fail.
- Along the marked lines, straight hangers are installed every 50-60 cm, which are attached to the wall with self-tapping screws on plastic dowels. That is, they drill holes in the wall, drive dowels in with a hammer, attach a hanger, which is tightened with a self-tapping screw. There are at least two fasteners for each suspension.
- Direct hangers must be installed along the perimeter of window and door openings. Here the installation step is from 30 to 50 cm.
- If the facade of the house is planned to be insulated, then this must be done right now.
Wall insulation
For a facade that is covered with siding, it is best to use slab thermal insulation material. This is mineral wool or polystyrene foam. The main thing is to accurately select the insulation thickness. For central Russia, a thermal insulation layer thickness of 50-60 mm is suitable. Mineral wool and polystyrene foam boards are sold at this thickness.
If a house is insulated and covered with siding in the northern region, then the thermal insulation layer must be at least 100 mm. And here there is a difficulty, because the antennae of direct suspensions have a mounting length of 80 mm. That is, the insulation is thicker. In this case, proceed as follows:
- wooden blocks with a cross section of 50x50 mm are installed vertically on the walls along the marked lines, which are not aligned vertically;
- and then direct hangers are installed on them and attached to them with wood screws.
There is a simpler and better option - a short block of the same cross-section is installed under each suspension, which is pre-attached to the wall. And already there is a suspension for it. This is how the distance from the cladding to the wall surface increases, where an insulating layer with a thickness of even 130 mm will fit.
As for installing the insulation, through cuts are made in each slab with a knife so that the antennae of the hangers can squeeze through them. Therefore, it is very important to accurately determine the locations of the cuts.
Attention! You cannot make large holes for direct hangers. This will reduce both the strength and thermal characteristics of the insulation.
The slabs themselves must be laid tightly to each other so that gaps do not form between them. If any cracks still remain, they must be filled with foam sealant. This is foam in a can, but not mounting foam. It does not expand in volume in air.
Continuation of frame assembly
A profile is mounted in one corner of the facade. It is leveled vertically using a level and attached to the suspension antennae with special self-tapping screws, which craftsmen call bugs or seeds. Now four or five strong threads are tied to the profile, which are pulled to the opposite corner of the house. Here, each thread is aligned horizontally, having previously been attached to a self-tapping screw screwed into the wall. That is, the threads should form a plane that is even both vertically and horizontally.
First, a corner profile is installed along them, attaching it to the hangers, then the rest are intermediate. Be sure to install profiles around the perimeter of window and door openings.
Material calculation
Do-it-yourself siding installation begins with purchase. The required amount can only be calculated approximately. To do this, sketch out the facade on paper and indicate all dimensions. Then divide it into geometric shapes and calculate their area, add the resulting numbers and subtract from the sum of the footage of window and door openings. The result must be divided by the area of one panel; it is recommended to add about 5% of the margin to the resulting figure. This is how you can calculate the siding for your house.
When calculating the material, elementary mathematical formulas are used, but you just need to remember that siding has a useful and total area, while the useful area is taken into account, plus 10 - 15% is added for trimming
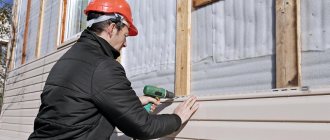
Siding assembly
Do-it-yourself siding installation continues. We move on to the last stage - cladding. Despite the apparent simplicity of the process, there are several important nuances that affect the quality of the final result. Therefore, we need to pay special attention to them.
Installing Starter Guide Bars
This cladding element must be installed perfectly horizontally. Therefore, a self-tapping screw is temporarily screwed onto the corner rail, at a distance of 5 mm from its lower edge. A strong thread is tied to it, which is pulled to the opposite corner of the building. Place it horizontally and at this level, on the corner profile, also screw in a self-tapping screw, to which the free end of the thread is tied.
Attention! If all the facade walls of the house are covered with siding, then all the self-tapping screws screwed into the corner elements of the sheathing are tied with one thread around the perimeter.
Now you need to attach the corner profile of the siding to the corner of the house and mark their edges on the frame according to the level of the tensioned thread. Marks are made with a pencil or marker.
Next, you need to retreat 6 mm horizontally from the edge of the corner profile, install the starting strip below the thread, but with its upper edge exactly along it, and fasten it to the sheathing elements. Then the remaining thread guides are installed. The main thing is to leave a gap of 1 cm between adjacent planks, which is compensatory. That is, it allows plastic products to expand under the influence of rising temperatures without coming into contact with each other.
There is another option, in which the gap between the corner profile and the starting strip is formed by cutting off the nail (mounting) shelves. In which holes are made for fastening. They are simply cut to the width of the starting profile, and the latter is installed closer to the corner elements, but with a gap equal to the width of the mounting shelf.
Installation of corner profile
There are no difficulties here, you just need to pay attention to two important points:
- The lower edge of the corner strip should be 5-6 mm below the starting profile.
- The top edge should not reach the soffits or other cornice cladding by 3-4 mm.
And so the corner profile is applied to the corner of the building and fastened with self-tapping screws to the sheathing of two walls. The main thing is to align the corner exactly vertically.
The standard length of the corner strips is 3 m. If the height of the wall is higher than this parameter, then you will have to install two or three elements. They are installed overlapping relative to each other with an offset of 2.5-3.0 cm. The top one is laid on top of the bottom one. In this case, the mounting flanges of the upper element are cut to a length of 3 cm. Be sure to leave a compensation gap of 8-10 mm between the mounting flanges of the two planks.
If the house structure has internal façade corners, then special corner profiles are used for them. Their installation is carried out in exactly the same way as external corners.
How to get around windows and doors - breaking off doorways
There shouldn't be any difficulties with openings. To decorate them, they use either special platbands, which many siding manufacturers offer today, or starting profiles. Their length is 3 m, so that with one element you can close both the window and door opening. That is, there is no need to connect anything to each other.
The side elements are aligned vertically, the top and bottom horizontally. The main thing is that the top plank should overlap the side ones so that precipitation does not flood under the cladding.
If windows and doors are not located in the same plane of the wall, that is, they are recessed into the facade, then a special corner element is used to frame them. That's what it's called - window. To do this, a finishing profile is installed around the perimeter of the window close to the frames. The tenon of the corner element will be inserted into its groove. And the corner itself is attached with self-tapping screws to the metal frame profiles that were installed around the perimeter of the opening.
Let us add that the width of the corner shelves on the market is represented by several dimensional parameters. This is done to make it convenient to select an element depending on the seating depth of the window or door.
Siding installation step by step instructions
Installing siding with your own hands is the simplest process of all those described above. You need to start from the corner of the house. The panel is inserted with the side edge into the corner element, and the bottom into the starting strip. Don't be lazy to check it for horizontalness.
Fastening is done with self-tapping screws along the sheathing elements. The length of the siding varies in the range of 2.5-4 m, so one panel may not cover the length of the wall. Therefore, they are joined together with a special profile. It is called the H-profile. Its design has two grooves on different sides, into which two adjacent siding panels fit. The H-profile itself is attached to the frame in the same way as the corner one. By the way, its installation is carried out before the installation of siding panels begins.
In this way, all rows are assembled to the last. In this case, every third row must be checked for horizontalness.
Now, regarding the installation of the last row. Firstly, a finishing J-profile is installed near the roof overhang cladding with an indentation of 3 mm. Secondly, the distance from it to the edge of the penultimate siding panel is measured. It’s good if this distance is equal to the width of the siding. That is, the panel fit exactly, covering the free space of the wall. If the size is smaller than the width of the panel, then it is transferred to the siding, the upper part with the mounting shelf is cut to this value.
So-called hooks are made along the upper trimmed edge. Essentially, these are cuts across the length of the panel, 2-3 cm long and 2-3 cm wide. The pitch of the hooks is 20 cm. The cut strips are bent outward. Their purpose is to fit into the groove of the finishing strip and push it apart to create a tight connection.
That’s it, we can consider the process of covering the facade of the house with siding complete. And some useful recommendations.
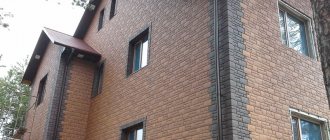
Advantages of using panels for facade finishing
Finishing buildings with siding panels, compared to other materials, has the following advantages:
- High resistance to negative external factors: precipitation, sudden temperature changes, some chemical compounds and ultraviolet radiation. The material retains its strength and decorative properties throughout the entire period of operation declared by the manufacturer.
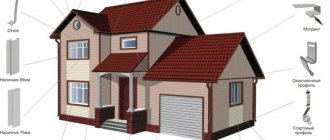
Exterior view of a house covered with siding
- The design of the cladding and sheathing has minimal weight, which allows finishing of objects with shallow foundations without additional reinforcement of the supporting structure.
- There is no need to level the façade walls due to installation on the sheathing. This significantly reduces the work time, and also allows you to lay heat and waterproofing layers in the space between the wall and the siding.
- The cladding does not require any maintenance or care.
- High level of fire safety and resistance to minor mechanical stress.
- The presence of a wide range of decorative colors will allow you to easily choose the one you need and create a unique home design without spending money on purchasing and painting it in the desired color. Moreover, unique textured images with imitation of natural materials, distinguished by a clear and rich pattern, are also available.
- A simple installation technology that can be mastered by people who have not previously encountered construction work.
Useful tips on choosing fasteners and more
Take them into account and strictly adhere to them.
- It is best to lay siding from left to right, from bottom to top.
- The self-tapping screws are screwed in strictly in the middle of the mounting groove perpendicular to the sheathing elements.
- Do not tighten the fasteners too much. It is necessary to leave a small gap in case of thermal expansion of the material.
- If nails are used as fasteners rather than self-tapping screws, then you need to purchase galvanized fasteners.
- Fiber cement siding is attached to the frame with clamps.
- If a wooden frame is finished with siding, then it is necessary to give time (at least six months) for the house to shrink.
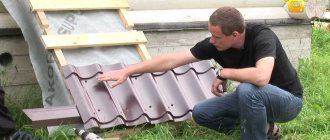
Installation of spotlights
If the frontal board is covered by a wind board, then installation is carried out in the following steps:
- The finishing strip is installed, into which the J-chamfer is then attached with the upper edge. If the J-bevel is wider than necessary, it can be trimmed.
- J-profile installs on the wall.
- The soffit must be cut to the required size and installed between the J-chamfer and the J-profile. Fasten with self-tapping screws.
If the wind board cannot cover the front board, then the following option is provided:
- Attach the J-profile along the top of the front board, and the outer corner at the bottom.
- Install another J-profile on the wall in the same way as the first installation option.
- Prepare a soffit of the required size.
- Install one soffit between the J-profile and the outer corner on the front board and a second soffit between the outer corner and the J-profile on the wall.
- In this option, we do not recommend using brown soffit. The sun's rays will hit the front board covered with soffit, and this can serve as an unfavorable factor for accelerated fading of the vinyl.
General information
Everything you need to get started
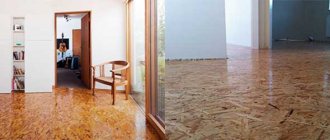
In the production of siding panels, several different types of material are used. Sometimes it is quite difficult to determine from external signs what specific material the panel is made of, since the front finish of different types of products may have the same color and texture.
If we classify siding according to the type of raw material from which it was made, it will look like this:
| Variety | Raw material |
| Metal siding | Galvanized steel, stainless steel, aluminum. |
| Polymer panels | Polyvinyl chloride, vinyl, polypropylene. |
| Composite siding | Wood flour and polymer resins or fiberglass and cement |
Of course, the technologies for producing panels from different types of raw materials are very different. For example, upon closer examination, you will notice that polymer siding panels are painted throughout, while fiber cement and metal panels have a surface decorative layer.
This can be a coating of paint and varnish composition, and powder/polymer spraying. Interestingly, the Japanese produce fiber cement siding with a ceramic coating, which not only makes the surface highly durable and beautiful, but also gives it the ability to self-clean. As you can see, choosing a material is not the easiest thing.
Design features of panels
If we are talking about fundamental design differences, siding can be divided into basement and facade. The second type of panels imitates various types of lumber sections, namely the texture of wood, although sometimes they are painted in a single color. This type of material, similar to a board, can be long and has similar dimensions - width from 15 to 20 cm and length from 3 to 6 meters.
From this we can conclude:
The stronger the material from which the panels were made, the smaller the thickness of the siding will be. For example, for metal the thickness can be 0.05 cm, and for vinyl 0.2 cm. Fiber cement panels reach a thickness of up to 1.6 cm. From this it becomes clear that the dimensions and design options directly affect the weight of the siding. On average, siding cladding weighs from 5 to 7 kg/m2.- There are two types of façade panels based on the installation method: horizontal siding, which is considered the traditional option, and vertical siding, which has small but still noticeable design features. For the most part, windows are about form factor configuration.
- Vertical siding has a distinctive lip along the locking edge, which makes the panels look a little different. Of course, horizontal panels can be installed vertically, but in this case it will be much more difficult to make the connections airtight, and there is a high risk of water getting inside.
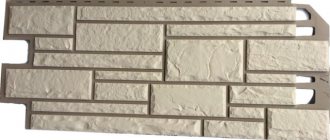
- Now a little about basement siding. The panels were named so later so that both the finish and their dimensions were adapted for finishing the above-ground part of the house. This material is not long; on the contrary, the siding in this case is a model product with a size of 0.6 * 1.15 meters. Such panels are made with an imitation not of lumber, but of brick or stone masonry, or wood chips.
- Despite the name “basement” siding, it is a full-fledged finishing material, and not only for facade siding. Its use makes it possible not only to cover walls, but also to create a unique interior and facade design using various combinations.
- To understand how to work with siding for cladding houses, you should separately consider vinyl panels. In shape it is a long-length façade, and in its front design it is like plinth panels. The main task is the cladding of spherical surfaces, namely parapets, semicircular walls, columns.
- Each manufacturer has its own finishing options, with special attention paid to colors. Some collections have up to 50 items and many different shades.
Please note that no matter which panel option you prefer, you should buy accessories that will be used to install the facing panels.
Next we will talk about auxiliary profiles and strips.
How to determine the required size of a corner profile
To determine how long the corner siding should be, you need to measure the value from the bottom edge of the starting strip (it is the one that is first attached to the sheathing) to the place where the cornice will be installed. Subtract 6 mm from the resulting value. This is necessary in order to take into account linear changes under temperature influence.
It happens that the length of one standard profile is not enough to frame a corner or you need to finish it in several pieces, what to do then? In this case, you will have to install the elements overlapping. Add 2 cm to the size of the additional part for joining.
Such an area will be enough to completely protect the structure from moisture, dirt and cold.
We fasten the external corners
The principle will be similar to working on internal corners. The only difference is the angle of work. You can easily resort to using two J strips.
An even simpler solution is to use a simple corner. It can be mounted on top of panels. It is easy and simple to install and does not have any significant drawbacks.