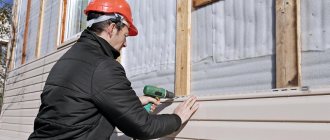
DIY siding installation
Their consumption when decorating a house with siding is calculated based on the step between these hardware on the planks of 30 cm. The fasteners must fit at least 20 mm into the wooden lath or metal profile of the frame. In this case, a space of 1 mm should be left between its cap and the PVC lining. If this is not done, the vinyl siding of the house will warp and ripple when the outside temperature changes.
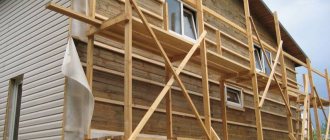
Assembling sheathing for cladding a house with siding
The sheathing is made vertical or horizontal with a distance between the slats (profiles) of 30–40 cm. These guides must be placed across the main vinyl planks. But by definition there should be no crossbars between them. You need to cover the house with siding yourself so that there is space under the panels for natural air circulation.
To ensure reliable fastening of the PVC cladding, additional support rails are installed around the openings and along the corners of the building. They are also needed in places where lamps and drains are hung on walls. It is necessary to securely fasten not only the facade panels for the exterior decoration of the house, but also various decorative elements on them.
House sheathing
Installing the starting bar
The first to be fixed to the walls is the starting bar. To do this, a rope is pulled level around the house on nails at a height of 3-4 cm from the lower edge of the mounted sheathing. The starting profiles are attached around the perimeter of the building not end-to-end, but at intervals of 5–6 mm in case of thermal expansion.
Installation of low tide and starting bar. Low tides are installed from the corner of the house. The starting profile is mounted 30-40 mm above the ebb strip.
Setting internal and external corners
Next, external and internal corners are attached, installed at the joints of two walls. Their lower edge should be located just below the starting strip already attached to the house. The first self-tapping screw is screwed into the top hole for fasteners so that the corner hangs on it.
External and internal corners are installed so that the lower edge is 4-6 mm below the starting profile, and the upper part is 1-3 mm below the soffit or cornice
Then the corner is aligned strictly vertically. The remaining screws are screwed down the bar in 30 cm increments in the middle of the holes and not all the way. This is the only way the PVC cladding of the house can “breathe” and not deform.
The corner elements are built up with an overlap. At the bottom of the top bar, the inner side edges are trimmed by 25 mm. It is inserted into the bottom corner by 20 mm, which leaves a gap of 5 mm for thermal expansion.
Installation of strips on door and window openings
The next stage is covering the house openings for windows and doors with platband. In order for everything to turn out beautifully in the end, you will have to work hard here. In the upper horizontal J-profiles you will have to make cuts in the sides with a bend of the cut part of the panel, and in the lower ones you will have to make an angled cut at 45 degrees.
Trimming the window profile
Vertical strips are cut at an angle at the top, and cut out at the bottom with a similar bend on the side. The purpose of all these manipulations is not just to cover the house beautifully with siding, but to join the platbands so that water cannot seep into the joints anywhere.
Installing the main panels
With basic planks everything is much simpler. The first of them just needs to be inserted into the starting profile, and then fixed to the sheathing. The rest will follow one after another. It is the ease of installation of the main panels that allows you to decorate your house with siding with your own hands in literally a day.
If there is not enough siding length, we join several planks through an H-profile. To do this, do not forget to install and secure the connecting H-profile in advance. The distances below and above are the same as for the outer or inner corner
Installation starts from the starting profile and ends with the finishing profile or molding
Don’t forget to make “hooks” at the top of the panel
The finishing strip is attached to the upper edge of the wind board using “hooks” similar to the molding.
Soffits are installed between the molding and the J-bevel
The planks should be fastened from the middle to the edges, placing the screws exactly in the middle of the holes on the edge. The finishing touch to the vinyl cladding of houses is the installation of the finishing panel with the insertion of the topmost main PVC strip into it.
Material selection
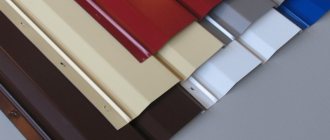
Siding today comes in three varieties:
- fiber cement (another name is cement fiber);
- metal;
- polyvinyl chloride (for short called vinyl or simply plastic).
Vinyl siding is the most popular - it accounts for 70% of all sales.
Vinyl siding
This is explained by a number of advantages of this material:
- Low cost.
- Light weight, due to which there is no need to strengthen load-bearing structures and foundations, and delivery and installation are extremely simplified.
- The widest selection of colors and textures. PVC plastic, like any other, can easily be given any shape, which manufacturers successfully use: siding is produced that imitates wood, brickwork, straw and other materials.
- Resistant to all weather conditions.
- Sufficient mechanical strength.
When choosing vinyl siding, consider the following:
- The cheapest panels are those that imitate wood. They are also the most popular - they account for approximately 80% of consumer demand. Siding with a more complex texture may cost more.
- You shouldn’t buy cheap siding from a little-known manufacturer out of a desire to save money. Some buyers think that there is not much difference, they say, siding is just a piece of plastic. In fact, a lot depends on adherence to technology: low-quality siding does not burn evenly, but in spots. In addition, the material itself is less resistant to ultraviolet radiation, which causes the destruction of polymers.
Siding in pastel colors is considered the most preferable. Compared to brightly colored panels, it has the following advantages:
- fades less quickly and less noticeably in the sun;
- less susceptible to thermal expansion;
- has a lower cost.
Among the manufacturers of vinyl plastic, Russian, Docke, FineBer, Grand Line, Northside, Belarusian Atlantic, U-Plast, Vox, Polish Royal, Canadian Vytec, Mitten and American Elixir, Variform have proven themselves well.
How to choose?
The parameters of each home are unique and require special attention. Installation work will vary depending on what kind of building it is: a country house among a large, ventilated space or a building among houses of the same type where there is no free movement of air flows.
The correct selection of the necessary materials is one of the difficult issues when doing your own cladding and insulation. The choice largely depends on the building material from which the house is made. For example, for construction from solid wooden beams, mineral wool is preferable, and for brick or cinder block, almost all types of insulation are preferred.
It is also recommended to use mineral wool for a timber frame house. This is due to the fact that it is the most fireproof material for wooden buildings.
As for external walls made of aerated concrete, experts advise insulating them with penoplex.
In turn, professionals in the field of construction and installation have identified a number of qualities that insulation should have.
Based on these standards, it will be much easier to make a choice:
- the most important quality is low thermal conductivity;
- the insulation must be hydrophobic or absorb moisture in minute quantities;
- it must “maintain its shape” (not crumble, slide, flow, or change shape due to temperature);
- Particular attention should be paid to its safety for humans; the material must also be fire-resistant and not emit pungent odors when heated;
- It is unacceptable to contain substances that will promote the growth of bacteria, fungi and mold.
Siding also requires attention. Its choice must be approached wisely, since it is affected by natural phenomena (wind, rain, snow, temperature changes, etc.). Each type of siding has its pros and cons, but among the wide variety, the greatest preference is given to vinyl siding panels. Thanks to its properties, it tolerates “street conditions” well, does not fade in the sun for a long time, and is also a “breathable” and safe material.
If you choose metal panels, then you should think about the level of complexity of their installation. A beginner in this matter cannot cope on his own. As for their characteristics, do not forget about their susceptibility to corrosion. Plus, when it rains slantingly, water drops hit the walls and create a high level of noise.
If you still have doubts about the choice, then real consumers will be the best guide in this matter. The best thing to do is talk to the home owners. From them you can find out what pros and cons they identified during operation.
Before you start finishing the house siding
This is what a house covered with vinyl siding looks like.
When planning to decorate a wooden house with siding, you should take into account some features of such buildings:
- If a house is built from logs or solid timber that have not been processed in drying chambers, it will shrink over a long period of time. This means that the geometry of the structure will change in some way. To the naked eye, the shrinkage will be invisible, but if the finishing is fixed to the walls, it will probably be deformed and in some places may even collapse. Shrinkage is also taken into account when constructing the roof: the rafters are not fixed rigidly, but according to a sliding pattern.
- Depending on the design, wooden walls can have a vapor permeability from 0.06 (across the fibers) to 0.32 mg/m*h*Pa (along the fibers). Siding, whether vinyl or metal, has zero vapor permeability. If we screw the facing panels close to the wall, then the steam that has penetrated into it from the inside, having no outlet, will turn into condensation on the outer surface (under the siding).
Moisture is dangerous for any building material, as it increases the thermal conductivity of the structure and, when freezing, creates gradually increasing cracks in it. And in the case of wood, it also leads to rotting. Therefore, a house covered with siding will serve you for many years.
This is what an unprotected tree turns into over time
Therefore, it is very important to ensure effective steam removal: the siding is mounted so that there is a ventilated gap (builders say ventilated) between it and the wooden wall.
There is no need to install a ventilated gap only if the inside of the wall is covered with a vapor barrier film or trimmed with some absolutely vapor-proof material, for example, covered with vinyl wallpaper. But this solution has a drawback: to remove excess humidity, it is necessary to increase the ventilation performance, which leads to an increase in heat loss and, accordingly, heating costs.
Houses made of laminated veneer lumber, as well as those built using frame technology, are not characterized by shrinkage: all wooden elements from which they are built are thoroughly dried before starting construction work.
How to install siding panels
First you need to insulate it. A warm home means comfort and lower utility bills.
To do this, it is best to use mineral wool, basalt slabs or other types of insulation (see Insulation under siding for a wooden house - protection for many years). They will not cause any harm to the walls.
To protect the insulation from the action of moisture vapor and condensation, it should be placed between steam and water barriers.
Installation of siding is carried out in the following sequence:
- Corner elements are installed, they are almost the same as for plastic panels, only slightly larger in size.
- They are fixed rigidly; temperature deformation is not taken into account here.
At the junction of different planes, they are inserted into one another or joined to each other at an angle of 45˚. Such places are located in the area of slopes.
Installation of metal sheathing
- Starting elements are fixed to the windows and below on each wall, which ensure a tight fit of the vinyl siding to the base of the house.
- If the length of the walls exceeds the largest size of the siding strip, it is necessary to install the connecting element in a vertical level.
After installing the corner parts, you can cover the house with siding:
A solid panel or cut to a specific size is inserted into the corner elements and fixed to each profile with special self-tapping screws, which differ from ordinary ones in the size of the caps, larger in size and corrugated, for reliable clamping.
Installation of wooden sheathing
The strip of siding should not be completely included in the connecting elements - at least one centimeter of free space must be left between the strip and its ends on each side.
The task is both simple and complex, but if completed on your own, it will bring satisfaction to its owner, and reliable protection and visual appeal to the house.
Types of facing material
Types of siding for cladding a house:
Wooden - is the least common due to its high price and difficulty in maintaining. Wood siding is the most environmentally friendly, but it must be constantly treated with antifungal agents, painted, and damaged panels replaced. Often, lining for interior work is made from wood, the fastening of which we wrote about here.
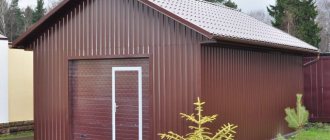
Iron - not used for renovation of residential premises. Most often, metal siding is used for warehouses and garages.
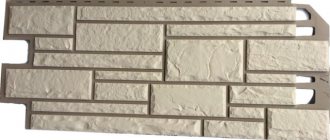
Basement is the newest type of all. If you look at the photos of the houses, they look like brick or stone masonry. Installation of basement siding will immediately make any home stand out from the rest.
Vinyl siding for finishing. The advantages of vinyl components: long service life (about 50 years), corrosion resistance, basic maintenance and the ability to attach to any surface. Covering a balcony with this type of siding will improve even an old “Stalin” building.
Today we will look at the principles of wall cladding with vinyl material.
Work procedure
Installation differences
Installing siding under a log is not fundamentally different from installing conventional vinyl siding. The only exception is joining panels through an H-profile. The panel connections do not move horizontally, do not run like a ladder, but are placed exactly in a row and joined through an H-shaped profile.
Starting line and starting point
The first step is to determine the so-called starting point. On an old house this is the lower border of the lining, on a new house it is a place just below the line where the walls and the base meet. When this point is found, the thickness of the nail edge of the starting strip should be set upward from it, and at this level, draw an even horizontal line along the wall.
Fastening panels
We drive the nails strictly in the middle of the holes, the head does not reach the panel by about 1 mm. If the panel moves freely from side to side after fastening, then the fastening is done correctly.
Advice: we fasten at least every 40 cm, for areas where hurricanes are possible - every 20 cm. Vertical parts are fastened every 20 - 25 cm.
To make it easier to remember, let’s write down the basic rules for attaching panels:
- panels can be secured with staples, nails or screws;
- fasteners must be galvanized or made of aluminum;
- nails and screws should not touch the panel surface with their heads, the gap should be at least 1 mm;
- The brackets should also not press the panel tightly;
- fastening is done in the middle of the nail hole;
- The joining between panels and accessories is made through a gap.
Attaching vertical accessories
After this, we install the corners, trim (J-profiles), finishing strip, flashings and other fittings. Vertical accessories are nailed onto one nail, which is driven into the upper part of the top hole, so that the panel hangs. Then all other nails are driven in the middle of the holes.
Joining parts
When joining parts together, you should remember about the gap - it ranges from 6 to 12 mm. Some kits leave up to 25mm of clearance. These are necessary measures to level out expansion of the material due to temperature changes.
Installation of panels begins from the center and moves to the edges. The panels are joined through an H-profile, leaving a gap of 6 mm between it and the panel. When the walls are ready, the gables are sheathed, soffits and wind strips are installed. They also install gutters, pipes, etc.
Instructions for installing log siding may vary depending on the model, manufacturer and architecture of the house. It is best to follow the manufacturer's instructions. You can also find standard installation cards on the Internet. Another way to improve your skills is by watching videos on thematic resources and forums.
The process of installing siding under a log can seem like a very difficult task to the untrained DIYer. In reality, you just need to follow the step-by-step instructions, allocate the required amount of time and put in some effort.
The lower trims are installed inside the side profile. To do this, “tongues” are pre-cut in the side profile. At the bottom, unique “windows” are created. They must correspond to the height of the profile used. The tabs need to be folded onto the lower profile to cover the cut area. Finally, they are pressed against the protruding part of the window.
Criteria for selecting quality products
If you decide to use this particular option, then it is important to select a solution from the entire range on the market that will meet several important requirements:
Quality First of all, you need to carefully inspect the surface; it must be done very carefully, without any flaws or defects caused by low-quality equipment. Ask the seller for documentation that confirms the product’s compliance with all standards and regulations established in our country Physical parameters A very important indicator is the thickness of the panels, it should be at least 1.1 mm, since if this value is less, the planks will be very flimsy , in a few years the surface will begin to ripple. It should be noted that options whose price is very low most often have low strength and a thickness of 0.9 mm or less, which is very small. Manufacturing material
There can be two types, the first of them is vinyl, this material is distinguished by its affordable cost and quite attractive appearance, but its frost resistance is low, and at low temperatures the coating becomes brittle.
Acrylic panels are more durable and more attractive in appearance, but their cost is noticeably higher than that of the first option
As for installation, the instructions for carrying out the work are the same for both types
Coloring It is no secret that colors may differ from one manufacturer to another; it is important for you to choose a solution that will harmoniously fit into the surrounding space and will fit well with other objects on the site
Golden oak wood siding is one of the most popular due to its very pleasant shade and beautiful structure.
Preparatory work
If there was old decoration on the walls, first of all it is dismantled.
All parts that will interfere with the work are removed - gutters, platbands, lights, etc. If areas with fungus or mold are found, the infection must be eliminated before moving on to further work.
The cracks in wooden houses are caulked, and the wood is treated with an antiseptic. Cracks in brick walls are covered. The surface is leveled at least minimally.
It is important to choose the right time to start installation. At temperatures from zero to -9°C, it is recommended to cut plastic panels only with a grinder, and not with scissors (frozen material breaks)
Temperatures below -10°C are generally not suitable for working with vinyl siding.
Useful tips
Cladding should begin with the first panel from the bottom . We strengthen it with the side to the corner profile, and the bottom - to the original panel. Now we attach it to the sheathing. Do not forget to maintain a temperature gap between the panel and the profile from the corner. It should be 6 millimeters. If you do work in winter, then the temperature gap should be 9 millimeters.
We recommend starting work from the rear facade of the building - firstly, possible errors will be less visible here, and secondly, if you get to the front facade, you will already have good practice in installing siding. When the first panel is reliably defined, we proceed to extension.
So, it is quite possible to install siding with insulation yourself, the main thing is to follow the technology and in the process do not forget to once again check the quality of the work - this will save you from the need to redo it in the future.
Frame for siding
The frame can be assembled either from wooden blocks or from a metal profile, which is used to install plasterboard sheets. Today, some siding manufacturers offer ready-made frame elements that are sold complete with cladding.
The question of which frame is better: wooden or metal is asked by many novice home craftsmen.
- Lumber is cheaper, but for lathing facade finishing, bars of at least 1st grade are required. That is, dry, without a large number of defects: delamination, cracks, bluish spots, wormholes and eyes. They must be treated with an antiseptic and fire retardant. But keep in mind that under the influence of high humidity and then drying, the bars may warp, which will affect the quality of the finishing of the wall of the house.
- In this regard, metal elements are better. They do not change their size under the influence of changes in temperature and humidity. They do not need to be treated with anything, but they are more expensive.
Installation of sheathing
Before installing the sheathing to the wall, you need to prepare it.
- Facade elements are dismantled: drainage system, window and door frames, drains, etc.
- If there are defects on the wall, then they must be repaired with a repair mortar, for example, cement-sand with a ratio of 1:2. You can use ready-made facade putty or plaster.
- Since siding is primarily installed horizontally, this means that the sheathing elements must be installed vertically. Therefore, first markings are made on the wall, where vertical lines are drawn every half meter. In the corners, regardless of the specified pitch, lines are drawn without fail.
- Along the marked lines, straight hangers are installed every 50-60 cm, which are attached to the wall with self-tapping screws on plastic dowels. That is, they drill holes in the wall, drive dowels in with a hammer, attach a hanger, which is tightened with a self-tapping screw. There are at least two fasteners for each suspension.
- Direct hangers must be installed along the perimeter of window and door openings. Here the installation step is from 30 to 50 cm.
- If the facade of the house is planned to be insulated, then this must be done right now.
Wall insulation
For a facade that is covered with siding, it is best to use slab thermal insulation material. This is mineral wool or polystyrene foam. The main thing is to accurately select the insulation thickness. For central Russia, a thermal insulation layer thickness of 50-60 mm is suitable. Mineral wool and polystyrene foam boards are sold at this thickness.
If a house is insulated and covered with siding in the northern region, then the thermal insulation layer must be at least 100 mm. And here there is a difficulty, because the antennae of direct suspensions have a mounting length of 80 mm. That is, the insulation is thicker. In this case, proceed as follows:
- wooden blocks with a cross section of 50x50 mm are installed vertically on the walls along the marked lines, which are not aligned vertically;
- and then direct hangers are installed on them and attached to them with wood screws.
There is a simpler and better option - a short block of the same cross-section is installed under each suspension, which is pre-attached to the wall. And already there is a suspension for it. This is how the distance from the cladding to the wall surface increases, where an insulating layer with a thickness of even 130 mm will fit.
As for the installation of insulation, through cuts are made in each slab with a knife so that the antennae of the hangers can squeeze through them
Therefore, it is very important to accurately determine the locations of the cuts.
The slabs themselves must be laid tightly to each other so that gaps do not form between them. If any cracks still remain, they must be filled with foam sealant. This is foam in a can, but not mounting foam. It does not expand in volume in air.
Continuation of frame assembly
A profile is mounted in one corner of the facade. It is leveled vertically using a level and attached to the suspension antennae with special self-tapping screws, which craftsmen call bugs or seeds. Now four or five strong threads are tied to the profile, which are pulled to the opposite corner of the house. Here, each thread is aligned horizontally, having previously been attached to a self-tapping screw screwed into the wall. That is, the threads should form a plane that is even both vertically and horizontally.
First, a corner profile is installed along them, attaching it to the hangers, then the rest are intermediate. Be sure to install profiles around the perimeter of window and door openings.
Types of plinth panels
Panels for finishing external walls can differ in materials of manufacture, design, and sizes. These are the main criteria for their selection.
Dimensions of individual cladding elements
Plinth panels are easy to distinguish not only by thickness, but also by size. Most often they have an approximate aspect ratio of 1:2.5. For regular façade siding, the length to width ratio is approximately 1:10. Accordingly, the individual elements for cladding the plinth are quite short.
But their width can vary significantly and range from 16 to 50 cm. Manufacturers produce such panels for the convenience of decorating a narrow strip at the bottom of the walls. Sometimes it is enough to put them in just one row.
The dimensions of the products are also influenced by the type of material being simulated. Thus, the panels “like chipped stone” will be shorter and wider than elements with a “red brick” decor.
When purchasing, keep in mind that each panel, in addition to the actual one, also has a useful size. This is the apparent height and width of the product after its installation.
Panel material
A wide range of products are made from polypropylene, fiber cement, and galvanized steel.
Polypropylene should not be confused with polyvinyl chloride (PVC). Polypropylene sheathing is much more resistant to weather conditions. It is also characterized by a high degree of strength, which is achieved by casting. Finished products are light in weight, easy to clean and reliably imitate the relief of natural stone.
Metal panels are products based on galvanized steel sheets. They are also coated with a primer, an anti-corrosion compound, and have a decorative and transparent protective layer of polymers.
The metal cladding meets all the requirements for the material for the design of the base. However, it does not always reliably imitate natural material and may be exposed to moisture at the cutting sites.
The main components of fiber cement boards are cement, cellulose fiber, water, quartz sand. They are made by pressing at high temperatures or pressing with further “ripening” for a month (by analogy with concrete). Finished facades made of DSP are distinguished by a high degree of decorativeness, low thermal conductivity and strength.
Design of plinth panels
Panels for plinth cladding can imitate several dozen coatings made from natural materials. The most popular options:
- dolomite;
- granite;
- rubble stone;
- sandstone;
- rocky stone;
- clinker brick;
- aged brick.
Facade panels with large imitation stone are associated with a fortress, a castle and visually increase the dimensions of the building, creating a feeling of increased reliability.
If desired, you can use panels with imitation wood chips. This is a rather original solution. It requires careful study if the walls of the house are decorated in a different way.
The panels differ not only in the type of simulated stones, but also in the width of the seams between them
This point is important to consider if you plan to grout them. The wider the seam, the easier it will be for you to work with it.
Pay attention to the relief of the cladding elements. If it is very pronounced, be prepared for the fact that dirt will accumulate on such a coating more often
Facade panels with insulation
As a rule, the base is additionally insulated when covered with decorative material. This is done using heat-insulating material, which is placed in the cells of the sheathing. An expensive, but time- and effort-saving alternative is façade panels with insulation for the exterior of a house.
They are a “pie” of three layers:
- The basis. Its role is played by a substrate made of OSB or moisture-resistant plywood.
- Insulation. This can be polyurethane foam, extruded polystyrene foam, expanded polystyrene. In this case, the best option, taking into account its performance properties, is polyurethane foam.
- Decorative layer. It can be made of metal, ceramics, cement, polymer composition, clinker. Polymer and clinker panels are good solutions in terms of price and quality ratio.
Thermal panels, like facade cladding without insulation, are presented in a wide range.
The issue of vapor permeability
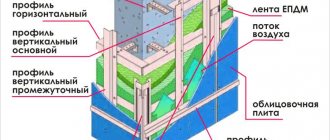
The building wall in SNiP is described as a multi-layer enclosing structure. Interior decoration - wallpaper, for example, plaster, the wall - monolithic, with voids, double, and exterior decoration - this is the simplest version of its construction. If thermal insulation is assumed, the design becomes much more complex.
Obviously, the ratio of different materials in such a “pie” cannot be random and is subject to a certain pattern. It sounds like this: the ability of a material to remove steam should increase from layer to layer from the inside out.
Why is this necessary? In a residential building, a constant source of steam formation is not only a gas stove or water in a sink, but also people, animals and plants. Steam released through breathing or during washing and cooking is removed using a ventilation system or simply through an open window, but also through the walls of the building. If this does not happen, moisture accumulates in the room, and condensation falls on surfaces - walls, furniture, clothing.
This case is best illustrated by a bathroom in a multi-story building, where there is almost never good ventilation. After taking a bath or even a shower, the entire room from the ceiling to the handles on the washing machine becomes wet. Why? The bathroom is finished with tiles or tiles; this material is completely vapor permeable, and therefore moisture is not removed at all. The dew point is condensation, located inside the living space on the walls.
- Option two is thermal insulation inside. A solution that builders try their best to avoid. Compared to a brick wall, the vapor permeability of insulation is much higher, therefore, in the design - finishing / insulation / wall, the most vapor-permeable element is mineral wool or polystyrene foam. Condensation falls in the thermal insulation area and quickly destroys the material, which makes waterproofing necessary.
- If insulation is carried out from the outside, then the “pie” looks like this: wall/insulation/cladding, and, again, the dew point falls on the thermal insulation layer, since the cladding absorbs moisture much less. To prevent this from happening, the insulation is protected with hydro- and vapor barrier. Then the dew point ends up in the air gap between the wall and the insulation, for which purpose a substantial ventilation gap is left here during installation.
Installation of siding without insulation
But if the walls of the building themselves have high thermal insulation characteristics - a brick wall of sufficient thickness, for example, then there is no need to additionally insulate them, but they do need to be protected from wind and rain. Do you need waterproofing and wind protection for siding without insulation?
To avoid moisture accumulation, a ventilation gap is left between the finish and the wall. Therefore, installation of finishing without thermal insulation is quite possible, but without sheathing - not. If there is an air layer, then condensation accumulates on the inner surface of the finish, which is insensitive to water; if not, then directly on the wall, which leads to its destruction.
- Is waterproofing required here? It is not needed, since during sheathing its task is to protect the insulating layer, which in this case is not used.
- Do you need a vapor barrier for siding without insulation? Vapor barrier or wind protection is a vapor-permeable membrane that allows steam to pass in both directions, but water only in one direction, away from the heat-insulating layer. Again, if it is not there, then there is nothing to protect. Siding technology without insulation
Installation without heat and vapor barrier is much simpler.
- The surface of the facade is cleaned. Old finishing, if any, must be removed. If you plan to cover a wooden house with siding without insulation, then before work you should caulk the cracks between the beams or logs - this procedure will significantly reduce heat loss.
- A sheathing is fixed to the surface - made of a galvanized metal profile or a wooden beam treated with an antiseptic. The thickness of the timber should not be less than 50 mm, despite installation without thermal insulation.
- The pitch between the frame elements, as well as the direction - vertical or horizontal, are determined by the type of siding - lamellas, panels, and installation method.
- The material is fixed to the sheathing using the usual method: first, the starting strip is fixed, then the corner elements and near-windows, and the connecting profiles are fixed, if necessary.
- Then the panel is inserted into the groove of the starting strip and fixed to the sheathing. The fastening is not rigid; a film under the siding without insulation is not needed.
The photo shows one of the working moments.
Types and characteristics
The term “siding” refers to ordinary panels intended for cladding the facades of buildings and auxiliary home structures. In addition to their decorative purpose, the panels are often part of a multi-layer wall covering, installed for the purpose of waterproofing, reducing noise entering the premises, and improving the operational characteristics of the building.
At first, siding was made of wood; nowadays, the variety of types of such external cladding is quite large.
Natural wood remains extremely popular to this day. Of course, modern wood panels are significantly different from the boards that were used before.
The wood used for the production of natural siding, as a rule, is coniferous, and certainly goes through a cycle of special preparation, including disinfectant impregnations and heat treatment. This makes the raw material resistant to external influences and increases its resistance to fire and rotting.
Despite the processing of wood, it remains the most environmentally friendly material for the exterior cladding of buildings. No other type of material can compare with it in terms of thermal insulation properties.
Almost all types of modern cladding have a locking part with grooves, allowing the installation of panels with almost no gaps that require sealing.
Metal cladding of houses is not very popular. It is more often used for finishing public buildings, commercial and social buildings, industrial enterprises, offices and other similar buildings.
Most often, galvanized steel is used to produce such panels. The most expensive types are made from aluminum and zinc. The advantages of metal cladding are its reliability (with high-quality anti-corrosion treatment), ease of installation, non-flammability, mechanical strength (however, if the material is inattentively transported or due to a pinpoint impact, it may well become deformed).
Plastic siding is the most popular. More than half of the sales volume of all facade panels comes from this group. Most often, the base substance in them is polyvinyl chloride (PVC), a polymer characterized by excellent performance properties.
Siding installation is so simple and intuitive that anyone, even an inexperienced builder, can handle it.
The best insulation materials
Those home owners who ignore the issue of insulating the external walls of a building are deeply wrong.
No matter how you try, there will certainly remain voids between the wall and the cladding. They will not add heat to the house, but they will collect dampness and create conditions for the appearance of mold, moss, fungi, and insect nests, the proximity of which can be not only unpleasant, but also dangerous.
In addition, damp walls will inevitably collapse. And the dew point will be in the thickness of the wall, which means that temperature fluctuations will contribute to the freezing of the material, rapidly destroying the building. The insulation will move the point outward, into the thickness of the thermal insulation material. Condensed moisture will be discharged outside through the ventilation gap.
Any home should be insulated, even country houses where you live only in the summer. This will ensure the safety of the building and freshness in the house in the heat. After all, thermal insulation protects against heat no worse than against frost.
We install external corner profiles
Attaching the outer corner siding profile
First step. We mark the soffits. We need to see where the edges of these elements will be located in the future.
Second step. We apply the guide to the corner of the frame. We do this with a 3mm gap to the soffit or roof. We fasten the profile with self-tapping screws.
Place the bottom border of the element 0.6 cm below the edge of the starting profile.
Third step. Checking the vertical installation. If there are no deviations, we fix the bottom, and then the remaining places. Experts do not recommend placing fasteners in corner elements too often.
The principle of increasing the length of a corner profile
If the house is higher than 300 cm, the profiles will need to be placed one on top of the other. To do this, we trim the top profile. As a result, there should be a 9 mm gap between the planks of the joining elements. When laying the elements, maintain an overlap of 2.5 cm.
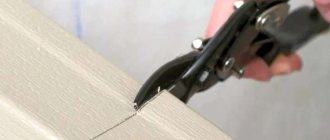
Electric saw for cutting sidingTo cut vinyl siding panels, use tin snips, a hacksaw, a cutter knife, or a hand-held power saw with an abrasive wheel.
If the base has a protruding structure, shorten the profile so that there is a 6 mm gap between it and the base.
Using two starting J-profiles of siding instead of a corner one
What should you consider?
During installation, it must be taken into account that in snowy areas and for slippery roofing coverings, the installation of snow retention systems is mandatory.
When planning drainage systems with frequent icing in winter, it is recommended to use electric heating for drainage gutters, which reduces the risk of damage to them. For stormwater systems made of plastic, gutters and funnels are additionally glued together with special adhesives, which ensures the strength of the system under any climatic conditions.
It is advisable to install nets or caps over the gutters and drain funnels to protect the system from debris, branches or leaves getting inside the pipes.
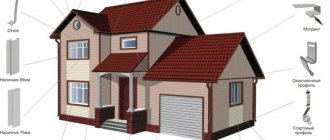
Siding elements
Drainage
This element serves to protect the base and foundation of the building from moisture. It is a painted metal corner. Drainage drains are leveled along the entire perimeter of the building. Insulation and siding of a house should begin with drainage.
Then the initial or starting rail is attached to them. The rigid design of the drain allows it to be set strictly at level, which simplifies the installation of the soft starting rail.
Drainage
Starting rail
This rail is attached directly to the drainage system while maintaining the level. This is where siding installation begins. The lower starting level is corrected by releasing the sheathing to the required level if the walls have a slope.
Siding elements
The siding panel is inserted into the starting rail until it clicks. After installing all the elements, install the panels from below into the lock, also until they click. On a blank wall, the panels are stacked up to the roof, and on a wall with windows – up to the bottom of the window.
Siding corners
The siding must be closed on the sides and ends of the building. To protect against side winds and water, wide siding angles are used. To properly install the sheathing, you need to attach the corner of the siding to the wall surface and make the necessary notches. The panels extend into the corners by 10 mm and should not rest against its walls.
Finishing rail
This element is attached under the roof arch and in the narrowing areas of the wall. The siding panels are not attached to the finishing strip.
Soffit
A soffit is needed for lining the roof overhangs from below. The difference between soffits and panels is that soffits have perforations for natural ventilation. The fastening technology is the same as for all elements, only the edges of the spotlights are inserted into the J-rail.
Soffit
Fastening the panels after installing all the elements will not be difficult. This is easy and simple to do, just like insulating plastic windows or insulating a loggia.
Insulation of the house followed by cladding with siding panels
Insulated loggia
Insulation and waterproofing of the house
Before you start covering the house, you need to clean the walls and seal the cracks in them. Old paint and plaster will not be visible under the siding, but it is better to get rid of them. If the house is made of wood or aerated concrete blocks, then a vapor-permeable waterproofing film must be attached to it under the sheathing.
The insulation is placed between the guides of the frame, which is stuffed under the finishing material in question for the facade of a private house. Next, another layer of waterproofing is laid on top of it. Moreover, everything is done so that an air cushion remains between the membrane and the heat insulator on the walls of the house.
Frame production and vapor barrier
The lathing is needed to fix the siding and create a ventilation gap that prevents condensation. For its construction, a wooden beam or metal profile is used.
A vapor barrier is first stretched onto the base; this is especially true for wooden and frame (panel) houses. The material is laid as follows:
The canvas is fixed to the surface in increments of 30–40 cm
A little sagging is allowed. Adjacent strips are laid overlapping and taped with adhesive tape. All connections and fasteners are sealed. Particular attention is paid to the corners: they are covered in solid pieces, without joints at the convergence of the walls.. Laying vapor barrier
Laying vapor barrier
The vapor barrier film must be laid with the rough side facing the surface of the facade, otherwise the desired effect will not be obtained.
Wooden frame
The design goes like this:
- The base is marked in increments of 50–60 cm (40–50 cm for base panels). The lines should be perpendicular to the siding being installed.
- Timber with a cross section of 50*40 or 50*50 is treated with protective and fire-resistant compounds. Holes for fasteners are drilled on its surface.
- The rail is aligned according to the markings, and the fixation points are transferred to the wall. Holes are drilled and dowels are driven in (not necessary for wooden bases).
- All fastening areas are prepared. The beam is placed at a given place according to the level. Substrates are used to ensure accurate and reliable alignment.
- Self-tapping screws are screwed in.
Wooden sheathing diagram
It is necessary to obtain a rigid structure with a single plane between the racks.
Metal sheathing
Installation is carried out using U-shaped profiles and hangers. The technology is as follows:
- Marking in progress.
- The locations of the hangers are marked on the line in increments of 40–50 cm.
- The holes are drilled and the rack fasteners are installed. To do this, dowels are driven in and screws are screwed in.
- The hanger is bent in the shape of a P.
- The racks are leveled and screwed.
Fastening metal profiles to the wall
To increase rigidity after insulating the house, you can install jumpers.
Lathing for basement siding
If this type of cladding is planned to be used according to its name, that is, for cladding the base or under-pile space, it would be better if the siding sheathing is positioned horizontally. This refers to situations where the distance between the top and bottom of the plinth is within 20-50 cm. In the case of covering large surfaces, such as walls or gables, it is better to use the vertical arrangement of the slats.
For basement siding, it is more preferable to use a metal profile, at least when it comes to the lower part of the structure. However, cases of using wood also occur due to the well-known positive qualities of this material.
The method and procedure for installing siding depend on the presence of insulation Source megapolis-sc.ru
Methods for arranging the structure depend on the specific situation and are determined locally, preferably by a specialist who will be directly involved in the installation.
Siding Installation Basics
Below is a plan of work that will need to be done to cover a house with siding:
Preparatory work
The first step is to dismantle all protruding parts: doors, trim, grilles, etc. Next, you should seal all the cracks using foam or cement mortar.
The walls should also be cleaned of all contaminants. A wooden house must be treated with an antiseptic and antipyretic; foam concrete walls are treated with a primer.
Sheathing installation work
Since siding is not attached to the walls, sheathing must be installed. To do this, use a metal profile or wooden slats. For walls made of concrete and brick, galvanized profiles are used.
You can use a CD profile for drywall. When cladding a frame or wooden house, you can use wooden slats 60 by 40 mm, having a residual moisture content of 15-20%. Before using the slats, they should be treated with an antiseptic. Using a tape measure and a level, make a straight line marking of the walls until a closed contour is obtained.
Now, the distance from the marking to the foundation is measured at the corners, after which another contour is drawn according to the minimum value. The next stage is the installation of vertical guides. They must fit snugly against the walls; to achieve this, you can use pieces of wood or dense foam. The guides should be located at a distance of 30-40 cm from each other.
In areas of additional load, for example, at corners and near windows, additional guides will be required. There should be no connections between the vertical guides. This is done to provide ventilation, which prevents the growth of fungi.
Thermal and moisture insulation
Waterproofing must be done, unlike insulation.
For this purpose, a moisture- and wind-proof membrane is used. If thermal insulation is performed, the lathing must be done in two layers.
Installation of guide elements
Installation begins with drainage. It is a rigid structure, so it is easy to attach. After that, corner profiles are attached using self-tapping screws. The next stage is fastening the starting strip to the drainage along the markings. Along the perimeter of the windows, window strips or J-profiles are fastened so that the location of the outer lower edge is slightly lower than the inner one.
The doorway is edged using J-profiles. When H-profiles are installed vertically in previously determined locations, use a level. Here you need to leave a gap of 5-6 mm to the foundation to avoid bending of the planks over time. The top edge of the siding is covered with a finishing strip.
Panel installation work
After installing all the guide elements, you can begin installing the panels. The first row is fastened to the starting bar.
All other panels are fastened in the same way, up to the window or roof. The panels should not be overtightened or tightly secured; they should move a little to the sides. The top row of siding is finished using a finishing strip.
The siding can be connected along its length using a special H-rail. When using it, the panels are installed in the H-rail, and you do not have to deal with the so-called “running” - i.e. make sure that the joints are not located along one vertical line.
It goes without saying that the H-rails will be visible from the outside of the building, which can negatively affect the design. This problem can be solved simply - either the H-rails are matched to the color of the siding, or the siding is installed “overlapping”. As already mentioned, this kind of finishing requires a “run-up” so that the seam line is not so noticeable. Usually, they try to direct the visible part of the joints to the side from which the house is viewed less often.
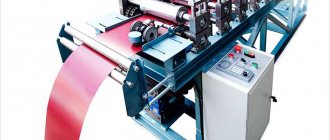
Calculation of the required materials for vinyl siding
A variety of decor options and siding textures
In order not to waste time later searching for the necessary components, it is better to calculate the amount of material needed in advance. The technology for cladding a wooden house with siding is not much different from cladding walls made of other materials, but there are some differences.
Vinyl siding components
Connecting elements for installation
To install siding you will need the following components:
External corners are standardly produced in a length of three meters. We calculate the length of the outer corners of the house and divide by three.
- Internal corners.
We measure all the internal corners of the house and also divide by three - the standard length of the strip. - Starting bar.
We measure the perimeter of the building and subtract from it the sum of the lengths of the doorways. Starter strips for vinyl siding are 3.8 meters long. - The J-profile
is installed in places where extensions adjoin the walls of the house. Profile length – 3.8 meters. - The window strips
are three meters long. - Low tides on the windows.
You can install them yourself if you don’t already have plastic windows in your house. Then the tides are already present. - Finishing strips
- mounted to connect the roof eaves to the walls. - H-profile
– a connecting element for joining siding panels.
Installation of connecting J-profile
Installation of metal siding - read about the main points of the entire process.
Manufacturers also offer components that are used quite rarely:
- Drain strip
– designed for installation above window openings; - Platbands or wide J-profiles
are used for covering window and door openings. But only if they are located in the same plane as the walls, which is extremely rare.
Required number of siding panels
To know how to properly cover a wooden house with siding, you also need to calculate the number of panels.
There are two options for calculating siding:
- Option 1
– calculate the entire area of the walls of the house and subtract from it the area of window and door openings. Next, divide the resulting amount by the area of one siding panel. - Option 2
(more economical). In the drawing, we calculate the required number of panels individually and immediately calculate where the scraps of material will be installed.
It is not recommended to use a hammer during installation; it is better to choose a screwdriver. A hammer may damage the panel
The technology of covering a wooden house with siding requires the use of only galvanized screws for fastening with a press washer. The length of the screws is twenty-five to thirty centimeters. An average of twenty screws are required per square meter of siding.
Which insulation to choose for the facade?
Owners of wooden, timber and log houses value the unique properties of wood, its environmental friendliness, and low thermal conductivity
When insulating a house by covering it with siding, it is important not to lose these advantages and not increase the disadvantages (fire hazard, high degree of water absorption, insects)
From this point of view, polyurethane foam is perfect for a wooden house. The material has good vapor barrier, is applied in a thin layer and does not weigh down the walls of the building. Fire safety, resistance to temperature changes. The microclimate inside the wooden house will be preserved.
Mineral wool and fiberglass are also popular for wooden structures due to their fire-fighting properties.
Brick houses
Extruded polystyrene foam and basalt insulation are recommended for brick houses due to their ease of installation and soundproofing properties.
Foamed polyethylene with the addition of fire retardants and fire extinguishing additives is used to insulate brick houses. The disadvantage is the need to attract installation specialists.
Despite these disadvantages of polystyrene foam, it is actively used in insulating brick houses under siding. The reason is simple - ease of installation, relative cheapness of the material and environmental safety. This is a great option for families with children and allergy sufferers.
Houses made of aerated concrete and foam blocks
When choosing insulation for aerated concrete, you need to take into account that blocks made of this material are characterized by high vapor permeability. The wrong choice of thermal insulation can only worsen the microclimate in the room and shorten the life of the home.
Vapor-proof material will disrupt gas exchange between the room and the environment.
Condensation will collect at the wall-insulation interface and lead to moisture in the wall. Aerated concrete will become covered with mold and begin to rot.
Mineral wool insulation, like aerated concrete, is characterized by high vapor permeability. This “duet” will have a positive effect on the microclimate of the house. Due to the ease of installation and relatively low cost, mineral wool is often used to insulate houses made of aerated concrete.
Polyurethane foam is also becoming increasingly popular. For houses made of aerated concrete, this is an ideal option. It is most effective to use the spraying method - this way you will avoid cold seams.
Polystyrene foam and expanded polystyrene have poor vapor permeability, so they should be used for insulation of houses made of aerated blocks only in extreme cases.
Frame houses
For external insulation of frame houses, mineral wool is most often used (see photo). Experience shows that the price-quality ratio is the most acceptable. But the material must be isolated from moisture and “dew point”. This is done using a vapor barrier and membrane film.
Despite the negative attitude of experts towards polystyrene foam, homeowners very often use this material for insulation. Cheapness and the absence of the need for additional moisture, noise, and vapor barriers play a decisive role.
Insulating the frame with polyurethane foam by spraying also has many advantages. For frame houses, as well as for brick and foam concrete, this is an excellent option.
Is facade insulation necessary?
A house loses up to 40% of heat through the walls. By insulating the facade from the outside, we can simultaneously
- create a comfortable microclimate in the house;
- reduce heating costs in winter and cooling in summer;
- avoid high humidity, which can lead to the formation of mold and mildew;
- increase the service life of wall structures;
- save usable space inside the house.
In addition, if you plan proper insulation at the design stage of a house, you can make the walls thinner, the insulation thicker and thus save your budget.
How to make a wooden sheathing - step-by-step instructions
Do you want to make an inexpensive and simple lathing for siding with your own hands from wood? Then use the recommendations and step-by-step instructions given in this section of the article.
Wooden sheathing for siding
Material selection
Let's start with selecting the material from which the siding will be formed in the future. For such a task, you need a wooden beam with a section of 40x40 or 50x50 mm. It is also possible to use material of other sizes, but it must be strong enough to support the weight of the siding. You need to choose high-quality wood based on several criteria, which you can familiarize yourself with in the list below.
- Humidity. The wood under the frame must be completely dried, so that later the sheathing does not shrink once it is already on your wall.
- Matching sizes. The length and cross-section of the timber must match those indicated in the documents.
- Evenness. A high-quality timber for sheathing under siding should be straight, without any bends or deformations.
- No defects. The timber for the sheathing should not have a large number of knots, dark spots or traces of mold.
Important! Give preference to wood varieties that are durable and better resistant to moisture. An example is larch.
Larch timber
Prices for various types of timber
timber
Required Tools
Having dealt with the material, let's move on to the list of necessary tools. It is presented in the form of a table, which indicates what you will need and why.
Table. Lathing for wood siding - list of necessary tools.
| Tool name | Function performed |
| Construction plumb line with cord | Setting a strictly vertical distance from the wall in preparation for installing the sheathing. |
| Nylon rope | Setting strictly vertical and horizontal marks necessary to align frame elements. |
| Construction level | Control of vertical and horizontal evenness of the main wall and sheathing elements for siding. |
| Marker or pencil | Marking the wall, insulation and sheathing beams. |
| Roulette | Accurate measurement of length or distance. |
| Woodworking table | A workplace for working with timber and other wood products. |
| Electric jigsaw | Sawing timber into pieces of the required length. |
| Hammer | Drilling holes in the main wall of the house. |
| Hammer | Hammering plastic dowels into holes drilled with a hammer drill. |
| Screwdriver | Tightening the screws connecting the wooden sheathing elements to the brackets. |
| Gloves | Protection of hands from scratches, minor wounds and skidding. |
Important! Instead of an electric jigsaw, you can use a circular saw with the appropriate type of blade to work with timber.
Hand-held circular saw for wood DS1600
Prices for the popular range of circular saws
A circular saw
Installation of timber sheathing
When the material and tools are ready, begin construction work. They include preparation for installation of the sheathing, the installation process itself and laying insulation.
Step 1. Remove all protruding elements from the walls of the house - storm drains, stakes, ebbs, window sills, etc.
All protruding elements must be removed from the walls.
Step 2. Remove any old trim from the wall that might interfere with the installation of the sheathing. To chip plaster and paint, use a hammer together with a screwdriver or spatula.
Remove any old trim from the wall that might interfere with installation.
Step 3. Using a plumb line, nylon thread and level, set marks at what distance from the main wall the frame will be located. Based on the results obtained, prepare small bars or brackets on which the sheathing will be attached.
Bar for fastening the sheathing
Important! All wooden parts must be treated with antiseptic and fire-retardant impregnations before fixing them to the wall.
Step 4. Mark points on the wall and drill holes with a hammer drill to secure the wooden blocks.
Drilling holes
Step 5. Insert plastic dowels into the newly drilled holes, hammer them in with light blows of a hammer or rubber mallet.
Dowels get clogged
Step 6. Attach a block with screws already inserted and tighten them with a screwdriver. Check with a level to see how level the product is.
The bars are screwed
Step 7. From the bar you just fixed, measure the required distance to the next similar element. In this case, this distance is 50 cm.
You need to measure 50 cm from the block
Step 8. Secure another block in a new place. Follow the same steps as last time - marking, drilling holes in the wall and fixing the product with self-tapping screws and dowels.
The following bars are attached
Step 9. Using exactly the same steps as outlined earlier, install support bars over the entire surface of the facade of the house.
Support bars installed
Step 10. Treat the walls with a deep penetration primer.
Step 11. Prepare the insulation for installation on the wall - take measurements and cut holes in the material for the support bars. In this case, expanded polystyrene panels are laid on the facade, but if you are afraid of dampness on the walls due to insufficient ventilation, use mineral wool.
A hole is cut for the support bar
Step 12. Apply glue to the back of the insulation board and lean it against the wall. The support bars must fit exactly into the pre-made rectangular holes. The glue is applied to the back side of the polystyrene foam as follows: a continuous strip around the perimeter of the panel and several medium-sized dots in its central part.
Installation of insulation boards
Step 13. Using a level, check that the insulation panel is installed correctly.
Checking the horizontality of the panels
Step 14. Repeat the previous steps and install polystyrene foam insulation panels along the entire façade of the house.
Installation of insulation
Step 15. Treat the joints between the insulation boards and the holes for the support bars with foam. Once it's dry, cut off any excess that sticks out.
The joints are filled with polyurethane foam
Step 16. Additionally, secure the insulation panels to the facade using disc dowels.
The panels are fastened with disc dowels
Important! If you insulate the facade using mineral wool, then after the operation presented above, you need to cover the insulation with a windproof film.
Step 17. Using a plumb line and tape measure, determine how long the siding sheathing will extend from the surface of the insulation. Given these data, place the first vertical posts on the left/right edge of one wall. Stretch horizontal nylon threads between them - they will serve as a guide for you when arranging the remaining elements of the sheathing.
Vertical racks are exposed
Step 18. Install the next vertical furring stud on the wall. Place rectangular or square pieces of wood between the support beam and the frame element to form a ventilated gap between the insulation and the façade finish.
Attaching the vertical stand
Step 19. Using the principles outlined in the previous two operations, arrange all the vertical posts of the sheathing on the wall.
Installation of other vertical racks
Step 20. Take measurements in the places where the window sills will be located, and install horizontal sheathing elements there.
Measurements at the locations of window sills
Installation of a horizontal sheathing element
Horizontal sheathing elements are installed not only under, but also above window openings
After completing all these operations, the wood sheathing for siding can be considered successfully completed. Now you can begin installing the facade trim on the finished frame.
How to calculate siding for a house
When making calculations, it is important to take into account one point - the width of the siding panel can be both working and useful. The fact is that each panel has a perforated strip, which at the time of installation will be hidden under another strip, and therefore the full width of this facing element cannot be used for calculations. Read this article for more details.