At the moment, there are a huge number of options for cladding buildings, and the construction segment of the market is filled with a variety of consumables for carrying out these works. In addition, you need to remember that the same material can be used in different technologies. Nowadays, people are increasingly installing a ventilated façade with their own hands. This finishing method provides a simultaneous solution to many problems, and in itself is quite simple. In this article we will look at the design of a ventilated facade and the features of its installation.
Return to content
Features of the technology
Before you begin installation work, you should understand the ventilated facade technology itself. It involves laying a thermal insulation layer between the finishing coating and the wall. The technology got its name because of the gap that allows air masses to circulate unhindered.
Ventilated facade with clinker tiles
Return to content
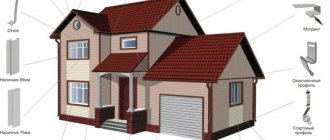
Scheme of a ventilated facade
A standard ventilated facade has the following composition:
- A layer of insulation is attached to the walls of the building.
- It must be secured with a specialized vapor barrier film. It will protect the material from external influences and prevent its destruction. The film also has a waterproof function.
- An air gap is installed for ventilation. Its standard width is at least 4 cm.
- Outer layer. Usually it is a decorative material. Serves as additional protection for the facade from mechanical damage.
Preparatory stage
The first steps are very important and you should pay special attention to them so that there are no unpleasant surprises during the installation process. At this stage of work the following is required:
- perfectly level the surface to be treated;
- prepare all consumables and tools;
- undergo theoretical training.
It is important to know! A wide variety of materials can serve as insulation in this design, but polystyrene foam remains the most suitable. Mineral wool also demonstrates high performance and thermal insulation performance, but it should not be used in a humid environment, since wet material loses its beneficial properties, unlike foam plastic.
Return to content
Why are vapor-tight membranes needed?
As mentioned above, the steam that forms in the premises must be removed by any means. Most often, ventilation is installed for this, but some of it escapes through pores in the walls. To prevent moisture from accumulating in the insulation, it is protected with a vapor-proof membrane from the wall of the house.
But the same layer is applied on top of the insulating material. This is necessary so that cold air does not have the opportunity to penetrate to the load-bearing wall, and therefore cool it. This membrane is also called windproof.
Installation work
Before starting all work, you should clearly decide on the appearance of the future facade, purchase materials that suit your price and quality, set up scaffolding, stock up on consumables and tools that may be required before installation.
Marking scheme
It is important to know! When creating a ventilated façade, you must follow the manufacturer's instructions on the packaging.
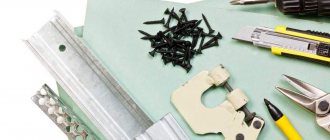
The technology for installing a ventilated facade requires the following tools and consumables:
- building level;
- plumb lines and rule;
- screwdriver, drill, and ideally a hammer drill;
- grinder with grinding attachment; knife, metal scissors;
- corner, tape measure;
- hammer;
- drills for concrete (10 mm) and for metal (4 mm), paronite gaskets, anchors and plastic dowels;
- metal profiles and fasteners;
- thermal insulation material;
- planks and slopes;
- facing tiles.
After completing the preparatory work and preparing everything necessary, the installation of ventilated facades begins.
The first step will be to apply markings along the entire perimeter of the building. To do this, draw a horizontal line from the bottom of the wall surface along the basement level and side vertical markings for the beacons. After this, you need to arm yourself with a tape measure and a building level to mark all the points at which the metal profiles will be attached.
Marking
The distance between the profiles directly depends on the dimensions of the facing material. After this, you need to determine the vertical lines using plumb lines and mark the installation locations of the brackets.
Now you need to drill holes in the marked places on the wall of the building using an impact drill or hammer drill. Then place paronite gaskets on the brackets and install them in these holes. All brackets should be mounted vertically. The bottom row of brackets must be installed horizontally, a maximum of half a meter from the ground level. This is done for better circulation of air masses. Installation of the lower row of brackets must be carried out along a horizontal line running along the entire perimeter of the building.
As mentioned above, do-it-yourself installation of hinged ventilated facades requires the presence of a thermal insulation layer.
Fastening for ventilated facade
It is important to know! In this case, it is better to purchase thermal insulation material in the form of slabs rather than rolls.
Most often, mineral wool is used as a thermal insulation material, this is explained by the economical cost of the material, but in conditions of high humidity it is better to use polystyrene foam or expanded polystyrene. In places where it touches the fasteners, the insulation must be carefully cut with a knife.
Very often, during this procedure, a fragment of thermal insulation material falls out; it must be returned to its place, since the solid structure of the insulation ensures the preservation of heat. The insulating material must be attached to the base using mushroom-shaped dowels.
By following the link https://vse-postroim-sami.ru/materials/flooring-tile/6879_ukladka-fasadnoj-klinkernoj-plitki-instrukciya-po-montazhu-svoimi-rukami/, you will find instructions for laying clinker tiles. This article contains information about facade thermal panels. You may also be interested in an article about glazing facades.
To do this, you need to drill a hole in the wall through the insulation, and then drive a dowel into it; you need to use two fasteners per insulation board. If you purchased multilayer material, then it must be overlapped to avoid joints. Using this method, the entire building is covered with insulation.
If the thermal insulation material you have chosen is not protected from moisture, you will have to additionally install a special protective layer. It is a film membrane that covers a layer of insulation. At the bottom of the wall, this film should be tucked under the thermal insulation layer and secured with the same plastic dowels.
Laying the thermal insulation layer
In those places where the brackets meet, cuts should be made in the film. It is very important to lay the membrane correctly so that in the end the film is not damaged, wrinkled or wrinkled. As a rule, the film is sold in small fragments, so joints cannot be avoided. You can make a slight overlap on the sides for greater confidence, but with the top things are different. The edge of the bottom piece of film must be tucked under the next one. This is done so that the resulting condensate flows from the bottom up and does not fall on the insulating layer.
After laying the thermal insulation layer and, if necessary, the protective film, you should begin installing the supporting structure. The thickness of the frame fragments determines the gap for the circulation of air masses between the thermal insulation layer and the cladding of the ventilated facade. The first step is to place the corner profiles on the corner fasteners accordingly. After that, holes should be made in the profile, which should be located exactly the same as on the bracket, and riveted. Using this method, you need to install all profiles.
It is important to know! When installing profiles, you should remember that for the base, metal structures must be installed in a horizontal position. L-shaped products should be mounted in the center of future facing slabs, as well as along the perimeter of door and window openings. T-shaped elements must be installed in those places where the facing slabs will touch each other.
If it becomes necessary to extend the metal profile, this procedure should be carried out outside the bracket. That is, two elements must be secured to the brackets, and a special splint must be applied to the point of contact.
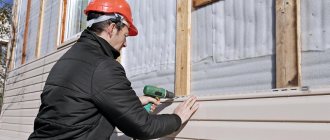
Installation of finishing coating
The final stage of installation work is the installation of the cladding. This operation should begin with the installation of slopes for the openings. Methods for installing facing elements can differ significantly from each other, it depends on the material used, for example, aluminum cladding can be placed directly on the profiles of the supporting frame, and products made of stone or porcelain stoneware are installed using clamps. Now you know how to make a ventilated facade in general terms. Next, we will take a closer look at the nuances of façade work.
Return to content
Tags
about the facades of houses ventilated facades ventilated facades Facades from Facades from curtain facades of ventilated facades Fasteners for facade slabs of ventilated facades are Such facades are relevant Ventilated facade Ventilated facade properties of ventilated facades installation of ventilated facades installation of a ventilated facade Types of ventilated facades Installation of ventilated facades curtain-mounted ventilated facades installation of ventilated facades Ventilated facade system Ventilated facade Ventilated facade Installation ventilated th facade
covered features the following which repair set
Installation of facing slabs
This operation can be performed in two ways - seamless and with sutures. The installation method also depends on the type of material used. In any case, façade elements must be installed from the bottom edge. If you are using products made of composite materials, the first step is to install the end clamps, and do this along the bottom edge.
Scheme of a ventilated facade with siding
Each fastener must be secured with a special fastener. A fragment of facade material must be placed on two end clamps, and two row fasteners must be mounted on top. With this system it is necessary to lay the entire first row. This must be done extremely carefully, since the remaining rows will rest on it, and mistakes are unacceptable here. All subsequent rows are installed a little easier. The bottom edge must be inserted with an ordinary clamp, and the top plate is fixed with the same fastening element.
If you decide to use metal products as facing materials, then the method of their installation depends on the presence of locks. In order to make the entire structure more durable, it is necessary to apply double-sided tape to the metal profile, and only after that install the cladding. If the products have a lock, then you need to place them one after another, securing them, in fact, with this lock. Simple facing cassettes are attached directly to the profile of the supporting structure using screws or rivets.
Facade work with fiber cement material is carried out using an open or hidden method; rivets or self-tapping screws are used as fasteners. Now you know how to install a ventilated facade yourself, and if you are completely confident in your abilities, and also have some experience in construction work, then you can safely take up the tool, but if this is not the case, it is better to turn to specialists or find a qualified friend who will help to you.
Metal profile facade
Return to content
Kinds
It is impossible to describe the installation of facade systems from “A” to “Z” in one article. Because facing materials are attached in completely different ways, and in each case they imply a unique number and set of system elements.
Example No. 1.
| Porcelain tiles | Composite |
| T-shaped profile is used | Either a T, Y, or H-shaped profile is used. |
| Profile pitch is always 600 mm | The profile pitch is adjusted to the size of the cassette, for example, it can be 800 mm |
| Fastened with a clamp | Attaches with a hook and slide |
In addition to the difference caused by different cladding materials, it happens that differences are caused by different distances of the cladding from the wall.
Example No. 2.
| Facade with 50 mm insulation | Facade with 200 mm insulation | Facade with system extension of 500 mm | Facade without insulation |
| Brackets with a length of 90 – 100 mm are used | More expensive brackets with a length of 240 mm are used | Brackets with a maximum reach of 240 mm are used + extensions + the facade is reinforced with T-profile jibs + it is possible to install a metal frame on which the system will already be installed | The most inexpensive minimum offset brackets are used, usually either 40 or 60 mm |
Further - no more, don't relax, gentlemen