You may not be a perfectionist, but you must hide the cracks in the bathroom. Let us allow ourselves to paraphrase Nekrasov’s well-known “verses” to clearly illustrate a simple but practical idea: at the junction of the bathtub and the wall, ugly cracks often form, which not only spoil the overall appearance, but also allow water to flow down, thereby causing much more serious troubles . How to seal the gap between the bathtub and the wall? In today’s material we will analyze in detail 5 options for solving the problem and visualize each of them with photographic examples from life.
- Why is joint sealing necessary?
- We use cement mortar;
- We use polyurethane foam;
- Another option is silicone sealant;
- Ceramic skirting boards are a beautiful solution;
- Border tape is the final touch;
- Useful materials. 3 video instructions;
- Conclusion.
Why do you need joint sealing?
Imagine walking into a bathroom after renovation and meticulously inspecting every inch. What do you think your eyes will fall on first? Of course, on the bathtub itself, recently installed by specialists. And after the snow-white coating, you will be disappointed to discover that the distance from the wall to its edge is ugly empty. This will be your first moment of natural disappointment.
The second will come when you use the bathroom for its intended purpose for the first time. And you will find how water literally strives to seep into the recently discovered joint. The consequences of such a repair gap have not only a cosmetic aspect: water flowing onto the floor can ruin the coating and provoke the appearance of fungus or mold.
You need it?
Gaps most often arise due to the disproportion between the length of the bathtub and the wall part to which it is adjacent. You can provide for such a “jamb” even at the repair stage:
- having purchased a bathtub of the required length;
- installing an additional plasterboard partition.
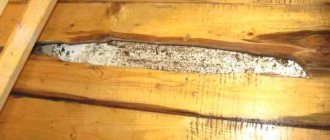
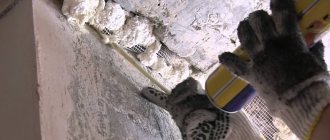
Fix a hole in the bathroom
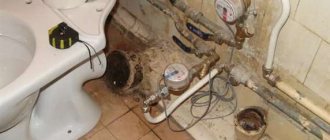
Hello. We partially replaced the pipes to cast iron, hollowing out the old cast iron from the floor. Since this is a bathroom and there will be water around, the question arose of how best to seal it. Just concrete it? What if later you need to chip away at everything again? And so they chipped off part of the pipe and installed a repair coupling. They suggest filling it with mastic and topping it with rotband. What options? Or fill it with mastic and leave it like that? Will there be a smell from bitumen mastic? There will be a sink in this place; there will be no tiles or anything else.
n58nordrus wrote: They suggest filling it with mastic and topping it with rotband.
Tell me, where do you find such morons?
Which one to fill? This all needs to be redone!
BV, Primorsky Krai, perhaps the proximity to Fukushima has an effect) But what about the matter then?
n58nordrus, to the point. “They had their arms torn off and did it with their feet?”
The sewerage is collected against the water in one place. The polypropylene joints may be overheated and sealed in a “chicken ass.” Damage to the PP fitting by the soldering iron is visible - it is melted almost right through. There may be questions about installing the rubber coupling - it's hard to see.
and what to fill the hole with? Fill with cement solution? Then the pipe will not be dismountable for repair and maintenance
Why does she bother you?
Why does she bother you?
bc—-, the neighbors below have expensive repairs, and half of the ceiling is missing. And the child is at home and will be splashing around in the bath. Leave it like that - the waterproofing is not very good
Why does she bother you?
bc—-, the neighbors below have expensive repairs, and half of the ceiling is missing. And the child is at home and will be splashing around in the bath. Leave it like that - the waterproofing is not very good
n58nordrus wrote: Leave it like that - the waterproofing is not very good
Sealing with cement, and especially with rotband, will not improve the waterproofing at all.
n58nordrus wrote: Then the pipe will not be dismountable for repair and maintenance
Then the pipe must be made as securely as possible, or a CAREFULLY waterproofed niche must be left
n58nordrus wrote: the neighbors below have expensive repairs,
especially! And not the way everything is done with you - back off and kicking
BV, how and with what to thoroughly waterproof a niche?
Bitumen mastic is usually only suitable for outdoor use; read the manufacturer's instructions. Waterproofing in the bathroom is usually done with any elastic waterproofing with polymer additives, such as Weber Tech, there are a lot of examples, look at the instructions to make sure it is suitable for interior work. If you want to do something reliably, then you should have waterproofing throughout the entire bathroom floor. In your situation, even if you carefully clean everything under the pipe, level the DSP with the mixture under the pipe and make smooth transitions, your waterproofing may begin to come off at the point where it adjoins the old tiles. In general, there is only a collective farm here. Rotband is clearly not worth using with plaster.
gidroprime wrote: , but your waterproofing may begin to come off where it adjoins the old tile.
We use cement mortar
- cheap universal option;
- needs additional processing for better visual reflection;
- reliable, but not durable fixation.
Probably the first thing that comes to mind when the need arises to seal the gap between the bathtub and the nearest wall. The first option is not always as bad as they say. The use of cement mortar is supported by low price and reliability; against - the need to additionally process the joints for a more or less normal decorative effect. This is what it looks like in a dry algorithm of actions:
- we clean the joint from all unnecessary things: dirt, dust, etc.;
- we treat the desired area on the wall with a primer for better interaction with the cement mortar;
- we prepare the solution itself, make it moderately thick;
- We close the gap with rags pre-soaked in the prepared solution;
- after they have dried, apply the solution directly along the entire length of the crack;
- As a means of camouflage, you can choose fragments of ceramic tiles, mosaics, or simply paint over the seam.
Good advice:
if possible, use the same coating as on the wall to obtain a bright decorative effect. It is especially easy to fulfill this condition if you have facing tiles. Buy a few extra tiles - you'll definitely need them, we assure you! Similar tricks can be done in cases where you used other options for decorating the walls in the bathroom.
How to restore an enamel sink?
Restoring the enamel coating of a sink or bathtub
- Cleaning the entire surface of the product using coarse sandpaper.
- Sanding the cleaned surface using fine sandpaper, removing dust.
- Uniform application of enamel with a foam roller.
- Shading the enamel using a flat brush.
Interesting materials:
Where can I find screenshots on my computer? Where can I find Windows 10 screenshots? Where can I find screenshots on my laptop? Where can I find hidden games on Steam? Where can I find griffin school equipment? Where can I find equity on the balance sheet? Where can I find saves on Steam? Where can I find saved passwords in Chrome? Where can I find my saved passwords? Where can I find saved pages?
We use polyurethane foam
- a good option for sealing even the widest gap between the bathtub and the wall;
- Only types with increased moisture resistance are suitable;
- strong fixation, mold protection.
Pay attention to the composition of the polyurethane foam before purchasing: it is very good if it is made on the basis of polyurethane. The moisture resistance indicator is also more than important - the durability of the structure you create directly depends on it. The entire procedure is below:
- Clean the work surface well and degrease it;
- protect your hands with gloves;
- Shake the can thoroughly, point it into the slot and start spraying gently;
- try not to shake the balloon too much - the foam that gets into unnecessary places will later have to be torn off with force;
- After the joint is completely sealed, use a knife to trim off all the irregularities to get a perfectly smooth and beautiful joint.
Removing shallow scratches
The use of multi-component cleaning products, cleaning the contaminated surface with a stiff brush, careless handling of metal objects during repairs - all this leads to the formation of shallow scratches.
Such scratches must be eliminated immediately, since the penetration of moisture and caustic chemicals into the resulting gap leads to the formation of rust, the proliferation of moisture-loving microorganisms and an increase in the size of the scratch. Which will lead to further destruction of the bathtub surface.
Shallow scratches include damage that does not expose metal. These minor damages can be repaired even without priming the surface.
The factory enamel on the bowl of a cast iron bathtub is very durable, so a screwdriver is needed to remove shallow scratches. If it has already been restored with acrylic or epoxy enamel, sanding paper will be suitable for treating micro-scratches.
In addition, to treat microdamages you will need:
- fine-grained sandpaper marked P1200, P1500 or a screwdriver with an attachment for attaching an abrasive wheel;
- fine abrasive car polish - economical polishes for one-time use are pastes from WILLSON and RUNWAY;
- wax polish without abrasive , for example, Golden Wax.
At the first stage, it is necessary to wash the surface with Pemolux, Comet, Sorti or baking soda to degrease. After removing the product, you need to dry the bath.
Next, the surface is polished with fine-grained sandpaper or a screwdriver with an abrasive wheel - zero, until leveled. When processing a scratch with a screwdriver, the minimum speed is set.
The treatment area must be constantly damp to prevent cracks from appearing when heated. Therefore, during the entire stage of primary polishing, it is necessary to pour a thin stream of water onto the damage.
After the treated surface becomes smooth and matte, it is necessary to apply a grainy polish to it. Treatment with a low-abrasive composition is carried out vertically, then horizontally, until a smooth, uniform surface is obtained.
The final stage of eliminating minor scratches is finishing the coating with car polish and wax. Wax-containing polishes are water-repellent and add a sparkling shine to any surface.
The polishing cloth should be soft and lint-free. Therefore, it is better to use flannel, calico, felt or microfiber cloths
After obtaining a shiny surface, it must be washed with soapy water or a non-aggressive liquid cleaning agent: Tersi, Oda, Sarma. Immediately after this, the bath can be used.
Another option is silicone sealant.
- it is necessary to select the optimal sealant in terms of moisture resistance and sensitivity;
- It is best used in conjunction with a plunger gun, which allows you to confidently control the entire process;
- used in cases of a gap of no more than 5 mm.
- degrease the gap between the bathtub and the wall and dry thoroughly;
- cut the tube spout at a certain angle, the sharper the angle, the thicker the layer will be;
- Apply sealant along the entire length of the joint between the bathroom and the wall;
- wet your finger in water diluted with soap and walk along the entire seam, evenly pressing the sealant inward;
- apply another layer and repeat the pressing procedure.
If everything is done correctly, then you will be able to seal the gap in such a way that it will be difficult to even notice what you used.
Bonus. Detailed video instructions
Useful tips
In this section we offer several useful recommendations that will help make your work more efficient:
- Before you begin to eliminate cracks, be sure to securely fasten the container on four sides, and if necessary, set the level and adjust the structure using the legs (modern bathtub models have threads).
- Fill the gap between the bath only after the tank is almost filled to the top with water. This will prevent deformation of the seam during operation. Drain moisture only after the seams have completely hardened.
- If the container is cast iron, then it must be fixed at the installation stage, and then begin filling the gaps. This will prevent the structure from becoming unstable and moving during operation.
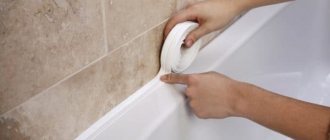
Eliminating a joint in a bathroom using sealant and PVC baseboard Source nikastroy.ru
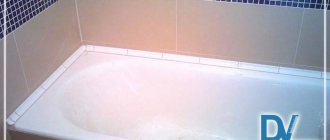
Ceramic skirting boards - a beautiful solution
- ideal if there are tiles on the wall;
- attractive appearance;
- reliable protection against leakage;
- durability.
- Traditionally, we prepare the junction area with the wall, clean it from dust, and degrease it;
- seal the gap with cement mortar;
- laying ceramic plinth;
- We seal the seams with white sealant (to match the color of the bathtub).
Preventing damage to acrylic surfaces
To reduce the risk of bathtub cracking, buy products from trusted manufacturers. Acrylic walls do not like contact with metal buckets and basins, which leave scratches, so they use plastic objects.
When bathing dogs and cats, a rubber mat is placed at the bottom. It is better not to soak laundry in an acrylic bathtub using strong drugs or bleaches. Clean the surface with mild detergents if there are no red streaks or abrasions from hard objects.
Do not use cleaning products containing acetone, ammonia, formic acid or formaldehyde. Stains are removed locally without powders; gels and liquid solutions are used.
Border tape - the final touch
- a practical option for finishing a silicone seam or processing a joint after polyurethane foam;
- does not require additional processing;
- high moisture resistance;
- fragility.
This solution will allow you to quickly and beautifully seal the gap, achieving a magnificent visual effect. Use only after you have already treated the joint with silicone or polyurethane foam. Please note the correct sequence:
- Apply any assembly adhesive from the “liquid nails” series over the seam;
- attach border tape to the wall and along the edge of the bathtub;
- carefully treat the joints and corners with silicone sealant.
The latter method requires more than a day to dry, but the result is a beautiful, modern option that will definitely please any housewife.
Advice:
The width of the tape should be at least 2 times the width of the gap between the bathtub and the wall.
Recommend glue or other material to fill the hole.
Topic of the General Questions section in the Model Technologies
; Good evening. Usually here I discuss various technologies related to models with my skilled like-minded people, but sometimes I have to come down to earth.
Theme Options
- print version
- Send by email...
- Subscribe to this topic...
Recommend glue or other material to fill the hole.
Good evening. Usually here I discuss various technologies related to models with my skilled like-minded people, but sometimes I have to come down to earth and face everyday problems. I ask for your advice. In my favorite Vyatka washing machine, there is a rusty hole in the metal enamel tank. about 5 years ago. I cured it by gluing a piece of rubber onto the hole using tsanacrylate. Lately the hole has become larger, especially after preparatory sanding. Recently I re-glued the pieces of rubber and poured a thin layer of epoxy with fiberglass on top. but after half a year everything came off and began to leak. Can you tell me what kind of glue is best for attaching the enamel?
Silicone sealant! - on the inside, and on the outside with fiberglass resin...
Recently I treated enamel chips with subsequent metal corrosion using chemicals. equipment (enameled mixing apparatus with a capacity of 6.3 cubic meters) with epoxy-silicon resin T-111. It’s holding up for now, but there the temperature is up to 100 degrees C and the environment is acidic, and so AIZ’s advice rules, instead of silicone sealant, you can apply gelcoat, or line it with resin thickened with Aerosil.
Unfortunately, I couldn’t find any of these tools in Yandex. probably very rare. There was also an idea to use a sandwich of silicone sealant and a more rigid top layer. It is also possible to use some kind of tie to press the whole thing down.