When installing a bathtub, there is always a gap between it and the walls, even if it is tightly connected. This joint needs to be sealed to prevent water from leaking onto the floor. It’s not difficult to choose how and with what to seal the gap between the bathtub and the wall. There are many different ways to refine a joint. The determining factor is the size of the gap.
What happens if you don't seal the joint?
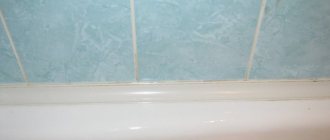
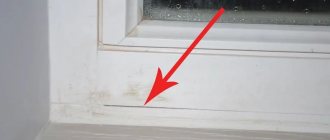
The junction between the bathtub and the wall requires insulation, since even a small gap can cause unpleasant consequences and problems, not to mention deterioration of the decorative appearance.
No matter how carefully the bath is taken, the condensation that forms on the walls will still flow down and seep through the gap. This will cause constant accumulation of moisture behind the bathtub and create favorable conditions for the development of mold. In the worst case, this defect causes water to flow to the neighbors.
Therefore, the need to seal the bathtub with the wall is obvious, and you should not refuse it. In some cases, the work can be completed within 1 hour even in the absence of a special tool, after watching the video.
Why is it so important to get rid of cracks?
There are several reasons that require urgent removal of gaps in the bathroom. We list them below:
- Unaesthetic appearance. The presence of voids greatly spoils the picture of the interior in the bathroom.
- Moisture ingress. This can cause water to leak to neighbors, and untimely removal will lead to the formation of fungus and mold.
- Damage to the floor covering. Sooner or later, if moisture gets on the floor, limescale and damp spots will appear on the floor, which are difficult to remove.
Sealing seams in the bathroom: modern methods
There are several effective methods to make the joints between the bathtub and the wall airtight. There are materials for temporary and permanent joint closure. Their selection in each case is carried out individually, based on the size of the gap, skills in carrying out installation and repair work and cost.
Polyurethane foam
Polyurethane foam is a universal material that comes in several types. It has found application in various areas of construction and repair work. You can close joints and openings in the bathroom with one-component polyurethane foam, which has a high moisture resistance.
You can start foaming immediately, since special preparation is not needed when performing this work.
To carefully seal the gap, you need to wash and dry the work area, and cover it with masking tape.
After the gap is filled and the foam has hardened, the excess is cut off with a sharp knife flush with the bathtub. It is important to take into account that the volume of foam increases, so it needs to be applied in smaller quantities. Masking tape is removed from surfaces. The method is suitable for any bathtub - acrylic, cast iron, steel.
It is not recommended to leave the polyurethane foam seam open. Firstly, it is unsightly, and secondly, the seam needs additional measures to protect it, since the foam has a porous structure, inside which moisture and dirt settle, creating conditions for mold to appear. You can decorate the joint, for example, with border tape, PVC or ceramic plinth.
When working, you need to take into account that dried foam is difficult to remove from ceramics and bathtubs. But if such a need arises, special softening solutions are suitable. The foam easily sticks to the skin, and it is also not easy to remove it from your hands, so you need to work with gloves.
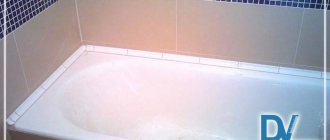
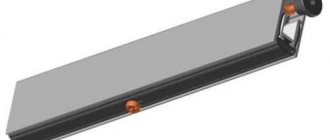
Using curb tape
Elastic self-adhesive curb tape is made of durable synthetic material. The glue applied on one side has water-repellent properties, so it is not afraid of prolonged exposure to water. Some types of seals are coated with antibacterial impregnation, which prevents bacteria and fungus from multiplying.
To ensure an angular bend along the entire length of the tape there is a special vein. After eliminating the gap, the corners are decorated with short pieces of tape.
The algorithm for working with the tape looks like this:
- Before gluing the tape, clean the joining surfaces.
- Remove the paper strip from it and lightly heat the adhesive surface with a hairdryer.
- Press the edge of the tape to the junction of the bathtub with the wall so that an angle of 90 degrees is formed along its fold line.
Border tape has the following advantages:
- low price;
- simplicity and short installation time;
- types of tapes of different widths;
- neatness of finishing.
It should be remembered that this solution is rather temporary or auxiliary. It is recommended to combine it with other finishing methods - polyurethane foam, silicone sealants or cement mortar. After applying only these sealants, the joints will look unfinished, and the tape will give them a decorative and finished look. If you use tape as an independent finishing material, the seams will need to be renewed once every 2-3 years.
Sealing with cement mortar
The method of treating the gap between the bathtub and the tiles using a cement-sand mortar is already outdated, although it is effective provided that additional seam protection is used.
A joint that is not protected from moisture will crack over time because it has a porous structure. It is best to use this method when filling wide cracks followed by a protective coating.
Cement-sand mortar is suitable for filling joints whose width exceeds 5 mm. Narrow cracks cannot be sealed in this way, since when the bath is filled with water, vibration occurs, which will definitely cause the thin seam to collapse.
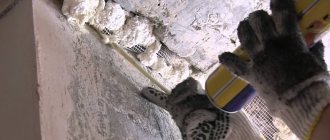
A solution of cement, sand and water is prepared in a ratio of 3:1:1. Preparatory work includes cleaning the joining surfaces. A container is placed on the floor under the bathroom into which excess solution will drain. The drain pipe is dismantled to prevent solution from getting into it.
Large cracks (5 centimeters or more) are filled with scraps of old rags soaked in cement mortar. For better adhesion of cement to the surface, it is recommended to moisten it with water. The gap is filled with mortar in such a way that a smooth surface of the seam is obtained.
Decorative treatment of the cement joint can be done using tape, plastic, ceramic tiles or borders.
Application of silicone sealant
You can seal cracks up to 5 mm wide with silicone-based sealant, packaged in a special tube. It is applied through the conical nozzle included in the kit, or squeezed out through a special gun for working with liquid silicone, which is sold separately.
When choosing a sealant, you need to pay attention to the information on the packaging about its moisture resistance and antifungal properties. They have sanitary silicone sealant, the range of which includes both colored silicone (it can be matched to the color of the cladding) and transparent universal one.
To prepare the tiles and sides of the bathtub, you will need white spirit, which will degrease them.
How to apply silicone correctly:
- The walls and sides of the bathroom near the joint are cleaned and degreased with white spirit.
- The tip of the silicone tube is cut off. The lower the cut, the thicker the layer.
- The sealant is slowly applied around the perimeter of the bathtub.
- The silicone seam is carefully pressed into the gap and aligned.
Other options
Other ways to seal the joint between the bathtub and the walls include decorative finishes such as plastic baseboards and ceramic borders.
Plastic skirting boards are sold in two types: with adhesive and with a simple inner surface.
To protect the joint in the bathroom, it is recommended to choose the second type of plinth due to the fact that the glue applied to the plastic in the factory will not ensure a tight fit to the rounded shapes of the bathtub and the buried seams between the tiles. The glue must be moisture resistant, and already applied to plastic is no different. When replacing the trim, it leaves hard-to-remove marks on the tiles and bathtub, which will require a solvent to remove.
You can buy additional elements for the baseboard - connectors and corners, which allow you to carefully and completely seal the joint.
For a plastic skirting board, you will need a moisture-resistant transparent glue, preferably with a quick setting, so that it does not require prolonged effort to fix it.
Installation of the plinth is carried out only after sealing the hole with sealant, cement mortar or polyurethane foam.
Stages of work:
- Cleaning and degreasing the surface.
- Preparing the baseboard of the required length.
- Applying glue to the walls and sides of the bathtub (as close to the seam as possible) and laying the baseboard.
- Apply a thin strip of silicone along the edges of the baseboard, where its upper edge adjoins the tile.
Ceramic borders allow you to create the most beautiful and reliable frame around the bathtub. But at the same time, such finishing is the most expensive and labor-intensive; it requires special tools for tiling work.
For ceramic cladding, as well as for PVC skirting boards, components are supplied - connectors, external and internal corners. Due to the fact that there is no need to make complex trimmings of products, the work on decorating the joint is simplified.
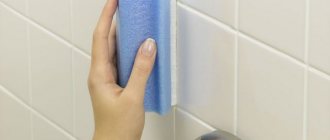
Ceramic edgings are laid using a mortar of cement and sand or tile adhesive. The work is done with metal and rubber spatulas. The seams between the border elements can be sealed with a mortar for laying tiles or with a special grout (fuge). Cleaning the cladding from mortar and fugue is done with a sponge and water.
Stages of work:
- Cleaning work surfaces.
- Primer of ceramics.
- Apply a layer of 2-3 mm of glue to the skirting boards.
- Laying with leveling and removal of excess glue.
- Jointing seams after the glue has set.
- Cleaning and smoothing seams with a sponge.
Silicone
Quite a popular type of sealing compounds. The composition can be acidic or neutral. Acid ones are easier to produce and cost less, but working with them indoors is difficult - there is a strong smell until they harden. The second negative point of acidic ones is that when applied to metal, it quickly oxidizes. Therefore, it should not be used to seal steel and cast iron bathtubs. Neutral silicone sealants do not react with materials, so their scope of application is wider. But the production technology is more complex and they cost more.
Silicone sealant for the bathroom is a good solution
Both acidic and neutral silicone sealants may or may not be waterproof. Only waterproof ones are suitable for baths. They also come in one-component and two-component types. For private use, single-component ones are mainly used, since they do not need to be mixed before use.
Properties and scope
Properties and scope of application of silicone sealants:
- They have good adhesive ability. They can be used to seal joints between stone and plastic window sills, when installing sinks and other appliances into the countertop.
- It is used for sealing joints of glass, non-porous building materials (metal, plastic, glass, wood, ceramics), joining plasterboard to the ceiling, and drainpipes.
- They are characterized by increased tolerance to high temperatures and can be used to seal seams around chimneys.
- They are resistant to water and can be used to seal junctions of bathtubs and showers, sinks and other plumbing fixtures.
The main advantage of silicone sealants is that after polymerization the seam remains quite elastic. It does not crack and can be used to seal the joint between an acrylic or steel bathtub and a wall. Disadvantage: susceptibility to the appearance and proliferation of fungus. It can be solved by adding antiseptic additives. To prevent the development of mold and mildew, it is better to use silicone sealant for an aquarium or a special plumbing sealant. Both of these types have antibacterial properties.
Brands and prices
Silicone bathtub sealants are popular today and any store will have a fairly decent assortment.
| Name | Color | Special properties | Surface film formation | Release form and volume | Price |
| BAU MASTER UNIVERSAL | white | acid | 15-25 minutes | Gun tube (290 ml) | 105 RUR |
| Bison Silicone universal | white, colorless | acidic, resistant even to sea water | 15 minutes | Gun tube (290 ml) | 205 RUR |
| KIM TEC Silicon 101E | white, transparent, black, gray | acidic, contains antibacterial additives | 25 min | Gun tube (310 ml) | 130-160 rub. |
| Somafix universal silicone | white, colorless, black, brown, metallic | acid | 25 min | Gun tube (310 ml) | 110-130 rub. |
| Somafix construction | white, colorless | neutral, does not turn yellow | 25 min | Gun tube (310 ml) | 180 rub. |
| Soudal Silicone U universal | white, colorless, brown, black, | neutral | 7 min | Tube for pistol (300 ml) | 175 RUR |
| WORKMAN Silicone Universal | colorless | acid | 15 minutes | Tube for pistol (300 ml) | 250 rub. |
| RAVAK Professional | neutral, antifungal | 25 min | Gun tube (310 ml) | 635 RUR | |
| Ottoseal s100 sanitary | 16 colors | acid | 25 min | Gun tube (310 ml) | 530 rub. |
| Lugato Wie Gummi Bad-Silicon | 16 colors | neutral with bactericidal additives | 15 minutes | Gun tube (310 ml) | 650 rub. |
| Tytan silicone sanitary, UPG, Euro-Line | colorless, white | acidic with bactericidal additives | 15-25 minutes | Gun tube (310 ml) | 150-250 rub. |
| Ceresit CS | colorless, white | acidic/neutral | 15-35 min | Gun tube (310 ml) | 150-190 rub. |
As you can see, there is a very wide range in prices. Expensive sealants (Ravak, Ottoseal. Lugato) - made in Germany, Denmark, Czech Republic. According to reviews, they are of excellent quality - they have been used for several years without changes, fungus does not multiply on them. They are presented in the widest range of colors.
Inexpensive Ceresit, Tytan, Soudal serve well. These manufacturers have a wide range of both acidic and neutral silicone sealants. There are other types (acrylic, polyurethane). They also have good reviews specifically for use as a sealant for the bathroom - the joint with the wall.
Sealing in wooden bathrooms
In bathrooms with wood trim, the seams are sealed using wood joint sealant. The main components in its composition are silicone and acrylic latex. It has a high stretch coefficient. Thanks to this, the expansion and contraction of wood during temperature and humidity changes is compensated. Wood sealants have good permeability - air and vapor permeability, due to which the surface “breathes”.
The work begins with cleaning and degreasing surfaces. The inside of the gap is sealed with mounting foam (to save sealant consumption). To obtain an even seam, its boundaries are marked with masking tape. At this stage, the processing of the joint should be considered complete, but if desired, you can make cladding, which is available in a wide range of colors and textures suitable for any type of wood.
Compatibility of sealants with materials (table)
| Type of sealant | Acrylic, Plastic* | Marble, stone | Enamel** | Ceramics |
| Acrylic | ★★★ | ★★★ | ★★★ | ★★★ |
| Silicone acid | ★★ | ★ | ★★★ | ★★★ |
| Silicone neutral | ★★ | ★★ | ★★ | ★★ |
| Silicone-acrylic | ★★★ | ★★ | ★★ | ★★ |
| Polyurethane | ★★ | ★★★ | ★★★ | ★★★ |
| Latex | ★★ | ★★ | ★★★ | ★★ |
| MS-polymer | ★★★ | ★★★ | ★★★ | ★★★ |
* - also includes PVC, fiberglass, ABS plastic.
** — Any painted materials.
How to fill large gaps
Major work is required to close gaps wider than 5 cm. You can build a plasterboard structure, which will require metal profiles and moisture-resistant drywall. The work is similar to the construction of a plasterboard partition, box or decor.
First, the frame is assembled, the fastening elements of which are dowels and screws. After installing the profiles, a sheet of plasterboard is cut to the required size and attached to the frame. The cladding is done at the discretion of the owners. You can apply waterproof decorative plaster, lay tiles or install wall panels.
In this case, you need to pay attention that the installation of the plasterboard box should be carried out taking into account the thickness of the tiles and the adhesive layer. The finish looks beautiful when the tiles are laid flush with the sides of the bathtub. After this, the tile joints are covered with a fugue, as described above.
Drywall and other panels
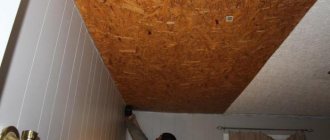
This method of solving the problem is only suitable if the surface of the panels is carefully protected from water, because even moisture-resistant drywall cannot withstand direct contact with water and constant high humidity.
GKL requires good waterproofing at the ends of the sheets and painting with waterproof paint on the reverse side; OSB panels, chipboard, fiberboard, wood - high-quality waterproof impregnation. The panels are laid on a prepared frame, wooden (also impregnated) or metal. Typically, this method of closing the gap is used in conjunction with installing a protective screen under the bathtub.
The panels are also finished with tiles, waterproof paint or high-quality plastic.
How to choose the right method
The space between the bathtub and the wall must be properly sealed and lined. How to close this gap should be decided depending on its width, wall finishing material, as well as the preferences of the owners and their financial capabilities.
It is more preferable to cover distances of 5 cm or more with a plasterboard box, the upper side of which will serve as a shelf, than to seal it with a large amount of polyurethane foam or a thick layer of cement and sand mortar. To complete the work, the shelf can be lined with ceramics.
A gap up to 2 cm wide can be decorated with border tape, polyvinyl chloride edging or tiles. Ceramic decoration is the most reliable, and tape is best considered as a temporary method of sealing a joint.
From this we can conclude that it is recommended to veneer any method of sealing a joint. This will not only make it decorative, but will also serve as reliable protection. Only the thinnest cracks that are filled with silicone do not require additional finishing.
Matching the material to the style of the bathroom
The finishing method around the bathtub should be in harmony with the interior style and cladding of the bathroom. The best option for upgrading the joint is a PVC skirting board, which comes in different colors and textures, and a ceramic border from the same collection as tiles.
Self-adhesive tape
One of the fastest and easiest ways to finish the joint between the wall and the bathtub bowl is with closing tape. All you need is the roll itself and a spatula to form a corner (often included in the kit). Another advantage of curb tape is that it contains a sealant that saves time and money.
Step-by-step installation instructions:
- Wash and degrease the surface.
- Remove the protective film from a small area.
- Press the adhesive side of the border against the wall and bathtub, starting at the corner and using a putty knife to form the corner.
Tip: To make the material more flexible, heat the border tape with a hairdryer as you install.
Helpful installation tips
To ensure reliable seam sealing, it is best to combine several finishing methods. For example, apply polyurethane foam, after it has completely dried, coat it with silicone, and at the end decorate it with a plinth.
Before sealing the joint, the bathtub is filled to the brim with water, especially if it is acrylic, which bends, albeit slightly. This is necessary to take into account its shrinkage when sealing. The water should remain in it until the joint treated with sealant is completely dry. Bathtubs made of any material (acrylic, steel or cast iron) must be securely fastened.
The PVC skirting board will fit more tightly if you cut it from the inside at an angle of 45 degrees.
To ensure the reliability of the cement-sand mortar joint, it is recommended to additionally strengthen the bathtub using reinforcement mounted into the wall at 15 cm intervals. The bottom is covered with film to prevent the mortar from getting into the drain hole.
Plastic skirting board
The main advantages of modern plastic are inexpensive price, ease of installation, and aesthetic appearance. This can be installed over any finish: paint, tiling, panels.
Before starting work, prepare masking tape, a measuring tape or ruler, adhesive sealant, and a stationery knife.
- Clean and thoroughly degrease the surface.
- Apply paper tape to the wall and the edge of the bathtub, leaving the width of the border.
- Fill the joint with sealant and leave until dry.
- Cut the skirting boards to the required sizes.
- Glue using the same sealant or liquid nails.
- Install the plugs.
Before using the bath, allow it to dry completely for 24-48 hours.
Matching the sealing material to the style of the bathroom
Do not think that to eliminate the gap between the wall and the bathtub, you can take any material and cover the gap. Don’t do everything hastily, everything should be combined: high-quality material + ease of use + harmony with the interior. For styles such as hi-tech or minimalism, the latest, frequently used materials are suitable; a plastic border will look good.
If the renovation is done in an eco-style or an ordinary classic, you cannot do without stone or ceramics. A marble edge will suit the classic design. This element will add elegance and splendor. Eco-style is simpler, so limit yourself to regular white ceramics or simple grout. Those who are limited in finances can use plastic skirting boards and border tape.
The material for sealing joints must be chosen so that it does not differ in color and style of the room
Joint with acrylic bath tiles
As a rule, acrylic bathtubs weigh little, so when you use it, it can move and the seal of the gap can break. Making a recess in the wall to mount an acrylic bathtub does not make sense, since its back walls are flat. To ensure that the seam is sealed efficiently, thoroughly secure the bathtub in place - fix it to the floor using silicone sealant. Then the joint is sealed with sealant and finishing.
To ensure a good sealing of the bathtub, secure the bathtub
The main causes of gaps and cracks between the bathtub and the wall
There are certain rules for joints: the walls must be at a certain angle. 90 degrees is recommended. If you don't adhere to this, a gap will definitely appear. If the width of the toe angle is greater, the surface of the walls must be leveled. These rules also apply to the floor surface.
Another reason is improper installation of the bathroom. To prevent leakage, you can install it on legs.
A gap may appear if the bathtub itself is shorter and smaller than the plane along which it stands. This issue can be solved by installing a false wall (plasterboard will do). If the room is small and such a wall takes up a lot of space, it is best to groove the walls and lengthen the plumbing. But if nothing can be changed, you will have to look for alternative options. You can seal a large gap between the bathtub and an uneven wall using specialized mixtures.
A gap may appear if the bathtub itself is shorter and smaller than the plane along which it stands.