Polyurethane foam is used to seal cracks. Plastering cracks and cracks. How to seal a crack with reinforcing mesh. Advice from experts. High-quality reconstruction of premises does not consist in spectacular decorative design of premises, but in reliable sealing of cracks, cracks and joints. The gap between the plates can become a source of dampness, unpleasant odors and microorganisms. Experts know “how to seal the gaps between the wall and the ceiling,” and recommend one of three options. How to seal the gaps between the wall and the ceiling so that they do not crack
Polyurethane foam is used to seal cracks
The application method is determined by the foaming method and the type of container. For high-altitude work, it is better to buy a mounting gun, since the stream will be uneven and intermittent. During oxidation, the polymer increases in volume and fills any gap. After hardening, excess material can be removed, the seam can be puttyed and sanded so that the ceiling and wall take on the ideal appearance. Sealing cracks using this method has a range of undeniable advantages, including ease of execution, accessibility, low costs and durability. A large ceiling joint can be pre-filled with mineral wool or other non-flammable material, since electrical wiring can be laid in this place. For greater reliability, the sealed gap must be protected with moisture-resistant plaster, plaster or synthetic putty. Without a backup layer, the foam may crumble, and the cut areas will look unsightly. Minor defects can be corrected with acrylic sealant. It is better not to use silicone options, as poor adhesion will make it difficult to putty on the ceiling and walls.
Current methods
Today, there are many ways to eliminate unwanted gaps in the space between the wall and the ceiling. Here are several popular options that are distinguished by their availability, cost-effectiveness, durability and ease of execution.
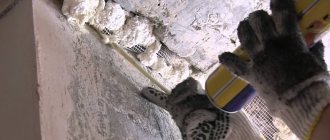
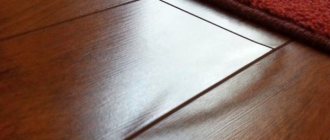
The simplest and most common way is to fill the cracks with mineral wool or polyurethane foam. As the experience of specialists shows, polyurethane foam in this case is more practical and convenient to use. It is best to use high-quality non-flammable material for these purposes, because electrical wiring may be located in the cracks being processed. You need to carefully fill all cracks and joints with foam. When dry, this material expands and tightly closes all the cracks between the wall and the ceiling. An important advantage of polyurethane foam is its elasticity. Over time, the building will shrink, and the foam will move along with the structure of the house, taking the desired shape. To make such a coating more reliable and durable, it is recommended to protect the outside with a thick layer of high-quality plaster. You can see in the photo how this popular method is carried out.
You can also get rid of unwanted voids between the surfaces of the wall and ceiling using a solution of ordinary gypsum or synthetic putty created specifically for these purposes. These practical materials provide excellent protection against moisture and other influences. In addition, they are absolutely safe and environmentally friendly. In order for the composition to better bond with the surface being treated, the crack is first moistened with water, then filled with paste or gypsum, after which it is dried and treated.
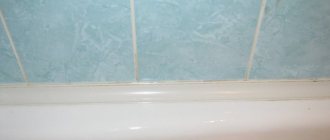
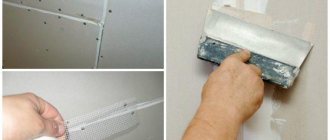
Instead of plaster, you can also use moisture-resistant putty. Today, construction stores sell such ready-made putty, specially created for sealing cracks. The material is applied to the surface to be treated with a spatula in a fairly thin layer. You can see how this process occurs in the photo.
Sufficiently large and noticeable cracks between the wall and the ceiling can, in addition, be repaired using reinforcing mesh (see photo). It must be placed in the existing voids, and securely laid on top with plaster and wait for it to dry completely. After the plaster has dried, it is necessary to apply a layer of putty to level the ceiling. At the final stage, the surface is ground to perfect smoothness.
Another simple and very popular method involves using linen or cotton fabric. Like the previous method, it is more suitable for eliminating fairly large cracks. Prepare special textile bandages. To prevent the fabric from shrinking during work, it must first be washed and ironed. After this, each piece of fabric is dipped in an adhesive (you can use ordinary paste, wood glue, cellulose or any other glue), carefully squeezed out and placed on the crack. Then the fabric is straightened with a spatula, and after drying it is treated with putty.
All of the methods listed above are easy to implement, accessible and effective. By choosing one of these methods, you can easily repair cracks and make your home more cozy and comfortable.
Cracks in the ceiling surface are the most common problem in older residential buildings. There are a large number of reasons why cracks form, ranging from mistakes made during the construction of a concrete frame and ending with the foundation. As a rule, in such situations there is no one to file a claim with, as a result of which you have to fix all the problems yourself. Repairing cracks in the ceiling is not as difficult as it might seem at first glance; it is enough to follow all the recommendations and carry out the work in stages.
Plastering cracks and cracks
This is the simplest and most effective method that does not require a lot of money, but perfectly protects the surface from aggressive influences. The algorithm of actions is extremely simple:
- you need to choose how to seal the gaps between the wall and the ceiling,
- prepare the solution according to the instructions,
- moisten the treated area well,
- saturate the work area with primer,
- after 20 minutes, fill the voids with the mixture,
- level the plaster with a flexible spatula.
- After drying, treat the seam in the same way as the rest of the ceiling.
If a concrete ceiling leaks and destroys the cement plug, then to eliminate the gap it is necessary to widen it to 10 mm, prime it with concrete contact and putty, pressing sickle tape into the seam. The choice of building mixture is determined by a combination of factors. These include: the initial state of the surface, climatic conditions and expectation of the final result. Mixtures with different characteristics are available for sale, suitable for any occasion. Most often, gypsum and chalk paste or synthetic compounds are used for these purposes, which better adhere to the ceiling and more effectively protect it from moisture. The layer thickness should not exceed 5 cm. If the cracks are deep, then at least 2 layers are applied to them and reinforced with fabric. For small recesses it is better to use fine-grained putty, for places with high levels of humidity - moisture-resistant.
Defect options
Most often, owners blame both the craftsmen and the quality of the wallpaper. But if the craftsmen are professionals, and before this room they managed to glue kilometers of canvases with high quality without any comments, why did they not take into account the peculiarities of the brand of trellis when gluing. Indirect confirmation is the fact that the same problem occurs with both cheap paper and expensive non-woven wallpaper.
The answer to the question of how to make wallpaper joints invisible does not have a clear answer, since the defect itself at the joints can manifest itself in different ways:
The last point is the most unpleasant. It often happens that when buying wallpaper in a company store, you can purchase rolls from the same manufacturer, the same brand, but belonging to different batches. To sell mismatched items and make the product attractive, salons collect leftover rolls from different batches into one and sell them at a slightly reduced price.
music posters for the wall
For your information! Even within the same batch, wallpaper may differ in shades.
Many manufacturers, due to the peculiarities of the technology for applying paints to the panel, are not able to ensure ideal distribution of the toner; as a result, one edge turns out to be slightly darker and more saturated than the other. It is impossible to hide such a defect, so an icon with two vertical arrows directed in different directions is placed on the roll. This means "reverse sticker sequence". To hide uneven coloring, each subsequent roll must be turned 180° before cutting and gluing. If you do not pay attention in time to the icon hidden in the text of the marking, the discrepancy in shades at the joints can only be corrected by painting the trellises.
How to seal a gap with reinforcing mesh
To fill holes, a reinforcing mesh is used, which must be covered with a layer of plaster. Putty is applied to the surface of the sealed crack, which is sanded to an impeccable level of smoothness with a grinder or sandpaper. The reinforced bandage can be replaced with linen or cotton tapes. Textile ties are prepared in advance: they are dipped in hot water and ironed. After the thermal procedure, the bandages are dipped into a special composition, the role of which is played by a paste solution, cellulose or wood glue, wrung out and the cracks are closed with them. The strips are straightened with a spatula and, after drying, putty is applied.
Sealing seams between ceiling slabs
Even after the structure is completely settled, cracks may appear between the joints of adjacent slabs. You can seal the seams on the ceiling between the slabs yourself, just follow all the recommendations and do the work sequentially:
- First of all, the seams are unstitched using a hammer, puncher or chisel. All existing mortar must be removed from the joints.
- The resulting gaps are blown out with an air stream under strong pressure, and during work the seams are generously moistened with water.
- The seams are filled 2/3 with polyurethane foam.
- A day later, as soon as the polyurethane foam has completely hardened, the excess is removed using a sharp knife. The cut depth should be 3 cm.
- The recesses and edges of the primer are primed with a latex-based mixture.
- The remaining gaps are leveled with cement mortar, after gluing the reinforcing mesh.
Expert advice
- If there is a fungus on the ceiling at the site of the defect, then before repair work the affected area must first be treated with an antiseptic or a chlorine-containing compound.
- To improve adhesion and strengthen the working area, it must be treated with a primer.
- If a defect has formed between the floor slabs, then the old seal should be completely removed with a hammer and spatula, and then the standard procedure should be followed.
- Small holes up to 5 cm in diameter in the pipe area are closed with silicone polymer. Large cavities are eliminated with simple reinforcement and foamed with several layers of sealant. After cutting the foam 5 mm above the overlap level, the surface will be treated with gypsum or acrylic putty, selected depending on the humidity level.
Sometimes, over time, a gap forms between the baseboard and the ceiling or between the joints of the baseboards. There are several options for eliminating the problem: you can fill the crack, fill the space with sealant, or make an insert.
The choice is determined by the type and size of the flaw and the technology of installation of the structure. To eliminate possible risks and ensure that the donor material does not fall out, it is recommended to practice sealing seams on unnecessary objects.
What are rustics on the ceiling
The ceiling in a room is a structural element that is visually open. That is why special importance was attached to the finishing of the ceiling surface. Over time, technologies for carrying out construction work and facing materials have changed, as a result of which many types of finishing work have become outdated and the owners of residential premises have to get rid of the results of their use.
Rust is an element of decoration, which has faded into the background with the development of technology. Today, there are a large number of finishing materials, thanks to which it is possible to repair rustications on the ceiling or remove them.
Previously, natural stone or its imitation was used to decorate facades. The visible part had a smooth or faceted surface, which was processed rather roughly by chipping the surface. The joints of stone elements were separated using special strips of a certain width, and they were called rustics.
Why do you need rustics on the ceiling?
Previously, floors in multi-storey buildings were prefabricated, and hidden slabs were used during the work. Since the most important thing was the level of strength and tightness, the perfect pairing of elements was not given much importance. The slabs used for the ceiling were not in the same plane; in addition, they could be located at different heights.
Since the range of finishing materials was not rich, they used cement with the addition of sand and lime, and adhesive putty based on chalk. Since the elasticity of the materials is quite low, cracks appeared between the slabs after finishing the seams.
To eliminate cracks between the seams, a ceiling rust - a demarcation groove - was used. With the help of rustications it was possible to mask differences between the slabs and existing cracks.
Sealing rust on the ceiling
If necessary, you can repair the rust on the ceiling with your own hands. It is important to consider that all work must be carried out in stages and taking into account all recommendations:
- The first step is to prepare the base, since the durability of the result directly depends on this. To do this, you will need to remove all furniture and household appliances from the room.
- The old leveling compound must be completely removed from the ceiling. If there is damage to the plaster along the rustications, then it is necessary to clean the joints between the slabs. If the plaster is completely in poor condition, then the entire ceiling is cleaned. During work, you can use a hammer, chisel, spatula or metal brush.
- After the ceiling and the seams between the slabs have been cleaned, it is necessary to prime the surface. It is recommended to carry out the work with a narrow brush, having first removed dust from the ceiling. After 24 hours, when the primer is completely dry, you can begin filling the joints between the slabs.
- The next stage is filling the joints. For these purposes, polyurethane foam is used. Foam must be filled with all seams, cracks and crevices. Excess foam must be removed the next day using a sharp knife.
- If the ultimate goal is to seal rust, then putty is applied on top of the mounting foam. Once the mixture has hardened, you can remove the excess.
- If the purpose of the work being carried out was to restore the rustication, then you should not wait until the composition hardens, you should immediately begin cutting the rustication.
After all the work is completed, you can proceed to final sanding, priming and painting the ceiling surface.
Using stubs
A special plinth for installation on a suspended ceiling is a practical option. It will hide the gap between the two surfaces, but the frame itself will not stand out. This option is characterized by simplicity and laconic finishing. Externally, the ceiling will simply fit snugly against the wall.
Plastic corner
Important! If the customer does not receive any wishes regarding the design of the perimeter, then the craftsmen themselves offer to install such a plinth on the suspended ceiling.
Variety of decorative caps
If the stretch ceiling is single-level, and it was installed in a room in an ordinary apartment, then either an F-shaped plinth or an L-shaped one is used. The latter is also called the wall corner.
In large rooms, a dividing profile with a separating plug is also used. This plinth differs from others in that it has a symmetrical profile: two locks and two shelves that cover the panel on both sides of the joint.
Connecting baguette with plug
The L-shaped plinth has one edge with hooks, which is inserted into the load-bearing profile of the trim. It is made from soft types of plastic, so it is flexible and allows you to make a joint along a curved line.
F-shaped baseboards are rigid and are installed on flat surfaces, mainly tile or drywall. Due to its rigidity, it holds a straight line well, which is important for the overall impression of neat framing.
To install such a plinth, the owner will need a few minutes. Using the fastening rib, the corner is inserted into the profile and pushed through with pressure. To do this, use a blunt spatula.
In addition to quick installation, such a plinth has a number of advantages:
An equally colorful assortment of decorative plugs is produced for a wide range of fabric and film materials. This is done not from an excess of imagination, but because it is advisable to select a plug of the same color for any canvas. The fact is that over a long span the decorative tape gives a wave, no matter how hard the master tries to even it out. A plinth of the same tone will only mark the smooth edge of the ceiling, and the wave will not be noticeable.
Variety of decorative caps
It is important to choose the right baseboard for the installed load-bearing molding. There are plugs that are used only for baguettes of the harpoon system; in others, the fastening ribs are designed for the baguette of the wedge installation technology. There is a difference between plugs for aluminum and plastic baguettes. Therefore, returning to the previous recommendation, rely on a master installer. If you have to buy masking tape yourself, then take a piece of the supporting profile with you so that you can select a suitable baseboard in the store.
Video of how the decorative plug is fixed:
The quality of wall finishing plays an important role when choosing a baguette for a suspended ceiling. If they are uneven, then it is better to abandon the standard masking tape and use a wide baseboard made of polyurethane or foam.
How to remove cracks in the plaster layer on the ceiling
As a rule, in such cases, the size of the crack is limited by the plaster layer, which is why eliminating such defects does not require much effort and time.
The first step is to seal the seam with a primer, after which they begin to prepare the putty. The existing recesses are filled with the mixture, and then leveled with a spatula.
Once the plaster has completely dried, the surface is rubbed with fine-grained sandpaper until the surface is perfectly smooth. If the cracks are large, it is necessary to additionally strengthen the surface with reinforcing mesh.
Decorative cord
This is an original option for hiding a technological gap. The decorative edging is made of thick textile and has large rope knitting in various design solutions. The color palette of cords is very wide, from monochromatic to weaving several threads of different shades. All this allows you to give the room a more expensive and sophisticated look. But such finishing will not be appropriate in every interior.
Advantages of decorative edging:
It is also important to understand that the cord does not fit every type of design. It looks much more advantageous in a classic interior than in a loft or modern style. But if you choose a discreet white or black edging, then it can be used in almost any room.
The cost of decorative braid starts from 80-100 rubles. per meter and reaches 200-250 rubles, which is twice as much as the previous options.
If you choose the right thickness, the edging can be installed without glue, simply inserting it into the gap. This is a simple job that can be easily done on your own.
Sealing cracks on the ceiling in reinforced concrete slabs
After the foundation has settled, there is a possibility that cracks will appear at the joints of the floors. Damage to the seam can occur due to temperature conditions, vibration or other factors. If necessary, you can repair the crack in the ceiling between the slabs yourself.
In order for the finishing in the seams to last for a long time, it is necessary to remove construction debris. After which the cracks are treated with an air stream and moistened with a small amount of water. After this, the seams are filled with polyurethane foam approximately halfway. For work it is necessary to use high quality foam.
After 24 hours have passed and the foam has completely hardened, you need to carefully cut off the excess. It is important to ensure that the end-to-end recess is about 4 cm. After this, begin priming the surface.
When the surface is primed, the seams are leveled using a cement mixture. After 48 hours, the seams are re-leveled using putty. After the work is completely completed, the ceiling is sanded and painted.