Bathroom renovation is an expensive undertaking that can make a big dent in the family budget. But if we are talking about tiles, then it is not at all necessary to completely dismantle the old finish and lay new tiles. Often it is enough just to update the joints between the tiles, and the bathroom will immediately take on a completely different look. There are several ways to do this, ranging from simple and cheap to labor-intensive, but at the same time more aesthetic and reliable.
How to update the grout between bathroom tiles
Why do you need to seal the seams between bathroom tiles?
Tiles are a practical finishing material, excellent for laying on floors and walls in rooms with high levels of moisture, but without sealing the free space between the elements, the coating does not have an ideal appearance and does not look complete. The installation of products is carried out in compliance with a certain technology, which is why during the work special crosses are used, which make it possible to make equally even seams, mainly within the range of 2-4 mm. Their presence is necessary in situations of wall subsidence for possible movement of tiles.
In addition, when caulking the seams, it is possible to prevent the penetration of water and achieve the following:
- The grout present at the joints acts as a barrier against excess moisture. Mold and mildew can grow in seams that are not filled with it.
- When processing joints in this way, the adhesion between the tiles is strengthened and the adhesive composition used to fix it to the walls and floors is protected.
- When caulking the seams, it is possible not only to complete the coating, but also, if necessary, to simultaneously mask the corners of the elements that have undergone deformation.
The quality of the work performed directly affects the service life of the laid material.
Polyurethane foam
A very good result can be obtained by using ordinary polyurethane foam. It is important to choose the right mixture. It should be suitable for interior work, have water-repellent properties, and a good shelf life.
You can only work with this substance while wearing gloves. If it gets on your skin, you can get a severe burn; it will be extremely difficult to clean the skin from it.
The process requires a certain accuracy. It is better to cover all surfaces where it is undesirable for the composition to come into contact and seal it with mounting tape.
Experienced craftsmen know little secrets that not only make the consumption as economical as possible, but also ensure the best quality of the coating.
Foam is best applied in summer. It is at this time that the quality of the coating is the highest. Before using the bottle, you should hold it under hot water and shake it. A little trick will allow you to use the composition more economically. If for any other material it is important to ensure a perfectly dry surface, then foam loves moisture. The surface can be properly moistened. This way the clutch will be much more reliable. A couple of hours after application, the composition will increase in size to its maximum.
Once the substance has sufficiently hardened, you can begin to remove the excess. They can be carefully cut off with a blade.
The surface is ready for decoration. There are infinitely many options for decorating, from finishing with tiles, sealant, gluing tape, to borders.
It is important to choose foam without toxic substances and with a good shelf life. Another distinctive feature of the material is that it works better in warm conditions.
For cast iron bathtubs, this finishing option is quite acceptable. The material works well with acrylic. But with steel bathtubs there is one point that it is advisable to remember. When exposed to temperatures, it can contract or expand. Therefore, it is better to check the quality of the connection several times.
Criteria for choosing a material for sealing joints between tiles
To effectively putty joints, it is necessary to give preference to a mixture that has a number of the following properties:
- Uniformity. Thanks to the presence of this quality, it is possible to fully fill the free space in the joints between the tiles.
It is better to refrain from purchasing mixtures that contain solid inclusions that create unwanted plugs inside, since they will not allow the grout to penetrate to its full depth. For this reason, there will be incompletely filled areas in the middle of the seams. - Resistance to dampness. After hardening, the grout must not absorb moisture, easily repelling it.
- High strength index. The material used for sealing joints should not fall off, crumble or be washed out during cleaning and operation of the tiles as a whole.
Wash basin
How to seal the joint between a sink and tiles?
We have to use silicone sealant. When installing a sink, it combines two functions:
- A couple of beads of sealant act as a damper between the back and the tile. It will distribute the load along the wall if you lean too much on the sink. Before installing the washbasin, the sealant on the back wall must be completely dry , otherwise it will firmly glue the sink to the wall;
- The same sealant is used to fill the gap between the sink and the wall. It is applied from a tube using a mechanical gun and fills the seam to the maximum depth. To avoid staining the tiles and sink, first stick two strips of masking tape on them. Excess sealant is removed with a damp finger.
The gun will make it easier to fill the joints with sealant.
Use only clear sealant. White, despite antifungal additives, noticeably darkens over time. I don’t know how to bleach darkened silicone without completely removing it: all bleaching and cleaning products only partially remove the blackness.
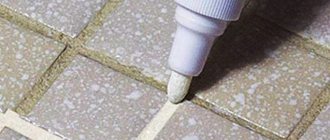
Types of grout mixtures
Before treating the tile seams in the bathroom, you need to take a closer look at the types of grout on the market that are intended for this purpose. These include the following mixtures:
- epoxy;
- cement;
- polymer.
Each type of material has its own characteristics, as well as advantages and disadvantages, which you need to familiarize yourself with in more detail in order to decide which composition is most suitable for use.
Epoxy grouts
These grouting materials have a wide range of uses. They can be freely used not only when sealing seams between tiles in the bathroom, but also in other rooms, and can also be used to treat the facade of a house.
The advantages of epoxy grout are as follows:
- Resistant to various household chemicals. Taking this into account, when cleaning, you can use any cleaning agents of your choice, since even acid and alkali cannot cause any harm to them. Due to their high protective qualities, such mixtures can be used in places with increased sanitary and hygienic requirements.
- Significant level of strength. After complete hardening, epoxy grouts become as strong as possible. For this reason, even with direct mechanical impact, the joints will not be destroyed. Basically, such mixtures are freely used for 40-50 years.
- The material is not affected by fungi and mold.
- High moisture resistance. Even when found in conditions with high humidity and in the presence of regular changes in the level of dampness, epoxy grout is indestructible and does not lose its original properties.
In addition to the very impressive positive qualities, such mixtures still have some disadvantages, due to which preference is often given to other options:
- Preparation must be done independently. The result is a mass with a fairly high degree of viscosity, which is why after mixing the epoxy resin and hardener, which act as the basis of the composition, not every novice master is able to qualitatively seal the seams between the tiles in the bathroom using it.
- They are an order of magnitude more expensive than cement and silicone mixtures, which is why they are much less often preferred.
- Toxicity. In a liquid state, epoxy grouts can harm not only the skin, but also the human respiratory system. For this reason, when carrying out work using them, it is imperative to use appropriate protective equipment and exclude the presence of strangers in the room. You can start using the bathroom only after the mixture has completely hardened. Until this moment, all people living in the house should avoid entering this room.
Note! Manufacturers produce a huge number of different shades of epoxy grout, among which there are mixtures with glitter, mother-of-pearl, and also made in gold and silver.
Cement grouts
Cement-based compositions have been used for many years. They are often preferred because they increase the strength and improve the appearance of the coating. When used, the tiles become more resistant to mechanical damage, thereby increasing their service life.
The production of such grouts is carried out from cement, sand, as well as other additional components, which are colored pigments and plasticizers, which improve the technical characteristics of the material. There are two varieties of them. Their main difference is that some contain sand, while others do not. The surface treated with them dries after about 20-30 minutes.
When filling wide joints between tiles in the bathroom, cement grout with sand is used, which is a suitable option for joints over 4 mm wide. Narrower strips should be sealed with mixtures containing polymers.
Important! It is not recommended to seal the seams between marble and glazed tiles with cement mortar due to its greater sensitivity.
Cement-based grouts are made in different shades. In most cases, they contain the necessary color pigment and only in some situations it is necessary to purchase it separately and add it yourself. In addition, manufacturers produce mixtures with which you can mix special powder, which has the color of silver or gold, which makes the tile covering in the bathroom more elegant and expensive in appearance.
In general, such grouts have many advantages, which is why they are often preferred even if there are more modern compounds on the market now:
- Easy to prepare and apply. It is extremely simple to seal the seams between the tiles with cement mortar, even if such work is being done for the first time, since no special preparatory measures are required before this. To prepare the mixture, you should combine the dry composition with water, and then continuously stir until a homogeneous mass is obtained. After 5 minutes, you need to thoroughly chop the solution again, after which you can begin applying it.
- Significant level of mechanical strength. Grouted joints made of this material withstand direct physical influence well, even when under regular exposure to high dampness.
- Versatility. Using cement mortar, you can process any seams. For processing narrow and wide joints, there are corresponding mixtures on sale, the difference between which is the presence of components of different fractions in their composition.
- Affordable price. Cement-based grout mixtures are among the cheapest compositions. This makes them extremely suitable for use when sealing joints, especially when you have an extremely limited budget at your disposal and you have to do it yourself when laying tiles in the bathroom and doing all the associated work.
In addition to a number of significant advantages, cement grouts also have some inherent disadvantages:
- It is not possible to clean tiles when they are dirty with seams filled with these mixtures using just any household chemicals.
- The negative impact of moisture manifests itself an order of magnitude faster than when using other types of grouting compounds, since cement itself is a water-soluble material.
- Seams filled with them are much more likely to become contaminated than other mixtures intended and used for this task.
Note! Cement compositions are presented in the assortment of construction stores as dry powder and ready-made mortar. The second option is slightly more expensive, but giving preference to it eliminates the need to use special tools for cooking and saves the time required for this. The purchased ready-made solution can be used for its intended purpose immediately after opening the container.
Polymer grouts
These mixtures are also often preferred due to a number of advantages they have:
- reducing the degree of shrinkage of seams;
- ease of rinsing;
- frost resistance;
- hardening occurs regardless of the room temperature;
- high plasticity;
- after the final hardening of the grout in the area of the seams, cracks do not appear on their surface;
- dirt-repellent properties;
- resistance to moisture.
Their disadvantage compared to epoxy grouts is their lower level of strength. To increase this indicator, polymers that are in a liquid state can be added to the mixture. Such compositions are also available in a wide range of colors, making it easy to choose the option that best matches the tile.
Ribbon
A simple, convenient, expensive way. This option can only be used in combination with other types of surface protection. It is only suitable for short distances. The application site must be treated with a cement composition or foam for installation.
Modern industry offers a wider or narrower option. The use of such decor eliminates the need for additional work.
To increase adhesion to the surface, you can use sealant, liquid nails, and glue. It is important to pre-degrease, wash, and completely treat the surface.
An additional advantage is speed of installation. Such work will only take a few minutes, but will last a long time.
How to seal the seams between bathroom tiles
There are several ways to grout the tiles in the bathroom, so you can use any of them that is more comfortable and affordable for you. Before this, it is only necessary to fully carry out some preliminary activities, the quality of which significantly affects the final result.
Preparatory work
They must begin after the adhesive used to fix the tiles has completely dried. After this, you need to clean the ceramic tiles from excess tile adhesive. You can speed up the process by using appropriate means. In addition, you should remove the crosses that help lay the tiles and create equally even seams between the elements.
At the next stage, it is necessary to carry out a complete washing of all products between which the joints will be sealed. Next, it is advisable to use masking tape to mark the boundaries, gluing it to the sides of the stripes that are to be filled. Thanks to this, it will be possible, if not to completely avoid contamination of the coating, then at least to reduce it to a minimum.
In the case of re-sealing joints, initially, before applying new material, you must also thoroughly remove the grout from the joints, which previously filled the space between the tiles.
Note! If you are processing joints between elements of unglazed tiles, then it is necessary to wet their edges with water. If this is not done, the product will absorb the liquid contained in the grout, which may ultimately cause the material to crack.
After all the preparatory activities have been completed, you can begin the main work, using the method that suits you.
Sealing seams using the first method
In this case, actions must be performed in the following sequence:
- The first step is to open the container with the prepared mixture and mix it thoroughly. If a dry composition is preferred, it must be prepared in accordance with the manufacturer's recommendations. The mixture should be prepared in small portions, which can be used freely before it hardens. It is impossible to use the mass that has undergone setting, nor to dilute it with additional liquid, since in such a situation there will be a significant decrease in technical performance.
- After this, using a narrow rubber spatula, you need to apply the mixture into the seams between the tiles, using it to scoop up the solution in small portions and pressing with little effort at an angle of 30°.
- First, it is necessary to treat the entire surface of an area of 1-2 square meters. m of seams horizontally and vertically. After this, you can proceed to sealing the joints on the rest of the surface.
- 5-7 minutes after opening the seams with grout material, wipe the area with a damp cloth.
Note! If you first process all the vertical joints on the surface, and then proceed to the horizontal ones, then the difficulty will arise in the hardening of the previously applied composition.
Putting seams in the second way
When using the second method, work must be done using a special bag, into which grout is placed before application and a tip of optimal diameter is installed in accordance with the thickness of the seams being processed.
After filling it with the mixture, you can begin sealing the joints. To do this, lightly press on the bag, moving from top to bottom until the strip you have started is finished. To improve the quality of the seam, you can additionally make a movement in the opposite direction. After the mixture has hardened, you can begin to form the final dimensions of the joints and remove the excess.
Sore spots
Where in the bathroom are the seams that require our attention?
- Between the washbasin and the wall. When you wash your face, water inevitably hits the tiles and flows down it into the gap between the wall and the sink. If the seam is not sealed, puddles on the floor are guaranteed;
- Between the wall and the bathroom. The nuisance is the same, but on a much larger scale: with a leaky seam, there are very real chances of becoming acquainted with the lower neighbors in a very unpleasant way by pointing the shower at the wall for a few seconds;
This problem is acute if your bathroom floor is not waterproofed. If you put regular plastic film under the screed and tiles, puddles will become your only headache.
- Finally, another problem is mold in the bathroom on the seams between the tiles. Due to a leaky or rough surface of the seal, it is often infected with fungus.
Fungus appears where seams often come into contact with water.
Now let’s talk about solving these problems.
Useful tips for choosing
Due to the fact that the grouting material has an important impact on the final appearance of the tile covering, in order to choose the right grout, it is advisable to take into account the following recommendations:
- To provide contrast to the tiles and to separate each piece from each other externally, choose a mixture of dark colors.
- For light tiles, it is better to choose a composition that is 1 tone lighter than it.
- White grout is universal because it goes well with products of any color and regardless of whether they have patterns.
- For dark tiles, it is optimal to select a solution that is 1 tone darker than it.
- If the coating consists of products of different colors, then it is better to choose a grout that best matches the interior of the room.
After finding out how to seal the seams between the tiles in the bathroom, as well as selecting and purchasing grouting material, you can begin to carry out the work yourself using one of the above methods. Video:
Flexible self-adhesive border
If the gaps are not significant or there is simply a desire to improve aesthetics, you can resort to adhesive-based borders. A set of such material usually includes a small tool for carrying out the work.
The substance is a moisture-resistant element with an adhesive base. It is important to prepare, degrease, and ensure the surface is completely dry.
The adhesive side is pressed tightly against the joint surface. Work can be carried out manually or using a tool.
The option is fast, economical, but has a number of features. Firstly, it approaches the quality of surface finishing. Secondly, it won't last very long. The service life of such a coating is hardly close to years. But replacing it will not be difficult or costly.
Using a grout bag
If you are working on a surface that is particularly difficult to clean after grouting, such as antique brick veneer, use a grout bag to fill the grout. This bag looks and acts just like a piping bag for decorating cakes. A metal tip approximately the same width as the grout joint is attached to the end of the bag. The bag is filled with grout, and then it is squeezed out with force through the tip into the seam.
When working with a grout bag, place the tip of the bag at the top of the joint and slide it forward along the edge of the joint as you fill it. For best results, grout the entire length of the grout rather than around individual tiles. Usually, all horizontal seams (along the x-axis) are filled first, and then the vertical ones (along the y-axis).
You should squeeze out a little more grout than seems necessary. After it has set slightly, tamp the grout into the joint using a jointer or a piece of smooth metal tube, the diameter of which is larger than the width of the joints being filled. Then let the grout pressed into the joint set for half an hour, after which remove the excess with a stiff brush.
Removing grout
The first removal of excess grout is dry.
When all the joints are filled, to remove excess grout you will need a float, which should be held at almost right angles to the surface of the tiles (as shown in the picture). In this case, it is necessary to move the trowel diagonally relative to the seams, otherwise the edge of the tool may get into the seam and remove part of the grout from it (if this happens, just add a little grout to the seam and level the surface of the seam with the edge of the trowel). Once the excess has been removed, allow the grout to set before cleaning. While you're grouting and cleaning, you'll want to remember to stir the grout in the bucket occasionally to keep it soft before applying it to new areas.
The second grout removal is wet. When should I start? After dry cleaning with the edge of a float (which removes the bulk of excess grout from the surface of the tiles), each cladding requires wet cleaning to one degree or another. The time it takes for grout to fully set before wet cleaning varies greatly from installation to installation.
It may be 5 minutes, or it may take 20 minutes or more. The rate of evaporation of liquid from grout is affected by weather conditions, the type of base, adhesive and tiles.
Keep in mind that grout residue on the tile surface may set fairly quickly, although grout may take longer to set in the joints. You can use a sponge to assess the readiness of the surface of the tiles and grout joints for cleaning: wet the sponge as much as possible, and then test a small area of the tile surface. The grout in the seams should be elastic and dense, but not hard.
If the grout sets too tightly, the tiles will have to be difficult to clean, which can damage the seams. On the other hand, if the grout is pulled from the joints behind the sponge, this means that the grout has not set sufficiently. Wait a few minutes and check again. Cleaning can begin when the grout in the joints remains in place.
If it turns out that too much time has passed before you start cleaning, and the grout has dried to the surface of the tile, you can remove it using a special abrasive float. (Unlike other scouring floats, this float does not leave scratches on the surface of the tiles - to be sure, test on a piece of tile first). After cleaning the dried grout residue, go over the entire surface with a well-wrung out sponge.
There are many tricks for cleaning grout, some of them quite unusual. For example, some tilers pour dry grout over the joints (so that the wet grout in the joints dries faster). Others use sawdust so that it will draw out excess moisture so that excess grout can be easily removed. Many of these methods weaken and thereby destroy grout joints, so we do not recommend their use.
It is better to use a combination of proven techniques that is suitable for both commercial and residential cladding. The main principle of this method is to use a minimum of water during cleaning so as not to weaken the grout.
Combined method
Often, combining several sealing options works more efficiently. The combination depends on the actual dimensions of the joint:
- A wide gap is first filled with foam and covered with a special sealant. Finally, a curb is installed.
- How to seal a narrow joint between the bathtub and the tiles - treat it with silicone, stick a border or tape on top.
The combination helps protect the joint and at the same time give it an aesthetically pleasing appearance.
By the way, if you close the wide gap horizontally by installing tiles or plastic flat borders, you can get a small shelf.
Installation Features
Metal is not effective for a base; it quickly rusts and corrodes. Surface treatments and sealing will not help. It is better to initially choose moisture-resistant, at the same time durable materials.
Externally, the finished shelf will have to be covered with tiles or other material, then waterproofed.
If there are two similar large gaps and it is impossible to rearrange the bathroom, you can create two different shelves. One higher, hiding parts of the washbasin, the second lower, at the same time hiding the cracks.
In a similar way, you can lay a beautiful ceramic border. Designers try to use every millimeter of available space, especially when the room is small.
Let's sum it up
The variety of materials for sealing the gap between the bathtub and the wall is really great. Try to choose the one that suits you best and get to work. We promise, you will definitely succeed!
Small-sized apartments exist not only in old Khrushchev-era buildings; completely new housing projects, designed for the poorer category of our fellow citizens, also save on passerby space. The industry takes into account the situation in the housing market and produces small-sized but very functional furniture specifically for such situations. In a special article you will find tips on choosing a cabinet for a small hallway, as well as instructions for assembling a door cabinet.
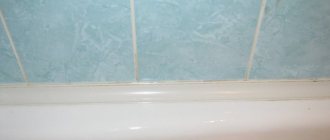
Silicone sealant
A simple, affordable and effective way. It will work if the gaps are small.
Seam sealing process:
- Clean and degrease the desired area. Dry thoroughly; apply sealant only to clean, dry surfaces.
- After opening the package, carefully fill the gaps with sealant. Proceed with caution; if you stain the tiles or the bathroom itself, it will be difficult to clean afterwards. You can seal adjacent areas with masking tape before work. Manufacturers produce sealants in special narrow tubes equipped with a gun. Thus, the substance comes out in a thin, controlled stream. Fill the seams with it.
- It is easier to squeeze out the mixture with a rubber spatula.
- When finished, let the material dry.
Work wearing a mask and special gloves. The solution smells strong. For bathrooms, a white water-repellent sealant that has useful antibacterial properties is better suited. Transparent is good, but it looks ugly, and cheap mixtures are short-lived. Manufacturers provide detailed instructions at the top of the bottle, making it easy to choose the right product.
The gun can be taken separately if not included.
Applying grout
First, spread a mound of grout onto the surface of the tiles (you can simply pour the grout out of a bucket if you are working on the floor, or scoop the grout with a square trowel for applying it to the walls).
In order to distribute the grout, a grout float (in the appropriate version for floors or walls) is more suitable than a steel trowel.
Hold it at a 30-degree angle to the tile (as shown in the photo) and apply grout diagonally to the surface of the tile (as shown in the photo). Run the float over the entire surface two or three times, but don’t just cover the seams with grout, but try to rub it in, press it firmly into the seam so that it is tightly filled with grout.
The stronger the resistance, the more densely the seam is filled and the stronger it will be. The main idea is to fill all the corners and voids around the tiles that remain after applying the adhesive to the top with grout. During the grouting process, the liquid will leave the grout, and the seams will be filled with particles of sand and cement - one might say, you will get a solid body instead of liquid cement paste.
Do not grout the entire surface at once; it is better to first distribute the grout over a small area of about one or two square meters. meters until you figure out how quickly the grout sets. So, if you find yourself working with grout that sets quickly, you will need to stop and clean up.
Sometimes it is possible to immediately wipe about 9 square meters. meters before you start cleaning it; in other cases, only a small area can be covered with grout. Working in a small area will help you determine the speed at which you should work.
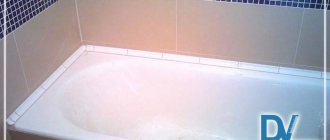
If the gap is large
A situation often occurs when the bathtub does not fit close to the walls, since it is smaller than the size of the room. If there is a space of 3 cm or more, then the above methods cannot be used to close it.
It is optimal to seal such a seam with tiles, having previously secured a support from below (a width profile, a piece of plywood or a board).
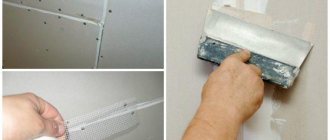
If the gap is 10 centimeters or more, you can build a frame from a gypsum board profile, cover it with plasterboard and tile it - you will get a convenient shelf for bath accessories.
The considered methods allow you to seal the cracks behind a bathtub of any size in the most aesthetically pleasing and neat way. In conclusion, here is a video about common mistakes made when installing a bathtub.
Advice! If you need bathroom renovation specialists, there is a very convenient service for selecting specialists from PROFI.RU. Just fill out the order details, the experts will respond and you can choose who to collaborate with. Each specialist in the system has a rating, reviews and examples of work, which will help with the choice. Looks like a mini tender. Placing an application is FREE and does not oblige you to anything. Works in almost all cities of Russia.
If you are a master, follow this link, register in the system and be able to accept orders.