Often, the seams between tiles in the bathroom or kitchen are susceptible to the appearance of unsightly yellowing and harmful mold.
Unfortunately, many cleaning products are powerless against yellow formations; they stubbornly do not disappear. But there is a way out!
For this purpose, a special miracle pencil has been developed, designed to restore the former whiteness of tile joints.
Outwardly, it looks like a simple marker, but during operation it really “works” miracles - the tile looks like new.
Why is seam bleaching required?
A marker for plumbing work, also known as a pencil for whitening joints, is a unique invention that helps renew tile joints without wasting extra time. The marker is designed for processing seams in any room, especially where household chemicals cannot cope. This product is most often used to improve the appearance of old masonry, because over time, fungi and bacteria begin to multiply on the white seams. Microorganisms penetrate deep into the grout of tile joints and release waste products that cause blackening and yellowing. This is why it is impossible to remove stains by hand.
A plumbing marker is a real miracle; it is used to paint over the oldest stains and drips, helps disinfect seams and get rid of mold. By purchasing a marker, you will not need to remove the old grout and apply new one. It is enough to apply a strip of this special product to obtain snow-white tile joints. The pencil is harmless, non-toxic, not dangerous for children and pets, it can be used in any room where it is required.
Marker composition
The main component of the marker is white ink with high covering power, which can be used for various finishing works. They are odorless because they do not contain solvents or other harmful components.
The ink is lightproof and, after application, provides a beautiful varnish effect to the tile joints. They are also waterproof, so they can be used even in places where moisture regularly gets in. In addition to ink, the marker composition includes special fungicides and antiseptics that destroy microorganisms and prevent their reappearance.
Marker Specifications
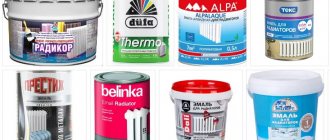
You can purchase a plumbing marker at any large hardware store, for example, at Leroy Merlin. The most popular brands are Snezhok, Edding E-8200, Grout Aide, Bradex. You can also order a marker from AliExpress, where products from Chinese and other manufacturers are presented. The products have approximately the same parameters and properties: water resistance, ultraviolet resistance, high adhesion to surfaces. Outwardly, they all resemble a regular marker with a tip and a removable cap. The body of the marker is plastic, it is filled with a white solution. The approximate dimensions of the product are:
- length – 15 cm;
- diameter – 1.5-2 cm;
- feather thickness – up to 3-4 mm;
- weight – 25-30 g.
Some brands of markers have a spare writing tip. Any pencil contains detailed instructions for use. The products can be used to paint grooves near sinks, between tiles, and near countertops. After facing, the seams dry quickly, and the ink does not fall off over time. Among the Chinese markers you can find not only white, but also colored ones, which can give the tilework an original look.
Advantages and disadvantages of markers
The advantage of the marker is its absolute safety for humans and the environment due to its environmentally friendly composition. The product can be used at any time, because it has no odor, so the room does not require ventilation. Resistance to water is a huge plus: you will not need to buy additional moisture-proofing compounds. Other advantages of the marker:
- ease of application, speed and ease of operation;
- the presence of a powerful antiseptic effect;
- beautiful varnish coating of the finished seam;
- high drying speed even with high indoor humidity;
- long-term result;
- a dense layer through which yellow and black spots do not show through;
- perfect whiteness of the finished coating.
The plumbing pencil also has its disadvantages. Reviews claim that many Chinese-made products are of poor quality. Sometimes markers arrive dry or completely empty. In addition, the packaging is enough for a small area of tiled work, so you will have to purchase several markers for the bathroom (the price of each is 100-170 rubles). Another disadvantage is that it is better to use the marker exclusively for walls: on the floor covering, the seams will quickly become dirty, covered with dust, and it will not be easy to return them to their snow-white appearance.
How to change the color of the grout to give the interior the desired atmosphere?
It may seem that the color of the grout is not very important for interior design. However, this is a wrong impression! Even a slight difference in the shade of the grout can determine the ideal effect of a renovation or partial success. So how to choose the color of the grout so as not to regret it and not think about painting it in a short time?
The color of the joints is selected in several ways. First of all, if you want it to match the color and pattern of the tiles, choose a shade that is as close to their color as possible. On the other hand, if you want a contrasting effect, you need to choose a color that is not only completely different from the color of the tile, but also goes well with it.
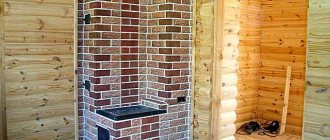
A few combinations for the brave: black tiles and red grout, blue tiles and yellow grout, dark brown tiles and light pink grout, white tiles and graphite grout (especially suitable for brick).
What grout color should I choose for my mosaic? It usually looks beautiful when paired with white or shiny stitching. The latter case is especially effective - with the right light (bright, spot light), the tile looks as if it is suspended in a flickering glow.
How to choose the color of tile joints?
- By contrast or similarity of shades,
- Mosaic tiles combine beautifully with white and shiny grout.
How to use a tile marker - instructions
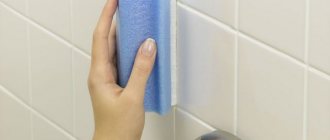
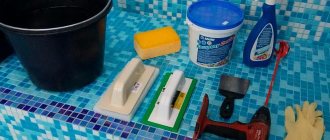
No special knowledge or skills are required to apply the product. To return the tiles to a fresh look, you only need a marker, but you should first prepare the walls for work. By washing them or wiping them with a cloth to remove heavy dirt, you can reduce white ink consumption and reduce costs.
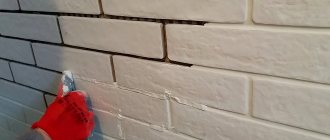
Paint should be applied after the tile joints have completely dried. You need to take the marker out of the package, shake it well, then remove the protective cap and start filling the tile joints. To do this, you just need to move the marker along the seams, pressing it a little and drawing straight lines. The thickness of the applied layer should be minimal; this will be enough to ensure an even white color after drying.
The width of the marker pen most often coincides with the size of the seams, so the work will proceed quickly. Even large stains are covered with one application of ink. While working, you need to periodically shake the contents of the package so that the paint does not settle and wets the pen well. After finishing painting the seams, you need to evaluate the result and apply another layer of ink where there are flaws. The marker can be used repeatedly, it is only important to close the storage cap tightly. The nib wears out faster, so it’s better if you have a spare one in the kit. You can use the bathroom or wet the walls after the marker has completely dried.
Step-by-step instructions for using a whitening pencil
In fact, you do not need special knowledge and experience to operate such a composition.
For such work, you should only have a bleaching marker and a pre-prepared wall surface in your arsenal. To reduce the waste of material and your funds, you should first thoroughly wash the walls to remove excess.
Painting of paintwork materials occurs only after residual drying of the joints between the tiles.
To begin, take out the whitening pencil, shake it, remove the cap and start applying it to the seams.
It is enough just to run it along the joints with light pressure and draw straight stripes.
Each layer must be made with a minimum thickness in order to obtain a uniform white color upon drying.
As a rule, the tip of the pencil is proportional to the seam, so you can complete all the work with ease and in a short time. Moreover, even the most noticeable stains will be invisible after the first ball of white ink.
Do not forget to shake the marker periodically during the application process to avoid the paint settling and at the same time wetting the pen.
When you finish the job, look for any imperfections - if there are any, you can reapply the bleach.
The pencil is suitable for repeated use, the main thing is to ensure that the cap is closed.
It is advisable to take a product that comes with an additional feather, since the first one will quickly be erased. You should start using the bathroom only after the pencil has hardened.
Other variations of bleaching grout for joints
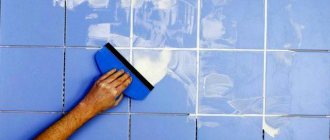
How to whiten grout in the bathroom if there is no marker available? You can use high-quality grout for joints, which will create a beautiful and durable coating. Grout is applied between the masonry elements initially, because if there are no gaps, the tiles can become deformed. The grout also corrects roughness, smoothes out irregularities that arise when cutting individual elements, and enhances the thermal characteristics of the masonry.
The use of grout with antiseptic properties reduces the risk of mold, which likes to settle in damp rooms. The grout mixture does not allow microbes and moisture to penetrate under the tiles, therefore, the masonry will last longer. Grouts are different, it all depends on their components and basic properties.
Cement products
Cement-based grouts are the most popular, inexpensive, durable, and have a high level of adhesion to the surface. They are sold in the form of a loose mixture, which just needs to be diluted with water before application. In addition to white cement, the composition contains quartz sand, plasticizers, and modifying additives.
Epoxy products
Grout mixtures with epoxy resin are the most expensive, but the most durable. They are difficult to work with, but the resulting seam does not turn yellow for a long time, does not crumble at all and can last for decades. It is recommended to use such compositions in places with constant contact of walls with moisture: the water resistance of epoxy resin is at the highest level.
Polymer cladding
Such products are moderately durable, but have excellent water-repellent properties. They are usually used to create a hydrophobic layer in tile masonry. Polymer seams can be painted in any color, so they are valued and often used by experienced designers.
How can I replace a whitening pencil?
Of course, you will ask yourself the question, what to do if the farm does not have such a product?
A high-quality grout for tile joints can be used as a replacement, with which you can create a reliable and pleasant-looking coating.
After laying, it is necessary to immediately grout, because if this is ignored, the tile will simply deteriorate.
In addition, using grout you can get rid of roughness, level the base, which is distorted when cutting parts, and also increase the heat resistance of the tiled finish.
“If you purchase grout with an antifungal effect, you will thus provide protection against mold, which often appears in rooms with high humidity. The grout will prevent bacteria and moisture from seeping deeply under the tiles. Grouts are produced in different variations, depending on the constituent substances and the effect.”
What are cement grout compounds?
Cement grouts are very popular among consumers, do not cost exorbitant amounts of money, are reliable and have high adhesion.
Available in powder form, which are pre-diluted with liquid.
In addition to white cement, this grout consists of quartz sand, plasticizers and transforming components.
Characteristics of grouts based on epoxy resins
These products belong to the category of expensive, but very reliable compounds. They are difficult to work with, but the seam will not turn yellow for a long time, will not crumble, and will serve for a long time.
Due to their increased water resistance, it is advisable to use such products in rooms with constant humidity.
Finishing compositions made of polymers
Although polymer facing materials are not very strong, they are resistant to water and moisture.
They are often used in tile masonry to create hydrophobic balls.
Any color paintwork material can be applied to polymer seams (it is for this reason that interior designers give them their preference).
Use of folk remedies
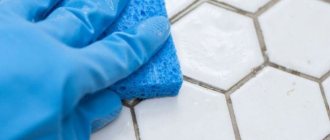
There are a number of home methods that can also be used to clean and whiten grout in the bathroom. Here are the most popular:
- A mixture of lemon, soda, vinegar. This “bleach” can only be used with gloves. Take ½ cup of soda, pour in the juice of 1 lemon, ¼ cup of vinegar (9%). Pour the resulting mass into 1.5 liters of water and mix. Use a sponge or old toothbrush soaked in the solution to clean the tile joints. For severe stains, apply liquid, leave for 20 minutes, then rinse.
- Ammonia. Dilute a tablespoon of ammonia with a liter of water, pour it into a spray bottle, and spray the wall. After 20 minutes, wash off the solution with a rag.
- "White". Apply “Whiteness” diluted twice with water to the area of the seams with a small sponge, after the dirt has disappeared, thoroughly wash the wall from chlorine. You can also mix equal parts soda and “Whiteness”: you get a very powerful cleaning and bleaching agent. You only need to work with gloves and a respirator!
- Toothpaste, mustard, soda, lemon. You can get rid of dirt on the seams like this: take ½ cup of soda, combine with 1/3 cup of lemon juice, a tablespoon of mustard powder, and a tablespoon of toothpaste. Pour the mixed mixture with a liter of water. Using a sponge, rub the product into the grout joints, then rinse.
- Salt. To remove dirt, you can wet a sponge with water, take a little salt with it, and treat the surface well. You can also use a brush for salt cleaning. Remaining salt should be removed with water after finishing work.
- Hydrogen peroxide. This pharmaceutical product works best for cleaning cement grout joints. You just need to moisten them with undiluted peroxide, wipe with a sponge and rinse.
It is recommended to treat stubborn stains with hot steam using a kettle or iron. Such manipulations are best achieved using a clothing steam generator. After steaming, the dirt can be removed, besides, mold and mildew will also die, and the tiles will remain clean for a long time.
Reasons for darkening of joints between tiles
Ceramic tiles are strong, reliable, durable material. But the seams between the tile elements are less resistant to the external environment.
The reasons why tile joints darken may be the following:
- Untimely cleaning of tiles.
- Lack or poor ventilation. As a result, excess moisture accumulates in the bathroom and mold appears between the tiles.
- Absence or malfunction of the hood in the kitchen. Grease and oil splashes accumulate on the seams, leaving yellow stains.
- Low quality grout material used when laying tiles.
- Failure to comply with joint processing technology when installing tiles.
It is possible to return the tiles to their attractive appearance. To do this, you can do without replacing the tiles. You just need to update the grout mastic.