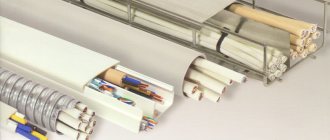
Cable channels are plastic or metal boxes for hidden or open laying of wires and cables. Can be used both outdoors and indoors. They are also called cable trays and boxes, sometimes the word “electrical” is added.
Consists of a body and a cover. The cross-section is mainly rectangular and square, but there are others, more specific. The body can be solid, or perforated. Perforated housings are rarely needed for better ventilation and faster cooling. In this article we will talk about how to attach a cable channel to your wall in the house.
Purpose of the cable channel
The device is designed to hide unsightly wires. Laying of cables in channels is carried out after completion of repairs. In addition to camouflage, the boxes provide access to the wiring.
They are made from non-flammable materials and are designed for long-term use. The channel looks like a rectangular box with a snap-on lid. Wires are placed into the cavity and then closed.
The special structure allows the product to be mounted on walls, ceilings or floors.
The channel does not conduct current, it is flexible, durable and resistant to aggressive substances. Cable channels are used when arranging wiring in industrial, residential, and utility rooms.
Preparatory work
To begin with, determine the location of the route, line turns, and intersection points. They draw up a project for the highway so that after installation they do not have to redo the work. The drawings indicate the cross-section of the wires, the places of passage so that they do not interfere with pieces of furniture or other elements.
Procedure for preparing for work:
- selection of tools;
- acquisition of necessary materials and elements;
- surface preparation;
- marking routes on walls, ceilings, floors, taking into account the design and safety precautions.
The cable channel can be moved from one place to another, but traces of hardware or glue will remain on the surface. Therefore, special attention is paid to design.
Tools and materials
For marking you need a tape measure and a pencil. It is better to lay the route using a laser level, which will show an exactly horizontal line. Vertical sections are marked with a level, or a plumb line is used.
Tools needed (some can be omitted, depending on the method of mounting the cable channel in the wall or on top):
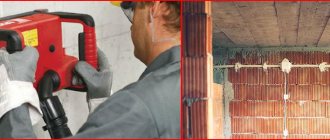
- a hammer drill with an impact element (for cutting grooves for boxes); for drilling holes, use drills with diamond or pobedite tips;
- drill, screwdriver;
- mounting gun for “liquid nails” glue.
You will need: screwdriver, hammer, pliers. For marking, instead of a pencil, use blue tape with tapping thread.
Prepared from materials:
- external and internal corners;
- end caps;
- connecting parts (L, X and T-shaped).
Plastic and metal boxes are produced by many companies, so the configuration and shape of the parts differ.
Marking
The operation plays a significant role in order not to redo the work in case of inaccurate fastening (the route can go down or up, the beginning and end of the line in the plane do not coincide.
Marking order:
- The length of the box is applied to the surface, the remaining areas are marked with a tape measure, and marks are made with a pencil or core.
- They mark a line horizontally, aiming a thread with blue (a cone with a cord) from one corner to another; when working, they try to pull the thread so as not to get sagging in the center.
- The locations of sockets and switches are marked on the line, and holes are cut out using a crown on cardboard or concrete.
- Vertical lines are also measured with a plumb line and beaten with thread.
The box cannot be placed at an angle; this is important for products installed inside the wall.
Preparing the walls
It is necessary to level the plane:
- Channels placed on glue will experience tension in the area of kinks and over time will move away from the wall completely or partially.
- Products mounted on self-tapping screws hold tighter, but they can also break out of the wall.
- Straight cable ducts will emphasize the curvature of the surface.
For leveling, plaster and starting putty are used. If the curvature is large, part of the layer can be knocked down, and a metal mesh can be nailed under the greater thickness. It is better to use beacons that make the plane ideal.
Types of cable channels
The boxes differ in materials, rigidity, and installation locations. Other characteristics are considered less important.
By material
Taking this feature into account, the following varieties are distinguished:
- Metal boxes. Such channels are used for laying wiring outdoors or indoors. Painted products are available in different colors. You can choose a box to suit any interior. The galvanized surface is not subject to corrosion, so the device lasts at least 10 years.
- Plastic boxes. Electricians often use such channels due to their low cost. In addition, they are flexible and durable. Manufacturers also offer channels in different colors. The most popular are white products.
At the location of attachment
There are these types of cable channels:
- Electrical. Small cross-section boxes are placed on walls to hide thin bundles of wires.
- Modular. Used when installing sockets.
- Floor-standing. Used when laying wiring on the floor.
- Trunk. Large cross-section structures are designed for stretching wiring over long distances.
- Skirting. Used when laying cables at the junction of walls and floors. The product looks like a plinth with a recess and a cover under which the wires pass.
By hardness
There are 2 types of cable channels:
- flexible, able to take the desired shape;
- case, which are rectilinear rigid structures made of metal or plastic.
[/caption]
Design and benefits
The cable channel is a structure consisting of 2 parts:
- grounds;
- covers.
The profile of the assembled structure can be rectangular, triangular, or rounded. The base is always flat, because mounted on a flat surface, most often on a wall. It may have partitions inside that allow you to separate conductors for different purposes and facilitate their installation. The cover is inserted into special grooves in the base and securely connected to it. This design allows you to quickly dismantle or expand the network when modernizing it.
The materials for making products are:
- metal (cold-rolled or galvanized steel, aluminum);
- plastic (most often polyvinyl chloride - PVC).
Cable channel made of PVC and metal profile
To install routes of various configurations, electrical boxes are equipped with special accessories (plugs, transitions, joints, etc.). This allows corners, joints, various transitions and bends to be aesthetically beautiful, so as not to spoil the interior. Accessories are compatible with a specific type of box and are selected depending on the route of open wiring. They are produced by domestic and foreign manufacturers in different sizes in a wide range of colors with varying degrees of protection (from IP00 to IP44).
The main advantages include:
- ease of installation and dismantling;
- the ability to lay conductors along a route with a complex configuration;
- easy access to conductors;
- protection of wires and cables from fire, damage, moisture, rodents and other negative factors;
- the ability to install switches and sockets directly on the surface of the product;
- a wide range of manufactured products, which makes it possible to choose for specific needs.
Mounting options
Despite the versatility of boxes, different methods of installing elements are used. When choosing a method, take into account the type of base to which the products will be attached.
Common fixation methods:
- screws;
- dowels;
- liquid nails;
- "bugs".
Self-tapping screws
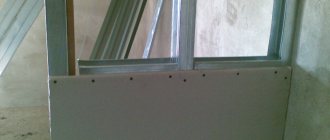
This method is used to attach channels to drywall or wood. Most often, self-tapping screws 4 cm long are used. The frequency of placement of fasteners depends on the cross-section and number of cables being laid. It is enough to maintain a step of 40–50 cm. Using a screwdriver simplifies the work.
Screeds with platform
It is a dowel with a thread and a platform (square or rectangular) to which a tie is attached. These fasteners (KSP) are convenient for quick installation. Made from non-flammable plastic.
KSP - screed with mounting platform for dowels
Initially, a dowel is installed, onto which the platform with the screed is screwed. After this, the wires are attached. Installation is suitable for wooden, brick and concrete walls and ceilings. With the help of such platforms you can attach several cables at once.
Dowel clamp
Used for quick fastening of one cable. The clamp is very easy to install. Using a hammer drill (if the wall is concrete), a hole of the required length and diameter is drilled. After this, the clamp is carefully opened, the cable is placed in it and the sharp end is inserted into the hole. The clamp will not fall out of it thanks to the double-sided notches on its sides.
The shape of the clamp must match the cross-sectional shape of the cable. Basically it is either round or rectangular. These installation elements are low cost and reliable in installation.
Open wiring in a box
This is the best installation method. Wiring is considered open only according to installation technology. She is unusual in appearance. The laying of cables in channels is sometimes called semi-open.
The advantages of the method include:
- safe operation;
- compact dimensions of structures;
- ease of installation;
- versatility of use;
- wide range of accessories.
Calculation of cable box size
Before purchasing materials, you need to draw a diagram of the layout of the structure in the apartment, indicating the type of channels and the length of each line. After this, determine the dimensions of all trays. When calculating the length of the box, the number and cross-section of wires are taken into account.
Additional material consumption is taken into account when decorating corners or damaging the box. It is recommended to leave 10% margin in width and length. It is enough to add 2-3 medium wires.
There should be room in the tray for other cables. When laying a single wire, it is not advisable to buy a wide channel.
Its price depends on the parameters of the box. According to the PUE, the filling of the channel with a lid should not exceed 40%. For blind trays this parameter is 30%.
Calculation of the minimum dimensions of the box is carried out using the table:
| Type of box | Single section | Two-piece | Three-section | ||||||||
| 10x22 | 10x30 | 10x22 | 10x30 | 15x54 | 10x40 | ||||||
| Wire size | Number of cables in 1 section | ||||||||||
| 1,5 | 10 | 12 | 3 | 3 | 5 | 5 | 19 | 13 | 5 | 4 | 5 |
| 2,5 | 7 | 10 | 2 | 2 | 3 | 3 | 13 | 13 | 3 | 3 | 4 |
| 4 | 4 | 8 | 1 | 1 | 2 | 2 | 10 | 13 | 2 | 2 | 2 |
| 6 | 2 | 3 | 1 | 1 | 1 | 1 | 5 | 5 | 1 | 1 | 1 |
Channels are sold in packages that differ in the number of elements and overall length. To calculate the latter, the number of products is multiplied by 2 m. The length of the element is standard, other values are less common.
Attach to the wall
It is not always possible to lay cables under plaster. Cable channel is a good and inexpensive alternative.
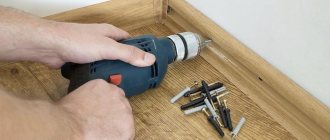
Attach to the wall with self-tapping screws:
- Can also be secured with screws.
- Many already have pre-drilled holes.
- After cutting the duct to the required length, drill corresponding holes in the wall.
- Then you can insert the dowels and secure the air duct with self-tapping screws.
Features of fastening on different materials
On some surfaces the channel is easy to install. Difficulties may arise when working with problematic materials such as drywall.
Wooden wall
The easiest way is to fasten the trays with self-tapping screws. The length of the screw is 1.5–2 cm. Holes are drilled in the cable channel in increments of 20 cm, which will be used for fixation. It’s easier to work this way, but installation takes more time. Experienced builders screw the self-tapping screw into the bottom of the channel and the wall at the same time.
When wiring is laid openly along the lining, problems arise. The board has a profile; you need to screw in the screws carefully.
When the screw hits the convex section of the lining, it can be tightened. When screwing a fastener into a concave area, the self-tapping screw must not be inserted all the way. The screw should not deform the plastic tray.
What to look for when purchasing
When choosing the appropriate cable channel model, consider the following criteria:
- Installation location: check whether this item is intended for indoor or outdoor use;
- Diameter: The cables that need to be hidden inside the duct must have enough space so that it is not pinched. The guide means are usually built into larger diameter cable ducts;
- Length: Make sure the material can be cut to size if needed and think about suitable connectors when purchasing;
- Design: Cable ducts or cable columns made of aluminum give living rooms a stylish look. Alternatively, consider whether you want to paint over the cable duct or hide it under wallpaper or behind baseboards.
View this publication on Instagram
Publication from electrical installation Moscow and region (@fastelectro)
Installation stages
Work begins with drawing up drawings and marking the wall. After this, holes are made, the boxes are installed and secured, and the cables are placed in the cavity.
Wiring diagram
At the first stage, the location of electrical wiring elements in a house or apartment is determined. If you have the appropriate knowledge, you can draw the diagram yourself. In other cases, you will have to contact specialists.
Cable channel laying drawing
At the next stage, a detailed diagram is drawn up, including all trays, sockets, switches, panels and distribution boxes. It is recommended to draw the drawing using a computer program that displays a three-dimensional image.
Route markings
Walls, floors and ceilings are marked at the locations of channels and other network elements. To maintain the vertical and horizontal, use a level and plumb line. A laser level replaces both of these tools.
Preparing the cable channel
At this stage, boxes of appropriate sizes are purchased. The products are cut as the products are installed. It must be remembered that the channels are not equipped with fittings. Connecting elements will have to be purchased separately.
To get a beautiful joint you need to do the following:
- Prepare 2 boxes. One is laid entirely.
- Cut the second channel to the required length. The same operation is performed with the lid.
- Place the lid section on the solid tray. Snap the untouched protective cover into place.
Laying along the route
Electrical products can be fastened with self-tapping screws, liquid nails, and dowels. It is advisable to screw in the fasteners in a checkerboard pattern. Glue is applied to the back of the tray in zigzag lines.
Installation of corners and joints
The main requirement at this stage is the absence of pronounced gaps between the elements after closing the covers. To do this, you need to measure and carefully cut them several times with a hacksaw, miter saw or miter box.
When installing it yourself, you need to use fittings that hide defects. The gaps remaining after installing the connectors are sealed with sealant.
There is another way: instead of cutting the workpieces at an angle, the walls of the bases are adjusted to the full width. The boxes are overlapped.
Securing cables
After installing all the boxes, you need to lay the wires. Before closing the end of the cable channel and snapping the lid, it is important to secure the contents of the tray.
When performing work, take into account the following rules:
- Do not connect power wires in the channel. The presence of twists increases the risk of fire.
- Television, computer and telephone lines must be placed in separate trays. Mixing such cables with power cables is not allowed.
- Wires in boxes should be secured with clamps and spacers.
General markup rules
Correctly executed markings clearly indicate how to attach the cable channel to the wall, taking into account all the executive elements of the electrical wiring. To apply marking lines you need to prepare:
- ruler and pencil;
- bubble or other type building level;
- beating cord, also called coated thread, with pigment.
The sequence of marking is as follows:
- In accordance with the architecture of the room and the electrical wiring diagram from the distribution board, the placement points for sockets, switches, and mounting boxes are determined. The optimal dimensions of their distance from the joints of the floor with the walls, corners, etc. are measured with a ruler. Appropriate marks are made on the walls with a pencil.
- In all places where the cable route is supposed to be laid, straight lines are drawn with a tapping cord.
- The construction level controls compliance with the vertical and horizontal lines.
Additional wiring in cable duct
This method is used when it is necessary to install additional electrical elements, for example, a second outlet in a kitchen where renovation has already been done.
Wiring in a box helps maintain aesthetics.
Installation is carried out in the following ways:
- Using sockets and trays from different manufacturers. First, the cable channel is installed. Wires are placed in the cavity of the product. Install the socket and snap the cover.
- Using a comprehensive system. It's more aesthetically pleasing. Some people think that office systems are not suitable for apartments, but this is not true. When installed correctly, such kits fit well into the interior.
pros
The advantages of the method are:
- perform installation using a small set of tools;
- Possibility of use in rooms with different interiors;
- Availability of cable channels for simultaneous installation of low-current and power lines.
- ease of adding new electrical points.
Minuses
The only drawback is the visibility of the additional line. This is especially problematic if the existing wiring was installed using a hidden method.
Accessories for cable duct
For ease of installation, electrical trays are equipped with the following fittings:
- external and internal corners;
- plugs;
- L- and T-shaped splitters;
- adapters.
The use of the above elements is necessary when installing wires in wooden houses and rooms with high humidity. In other cases, accessories are used to maintain aesthetics. The manufacturer offers fittings in different colors. This helps you choose a design that is in harmony with any interior.
Common Mistakes
A self-taught DIYer may not know how to properly route cables through channels.
Such people make the following mistakes:
- They refuse to draw up diagrams and drawings at the preparatory stage. It happens that the owner of the house decides on the location of the cable during installation. In this case, you have to adjust the entire environment of the house to the electrical network.
- Using inappropriate tools. For example, a metal drill is not capable of making a hole in concrete or brick. An incorrectly selected hammer drill attachment quickly fails.
- Save on accessories. Some people think that buying accessories becomes an unnecessary expense. Experienced electricians successfully install channels into joints. The self-taught person does not get a high-quality angle the first time. The fittings mask unevenness and gaps. In a wooden house, connectors protect cable ducts from displacement and walls from excessive heating.
- Fasten products to the surface without markings. Not everyone wants to buy a level or level. Unsuccessfully installed systems have to be redone.
- Glue the trays. This method cannot be used when planning dismantling. Part of the cladding is removed along with the structure.
Proper installation of cable ducts is a simple and safe way to lay wiring. Cables are freely accessible, but not visible.
Instructions on making corner joints
The main requirement of this work is the absence of visible “gaps” between the elements after snapping the covers. To avoid any cracks, you need to carefully measure and cut carefully, using a metal blade and a miter box or trimmer. Therefore, those who want to build a cable channel system on their own are strongly recommended to use accessories that hide all the flaws.
Minor errors can be masked with a color-matched sealant, but there is also a way to form a corner transition. Instead of cutting two pieces at the traditional 45º angle, you can simply cut the walls of the bases to their full width. In such cases, the boxes are installed with an overlap. Cuts and cutouts on the walls of the cable channel are made with metal scissors.
We are convinced that there are no special tricks in fastening electrical boxes. Connecting sockets and switches to the mains laid in them is done in a standard way. If the performer is patient, you can rightfully be proud of the result.