Individuality is valuable today, fortunately the times of the Inquisition have sunk into oblivion and the time of free creativity has come. This has opened up new opportunities for those who do not want to live in a standard environment, but dream of decorating their home in an original, shocking, and, in general, exclusive way. Our contemporaries go to great lengths to decorate their homes: they mix colors, experiment with textures, and develop whole sets of creative design ideas. One of these ideas - a drawing of a tree on the wall - with someone's light hand received a real start in life, that is, in design.
Now, with the help of this trendy technique, it has become possible, without major efforts and expensive repairs, to transform the atmosphere in any of the rooms, be it a nursery, bedroom, living room or hallway, and to do this without regard to their functional purpose.
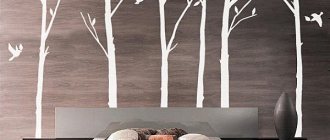
white wood against the background of light gray walls in the interior of a children's room
There are many techniques for depicting wood. This pattern can be an excellent addition to any stylistic interior. All you have to do is choose the space decoration option that suits your situation and show a creative approach to the matter.
Style
Drawings and various images will be an interesting addition to the interior, especially if you choose the right style. Wall trees can most often be seen in the interior in the form of photo wallpapers or special vinyl wall stickers. Similar options can be considered as examples or ideas. But if you paint trees on the wall, the interior looks completely different. Colors, lively strokes, a flow of imagination - they look much more complete, rich and visually attractive.
Many people worry that their inability to draw will make it difficult or simply impossible to create such a design. However, this is not so; a step-by-step drawing with a detailed plan will make the process understandable even for a small child.
A minimalist image of regular shapes, created using 1-2 paints, even without shades (solid color), will fit into a modern interior. This option is the easiest to implement. In a Soviet design or loft, oak with twisting branches, play of light and a combination of many tones will look good. However, Baroque, like Empire, will require the highest skill in artistic painting; these styles are best left to a professional.
Bonsai is ideal for a room decorated in Japanese style, with lanterns and images of geishas. You can also paint a sakura tree on the wall, which will look very elegant, especially in delicate colors. Having drawn the trunk, crown and flowers, you can apply them with asymmetrical strokes, like a mosaic.
Ideas for trees in the interior
If there are shelves hanging on the wall, then a tree can be placed between them, then the shelves will be its branches, and books, vases or figurines will stand on the branches.
The original version is a family tree, its branches will be decorated not with leaves, but with family photographs in frames; the tree will look especially stylish if all the frames are the same.
The branches of the tree can be decorated with images of butterflies, bees, birds, flowers, and fruits.
My laptop is running slowly, what should I do?New life for your balcony: non-standard ideas for renovation
- Discounts on windows - how to distinguish a fake from the generosity of a window company?
The tree does not have to be even, because there are no ideal trees in nature. It is not necessary to draw it completely - with a trunk and foliage, you can depict a part of the tree that will simply fit into the surrounding interior.
In building materials stores you can buy ready-made stickers with images of trees made of vinyl - it’s quick, if the tree gets bored, it can be removed without a trace, in addition, vinyl makes it easy to clean with wet water.
Color spectrum
In addition to the image style, the choice of colors plays a significant role. Shades can be luminescent, pastel or muted dark. A tree divided into four seasons will look original. Make part of the crown autumn in fiery red tones, and part light green with buds. Some branches can be covered with artificial snow, making the image three-dimensional. In the area of the roots it is worth adding details: depict flowers or “scatter” acorns.
Black and white options are popular. They are often done in a graphic style - using strokes and lines. The black design may seem too dark and ominous to many, but there are very airy variations of trees in this style that completely dispel this feeling. The black and white combination, due to its laconicism, is optimally suited to various color schemes. And it’s much easier to paint a tree on the wall in one color with your own hands.
Children's theme
Many people may find the stylish black and white combination boring, especially since you can use not only a natural color palette, but also a fantasy one. Who said that wood cannot be made with purple, blue, and yellow paints? The combination of pink and purple is perfect for the bedroom of a little princess. Next to the tree there may be a painted castle in the same color scheme or flowers in the background.
The heroes of Russian folk tales will help you draw a tree on the wall in the nursery with an amusing motif: a squirrel sitting on a tree with emerald nuts, a rejuvenating apple tree, Buratino’s money tree. Or a learned cat with a chain will walk along the branches, and a mermaid from A.S.’s poem will sit nearby. Pushkin.
Functions of ornamental trees
Trees can become not just decoration, but also a functional decorative element. The branches will make it possible to place shelves asymmetrically - at different levels - on which you can place various small items or toys.
In this case, it is better to paint it green or brown so that they and the tree form a single whole.
If a tree decorates the kitchen wall, towels and oven mitts can hang on its branches, and bottles of cosmetics can stand in the bathroom.
But there is nothing better than real wood in the interior. If the space of the house allows, then it is better to have a living plant in a pot, placing it in a corner - it will become both a decoration and will hide the empty space in the room.
Preparatory stage
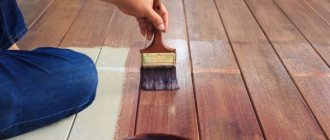
In order to paint a beautiful tree on the wall, you must first prepare the surface. Even ordinary wallpaper is suitable for this, but it is recommended to use wallpaper with a special coating. Bare walls should be plastered and then primed to ensure the paint adheres well. Walls covered with paint can be painted literally immediately, provided that the coating is not glossy. If you apply a design to an unprepared surface, the paint can literally flow down or remain as watery spots.
If you have a suitable ready-made design, print out the parts large and make a stencil based on them. To do this, first cut out a piece of paper of the desired shape, take thick cardboard and repeat the shape from a denser material. The same stencil can be used repeatedly, for example, when drawing leaves.
The process of creating a drawing
Before you paint a tree on the wall with your own hands, you need to apply the future drawing with a pencil. The first step will be a sketch that just roughly shows where the main parts of the tree will be located. Next, we outline the contours, it is better to draw leaves and small details according to the template.
Next, the first, main layer of paint is applied. Using a large brush, the trunk is painted over and a background of foliage is created. Then the shades are placed with a smaller brush. The final element is working out the details. Using a thin brush, miniature details are drawn: twigs, highlights, buds.
There is one clever way to quickly and effortlessly draw a tree on the wall. The main “ingredient” will be a stencil, which will need to be firmly glued to the wall. After that, the shape of the tree can be painted over using a can of spray paint. The only caveat is uniform spraying, otherwise the color will turn out uneven: with spots and poorly painted areas. Later, it will be easy to draw contours, shadows, and details over the paint. Markers or acrylic are best.
To create a multi-colored tree, completely painted with spray paint, you will have to work hard. You will need to cut out a multi-layer stencil; more often it is done on several sheets. The more layers, the more colors and details there are in the drawing.
LED tree
Making a tree from individual LEDs is considered a more labor-intensive process. However, this method does not have the disadvantages inherent in ready-made garlands, which makes it possible to produce structures of any shape and size.
The main material is 5 mm LEDs. To equalize the voltage you will need resistors.
Direct manufacturing begins with soldering resistors to the LEDs. The LED contacts have different lengths, so the resistor legs are pre-shortened on one side. You need to solder the contacts of both elements very quickly so as not to damage the LED.
- Heat shrink tubing is then cut into the wires to cover the solder joints and resistors. It is necessary to leave space for soldering the power wire. The tube is inserted onto the resistor leg and heated a little with a lighter to give the insulation the required shape. This operation is performed with each LED.
- After this, you can begin making the tree itself. Most often, the trunk is made of thin plumbing pipes, and the branches are made of wire, approximately 50 cm long. The main part of the branch takes 45 cm, and 5 cm is left for attaching it to the trunk.
- Small branches are cut into sizes up to 10 cm. The number of LEDs on one branch must be calculated in advance.
- At the next stage, small branches are tied with electrical tape to large branches. It is recommended to make the number of LEDs on each small branch equal to the number of LEDs on the large branch. Each LED is secured using electrical tape.
- The wires need to be stretched along the entire length of the main branches, after which they are cut taking into account the bends of the small branches.
- The ends are wound to the trunk, after which all the pros and cons on each branch are connected. Their number should match the total number of branches. The wire connections are insulated. All that remains is to hang the decorative ornaments evenly and connect the finished tree to the electrical network.
Materials
To prepare an old wall for painting, you may need building materials: putty, putty knife, primer, several construction brushes. Since you will first have to seal the cracks, level the surface and apply a paint-sensitive layer of primer.
Next you will need a simple pencil and an eraser. To draw a tree on the wall with your own hands, you don’t have to make templates. This is only recommended if the tree must have some identical parts or be symmetrical. To create a stencil, it is better to use a printed drawing; in addition, you need scissors, cardboard, and you may need a ruler.
To complete the drawing, you need brushes of different diameters, paints, a palette, and a glass of water. An additional layer of varnish can be applied over the image.
Choice of colors
The final stage is the actual application of paint. The most important question: how to choose the right paint? It is also worth paying attention to hypoallergenicity if there are small children or allergy sufferers in the house. For water resistance: you can take waterproof paint or varnish with the most ordinary gouache.
In no case should you take watercolor to paint a tree on the wall with your own hands, since the paint is very watery and is not suitable for walls; gouache is a cheap, but far from the highest quality and most beautiful option.
Acrylic paints are ideal for decorating surfaces; they are used for artistic wall painting.
We create bonsai
The tradition of creating bonsai was born in Ancient China more than two thousand years ago. The name “bonsai” is written in two hieroglyphs, which mean “bowl” and “tree”. Later, already in Japan, the unusual method was actively developed and rose to the rank of fine art.
It was the Japanese who brought the method to perfection, creating a special system of canons and proposing rules for exposure. Miniature trees are an aesthetic pleasure for perfectionists.
Many people claim that looking at an elegant bonsai, they are overcome by an extraordinary feeling of calm, tranquility, and anxiety goes away, as if by magic. Decorate the world around you, try your hand at creating amazingly beautiful products.
Do you want to create a luxurious miniature garden at home that does not require special care? Then an interesting master class will help beginners in creating a bonsai tree with their own hands.
Step-by-step instruction:
- We select materials for work. Any gifts of generous nature will be needed: intricately curved twigs, driftwood, juniper, spruce or pine branches, moss, reindeer moss.
- We preserve the branches. For processing, we will prepare a special solution consisting of denatured alcohol, acetone, and glycerin. We take everything in the exact proportion 1:1:2.
Important: The solution for preserving natural materials should be stored in a tightly closed container, as it has a pronounced chemical odor.
- Initially, we wash the branches under cold water, thoroughly cleaning them from dust and dirt, then place them in the solution for at least a week.
- Next, dry the decorative material and paint it if necessary. Let's reveal a little secret: before painting, you need to dip the branches in hot paraffin, the treatment will help to apply the paint evenly to the surface.
- Let's start making a decorative bonsai tree. Cut the branches to the required length and carefully glue each one to the base. To prevent the structure from falling apart, we will wrap the individual elements with wire; after gluing, it can be removed.
- We decorate individual areas with moss, reindeer moss, white sand or decorative pebbles. In our work, we will definitely designate the center of gravity of the structure in order to give the craft greater stability.
After completing the painstaking work, a unique live composition will open to your eyes. An eco-style bonsai will delight the eye for a long time; all that remains is to occasionally brush off the dust from the elegant creation.
Details
The crown of a tree painted on the wall can be used as a board for reminders or photographs. You can place stickers with an adhesive strip on the wall, which will contain reminders of important dates and events or notes about upcoming activities. You can hang fishing line or thread on the buttons, on top of which photographs can be easily attached using paper clips or mini clothespins.
Additional lighting installed above the painted tree will create interesting accents. If the wall has a purely decorative function, then in some places real twigs can be glued onto the drawing. And on the images of leaves there are voluminous paper applications. Some designers complement the composition with small pieces of canvas bags, fabric, and shreds.
Volumetric decorative trees
More interesting, but more difficult to manufacture, will be a three-dimensional tree. It can be made from a foam plate.
Wood can also be made from yarn. To do this, you need push pins, which need to be fixed on the wall, marking the silhouette with them - and the threads are wound between them. Such a tree will look like an exclusive handmade masterpiece.
A three-dimensional image can be obtained using toilet paper. To do this, dry paper is rolled into bundles, moistened and weaved into the desired shape.
It’s even better to make gypsum wood; the packaging with gypsum indicates the technique for working with the material. A plaster tree will look expensive and give the room a luxurious feel.
- How to choose blinds?
Flaviker Supreme tiles
- We buy quality windows