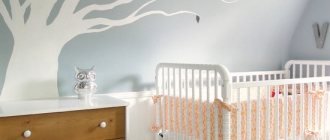
Darkened comfort, which was fashionable and in demand in interior design not so long ago, has practically lost its relevance. It has been replaced by elements of luxury and comfort, filled with light and volume, which are fully provided by the original “bleached oak” color. In combination with natural wood, it is the trend of the season and a bright word in the design of the room.
What is the “bleached oak” technique? In essence, this is the same painting of wood, but using special technologies. Due to the fact that furniture elements, panels or other wooden products are varnished, a clear, pronounced texture and noble matte finish inherent in expensive types of wood are clearly visible.
Subtleties of choosing a composition
- Before answering the question of how to properly paint wood, any specialist will first ask what the final result you want to get at the finish. The type of coating composition largely depends on this. Without going into professional difficulties, let's say that there are glossy and matte surfaces.
Advice: if you are not in the mood for complex multi-stage technology, then it is better to immediately abandon glossy surfaces. You can make a high-quality glossy finish with your own hands at home, but instructions will require time and serious labor.
- Radical color change coatings are typically used on older, severely damaged wood. Or in the case when the style direction in the interior requires it.
- If you want to preserve the natural beauty of the solid wood, then the wood is painted with transparent and translucent varnishes or enamels. Here, in addition to applying the finishing layer, wood treatment is necessarily used before painting with various types of primers and impregnations. It is at this stage that the solid wood is tinted to resemble bleached oak or other elite types of wood.
- Pay attention to the packaging of the composition; there will definitely be recommendations for use. So there are paints and varnishes for furniture, parquet, as well as for exterior and interior work. If you cover a stool or table with urethane-alkyd (yacht) varnish, they will not become stronger, but removing such varnish will be problematic, plus its price is serious.
- The most popular materials for processing furniture, doors, window sills and other similar products are now acrylic paints and varnishes. The basis here is acrylic resins, harmless to humans, dissolved in a water-dispersed emulsion. Most brands have an antiseptic effect; the line includes compositions with fire retardants (fire protection).
- If we are talking about parquet or products that will be in a humid environment, for example, entrance doors, as well as bath and bathroom furniture, then you should pay attention to polyurethane or alkyd varnishes and paints. They have good resistance to moisture, in addition, polyurethane parquet varnish has enviable wear resistance.
Radical color change.
- Nitro enamels adhere well to the surface and dry within an hour, but you shouldn’t count on serious durability here. Plus, these compounds are made with toxic solvents that have a strong, unpleasant odor. Therefore, it is recommended to carry out all work in well-ventilated, preferably non-residential premises, or better yet, on the street.
- Painting wood with oil-based compounds was popular in the past. Nowadays you can still find oil-based varnishes for painting wood in residential areas. As for paints specifically, they dry for quite a long time and last no more than 3 – 5 years. Therefore, they are most often used to paint utility and utility rooms.
Important: if you have already decided on the coloring composition, then it is better to immediately buy a suitable primer for it. Moreover, the primer or impregnation should be taken from the same manufacturer as the paint itself, so there is less chance of rejection.
Parameters of various paints.
Types of funds
Coverings for lining are divided into two main groups: protective and finishing (decorative). The first group includes compounds that have different working functions. Some are impregnations, others are covering materials. Both of them create a barrier against negative external factors.
Impregnations suitable for lining:
- covering soil;
- stain;
- wax;
- oil;
- specialized impregnation;
- antiseptics;
- drying oil;
- bleach;
- fire retardant
Several layers of stain with and without the addition of toners look different Source elka-palka.ru
Covering finishing materials act as a decorative layer, simultaneously serving as both protection and decoration. When there is no desire to cover up the wood pattern and its color, the coating composition is chosen from among the following translucent options:
- glossy or matte clear varnishes;
- tinted clear varnishes;
- translucent varnishes;
- wax;
- aqualak on acrylic;
- translucent enamel;
- decorative azure.
Brushed lining is coated with water-soluble transparent varnishSource 1povagonke.ru
For other cases, in which the natural color, texture and pattern of the board are unimportant, the lining inside the house is processed using covering materials. These include:
- acrylate, acrylic paints;
- oil paints;
- water-based paints.
Painting new lining with acrylic paint - the first layer of light green colorSource sparta-stroy.ru
Wax belongs to the group of coating materials and impregnations. It all depends on the technology and the thickness of the applied layer. The degree of gloss of the coating depends on the duration and technique of polishing during waxing. In this case, wax can be called a coating material. The longer the procedure is carried out, the more the working wax surface approaches gloss. The less and less intensive grinding is done, the more the matte structure of the wax coating is preserved.
Dyeing process
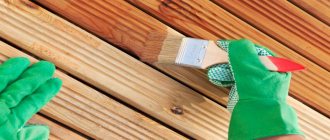
Painting wood with your own hands is not a difficult task, but in order to achieve a high-quality result at the finish, the instructions must be strictly followed. As already mentioned, the general algorithm for such work is similar. Therefore, as an example, we will talk about how to paint a wooden table.
White bedside table.
Preparing the base
Painting furniture, like any other product, is best done disassembled, of course, if possible. All trims, handles, locks, metal or plastic parts, and stained glass must be removed or covered with masking tape and foil.
Working with a construction hairdryer.
Next you need to remove the old coating. We immediately reject the use of chemical reagents; wood is a hygroscopic material and, having absorbed the chemistry of solvents, such furniture will become harmful to health. If you have a hair dryer, then heating the surface with it and using a metal spatula can quickly and easily remove the old paint. You can take a blowtorch, but it will leave scorch marks.
Those who do not have a hairdryer can use sandpaper, although it is time-consuming and difficult. It is much faster and more convenient to take a relatively inexpensive attachment for a drill or grinder, made in the form of a metal brush.
The principle is shown in the photo. In this way, the old coating can be removed quickly enough, but there will be a lot of dust. And be careful with the veneer, it is easy to wear out.
When the old coating is removed, the surface needs to be leveled. Experienced craftsmen recommend using a grinder or regular sandpaper with a number of 180 or more, stretched over a block.
Advice: all work of this kind involves the need to periodically remove dust. So, for this it is better to use a vacuum cleaner, dry rags or brush. After sanding, the pores of the array open and with a damp swab, you will simply clog them with fine dust.
Do-it-yourself sanding.
How to paint wood bleached: advice from a paint shop technologist
Natural wood is again becoming in demand; it is increasingly found not only in private homes, but also in the interior of city apartments. Wood is used to make durable, strong lumber, which perfectly helps maintain heat and optimal humidity levels in the room.
But wood requires special care, which consists of processing the material and coating with paint and varnish products. In addition, painting will get rid of boring color and allow you to quickly change the design of the room. One of the trendy solutions is painting with the effect of “bleached oak” or “frost”. A specialist from our company, technologist Alexey, talks about how to paint wood bleached.
If bleached wood will be used in a Scandinavian or rustic style, then it is advisable during the staining process to create not a dense layer covering the wood, but to favorably emphasize the structure of the wood. The composition is applied twice, but in a very thin layer!
Photo 1. Whitened planken
For example, you can use oil with wax Rammers Wohnraum lasur or very good wood oils from GNature. With these products you will get a translucent finish, even if you apply two coats to achieve the whitest shade possible. You can coat it with oil-wax once, in which case the wood texture will be visible even more clearly.
Photo 2. Wohnraum-lasur
A very interesting fact about oil: absorbing well into soft layers of wood and poorly into hard ones, the oil creates a contrast of wood texture, which looks simply incredibly beautiful and natural.
Photo 3. White lining
If the task is how to paint bleached wood in a dense layer, then we recommend giving preference to water-based paint, for example, Remmers Deckfarbe. It will create a film on the material through which the structure of the wood will not be visible.
Photo 4. Deckfarbe Remmers
There is a “but” here, and we, as professionals in our field, are simply obliged to warn you about it. This “BUT” is that only knotless wood is suitable for painting in perfectly white COVERING tones, otherwise the knots will appear in a short time as ugly yellow spots.
Photo 5. Remmers insulating primer
Remember: NOT ONE INSULATING PRIMER protects against the appearance of yellow spots in the area of knots on white opaque paint.
Photo 6. Lining painted white
Is there a way out? Yes. Firstly, these are whitish glaze paints (which do not cover the texture), and secondly, these are various shades (ivory, etc.) in covering, light colors.
Photo 7. Covering white paint
Today you learned how to paint wood bleached. Do not forget that if you strive for standard quality of coating, it is better to turn to professionals. The quality of painting done manually on site is always much inferior to painting done in production using special equipment.
Photo 8. White glaze paint
In our paint shop, we work with industrial compounds from the Teknos line and give preference to an elite, varnish painting scheme. This is when the tone is set by a priming composition - a primer, and two layers of 5-10% tinted breathable varnish are applied on top, which can have different degrees of gloss, depending on your preferences.
Photo 9. White painting options
At lesobirzha.ru you can purchase a variety of paint and varnish products from well-known manufacturers at affordable prices, and at any convenient time!
Wood painted white looks very simple, stylish, and cozy at the same time. This type of painting while preserving the wood texture has become one of the most popular interior and exterior styles!
In this article, we'll look at 3 simple methods for painting distressed or distressed wood, as well as beautiful and inspiring examples of floors, walls, doors and furniture painted with them.
Original design of a wooden house
For construction and interior design, wood is an environmentally friendly and popular material. The structure of the wood has an aesthetic appearance, and in many cases it is enough to varnish it for an elegant design.
Color solution
Fresh wooden coverings with a beautiful structure simply need to be treated with protective compounds, if desired, tinted using a mordant with shades of different woods, and varnished.
If necessary, the wood can be painted in any color according to the design concept.
Decorative designs: ideas
The design of a wooden house looks elegant both outside and inside using varnish and lightly darkening the wood. Different shades of mordant can be used to zoning a room and placing accents.
Painting examples
An elegant option for treating wooden walls and ceilings would be to paint them with clear or light-colored varnish, which will add sophistication and create a feeling of freshness and spaciousness.
Lightening the wood using milky varnish will look original. You can place accents with a dark shade of varnish on baseboards, doorways and other protruding parts. Milky-colored walls will add space and light to the room, and accents will add playfulness to the interior and help zone the room.
Half-clad walls will look noble if they are painted in dark shades of wood in the same tone as the window frames, with the rest of the wall having a light background.
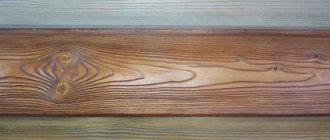
What is wood stain
Wood is a strong and durable material that is susceptible to adverse environmental factors, therefore, in order to protect products made from it from possible damage, they must be treated with special means. On the construction market you can find a huge number of different antiseptics, varnishes and other impregnations that change the color and some properties of wood; the most popular and inexpensive product is stain. Some people think that stains are used only to change the color of an object, but this wonderful drug also has other properties.
The color of wood stain should be chosen depending on the interior design.
The properties of stains may vary depending on their composition. However, even if you do this tint yourself, it will still have some protective properties.
Properties of stains:
- If you want to change not only the color of the wood, but also highlight its texture, then stain is just what you need. It does not completely cover the design, like paint, but gives the entire product a pleasant shade.
- Staining wood will protect furniture from insects and rot, while maintaining the texture and grain of the wood.
- Stain is a protective agent that increases the service life of wooden objects and costs several times less than varnish and paint. In addition, due to its watery consistency, it penetrates deeper into the wood structure.
- With the help of stain, you can make even inexpensive pine, painted with colored stain, look like noble and strong oak and exotic mahogany.
- Tinting with stain can lighten the wood. This technique is especially often used before painting wooden products.
- Impregnation with stain will strengthen the structure of the wood and give it a slight moisture-proof property.
Not all stains have the above qualities. To understand what kind of stain you need, you need to read its composition and see what the instructions for use say. By the way, you can treat not only solid wooden boards with stains, but also chipboard, objects made of plywood or parquet and other wooden crafts.
Bedroom with sloping roof
A bedroom in a wooden house often turns out to be truly original if an attic with a sloping roof is chosen to create it. Although many people think that such an architectural feature “steals” part of the space. This drawback can be turned into an advantage and the main highlight of the entire interior decoration.
The roof slope forms an interesting configuration of the interior space, which allows you to create an original, unique bedroom interior.
Structural elements in the form of beams for some style trends are the touch that emphasizes the individuality of a wooden house.
Basic rules for decorating an attic bedroom
- The room should be well lit, not only with natural light, but also with additional sources.
- Use a small amount of furniture, do not overload the space.
- Experiment with accessories, decorative pillows, light curtains, original lamps.
The main thing is not to forget to decorate the windows with curtains, otherwise the interior will turn out somewhat empty and harsh.
Advantages of oil-based stains and wax and acrylic stains
Oil-based stain comes in a wide range of colors and shades. It costs more than water sprays, but it also has more useful properties. This preparation can be used not only to change the color of the product, but also to emphasize its texture.
Treating wood with oil-based stain is easy and convenient; it is applied in a thin layer and does not lift the fibers of the product. Also, this tinting does not fade under the influence of sunlight, makes the wood resistant to temperature changes and protects it from moisture. Oil stains can be removed using white spirit solvent; it can also lighten painted wood a little. It differs from compositions with similar properties in that it does not require varnish to secure it. The disadvantages of staining with oil include: long drying of the tint and its toxicity.
Oil-based stain can be applied using a regular brush.
It is very important to find a stain from a responsible and conscientious manufacturer. Judging by the reviews, the most popular companies are Vartan, Latek, Novbytkhim and Herlak.
Acrylic and wax stains are very easy to apply; they apply in a uniform layer and do not leave stains or streaks. However, due to the rapid drying of such stains, you need to work with them very quickly.
Wax stain is used to protect wood from moisture. It can be used to treat parquet. This stain is not resistant to mechanical damage, so to extend its service life, it is better to use varnish.
Acrylic, also known as rustic, stain perfectly emphasizes the texture of wood. With its help you can get a variety of shades, which is why this drug is so popular. Wood painted with such stain will still need to be opened with several layers of varnish.
Wood stain colors
Wood stains differ not only in composition, they come in different colors and shades. Most often, a dark mixture is used; it gives the products a more noble appearance. With the help of such stains, ordinary larch and maple can be turned into oak boards.
Modern stains can give wood the most unusual shade. However, to this day the range of natural wood colors is considered the most popular.
Before choosing a wood stain color, you should study the designers' recommendations.
The most popular stain colors:
There are many such examples. It is noteworthy that the names of the same shade from different companies can differ greatly. When choosing the color of stain, first of all, pay attention not to the color palette that is printed on the packaging, but to the samples printed on birch boards.
It is also important to consider that the intensity of the color of the stain depends on the type of wood on which it is applied. Giving a dark shade to an item if the wood from which it is made will be more difficult than darkening an oak item. A non-aqueous stain will not be able to stain a pine board well enough unless it is first desalted, but water-based stains are generally unsuitable for resinous wood species.
White wood stain
To give your furniture a white color, you don't have to paint it. A lightening stain is also suitable for such work, which will not only make the product lighter, but also emphasize its structure.
Wood stain is intended not only to give the product a lighter shade, but also to protect it from adverse environmental conditions. It is very important to consider, when considering different types of such a product, how and what you will apply it to. If there is a risk that moisture will spill onto the surface of a bleached object, then it is best to use wax, oil and acrylic preparations, but if your craft will be in a dry and ventilated place, then water stain will also work.
With the help of white stain you can visually expand the room by applying it to the flooring or wooden walls
Using white stain you can achieve a very interesting effect and create an aged finish. It must first be painted with a white water-based stain; after it dries, the object must be treated with a stiff brush. A dark-colored wax or oil stain is rubbed into the formed pores on the wood.
When using water stain, do not forget about the protective layer. The painted product must be treated with wax or oil.
Light stains do not always have a pronounced color. There is a colorless stain that is applied solely to protect the wood from adverse natural factors.
We paint the lining according to all the rules
Painting lining involves a certain sequence of actions that must be followed.
- Cleaning from dirt and dust.
- Surface grinding.
- Application of antiseptic and primer.
- Coating the lining with paint or other selected composition.
Ideally, the lining should be painted before installing it on the wall, painting each board separately; it is extremely difficult to properly apply paint on a ceiling or walls already covered with lining. Painting the finished surface is allowed only when the paint is renewed.
How to make your own stain
It is not necessary to buy ready-made stain. By mixing dyes such as coffee, a few drops of iodine or black bark shavings, and some chemical elements, it can be made at home. Homemade stain is not only effective, it is also natural.
A few tips on how to make your own stain:
- Boil a glass of larch bark in a glass of water. The resulting product can be used to coat birch products; it will give them a beautiful reddish tint.
- Grind the dried walnut shells into powder and boil for ten minutes. The resulting decoction must be mixed with soda. Apply the solution to light-colored wood and it will turn brown. If you want to change the color of the product, you can treat it with vinegar or potassium bichromate. In the first case, the shade will be gray, and in the second, red.
- Brewed tea or coffee can give the wood different shades. The intensity of the colors depends on the strength of the brew.
- Using a solution of potassium permanganate you will paint the product cherry color.
- A red tint can be achieved by soaking rusty nails in vinegar for several days. Black stain is obtained by adding a decoction of oak or walnut leaves to a vinegar solution.
To properly make stain with your own hands, you need to first watch the instructional video
They make their own stains quite often. They turn out to be environmentally friendly and harmless. Unfortunately, they all tend to fade, so to preserve the color of the product, you need to apply a layer of varnish over the stain.
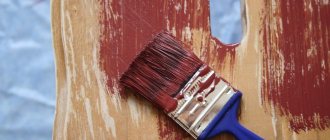
Applying paint
To paint the lining, use a small or medium-sized paint brush and a spray gun (this device allows you to cover large areas in a short time, but is used only by professional builders). The first option is considered more popular when doing DIY painting due to the availability of tools. Work begins with painting hard-to-reach places. First, the composition is applied with a narrow brush, then with a wide one.
The dye is applied 2-3 times, allowing the solution to dry. Work on painting lining can be divided into several simple stages:
- thoroughly mixing the paint in the original container;
- pouring part of the dye into a small plastic container;
- dipping the brush into the composition for half the bristles;
- applying the painting tool to the panel, carefully moving along the surface along the boards.
All movements with the brush are performed in one direction, while it is necessary to slightly overlap the already painted areas. To process the finishing material at the joints, at the corner of the room, as well as in areas adjacent to window and door openings, use a narrow brush.
Each subsequent layer is applied after the previous one has dried. The last time the surface is covered from top to bottom with uniform light movements of the brush. When applying the finishing layer of aqualak, it is necessary to periodically stir the composition.
If you need to get a natural wood texture, you need to use wax, pigmented oil or glaze. Any of the compositions is applied along the entire length of the lining, then the strokes are shaded and the solution is left to soak in for 5-10 minutes. After the specified time, remove part of the dye with a lint-free cloth, which allows you to highlight the structure of the wood. A significant portion of the pigment remains in the grooves of the wood, while there is little dye in the protruding areas. At the final stage of work, after the layer has dried, the boards are coated with colorless varnish.
Tinting wood with stain: step-by-step instructions
To make the product look neat and beautiful, you need to cover it with stain correctly. If the stain is applied poorly, it can fade in just a few weeks; also, if you do not follow the staining technology, you risk getting a surface covered with stains.
How to properly stain objects:
- First of all, it is necessary to remove a layer of old paint from the surface of the product. This can be done using sandpaper.
- Next, the surface is degreased with alcohol, white spirit or gasoline. If the product is made from resinous tree species, then it is deresined.
- The stain is heated and applied in a thin layer to the surface of the product. The top of the item is processed first. Layers are applied on top, one on top of the other, until the desired shade is achieved.
After the stain has dried, the product must be coated with several layers of varnish. Before applying a new layer, the dried varnish is treated with fine-grained sandpaper.
Required tools and materials
In addition to the impregnating composition itself, you need to prepare tools for application. This could be a spray gun or a set of brushes of different sizes. The product packaging provides detailed application instructions and recommended tools.
Also useful for work:
- construction tape;
- absorbent wipes;
- container for coloring product;
- sandpaper No. 240.
To coat the joint areas, it is better to prepare a separate small brush. To prevent lint from sticking to the surface, instruments should be periodically rinsed in a soapy solution. It is worth doing this before you start applying the product.