Rationally located and trouble-free plumbing in the bathroom is an important component of the comfort of the owners. Its flawless connection is a guarantee of good relations with neighbors from the apartment below. To achieve the ideal, you need professional installation, the price of which not everyone agrees with.
But there is an opportunity to significantly reduce the cost of replacing old plumbing. If you install a bathtub yourself, then the home craftsman will only have to pay for consumables. However, an excellent result can only be achieved if you follow the technological rules that we are ready to share with you.
We suggest that you familiarize yourself with a detailed description of the process of installing and connecting plumbing fixtures made of cast iron, acrylic, and steel. We thoroughly outline the nuances of connecting to the sewerage system. The information we present is supplemented by photo collections, diagrams, and videos.
Guidelines for choosing a suitable bath
Modern industry offers us bathtubs of different shapes and colors, made from various materials. Due to the variety of models, the home owner is always faced with the problem of choice.
If the shape of the container and its color concern us more from an aesthetic point of view, then the important performance characteristics of the product depend on the material of manufacture: its practicality, appearance and durability.
In addition to the material, dimensions and configuration of the bowl, the choice of bath is influenced by the size of the hygienic room, the height of the sides that is convenient for all members of the family, and the presence of additional accessories and functions.
In the production of bath bowls the following are used:
- Steel. Steel plumbing attracts with its affordable price and abundant assortment. Thanks to its lightness, installation can be completed without the help of assistants. The disadvantages include high heat transfer, the ability to deform, sag under the weight of large people, and “noisiness” when taking water into the bowl.
- Cast iron. Expensive, reliable, durable. It does not make noise when filling with water and perfectly maintains the temperature in the container. Due to its impressive weight, installing a cast iron bathtub cannot be done alone. Plumbing fixtures are quite fragile; if handled carelessly, you can break the bowl or damage the enamel.
- Acrylic. A lightweight and inexpensive option that is easier and more logical to replace than to repair. It doesn’t sound when filling with water, it retains heat, but it doesn’t last long enough and isn’t very stable. You can easily handle the installation yourself.
If there are people in the family with impressive weight, it is advisable to install sanitary containers made of steel and acrylic on pedestals made of brick or additional supports constructed from it.
These measures will ensure stability and stabilize the position of the bottom. For owners with a less solid build, instead of capital brick fixtures, it is enough to install an additional frame made of a bar or a steel profile.
A frame made of a wooden block or a metal profile will provide the opportunity to tile a unique bathtub wall or arrange niches under the plumbing for storing hygiene items (+)
The shapes of the bathtubs are also pleasingly varied. In addition to the rectangular structures familiar to our eyes, there are oval and square ones. For small bathrooms, corner models are increasingly being used. And in addition to products in which it is more convenient to take a bath while lying down, those that are specifically designed for procedures in the “sitting” position are also in demand.
Image gallery
Photo from
A set of plumbing equipment in the bathroom
Supply of communications to the installed bathtub
Siphon installation and connection to the sewer system
Finishing the bathroom after installing the bathtub
The subtleties of choosing a bath that suits you personally are described in detail in another popular article on our website.
Matching the dimensions of the room and the bath
Room measurements.
When choosing a bathtub for installation in a city apartment with a small bathroom, you need to take measurements of the room and when determining the size of the container, take into account that its length should be 3-5 cm less than the distance between the walls, and its width should be such as not to interfere with movement.
Corner bowls are selected according to the size of their straight walls: the product must fit in the designated space and not block the approach to the sink and other furnishings.
For a spacious bathroom, these restrictions are not important and the dimensions of the bowl can be any.
The height of the sides of the container is selected depending on the owner’s requirements. When purchasing a product, you need to take into account that the bowl will be higher than the floor: you need to attach a drain siphon under the bottom, install legs or other supports.
Preparing the premises for the upcoming installation
If you have already made a choice in favor of a specific model, you should complete a number of preparatory work before installation. In addition, you should choose a place in advance, decide how you will install the bath: you plan to do the work yourself, invite workers or call your friends.
After drawing up a unique plan for upcoming actions, it is necessary to assess the condition of the premises, and if a need for repairs is detected, carry them out.
When should walls be tiled?
It is best to install a bath before tiling the walls during a major renovation of the room. This sequence of work will allow you to achieve the best practical and aesthetic results.
Installing tiles after installing the bath allows you to most effectively seal all the gaps and cracks so that moisture does not accumulate in them, which creates an ideal environment for the development of bacteria and mold.
If you were not going to renovate the bathroom, but only wanted to replace the bathtub itself, you need to choose a model that will be slightly higher than the previous one. At least 1.5 cm.
Note that the tiles under the edge of the old bathtub are different in color from the rest of the tiles: they have not been faded. In addition, it may have a dirty surface that cannot be washed. Therefore, it is better to hide it.
It takes a lot of effort to seal all the seams in the tiles adjacent to the bathtub surround, but the result is worth it: your bathroom should be a place of concentration of strength, not infection
How to properly prepare the floor?
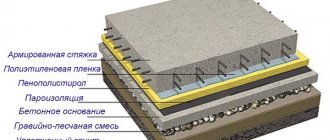
The floor in the bathroom should not only be perfectly flat, but also durable. This is especially important if we have to work with a cast iron product, which has a fair amount of weight even without water.
If we lay floor tiles under the bathtub with our own hands, then they should be laid using the pressing method to prevent the formation of voids underneath. Otherwise, the tile may crack during use of the bath.
Any bathtub filled with water creates a significant load on the floor surface. To distribute it evenly, wooden logs can be used. Practice has shown that larch is optimally suited for this purpose.
The wood is prepared by treating it with antibacterial and antiseptic solutions. Then the logs are impregnated with PVA putty or drying oil.
The logs not only redistribute the load, but also successfully solve the issue of increasing the height of the product. Sometimes we need to raise the bathtub so that we can install a siphon with a deep elbow. Such siphons will prevent sewage waste from entering in the opposite direction. If you raise the bathtub slightly, for example, less hair will accumulate in the siphon.
Before installing and connecting the bathtub, the walls and floor in the room must be repaired and strengthened if necessary
We put it on bricks
Installation on bricks requires care and precision - you need to align the support evenly so that the sides of the bath are in a horizontal plane.
They are usually placed on two or three rows of bricks laid on a bed (on the wide part). The number of bricks depends on the location of the sewer outlet. A thin layer of mortar is laid between the bricks. The bathtub is placed on bricks, the horizontal sides are checked, if necessary, they are adjusted by changing the thickness of the mortar between the bricks (we do not put anything on the top ones yet).
We lay out the bricks, screw the corner
Having set it up, we mark on the wall at what level the sides are located. At this mark, a corner is attached that will support the sides of the bath. It is better to take an aluminum corner, the width of the shelf is 3 cm, the thickness is 2-3 mm.
To give the base an aesthetic appearance, you can wrap them with a plaster mesh and plaster them. In fact, plaster also reduces the hygroscopicity of red brick, extending the service life of the support. So it is not advisable to skip this stage.
Plastering a brick base for an acrylic bathtub
Having folded the painting mesh, a solid layer of cement-sand mortar is applied to the tops of the bricks. A solid layer of plumbing silicone is applied to the corner, after which the bath is installed. We move it towards the wall evenly so that the gaps between the side and the wall are even.
The support for installing the bathtub is ready
We select the squeezed out silicone, forming a beautiful seam. You can smooth it out with a teaspoon. If you carry it without lifting your hand from edge to edge, you get an even and smooth seam. Then remove the squeezed out solution. We remove the silicone earlier - it “sets” faster. The solution must be picked up no later than 20-30 minutes after installation, so don’t delay it either.
This is what an acrylic bathtub looks like from below, placed on bricks
If the silicone was not enough and it did not squeeze out, it’s not a big deal. We form a seam by filling the gap at the top with silicone. This completes the installation of the acrylic bathtub on bricks. Next is connecting the siphon and finishing, but this is not entirely related to this topic.
Selecting suitable drain fittings
When choosing drain fittings, it’s easy to get confused by how wide the range of products offered on the market is. But really, what characteristics should you pay close attention to when purchasing, and what can you ignore?
Reinforcement material
The building materials market offers us two types of materials: PVC (polyvinyl chloride) and polyisopropylene. We come across PVC more often, that’s why we choose it.
But relatively expensive polyisopropylene is not only stronger than polyvinyl chloride, but also has a whole list of indisputable advantages, these are:
- Hardness _ This material is significantly harder than its competitor, which reduces the likelihood of mechanical damage during bath installation.
- Durability. Its strength characteristics do not decrease over time.
- Surface quality. The surface of this material is smoother than PVC, which means that dirt sticks to it less.
The efficiency factor is also extremely important. The efficiency of polyisopropylene is higher than that of PVC, since the friction of water against the walls of smooth pipes made of this material is much less.
Qualities of drain elements
Most of the plums you see for sale are made in China. During their installation, a bolt is used. Regardless of what material it is made of, over time this bolt will oxidize, rust, or otherwise corrode.
You can buy a stainless steel bolt separately, but its contact with the mesh will certainly form a solder, which will significantly reduce the repairability of the product.
The industry offers drain fittings for bathtubs in two versions: made of PVC (polyvinyl chloride) or PP (polypropylene). If you are interested in the longevity and reliability of the device, it is better to prefer polypropylene as a material that is more resistant to household chemicals
When buying drain fittings, do not hesitate to check its contents and make sure that all the elements stated in the passport are present:
- Drain mesh. The most economical of all commercially available nets is a model that consists of two intersecting crossbars. It perfectly traps hair, preventing clogging. The most practical option is considered to be one with round holes located around the perimeter of the product. The most reliable is a mesh that has profiled oblique holes. However, this is also the most expensive model.
- Cork chain. It would seem that the chain is a detail that is not of significant importance. But that's not true. Usually we use the chain that we come across as part of the kit. It is not advisable to do this. Buy separately the one that fishermen use. Its surface is covered with protective paint, which prevents water from spoiling its appearance over time.
- Overflow pipe. In older bathtub models, the overflow pipe is made of metal, but modern production offers a better option. Use a corrugated pipe that has a large diameter, and, therefore, throughput. The high capacity of the pipe significantly reduces the risk of water overflow.
There are some installation nuances that are worth considering. For example, if the outlet valve of the drain fitting is wide enough, you can make the connection without using a collar. The resulting gap is simply filled with silicone-based sealant or silicone itself.
Tips and tricks
When installing a bathtub, you should follow some rules:
- before replacing a bathtub, it is better to consult with specialists, because innovations are constantly being introduced in this matter that will be useful when performing work;
Correct connection of the bathtub to the sewer
- Be sure to ground the bathtub, because the use of electrical appliances in the bathroom is by no means uncommon, including hair dryers and electric shavers and much more. No one has yet canceled the safety rules;
- the space under the bathtub must be thoroughly treated with antiseptics before placing it;
- Brickwork also requires the same treatment when it is used to install a container. Otherwise, damage to the masonry is inevitable. A bathtub completely enclosed with masonry must have ventilation to allow moisture to escape.
Detailed Installation Guide
All. The workplace is ready. Let's start installation. Since installing different types of bathtubs has its own characteristics, we’ll talk separately about this procedure for each type of bathtub. Let's start with an acrylic model.
In general, the connection diagram for any bathtub is similar to this one. There are some features of working with a particular model caused by the properties of the materials from which it is made
Installation of acrylic sanitary ware
When you choose an acrylic bathtub in a store, pay attention to the fact that the kit includes special guides for attaching the legs of the bathtub. They are called lodgements. They are installed across the container. It is into them that the legs should be screwed.
The trays are attached to the surface of the bathtub using self-tapping screws included in the product package. Self-tapping screws must fit into holes specially designed for them.
Otherwise, they may simply make a hole in the bathtub. When drilling, use a drill equipped with a limiter. Holes cannot be made deeper than three-quarters of the length of the self-tapping screw.
The holders are installed. Now the bathtub should be carefully placed on the side surface and the drain fittings should be connected. Do not forget to thoroughly treat all gaskets that will be used with silicone before installing the drain fittings.
If you don’t want to make trouble with your neighbors downstairs and pay them for expensive repairs, make sure that the drain gasket is installed outside.
When connecting the drain, special attention should be paid to the tightness of all connections and the quality of the gaskets. Bathtub safety is extremely important
Of course, the design of the bathtub has threaded connections of the elements. Do not tighten them tightly, because the installation process is not easy, the joints and individual elements of the bath may become damaged and will have to be replaced.
If we install a bathtub, it must fit closely to three of the four walls. Make sure that the bathtub outlet is connected to the sewer pipe. Now you can level the bathtub using the rule, and treat the outlet connection with the pipe with sealant.
When the sealant begins to cure, take a fork wrench and tighten all loose threaded connections.
This is one of the options for connecting a bathtub to the waste line, which is made with high quality and is extremely simple, as it should be
That's it, the sealant has completely frozen. Now you need to check all existing joints for leaks. All shortcomings are eliminated, and if they are not there, then proceed to process the gaps between the walls and the bathroom. To do this, use the same sealant.
Nuances of installing a steel container
There are no special nuances when installing a steel bathtub. It is mounted in almost the same way as acrylic. The work algorithm is the same except for the method of attaching the legs. The legs are attached to the steel container using wedges, pins or bolts. When using bolts for this purpose, be aware that you will have to tighten them one by one and gradually.
No matter how much it seems to you that everything is attached correctly, you should not immediately tighten the bolt all the way. It is possible that fine adjustment of the legs will be necessary, which will become impossible if the bolts are completely fixed.
We have already said that during the process of filling a steel bath, a stream of water hitting the walls of the container makes a loud sound. To muffle it, you can place pieces of automobile rubber in the space between the surface of the bathtub and the fastening of the legs or fill it with polyurethane foam.
You can read about how to seal the joint between the wall and the bowl here.
Features of installing a cast iron bathtub
Cast iron is a heavy material. And the bathtub made from it has a lot of weight. To prevent this massive object from damaging doorways and furniture, you need to properly organize the installation work. The bathtub should be adjusted and connected directly in the bathroom, without moving the container to other rooms.
Some cast iron bathtubs can be equipped with decorative legs. Such models become a real interior decoration and a designer find. If, in the process of adjusting the level of such a bathtub, you use raising gaskets, you can completely destroy all the efforts of the designer.
Check out the legs of this charming cast iron model. Of course, it is impossible to unscrew or lengthen them by placing some materials under them, but they must stand on a perfectly flat surface
You can get around this point by filing the legs at the base, but only a professional can perform this work efficiently.
There are also special features when connecting the drain to the sewer. It is better not to place a cast iron bathtub on its side. You can simply lift the front of the container. This will create additional space, which will be enough to complete the work. The structure should be temporarily fixed in the desired condition using wooden blocks.
The general principle of performing the work is maximum accuracy and no possibility of moving a heavy container.
You will find guidance on installing a cast iron container on bricks, if this solution is necessary, in the step-by-step guide posted on our website.
The nuances of installing a plastic bathtub
Plastic bathtubs are a cheap analogue of acrylic models, therefore the installation process for these models is similar to each other. But of course there is a difference. For a plastic structure, a special cushion must be created, the task of which is to relieve the load on the bottom of the product.
The pillow can be made of wood (larch) or cement. Bathtubs made of plastic should be used very carefully. Caring for it with aggressive detergents is strictly prohibited. If these nuances are ignored, then after 7, or even 5 years, the bathtub will need to be thrown out.
The procedure for installing an acrylic bathtub on legs
Assembling an acrylic bathtub with legs is much easier and faster - the design is elementary. The kit includes two strips, four legs with pins, fastening of an acrylic bathtub to the wall, a number of nuts and self-tapping screws.
Marking and assembling the frame
In an acrylic bathtub with legs, the frame consists of two slats that are attached to the bottom. These slats come with adjustable legs. The task is to screw the planks evenly, install the legs and level the entire structure. Not too difficult.
Complete set of acrylic bathtub with legs
Find the middle of the mounting strips and the bottom of the bathtub and make marks. Having aligned the middle marks, two mounting strips lay the uninverted bathtub, stepping back a little from the edge of the reinforcing plate (3-4 cm), we install the strips. Use a pencil or marker to mark the installation locations of the fasteners (there are holes in the strips).
We place the mounting strips
Using the marked marks, drill holes to a depth of about 1 cm (you can glue colored tape to the drill to make it easier to control the depth). The diameter of the drill is selected 1-2 mm less than the diameter of the screws (indicated in the instructions or can be measured). Having installed the strips and aligned the holes, we fasten them with self-tapping screws (included in the kit).
Installing an acrylic bathtub on legs with your own hands: screwing the strips
Putting the legs on
The next step is installing the legs. They are assembled in exactly the same way as in the previous version: one lock nut is screwed on, the rod is inserted into the hole on the mounted bar, and secured with another nut. An additional nut is needed on the legs on the screen mounting side (pictured).
Putting the legs on
Next, we turn the bathtub over, set it in a horizontal plane, twisting the legs. We control the situation using the building level. Then you need to install a fastening on the walls, with the help of which the sides are fixed to the walls.
Place the bathtub, set according to its level and height, in place and mark where the sides end. We take the fastening plate, apply it to the mark so that its upper edge is 3-4 mm lower, and mark the hole for the fastener. The number of fasteners varies - one or two dowels, as well as the number of fixing plates on the wall (one or two on the wall, depending on the dimensions). We drill holes, insert plastic plugs from dowels, install clamps, and screw them on.
Installing an acrylic bathtub to the wall
Now you can install the acrylic bathtub - lift it so that the sides are higher than the plates installed on the wall. We lower it, pressing the sides against the wall, they cling to the fixing plates. The installation of the acrylic bathtub with legs is complete. Next, connect the drain and you can use it.
Installation of acrylic bathtub with legs is completed
Assembling such an acrylic bathtub takes a little time. But the design turns out to be very flimsy. Not every adult feels confident. The bottom sags, the legs slide on the tiles. Enjoyment is below average.
There is also a combined installation option. This is when they put the bricks on legs and is shown in the next video. After assembly, two bricks are laid on the mortar, a significant layer of mortar is laid on top (it must be kneaded to be low-plastic, adding a minimum of water). When you put the bathtub in place, part of the solution is squeezed out, it is carefully picked up, and the edges of the remaining part are corrected. The bath is loaded (can be filled with water) and left for several days to allow the solution to set.
Construction of a bath screen
The space between the bathtub and the floor does not need to be closed if the outer surface of the model has an attractive appearance. But more often we still try to close this gap.
This can be done using, for example, a sliding screen. This bathroom accessory is sold in stores, but some people prefer homemade screens. Homemade products attract with their uniqueness and low cost.
Those who think that a bathtub screen is only used to cover the side of the bathtub are mistaken. It can become a storage place for all kinds of household chemicals and hygiene products.
Recommendations on how to lay tiles in the bathroom from experts
Tools, materials
- Glue
- Tile
- Primer
- Plastic crosses
- Fugue
- Two containers: for fugue and glue
- Level
- Mixer attachment
- Brush
- Hammer or drill
- Notched spatula
- Rubber spatula
Preparatory work
Before learning how to lay tiles in the bathroom, let's clarify how to prepare the surface.
The most important rule of any high-quality finishing is the complete removal of the old one.
That is, we dismantle the panels, old tiles, wallpaper - everything that was there “before” the renovation. Some craftsmen claim that they can easily lay bathroom tiles on old tile floors. And such actions do take place, however, even here you will have to work a little so that your tiles do not “swell” in about six months.
Conclusions and useful video on the topic
Installing any bathtub is not as easy as it might seem. This video presents some editing nuances that you should pay attention to. Take a look and see if you can do this job yourself:
We have outlined to you the theory of how to install different types of bathtubs with your own hands. All that remains is to apply the acquired knowledge in practice. We warn you that theory is not always easily translated into practice.
You will have to skillfully use different tools, as well as demonstrate knowledge of the intricacies of the installation process. Particular attention should be paid to cast iron products. Take reasonable care to avoid injury to your hands and feet.
or you can tell about how you installed a bathtub yourself and connected it to the sewer in the block below. Please comment and share useful information. We and site visitors are interested in your opinion.
Installation materials and tools
The necessary materials and tools are summarized in the table.
| Name | Application area | Conditions of use |
| Tools and accessories | ||
| Electric drill | Drilling holes in the wall for support corners. | When installed near walls without the use of brickwork |
| Drill with a diameter of 6.5 mm for concrete | Is the same | Ibid. |
| Drill with a diameter of 5.5 mm for metal | Drilling holes in the support corners | Ibid. |
| Marker | Marking locations for installing support corners on the walls, marking holes in the corners | Ibid. |
| Dowels | Attaching the support corners | Ibid. |
| Screwdriver or power screwdriver | Installation and fastening of support corners on walls | |
| Gas key | Tightening threaded connections when installing a drain system | In all installation options |
| Construction level | Control of horizontal installation of the container and adjustment of the slope | In all accommodation options |
| Rule (a level bar is longer than the bathtub) | Control of horizontal installation of the container and adjustment of the slope | In all accommodation options |
| Construction trowel | Execution of brickwork when installing with tiling | When using brick supports and lining the bathtub with bricks |
| Notched spatula | Applying tile adhesive to tiles | When performing cladding |
| Wrench | Height adjustment of legs | In all locations |
| Materials | ||
| Corrugated pipe | Connecting the siphon to the sewerage system | In all installation options |
| Corner 32x32mm | Manufacturing of support devices on walls | When located near walls without the use of brickwork |
| Masonry mortar | Laying brick supports and cladding | When placed in the middle of the room or lining the bathtub with bricks |
| Sealant | When sealing joints between the bathtub and the wall | When placed near walls |
| Ceramic plinth | When sealing joints between the bathtub and the wall | When placed near walls |
| Tile | Facing device | When using brickwork |
| Tile adhesive | Facing device | Facing |
https://youtu.be/y_xIMsV8Fas
Select by material
The modern market for plumbing equipment includes acrylic, steel and cast iron bathtubs .
Cast iron containers are a time-tested option with impressive service life and heat savings. The material is resistant to various loads and generally does not cause any complaints.
The only unpleasant aspects are the high cost of such products, as well as their heavy weight . Due to the significant mass of the bathtub, installing it yourself can be difficult - you will have to hire an assistant.
Acrylic bathtubs have many advantages , including:
- light weight;
- almost complete absence of noise when filling with water;
- many different shapes, sizes and configurations;
- affordable price.
Steel bathtubs also weigh little and are relatively cheap, but filling such a container with water creates a lot of noise . And steel products do not last long.
Thus, if you have a sufficient budget and want to buy the most durable and reliable product , give preference to a cast iron bathtub.
If the most important characteristic for you is a non-standard shape and configuration , as well as a beautiful and modern appearance, buy a product made of acrylic.
If there are no special requirements for the parameters of the bath and you want to save money , feel free to install a steel container. Otherwise, the choice is yours, and the article “Which bath to choose: acrylic, cast iron or steel?” will help you decide faster.
For steel products
The installation procedure for this plumbing product is no more complicated than its acrylic counterpart . We adhere to the sequence below.
- First step . We prepare the place for installing the bathtub. Before starting work, a sewer drain pipe and outlets for connecting the mixer must be installed.
- Second step . We install supports. To do this, turn the bath upside down.
- Third step. Align the container in height. First, we do everything as in the case of an acrylic bathtub. Next we work in this order:
- Closer to the corners of the container, in the space between the walls of the room and the end sides of the bathtub, we drive in 4 narrow wooden wedges. With their help, we align the plumbing product along three walls;
fill the gaps between the bathtub and the walls with polyurethane foam;
- After waiting for the foam to harden, we pull out the wedges using pliers.
We do not remove the factory packaging at this stage. If it was removed earlier, we place some soft material to avoid damaging the bathtub.
We first try on each support in its intended place. We will attach the first support with approximately a 2-centimeter release in the direction from the drain hole to the center of the container . Let's fix the second one at the minimum possible distance from the opposite edge.
We install the supports so that there is no displacement of the flat bottom surface .
At the junction of the supports and the bath, we treat the surface of the latter with alcohol or acetone to degrease. Next, we need to remove the protective film from the linings , then carefully install the supports in the places intended for them and press them tightly to the bathtub.
Then we remove the protective film and carefully drive the adjusting pins into the plastic tips until they stop , checking the safety of the threads. First screw the nuts from the mounting kit onto the ends of the studs. Next, all we have to do is push the nuts to the tips and completely screw in the fixing studs.
The free space between the bottom of the bathtub and the floor can be closed at your discretion . For example, you can lay it with bricks and tile it, or hide it using a special decorative screen.
To learn how to properly install a metal steel bathtub and reduce the noise from its operation with your own hands, watch the video:
Design and advantages
A brick bathtub is an excellent option for a washing container that you can build yourself if the standard models do not suit the homeowner in size, shape or appearance. It is made of sand-lime brick and moisture-resistant concrete, and then lined with finishing material.
Brick bath
Most often, a brick font is placed between two opposite walls of the bathroom to save free space. A finished bathtub, made to individual sizes with your own hands, becomes part of the room, a kind of swimming pool. This technology has the following advantages:
- Individual approach. A brick bathtub can be made of any size, so it fits perfectly into the interior of the bathroom, allowing you to make the most of the available space.
- Affordable price. If you make a font with your own hands, then the cost of the finished product consists only of the costs of materials: brick, concrete, waterproofing, cladding. This option for making a bathtub is cheaper than ordering a model of non-standard sizes from the manufacturer.
- Low thermal conductivity. The brick font, due to the low thermal conductivity of this material, retains heat for a long time during hygiene procedures.
- Interesting design. Unlike washing containers made from standard materials, brick bathtubs look more solid and aesthetically pleasing; they fit organically into antique, rustic and minimalist interiors.
Note! If you decide to make a brick bathtub with your own hands, choose rectangular models that do not have rounded sections, as they require less masonry skill.
Tiles for facing
Installation under tiles is the optimal solution to the question of how to make a bathtub stable. This material is more hygienic and practical. To tile the bathtub itself, you cannot do without installing a screen. Moreover, you can surround any bathtub with tiles. Such cladding will be very harmonious in the interior. And, most importantly, it has maximum stability due to its special connection with the floor. The screen under the tiles can be built from brick or cement.
Important installation details
An example of high-quality installation of an acrylic hot tub on a frame
- The legs are attached so that the outlet element of the siphon easily flows into the sewer pipe. If your siphon is made of cast iron, then you will need to screw a steel tube into it;
- Installed with a slope;
- It is important to take into account the parallelism of the sides relative to the floor;
- How to seal a bathtub? The sealing of joints is subject to mandatory inspection. Small spaces between the wall and the side of the plumbing need to be cemented with a triangular notch. And apply a layer of acrylic paint to the outer surface;
- The tightness of the contact points between the bathtub and the sewer system is also mandatory!
- If the installation does not take place near the wall, but in the center of the room, sealing the edges is not important at all;
- Large gaps are filled with brick, plastic plate or pipe with a special sealing layer;
- It is also recommended to connect to an electricity normalization system. A professional installer makes this connection with copper wire or steel strip;
- Before using new plumbing, it is worth pouring about 10 liters of water into it. First hot, then cold;
- Installing a new hydromassage bathtub requires monitoring the installation of additional communications.
Our range:
Acrylic bathtub "Condor" on legs with waste and overflow Radomir 1-01-2-0-1-142 86261 RUR
Acrylic bathtub Aquanet Amelia 180×80 210314 RUB 27,782
Acrylic bathtub Aquanet Augusta 170×90 L 203904 RUB 16,232
Acrylic bathtub Aquanet Borneo 170×75/90 R 203910 22716 RUR
When is wall cladding required?
It is better to install the plumbing product before tiling the walls, in case of renovations in the room. If you adhere to this sequence of work, then you can get good practical and aesthetic results.
If the laying of tiles is carried out after the installation of the product is completed, this will allow for the maximum effect to eliminate all irregularities, cracks and gaps, then moisture will not collect in them, creating a favorable environment for the spread of mold and bacteria.
If renovations in the bathroom are not planned, but it was only intended to replace the plumbing fixture itself, you should know how to properly install the bathtub to the wall. To do this, you need to choose a model whose height exceeds the dimensions of the previous product by at least 15 millimeters.
It should be noted that the tiles that were under the old bathtub differ from the general design of the room in color, since they have not faded. It may have a dirty surface that is almost impossible to clean. For this reason, it is advisable to hide it.
Preparation
This process is very important for proper installation of the bathtub.
Make sure that all necessary tools are available when assembling the bathtub itself and attaching it to engineering systems.
In addition to preparing your tools, do the following: