We continue our traditional series of articles from Yuri Voedilo (professional builder and repairman). Yuri writes:
More and more people, among all floor coverings, are choosing laminate. So I think it’s worth giving him one topic. Let's look a little at the types of laminate, where it can be laid and where it cannot. Let's talk about the correct installation of laminate flooring on concrete, wooden floors, as well as on floors and OSB. And all this in a step-by-step form, after familiarizing yourself with which, you can lay laminate flooring with your own hands.
To produce laminate, impregnated paper is used from inexpensive wood by pressing. Therefore, he is afraid of moisture and this is his biggest drawback. This means that it cannot be used for a room such as a bathtub! Also, do not lay laminate flooring near the front door, especially if you have a private sector. It is not allowed to lay laminate flooring on top of an electric heated floor, otherwise it will simply come apart at the seams. Installation of the laminate should only be done on a well-prepared, flat surface, so we’ll start with that.
To work we will need the following tools:
- Jigsaw or electric parquet saw;
- Construction corner and tape measure;
- Substrate;
- Scotch.
What is OSB board
This is a multilayer board based on wood chips. It is classified according to the degree of strength, and the index is indicated in numbers.
Among the advantages of these plates are their low weight, as well as increased strength compared to any other products in a similar segment. Also noted is high moisture resistance, low cost and ease of use and installation. Among the most popular types of applications for these products are OSB floors.
Types and characteristics of plates
For construction work the following is used:
- OSB-2 – boards with low moisture resistance for interior work in dry conditions;
- OSB-3 – universal materials with improved characteristics for indoor or outdoor use;
- OSB-4 is the most durable and moisture-resistant product for load-bearing structures in high humidity conditions.
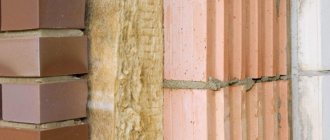
Why choose penoplex?
The popularity of penoplex is due to a number of important advantages:
- Fine cell structure . The presence of many cells increases the effectiveness of penoplex, aimed at retaining heat in the room.
- Moisture resistance . This property is maintained even with prolonged use of the heat insulator. Thanks to its ability to resist fungi and mold, penoplex retains its performance and characteristics for a long time.
- High level of strength . Penoplex has an increased compression resistance. Thanks to this property, sagging of the laminate can be prevented.
- Compatible with underfloor heating system . Contact with hot surfaces does not negatively affect the performance of the insulation. The exception is temperatures above 80 degrees. In this case, deformation of the heat insulator and partial or complete loss of its properties is possible.
- Fire resistance . Thanks to this property, penoplex can be used in wooden houses.
- Versatility . Penoplex is used for insulating floors placed on the ground, above basements, on floors, balconies and loggias. In any conditions, the material is able to provide an optimal level of comfort for people to live in.
- Relatively low cost.
Due to its characteristics, penoplex can be effectively combined with laminate of any thickness.
When choosing penoplex for laying laminate, it is important to consider that this heat insulator loses its properties under the influence of ultraviolet radiation and has lower sound insulation rates than other heat insulators, for example, fiberglass or mineral wool.
How to choose a floor slab
Modern industry offers the consumer a variety of options for such slabs. Products differ in technical characteristics, as well as in the presence of harmful substances that can harm human health.
When purchasing, you should pay attention to the manufacturer. Nowadays, slabs from European or American manufacturers are considered to be some of the highest quality products. Canadian products are of good quality. These slabs fully comply with all environmental and other standards.
If it is necessary to make floors, then products of the OSB-3 standard are recommended for these purposes. The material of the slab makes it possible to provide a reliable structure for the future floor, as it has a high density and has good properties to resist moisture.
Nuances and recommendations
If the room is non-standard, then preliminary marking is required, otherwise you will then have to cut a large number of pieces. The fewer joints, the better the quality of the floor. If the room has the shape of a trapezoid or there are curves, then the material is laid from the center. Gradually moving to the edges, the unoccupied area will then be filled with lump elements. When choosing which side to lay OSB on the floor, pay attention to the markings. Typically, installation is carried out with the front, smooth side facing the ceiling. If the room is small, then almost every sheet will have to be trimmed. You should not do this “by eye.” It is better to spend time taking measurements and marks than to redo it later. The corners of the slabs must clearly correspond to the shape of the edge of the room where the outermost piece is placed. Only the inner part of the canvas is trimmed; the outer perimeter must remain with the factory edge, which is additionally treated with a protective agent
Accordingly, two sides of the sheet should remain intact. It is important to create a comfortable temperature in the room where work is carried out. Do not lay linens in frost or heat.
Laying sheets in summerSource ytimg.com
It is important to maintain small gaps between the tile sheets, but no more than 1-3 mm. Experts advise using wedges that will allow you to maintain the same distance
An elastic damper tape is also used. This measure will avoid the occurrence of squeaks.
Technologies
It is recommended to lay OSB floors on special wooden joists or on a concrete screed. For the first case, you should use a plate whose thickness is 15 - 25 mm. The exact selection of thickness depends on the installation distance of the logs. When laying on a screed, it is recommended to use a product up to 10 mm thick. If the screed has multiple defects and potholes, as well as bumps, it is necessary to use a thicker product.
Slabs are produced in standard sizes 2440×1220 mm. When calculating the required quantity, it is necessary to consider the location of future slabs so that there is a minimum amount of waste. A circular saw works well as a cutting tool. It gives perfectly straight edges, which are very difficult to achieve using an electric jigsaw.
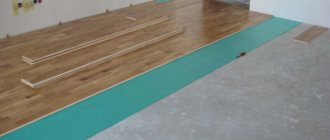
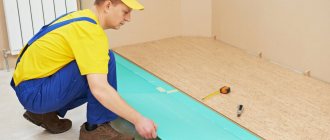
Stage 2. Laying the underlay for the laminate
Laying laminate on a bare surface is strictly prohibited ; it is always laid on a special substrate. Substrates can be polystyrene foam, polyethylene, or cork. Cork ones are environmentally friendly, but they absolutely do not tolerate moisture. The polyethylene foam backing is moisture-resistant, but at the same time, like a sponge, it can hold spilled water. Therefore, we usually use polystyrene foam underlay with a thickness of 2-3 mm, laying it on the floor in a checkerboard pattern. The sheets must be glued together with tape. This will provide additional protection from moisture and dust. And laying on a glued backing is much more convenient and simpler.
Laying on a concrete screed
Installing OSB floors in rooms with concrete screed will provide a reliable foundation for further installation of decorative floor coverings. It can be tiles, laminate, linoleum, parquet. The stove can perform important functions:
- Leveling the floor surface;
- Sound insulation;
- Insulation and waterproofing.
Typically, concrete floors are characterized by the presence of various defects. Significant altitude changes can also often be observed. Installing the slabs on a concrete base allows you to provide the most flat surface possible for further finishing work.
Thanks to the special design of several layers, the plates perfectly absorb various sounds and vibrations.
OSB is based on natural materials. They provide high heat-saving characteristics. In addition, these products prevent the penetration of moisture.
Is underlayment needed for laminate flooring for different types of floors?
Today laminate is the most popular flooring. It is easy to use, easy to maintain, looks attractive and harmonizes with various interiors. But not everyone knows that reliability and attractive
Quantity calculator
- on what basis the laminate will be mounted;
- what kind of floor unevenness there is;
- what type of laminate will be used;
- what is the humidity and temperature of the room where the coating will be laid;
Why do you need a substrate?
The main functions of any substrate are moisture absorption, sound insulation and leveling. In addition, it serves as a good shock absorber. If you have not leveled the floor well enough, the underlay will fall on all remaining unevenness and save the laminate from deformation.
Types of substrates
The thickness of the substrate should not exceed four millimeters, the best option is two or three millimeters. Today, most substrates are porous in structure and are susceptible to moisture.
- The most popular is the polyethylene foam backing due to its low cost. In addition, it is characterized by excellent moisture resistance, good thermal insulation, and is not susceptible to the influence of various microorganisms. This material is unpretentious to use. It is often produced with a foil layer of aluminum, look at the photo. However, it also has disadvantages. The most important of them is that it doesn’t hold its shape well and crumples after a while. Ideal for use on concrete floors.
- Nowadays, cork roll substrate is gaining popularity, which is not prone to rotting, mold formation, and insulates heat well. Due to its high cost, it is considered inappropriate to use it for low-budget coatings. The main flaw is considered to be water permeability; condensation may form under the coating. Mainly used for laying laminate on wooden floors and on floors lined with plywood, on OSB boards.
- Often, extruded polystyrene foam is used as an insulating layer, which smoothes surfaces well. This material is one of the most effective insulation materials. Keeps its shape perfectly and absorbs sounds, does not allow moisture to pass through. The existing drawback is that it is problematic to roll out on the base. It is intended for installation in buildings with concrete floors, as in the photo and on fiberboard slabs.
- Fiberglass insulation, fiberglass backing, is another famous type of environmental material. It has good sound insulation, is not subject to deformation, perfectly levels the surface of wooden and concrete floors, and also fits perfectly on OSB slabs.
Do I need film?
When installing a laminated flooring, the question often arises whether a film is needed under the laminate backing. When the plane on which you plan to lay it has strong defects, a film under the substrate is simply necessary. It will help facilitate the process of leveling the floor and allow you to achieve a result close to ideal. Also, when the humidity in the room is high, excess moisture can penetrate from the screed, forming condensation.
The presence of a protective film will correct this unpleasant phenomenon. For such purposes, you can use a vapor barrier or the simplest polyethylene film, about two millimeters thick. It is laid in an overlap of twenty centimeters and taped, as in the photo. The backing is already placed on top.
If the house had a floor covering such as linoleum, and you decided to change it to laminate, you should not dismantle the old covering, causing unnecessary effort and expense. You can lay laminate directly on old material. This type of repair allows you to achieve several positive goals at once.
Installation work
On a concrete base, logs and subsequent covering of them with OSB sheets allows you to get the most even floor possible without the need to use wet screeds.
Before installing OSB floors, you should prepare wooden blocks in advance. They will then be used as lags. Their use will help to significantly smooth out defects and errors in the concrete coating. The greater the distance between them, the thicker the slab should be.
The number of products should be calculated in such a way as to lay the products in 2 layers. This will ensure much higher rigidity of the material and greater resistance to various deformations. It is recommended to lay with some offset.
The first and second layers are fastened together using a special glue, and spiral or ring nails are additionally used.
If the concrete screed is level, then the OSB floor can be installed directly on the screed. One layer will be sufficient for this. The slabs can be secured with dowels or self-tapping screws.
Preparation of materials and tools
To install OSB boards on the floor, you must have a set of tools.
A set of woodworking tools
From this set you will definitely need:
- jigsaw or fine-toothed hacksaw;
- hammer;
- hammer drill or drill with operating modes for concrete and wood;
- a set of twist drills for wood and impact drills for concrete;
- nail puller or pliers;
- screwdriver;
- laser or bubble building level;
- grinding machine;
- gun for working with sealant.
In addition to the plates themselves, consumables are needed:
- material for sealing joints (acrylic putty, parquet varnish, acrylic or silicone sealant);
- dowel-nails or self-tapping screws for fixing the slabs to the base base.
To lay linoleum on OSB, the base should be prepared:
- roulette;
- steel guide bar or long ruler;
- masking and double-sided tape;
- roller (disc) knife;
- month-shaped knife;
- regular and serrated spatula;
- adhesives - construction adhesives for fixing sheets to OSB and “cold welding” for joining sheets;
- rolling roller;
- skirting boards.
For the final installation of plastic skirting boards with cable ducts, you will additionally need fittings (corners, plugs, transitions) and dowels and nails.
Dowel-nails and corners for skirting boards
detailed instructions
The first step is to remove debris and dust from the base. The concrete surface must be completely clean, otherwise the mounting adhesive will have weak adhesion. For even better adhesion and adhesion, the concrete screed is treated with a primer. The primer also allows you to create a film on the concrete that will prevent the screed from forming dust during the installation of the slabs.
Using a spatula, the slab is coated with parquet glue. Then you should place the product on a concrete screed. Be sure to allow for a 3mm gap. Moisture will inevitably come from below, since the slabs can change their size over time. Next, using a hammer drill, holes are drilled in the corners for dowels. The slab is then secured to the screed.
When installing a floating floor, leave a gap of 15 mm between the slab and the wall.
Work on wooden bases
If the building is based on a columnar or poured foundation, then often the floors in such buildings are laid on logs made of timber. OSB board is often used as a leveling product for the installation of other finishing coatings.
Laying technology on joists
The first layer of the slab is installed under the joists. The surface of the slab is additionally treated with bitumen waterproofing or any other waterproofing material. A layer of insulation should be laid in the free space between the joist beams and the first, rough layer, and the insulation should be covered with glassine on top.
Next, a finishing layer of OSB for the floor is installed on the joists. The thickness of the slab in this case ranges from 15 to 25 mm. You can also install two layers, but perpendicular to each other. Self-tapping screws should be used to attach the slab to the joists. Fastening is carried out every 25 mm. If several layers are used, parquet adhesive is used to provide greater rigidity and higher contact. It is recommended to lay the floor, taking into account technological gaps of 3 mm.
Surface preparation before installation
Any finishing work begins with preparing the base, and working with PVC laminate is no exception. Installation of panels with a lock is carried out without glue, which simplifies and speeds up the work process. The base for the laminate must be level, clean and dry. If the subfloor has significant differences, it is necessary to make a screed.
You can lay an OSB board 9 mm thick on a wooden base. This is done more for aesthetics, rather than out of necessity. Flexible vinyl laminate can be laid even on old floors with a difference of up to 3 mm per 1 m2. However, all cracks will have to be filled with putty.
If a new screed is made, the moisture from the concrete must completely evaporate. Otherwise, condensation will accumulate under the laminate, which, with the adhesive installation method, can lead to the boards falling off. It is better to level the old concrete floor with a finishing self-leveling compound.
- rubber hammer;
- roulette;
- stationery knife;
- wood hacksaw;
- square;
- a simple pencil;
- limiters.
IMPORTANT! The purchased laminate must lie in the room being finished for at least a day. This is necessary to adapt the material to local humidity and temperature.
How to process OSB for various coatings
The durable, hard, and even surface created by OSB boards allows it to become a completely universal basis for all types of finishing floor coverings.
For paint and varnish coatings, OSB products can be used as a finished floor, which only requires decorative treatment with paint and varnish materials. There is no need for additional processing of the slabs. It will be enough to clean them from dust and apply several layers of paint and varnish.
When laying rolled finishing materials, you should ensure that the places where the OBS slabs join each other are flush with other surfaces. It is recommended to remove any unevenness immediately. This can be done using sanding tools or sanding paper. If there are expansion gaps on the surface, they are filled with sealants.
If you need to lay tiles, for better fastening on the slab you should ensure that the product does not move. To do this, the logs are placed a little more often than required by the thickness of the OSB. The step between floor fastenings is also made smaller. The tiles are glued using a special glue that is suitable for wooden surfaces.
The slab is not prepared in any way for laying laminate flooring. If there are any minor irregularities, they are removed using a substrate.
OSB boards make it possible to very quickly and inexpensively make the existing floor covering perfectly smooth. If necessary, the floor is also quickly assembled on joists. It won't take much time and won't require much effort. The surface of the product will not require expensive finishing work, treatment with leveling compounds, or means to protect it from moisture.
By analogy with woven materials, OSB (also known as OSB and OSB) has a front and a back side. They do not differ in composition, but it is important to recognize them correctly; in many cases, this will allow installation to be carried out correctly.
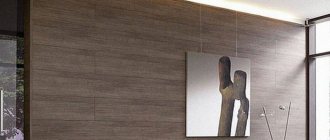
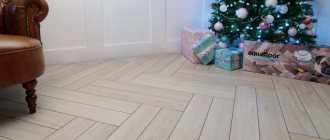
How to put laminate on a wall
Previously, no one had thought of putting laminate on the wall; somehow it doesn’t fit to put flooring on the wall.
Such use of standard materials for non-standard options is possible only with us. You can’t put laminate on the wall, but they do, and it looks unusually original and very good, it blends perfectly with the interior of various rooms, offices, rooms.
If you put laminate on the floor and walls of the same color, you can greatly increase the visual volume of the room.
The basis for attaching laminate panels to the wall
First of all, you need to make a flat surface of the wall from plywood, preferably from OSB board. To install the slabs, attach the lathing to the wall.
The sheathing of slats is carefully installed level, taking into account the difference in unevenness of 2 mm per 1 linear meter. You can also assemble a frame for OSB the same as for plasterboard, that is, strengthen only the vertical slats and profiles, and then attach the OSB to them.
The positive aspects of laminate on the wall
1. Installing laminate on a vertical surface
It’s not such a difficult task – anyone can do it.
2. Sufficiently high wear resistance of the material, which can withstand heavy loads. Of course, there are no such loads on the wall, so the service life of the laminate increases many times.
3. An inexpensive type of finishing, where it is possible to install a thin laminate and, accordingly, cheaper.
4. Laminate on the floor gets dirty a little, not to mention the walls. That is, it is highly antistatic and very easy to clean.
Inscriptions and markings on OSB
There are no generally accepted marking standards for marking OSB sheets. Each manufacturer decides for himself how and on which side to apply inscriptions to the OSB.
Sometimes in production there are inscriptions with orientation recommendations. On imported slabs there may be the mark “THIS SIDE DOWN”. This text can be translated as “this side from below.” Such an inscription is usually applied to the smooth side of the OSB sheet.
Manufacturers recommend that the sheet be oriented with the smooth side down to make it easier for people to move along the rough side. When laying roofs, installers do not slip on the rough side. This reduces the risk of people falling and getting injured.
Choosing the OSB side when installing sheets
When installing in places protected from moisture, the location of the OSB sides does not matter, since this does not affect their further operation.
Depending on the installation location of the slabs, there are recommendations for the orientation of the sheets with the front and back sides.
Which side to mount OSB sheets on walls outside the house
If the slabs need to be mounted on walls from the outside of the building, it is better to mount the OSB smooth, i.e. face side out . This orientation avoids the accumulation of water in surface irregularities, therefore, it will increase the durability of the slab.
You can read more about the technology of installing OSB sheets on walls outside the room in the article: how to properly attach OSB to a facade.
Which side to mount OSB sheets on indoor walls
When OSB sheets are installed indoors, their orientation does not matter. The main destructive factor for OSB is water, and indoors the sheets are protected from water.
The technology for installing OSB boards to indoor walls is discussed in more detail in the article: covering OSB walls indoors.
In wet rooms, it is better to cover OSB sheets with an additional protective layer. For example, glue tiles or ceramic tiles. You can learn how to do this correctly from a separate article: gluing tiles to OSB.
Which side should you put OSB on the floor?
When using OSB for flooring, the material is turned with its front side facing the ceiling. In this position, if water possibly gets on the floor, it does not penetrate deep into the sheet. Also, this water drains faster, evaporates and causes less damage to the structure of the slab.
Which side to attach OSB to the ceiling
For cases of installing OSB to the ceiling, there are no general recommendations on the orientation of the front and back sides. The fact is that the ceilings are protected from falling water, and, accordingly, both sheets are protected.
Which side should you put OSB on the roof?
When slabs are used in roofing, it is better when the rough side (wrong side) is oriented upward. Then it is safer to move on the roof during work.
Installation tools
To install the slabs you will need a screwdriver and a jigsaw.
Before attaching OSB to the subfloor, it is necessary to place it indoors for several days so that the material gets used to operating conditions.
You need to prepare the following tools:
- a jigsaw or a wood saw with fine teeth: these devices are necessary for cutting OSB boards (you can also use a hand-held circular saw);
- screwdriver for tightening screws;
- measuring tape, building level, square;
- fasteners at least 3.5 cm long (black screws can be used).
You will also need a plane or sanding machine. There are household versions of such devices that are relatively inexpensive.
Black self-tapping screws are suitable for fastening the plates. If the base is properly prepared, they will not be exposed to too much mechanical stress.
To decorate the flooring, skirting boards are required.
In some cases, it is recommended to take not one thick slab, but several thinner ones, obtaining a reliable and durable coating. There are no special requirements for such OSB sheathing; it is only necessary to ensure the strength and stability of the base.
Laying ceramic tiles on OSB, preparing for it and assessing the chances of success of the operation. Solving the problem is quite troublesome and complicated. You cannot stick tiles directly onto the surface of particle boards, as the tiles will not stick. This means that it is necessary to provide an additional coating that will provide excellent adhesion to the surface. There are two possible solutions to the problem: instead of OSB, CSP will be laid on the floor, that is, cement-bonded particle boards with a smooth surface, or cladding made of CSP, but of a smaller thickness, will be attached to the wood boards themselves on top. When laying ceramic tiles, care must be taken to ensure that the base is as strong, rigid and immovable as possible. The layers are fastened together with PVA construction adhesive and self-tapping screws.
Despite the fact that the quality of oriented strand board exceeds the characteristics of chipboard, this structural material is not suitable as a finishing floor covering:
- It is necessary to leave a gap of 2 - 5 mm between the sheets to avoid squeaking during thermal expansion;
- the seams are sealed with sealant, reducing the aesthetics of the coating design.
Nuances of OSB installation.
Therefore, OSB is used more often as a subfloor:
- the slabs have ideal flatness, which allows them to level tongue-and-groove floorboards that have become deformed from long-term use;
- the solid surface of OSB sheets is suitable for small format claddings that cannot be laid on an unedged board without disturbing the flatness;
- the slabs have a stable geometry and self-supporting ability, so they can be used to reinforce a subfloor with a rare joist pitch or a small thickness of floorboards in order to increase its spatial rigidity and load-bearing capacity.
After laying OSB, the surface is smooth and has a high load-bearing capacity.
In this case, you need to know how to properly attach OSB sheets to floorboards/joists and use offset seams in adjacent rows.
There are several types of oriented strand boards:
- OSB-2 – only for dry rooms;
- OSB-3 – can be used in rooms with high humidity;
- OSB-4 – for load-bearing structures.
Important! Since the subfloor has low maintainability, it is prohibited to use OSB-2 in it. The slabs are additionally treated with an antiseptic and waterproofing material.
The main characteristics of oriented strand boards are:
- density – 630 kg/m³;
- thermal conductivity – 0.13 W/m*K;
- linear expansion – 0.15% at a humidity of 70%;
- straightness – 0.6 mm/m;
- the perpendicularity of the opposite sides of the sheet is within 3 mm;
- thickness deviation – 0.3 – 0.8 mm (ground, untreated, respectively).
Advice! Manufacturers produce slabs of different sizes, which must be taken into account when purchasing in order to reduce cutting waste for specific dimensions and room configurations.
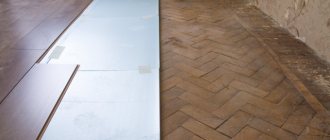
Installation technology
To properly lay sheet material over an existing plank floor, the following conditions must be met:
- revision of the base - rotten joists and boards are replaced, creaks are eliminated, the presence of insulation, a vapor barrier membrane on top of it and waterproofing under it is checked, the impregnation of floorboards with antiseptic and fire retardant is updated;
- layout - usually from a long wall, offset seams in adjacent rows by at least 30 - 40 cm;
Layout of material on the floors.
OSB fastening diagram.
Important! When laying parquet, PVC tiles, and other small-format cladding, the screw heads must be puttied.
Installation recommendations
Depending on the type of finishing floor covering, OSB boards are oriented differently on a wooden floor:
- for small-format decorative materials, it should be ensured that the seams of tiles and PVC tiles do not coincide with the joints of OSB boards;
- When choosing laminate, tongue and groove, decking or parquet boards, it is better to lay the rows of OSB across the direction of the long facings of the finishing layer or at an angle of 45 degrees for a diagonal layout (relevant in rooms with defects in the geometry of the walls).
Advice! On OSB it is allowed to apply a screed made of DSP or self-leveling floor. However, the surface of the oriented strand board must be pre-treated with a waterproofing material to avoid leaks into the lower floor and swelling of the structural material itself.
Finish flooring repair
The main problem with plank flooring is a floorboard or several boards, which develop a transverse “hump” during periodic changes in humidity or during drying. This leads to an increase in the repair budget:
- the floor surface becomes an uneven “comb”;
- OSB boards do not rest on the floorboards with their entire surface, but only in places of contact with the “humps”;
Deformation of the wooden floor.
In other words, OSB with a thickness of 22 mm or more should be used. This problem can be solved by preliminary grinding or scraping of the base:
- a grinder or sander will smooth out the “waves”;
- the contact area of the subfloor layers will sharply increase;
- You can get by with oriented strand boards of smaller thickness.
However, this is not always possible when the existing floor covering is thin.
OSB subfloor top layer
Wood-containing boards are excellent for the top layer of a subfloor, as they increase the performance characteristics of the structure:
- provide a level base for the floor covering;
- increase spatial rigidity and strength of the base;
- reduce labor and material consumption of work.
Unlike floorboards, self-tapping screws are screwed into OSB boards strictly vertically. When the hardware is tilted, a change in geometry and warping of the material over time may occur.
The main problems arise when opposite walls diverge (trapezoid instead of a rectangular room shape). In this case, it is necessary to mark the existing wooden floor in order to trim only the slabs of the first row:
- a center line is drawn along the long wall of the room;
- depending on the size of the slabs, markings are made parallel to it;
- the edge of the OSB sheet mating with the wall is trimmed with a hand saw or power tool;
- the second and subsequent rows are laid according to the markings without trimming, taking into account the displacement of the transverse seams;
- the last row is cut in a similar way to give the sheets a trapezoid shape.
Thus, the OSB structural material is suitable both for creating the top layer of a subfloor and for repairing a finished floor covering made of tongue-and-groove boards if dismantling this cladding for some reason is not practical in the room. When choosing an oriented strand board, the labor intensity of the work is reduced, and the home master makes do with the existing arsenal of tools.
Advice! If you need floor repair specialists, there is a very convenient service for selecting specialists from PROFI.RU. Just fill out the order details, the experts will respond and you can choose who to collaborate with. Each specialist in the system has a rating, reviews and examples of work, which will help with the choice. Looks like a mini tender. Placing an application is FREE and does not oblige you to anything. Works in almost all cities of Russia. Without your desire, no one will see your phone number and will not be able to call you until you yourself reveal your number to a specific specialist.
If you are a master, follow this link, register in the system and be able to accept orders.
Nuances of processing different sides of OSB sheets
At the stage of delivery of the material from the manufacturer to the consumer, its surface is protected from moisture by covering it with paraffin. The latter reduces the adhesive properties of the surface of OSB sheets.
Both sides of OSB are coated with the same compound. Without additional surface preparation, both paint and plaster will peel and crack over time. Moisture will penetrate into the cracks, and the material will become unsuitable for further use.
For this reason, before applying the finish, the surface is cleaned of the factory coating and a layer of primer is applied. Acrylic primer is used for this.
Cleaning is done first with coarse-grain sandpaper (P80), and then with fine-grain sandpaper (P200 and more). OSB-3 and OSB-4 boards are most reliably varnished, so their cleaning must be done more carefully. When the top protective layer is removed, the finish easily penetrates into the structure of the material.
Particular attention should be paid to the edges. Their structure is porous, so the absorption of paints and varnishes is increased here. The edges and corners are pre-rounded, otherwise the paint at the joints will crack over time.
The seams between OSB boards and gaps must be treated - filled with acrylic-based sealant. It is better not to use silicone, since paints and varnishes do not adhere well to it. Some craftsmen prepare mixtures themselves, using casein, sawdust and gelatin. More information about sealing seams can be found in a separate article: correct ways to seal OSB seams.
The texture and appearance of OSB from different manufacturers is sometimes very different. There are slabs that are smooth and beautiful; the shavings in them seem to be covered in varnish. The surface is rough and matte. This is not a sign of poor quality. This OSB is the best for roofing work. Therefore, when selecting a material, you need, first of all, to calculate its thickness, select the correct class, and during installation not to confuse the sides.
OSB or OSB (oriented strand board) is a relatively new building material that has become a successful alternative to plywood and chipboard. The role of OSB in frame construction and insulation of standard houses is great. Especially often, OSB is used to form and level floor surfaces. Today we’ll talk about how to do this correctly.
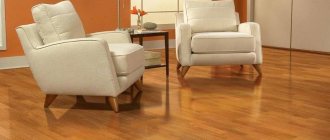
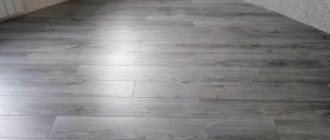
Stage 3. Do-it-yourself laminate installation
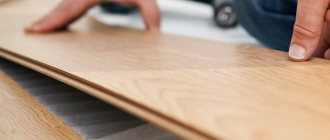
Laminate consists of individual strips called dies. Along the perimeter of each die there are locks and ridges for locks. The most common types of locks are Lock or Click. Personally, I am a supporter of the Click system, since if necessary, they can be disassembled and reassembled several times, but Lock cannot be disassembled, it will most likely break and will no longer be used. Panels with a Click lock are assembled like this: one die is laid on the floor and the end of another die is inserted into its end at an angle of 45 degrees and lowered, aligning the two dies in one plane on the floor. (See photo below)
So we collect a whole strip along the entire wall. If necessary, we cut the last die to length, and we will use the rest of it as the beginning of the second strip. But it must be taken into account that pieces of dies less than 30 centimeters cannot be used!
Note: Do not glue or screw the laminate to the base under any circumstances. This is also one of the conditions so that the laminate does not swell and the locks do not come apart!
Once the first strip is folded, the second strip is assembled side by side in the same way. Having assembled the second strip, we need to insert it into the lock first. To do this, lift it at an angle of 45 degrees and insert it into the lock of the first strip, while smoothly rocking it up and down, pressing it against the first strip, and lower it onto the base. During work, it is necessary to ensure that the distance between the transverse seams is at least 30 centimeters.
Between the laminate and the walls along the entire perimeter of the room there should be a thermal gap of 08-1.2 cm, both along and across the laminate. This is done so that when moisture increases, the laminate has room to expand and does not begin to warp and swell in the middle of the room. At the end of the work, this gap will be closed with a floor plinth.
Note: for convenience, I use improvised materials to maintain the thermal gap. For example, pieces of unnecessary osb or cuttings of lining. Inserting them every 50-60 centimeters.
Sometimes it happens that longitudinal locks do not close tightly, leaving millimeter gaps. Specialists who constantly install laminate flooring have special finishers and screeds. I can advise you to cut off a small piece of laminate and, when inserting it into the lock, use it in place of the punch, then your locks will remain intact and will serve for a long time.
The laminate must be laid under the existing door frame so that there is a gap of no more than 2 mm between the frame and the die. Once finished, this gap will need to be sealed with sealant or silicone.
If you have columns in your room, as in our case, then you also need to make thermal gaps of 0.8-1.2 cm around them.
Types of OSB boards and their characteristics
The following types of OSB are used in construction:
For construction and leveling of floors, OSB-3 sheets are usually used, which can easily withstand the load from furniture, equipment, and people’s movement.
OSB boards are used as a smooth and durable base for various modern coatings - parquet, tiles, linoleum, laminate, carpet. The main functions of oriented strand boards are:
Let's look at several popular technologies for laying OSB on different substrates.
Let's start with the simplest situation - leveling a concrete base with OSB slabs. The work is carried out according to this scheme.
The OSB is laid out on the surface, and if necessary, trimming is done with a jigsaw or circular saw. Rubber-based parquet adhesive is applied to the underside of OSB, using a notched trowel to ensure uniform application. Glue the sheets to the concrete base.
When laying, expansion joints 3 mm thick are left between the slabs. Along the perimeter of the room, between the OSB and the wall, the seam should be 12 mm. These gaps are necessary to compensate for temperature and humidity expansion (swelling) of the OSB during operation.
Laying OSB on an old wooden floor helps level the surface and prepare it for installation of the finishing coating. Installation is carried out as follows:
This completes the process.
If there is a concrete base (for example, a floor slab), installing joists and covering them with OSB sheets allows you to create a level floor without the use of wet leveling screeds. And also incorporate insulating, moisture- and noise-insulating materials into the structure.
The wider the distance between the logs, the thicker the OSB boards used. If the pitch is 40 mm, then the minimum OSB thickness is 15-18 mm; if the pitch is 50 cm, the thickness is 18-22 mm; if 60 cm, the thickness is 22 mm or more.
Thanks to the logs, space is created between the OSB and the concrete floor. It can be put to good use by covering it with insulating material. For example, the floors of the first floors are often cold, so a thermal insulator can be laid between the joists: mineral wool, polystyrene foam, EPS, etc. If there is a wet basement under the ceiling, the floor structure is supplemented with vapor barrier films or membranes.
The sheets are fixed to the joists with self-tapping screws or nails (spiral, ring). Spacing of fasteners: along the perimeter of the sheets – 15 mm, on intermediate (additional) supports – 30 mm. Nails (or self-tapping screws) fixing the boards around the perimeter are placed at a distance of at least 1 cm from the edge (so that the OSB does not crack). Fastening elements are selected so that their length is 2.5 times greater than the thickness of the plates used.
How to fasten OSB boards to joists in an ordinary city apartment, watch the video:
What thickness of OSB for the floor should be
OSB boards are quite often used for laying floors on joists, on a concrete base, and also on a dry screed. However, not everyone knows how to properly lay OSB and how thick they should be, as well as how justified such material is in a given situation. We will deal with these questions in detail and with photos in this article.
Which is better: OSB boards for flooring or other materials
To lay flooring or level the floor, you can use analogues of oriented strand board - plywood or tongue and groove boards. There are some differences between them.
Advantages of OSB in comparison with other materials:
- The cost of OSB is much lower than that of tongue and groove boards. However, it is worth considering for what purpose a particular material will be used. OSB boards are used for laying flooring under linoleum or laminate, while tongue and groove boards can be used as a finishing coating.
- The water resistance parameters of OSB are significantly higher than those of plywood. This should be taken into account when planning the finishing of the floor in a particular room. At the same time, the price of plywood and oriented strand board is currently practically the same. In this case, the choice of material may be influenced by its availability in stores, as well as the personal wishes of the buyer.
What thickness of OSB should be used?
To decide what thickness of OSB is needed for the floor, you need to know how it will be used.
- In cases where the base is a concrete screed and only a little leveling of the surface is required, the sufficient thickness of OSB for the floor is 1 cm.
- Laying particle boards on a fine expanded clay or sand cushion as a dry screed is done quite often. In this case, it is not fundamentally important what thickness of OSB to lay on the floor (about
Creating a subfloor from OSB on joists
- Logs are installed on the foundation. The lag pitch must correspond to the thickness of the OSB boards used (the larger the pitch, the greater the thickness).
- Perform rough rolling of the floor. To do this, retaining bars are nailed along the joists, and OSB boards are laid and secured on them. The surface facing the ground is covered with waterproofing preparations, for example, bitumen mastic.
- A layer of vapor barrier is laid on top of the OSB.
- Thermal insulation material is laid, for example, polystyrene foam, mineral wool slabs, ecowool, etc.
- Cover the insulation with another layer of OSB. Fastening is carried out in the same way as when laying OSB on logs on an existing concrete base (the technology is described in the previous paragraph).
A strong, hard and smooth surface makes OSB a universal base for all modern types of finishing floor coverings. How to cover an OSB floor? Here are some popular solutions:
What exactly to choose is up to you.
Using OSB allows you to inexpensively and quickly level an existing wood or concrete floor. And if necessary, create it from scratch on logs. An OSB surface will not require expensive finishing, additional leveling, or coating with moisture-resistant compounds. This is an excellent choice for those who want to create a high-quality floor with minimal effort.
Is it possible to use OSB for heated floors?
In house construction, especially wood construction, several types of flooring are used to install heated floors: slatted and modular. With the modular method, a heated floor under chipboard is formed into modules. The chipboard panel contains channels for the pipeline contour. With the rack method, pipes are placed on the surface of chipboard of the required width, and metal strips are placed in the grooves, where a traditional heating circuit is then placed. A specialized condensate-absorbing gasket is laid on the pipeline and the final floor covering is laid.
Guides for heated floor pipes under chipboard
Oriented strand boards are quite in demand; they are used to level curved surfaces. Laying slabs on a wooden surface makes the floor covering stronger and warmer. Any floor covering can be installed on such a base. Oriented strand boards are also used for electric floors.
Boards Oriented Strand Boards
The advantages of the material include the following characteristics:
- High density OSB;
- Resistance to moisture, which allows use in rooms with high humidity;
- Excellent pressing, thanks to this the material does not crumble;
- Protection from biological factors;
- Environmental safety;
- Not a difficult installation process;
- Financial savings: you only need a little bit, but it covers a large area;
- Reliability: withstands mechanical loads, lasts a long time;
- Possibility to use all kinds of means for finishing work.
Water
floor on a wooden base
Hydraulic heated floors on OSB boards are placed where it is not possible to create a screed: with low ceilings, on wood bases. Good qualities of this method:
- ease of installation;
- low floor height;
- the ability to lay the finishing floor covering as soon as installation is done.
The hydronic heated floor system involves an installation process on a wood base with OSB grooves using heat distribution plates. A moisture-proofing substrate is laid on the pipes, the final floor covering
made of laminate, wooden parquet.
- Pipes are used copper or polyethylene, but more often the final option (they are cheap and last a long time).
- For work, take modules from OSB or chipboard with grooves for pipes, where plates for pipes are installed. The modules are demonstrated in plates with widths of 130, 180, 280 mm. The size is selected based on the width of the pipe installation step.
- Heat distribution plates made of aluminum have the appropriate diameter. Heat redistribution occurs along the surface from below.
Floor heated water floor
The heated floor system is made from special OSB modules and planks. The modular installation method involves the use of oriented strand boards - ready-made modules for the circuit. The rack system is made of slats or boards.
The general process for laying floors on wooden joists is as follows:
- material
are placed between them . - OSB modules are placed at intervals for normal expansion compensation. The modules are connected with a regular snap lock.
- The wood slatted flooring method requires a rough wood flooring. They are placed oriented at a distance sufficient to accommodate the heating pipes, according to the selected pipe laying pattern (snake, snail, etc.). Planks and OSB modules are laid strictly following the layout diagram.
- Metal plates are installed on floor-mounted models.
- Pipes are laid on the plates.
- A soft noise-absorbing substrate is placed on top of the laid contour of the pipes, and a final coating of more than 1 cm is placed on top of it.