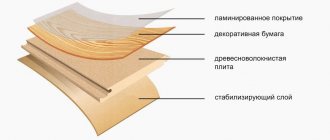
The most important stage in the formation of a floor covering is laying the underlay under the laminate. Properly installed material will ensure the reliability and durability of the floor, while protecting the feet of household members from the cold. Laminate flooring has gained popularity due to its beautiful appearance, similarity to parquet and affordability. In order for the floor covering to work effectively, we will analyze the subtleties of how to properly lay the underlay under the laminate. Looking ahead, we note that you can do this yourself without the help of specialists.
Functions of laminate underlay
First of all, let’s figure out what functions the laminate underlay performs.
- Final leveling of the floor. Based on current regulations, the difference in height of load-bearing foundations should not be more than a couple of millimeters per linear meter. To some extent, this meets the requirements for almost all floor coverings. However, laminate does not apply here. The reason is that the slats are only a few millimeters thick, so even with a small difference in height, deflections occur. As a result, we are faced with early damage to the locks and a tongue-and-groove connection; the floor begins to creak while moving across it; the front surface becomes unsightly in appearance. There are substrates that copy the surface profile, taking loads from the laminate in a similar position.
- Increased sound isolation. At the moment, Russia is adopting many traditions that have been established abroad. For example, people abroad do not exchange street shoes for indoor ones; this is done on various grounds. If you walk on laminate flooring in boots with hard soles, you can cause unpleasant sounds. The material allows sounds to pass through without any problems, and sometimes even amplifies them. The substrate is designed to dampen vibrations, everything is connected with the manufactured products. Noise can be reduced by approximately 20 dB or more.
Underlays under the laminate can reduce sounds from walking on the floor or objects falling on it
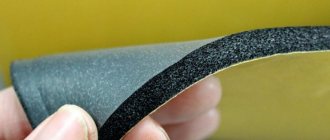
- Heat conductivity. There are varieties of substrates (cork, jute, coniferous), characterized by low heat conductivity parameters. Even with a thickness of about 5 millimeters, the heat reduction is significantly reduced. The floor feels quite pleasant; you can be in the room without shoes without freezing. It must be remembered that the most inexpensive beds are unable to retain heat and reduce sound. This is understandable, because cheap products are rarely of high quality.
- Water protection. This parameter is typical exclusively for certain types of polymer substrates. As an addition, sometimes aluminum foil or polyethylene film is fixed. It must be remembered that the material we are considering does not respond well to contact with liquid or long-term use in high humidity. The substrates become an excellent barrier that does not allow water to pass through. However, not all have these properties; there are those that need protection from moisture.
Not all, but most underlayments can protect the subfloor from water ingress
Features of the quick step lining
A special type of material that is used to form one of the layers under the laminate is called “Quick Step” and has the following advantages:
- Evens out defects in the subfloor.
- Protects against moisture that may accumulate depending on the time of year.
- Double-sided sound and thermal insulation.
- Allows comfortable use of the coating at all stages.
Substrate selection criteria
The required type of underlay is selected based on the individual characteristics and existing conditions for using the flooring.
Base
It is advisable to place such material on a base made of wood or concrete.
| The basis | Description |
| Concrete or sand and cement screed | It differs in that it can draw in water. The underlay is designed to act as a strong barrier, otherwise the laminate may become damp. It is advisable to take substrates made of foamed polymers that do not absorb liquid. You can use products that have special additional coatings; aluminum foil is most often suitable. |
| Natural boards | This is not the easiest material to use as a base for laminate flooring. It always differentiates its own linear dimensions based on relative humidity indicators. With the help of the substrate, it is necessary to smooth out possible vibrations, and the movement of loads should not affect the final coating. According to these characteristics, all varieties of commercially available products meet the requirements. In addition, it is necessary to take into account the number of floors of the room. If we talk about the first floor, then sound insulation is not so important here; loud sounds cannot cause discomfort to others. If the room is located on the second floor, you should think about good sound smoothing so that they do not disturb those who are below. |
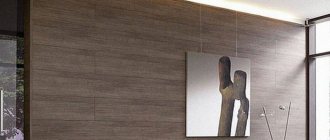
When choosing a substrate, you need to consider what surface it will be laid on.
Heat conductivity of the substrate
The selection rules are related to the specifics of the floor structure and its placement.
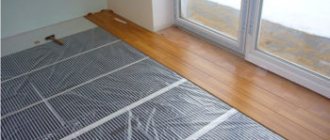
Heating floor . The efficiency of the system depends on how well the substrate conducts heat. Currently existing heating components can be placed without a top support; they are able to resist forces acting on the floor. If installation of this option into the system is not possible, then for the substrate it is recommended to use products based on a foam polymer. It is thin and responds to loads with compression, which increases heat conductivity.
It is absolutely not recommended to use cork, jute or other products as a substrate that do not transmit heat well enough. They not only reduce the efficiency of heating, but also provoke negative conditions for the use of heating elements. Electric mats always operate at high temperatures, and this significantly accelerates the process of physical obsolescence.
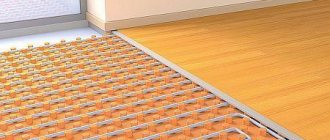
If you are planning to install a heated floor, then you need to select a special substrate
Floor on the first floor . Here the substrate should reduce heat loss from the heated floor to the cold floors. In such a situation, it is necessary to use products with a low thermal conductivity coefficient. The less heat escapes through the laminate, the more pleasant it will be to stay in the room.
Floor on the second floor . It's no secret that warm air moves up to the ceiling. The energy is then sent to the floor slabs and flooring of the second floor. There is no need to interfere with the natural movement of heat energy and try to insulate the heat as much as possible in laminate products on the second floor. It is much better in economic terms to use this energy to ensure automatic natural heating of the floor.
Interesting! It is recommended to fix components characterized by increased heat conductivity.
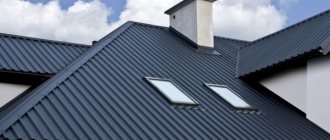
It’s great if the substrate under the laminate, laid on the second floor of the house, will allow heat to pass through well
From the listed examples, we can conclude that the best selection of products for installing laminate flooring affects not only the conditions in the room, but also makes it possible to save money due to the ease of operation of buildings in winter.
Water insulation
Any floors that include wood in their design must be provided with good natural ventilation. This criterion also applies to laminate flooring. In life, however, one often comes across obvious deviations from the requirements of construction standards and regulations. Ventilation in already used rooms is not easy, and sometimes it is even technically impossible.
It will be necessary to use special additional methods to protect wooden structures from high moisture content: treat with impregnations, construct special barriers. The substrate can act as this kind of barrier only when it is made from a polymer with a closed honeycomb. All other products allow liquid to pass through them, and some are absorbents and require protection.
It is better that the substrate has the function of insulating from moisture
Types of materials from which substrates are made
| Type of substrate | Briefly about properties and purpose | approximate price |
Foamed NPE | Made from open-cell polyethylene foam. It is advisable to use on concrete bases. Thermal conductivity is at the level of 0.031 W, according to flammability in group G2, the maximum temperature of use is 90 degrees Celsius. The most inexpensive underlay that is suitable for conventional laminates. | From 15 to 20 rubles per square meter |
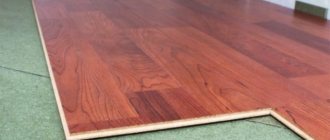
Jute | Differs in thickness of 4 millimeters. For production, natural bast fiber is used, which is characterized by high noise and heat insulation data. Capable of smoothing out large differences in height. Does not produce active chemical compounds into the environment. | 120 rubles per square meter |
Cork | It is crushed cork tree bark, which is pressed and glued using products that are not dangerous to humans. It is characterized by a thickness of a couple of millimeters and reduces the noise level by 22 decibels. Disadvantage - it is afraid of water; during the installation process it is necessary to resort to specialized construction measures to avoid direct contact with wet surfaces. | From 180 to 320 rubles per square meter |
Coniferous | Advanced technology allows you to make a backing from wood fibers with pine needles. The mass does not exceed 240 kilograms per meter, and the thickness is about 7 millimeters. Reduces noise by 25 dB, conducts heat in the amount of 0.05 W/(mK). It copes well with uneven surfaces, has a pleasant aroma, and has a good effect on the respiratory system. | 140 rubles per square meter |
HPS | Made from extruded polystyrene foam, it stands out due to its high physical strength, as it can cope with loads of up to 11 tons per square meter. Can maintain characteristics at temperatures up to 60 degrees. Flammability - G4, density - 50 kilograms per square meter. | 40 rubles per square meter |
Perforated CPS | A special backing for heated laminate material reduces unproductive loss of heat energy. Survives direct contact with aggressive chemical products. A large number of holes provide excellent movement of warm air, so the efficiency of the floor is quite high. | 60 rubles per square meter |
Of course, when choosing, you need to take into account your own capabilities (immediately determine how much money you are willing to spend on such material), as well as the characteristics of different substrates
Types of substrate: which option to choose
Natural substrates
These substrates are made from natural ingredients. Such materials are considered the most hygienic and do not cause harm to health.
Cork backing.
It consists of sheets of pressed cork chips.
Coniferous substrate.
It is made by pressing crushed needles and sawdust from coniferous trees. In the production of coniferous backing, no adhesives are used - the coniferous mass is held together by natural resin, which is released from the wood under high pressure.
Synthetic (polymer) substrates
Such materials are created from artificial compounds. Despite this, they do not cause harm to health: subject to the conditions of use, they do not emit toxic substances. They perform well in operation and at the same time cost much less than their natural counterparts.
Expanded polystyrene.
The second name is “iso-noise”. This is a wear-resistant material with good shock-absorbing properties. Available mainly in sheet format.
Polyethylene foam. The second name is “isolon”. Polyethylene foam is a sheet of polyethylene foam rolled into a roll.
Foil backings.
Foil substrates are foamed polyethylene or polystyrene, on which foil is applied on one or both sides.
Specifics of installing cork backing
There is no need to talk about the advantages of the product. But it’s still worth mentioning the downsides.
- High price. This is a fairly expensive type of substrate. It is worth saying that, according to experienced builders, a high price is not at all associated with excellent quality. The cost is so high because the manufacturer actively advertises its product.
- Does not respond well to high humidity. Like all products of natural origin, cork at high humidity suffers from rotting processes and fungal activity. To some extent, adhesives made from synthetic materials can be used for protection, but after some time this product will no longer be effective.
- Pressed mats made from crushed cork are very hard. To some extent, this can be considered a plus, since the material copes with high forces on the lamellas. But if you look at it from a different angle, it does not completely smooth out the difference in height, and this sometimes provokes unpleasant sounds when moving across the surface.
Cork substrates have a fairly high price, but their quality justifies it
Installation process
Step one. First, check how level the base is and get rid of construction debris and dust.
Note! As we have already said, the permissible difference in the height of the base under the laminate is plus or minus a couple of millimeters per linear meter. However, this does not apply to situations with cork substrates, for which it is necessary to prepare a truly flat base.
What is the reason? The thickness of the material does not exceed a couple of millimeters; to smooth out the difference of two millimeters, the material on the tubercle needs to be compressed to zero. This is impossible even in theory, let alone the implementation of this idea. You can use a thicker underlay, but in this situation the price will be higher than the cost of the laminate itself.
First of all, the base is thoroughly cleaned of debris and dust.
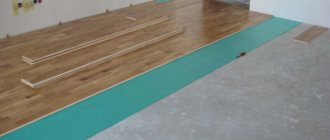
Step two. Roll out the roll. Level it well and roll out the backing over the entire area of the room. Make sure it is parallel to the wall. If there are irregularities in the geometry of the room, then maintain a small gap along the partition between the rooms, keeping the substrate further parallel. Its edges are very smooth, which is ensured due to the specific production technology.
The second step is to roll out the roll around the room and level the backing
Step three . Next to the opposite wall, bend the backing slightly and use a simple knife to cut off the excess roll. There should be no overlaps on the wall; you must form a neat cut. It’s okay if the substrate rises slightly; during the installation of the laminate, the base will become level.
When laying, the substrate should not “climb” onto the walls - it should be perpendicular to them
Step four. Correct the position of the first strip of the row and start rolling out the second. Make sure there are no gaps or overlaps; the edges must be strictly parallel.
After rolling out the second row, make sure that there are no gaps or overlaps between the two pieces of backing
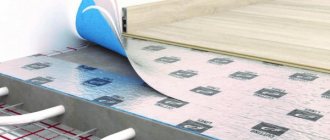
Step five. Treat the joints with masking or simple tape. Thanks to this, the substrate normalizes its position and will not move during further activities.
The last step is to secure several parts of the backing using masking or regular tape. It is not fixed to the wall or floor
Using the same principle, continue laying the substrate over the entire area of the room.
Advice! Experienced builders advise installing the laminate on each prepared cork backing strip, rather than leaving the placement to the finishing operation.
The reason is that cork is known for its tendency to crumble, and when moving on it or during construction work, defects may remain on it. There is nothing terrible in this, but it is still not very pleasant. This indicates low qualifications of workers.
You may see recommendations that the cork backing should be rolled out so that the adjacent lines are perpendicular to the slats. Life experience shows that there is no difference at all, the location of the stripes does not affect the quality of the floor. However, if you want to make them transverse, then do so.
When installing a cork backing, be careful: it may crumble
How to cut laminate correctly?
You can cut the laminate into the necessary parts with your own hands:
- electric jigsaw;
- small hacksaw for metal;
- a durable construction knife.
When cutting, you must ensure that no cuts or scratches appear on the top decorative layer. Then, on the surface under the sun's rays, they will all be visible to the naked eye. That is why it is not recommended to use a hacksaw on wood with large and medium teeth. It is almost impossible to make a cut without creating unsightly grooves.
Laying laminate flooring near the threshold
To get an even cross-section, it is best to use some kind of metal guide or square. And you should cut out the holes for the pipes slowly with a knife.
Using the tools listed above almost always produces a burr-free cut. If they do form, then such rags can be cut off with a knife or ground off with a flat rasp on wood.
Laying floors around pipes
How to care for polystyrene foam substrate
The substrate is sold in the form of rolls; the installation activity is no different from what we described above. If possible, before starting the work process, it is necessary to prime the concrete base well, which will provide tightness and reduce the formation of dust during the use of the floor covering.
About polystyrene foam substrates
Laying polystyrene foam backing
It is classified as middle class both in terms of cost and operational properties. The main disadvantage is the presence of styrene in the composition, which produces toxic elements during the combustion process. Of course, any type of smoke is dangerous for humans, but such compounds can cause almost instantaneous loss of consciousness.
The product is characterized by high strength. It retains its original properties and elasticity for a long time, reducing the possibility of seepage formation. Sound insulates well. In addition, this material has low heat conductivity and does not allow water vapor to pass through. The mats are well cut with a knife, then they are laid in a checkerboard pattern and secured together with tape.
Installing a polystyrene foam backing is no different from installing cork material
Waterproofing
This operation is necessary when using only certain types of substrate. For example, cork or polystyrene foam. If the substrate has a vapor barrier layer, then no additional measures are required.
To perform waterproofing, a dense polyethylene film with a thickness of 0.2 mm is required. This material is produced in rolls. The work is done like this:
- rows of film are laid on a base that is thoroughly cleaned of dust so that they extend slightly onto the walls (the excess can be carefully cut off with a knife after all work is completed);
- the next row of film is placed so that an overlap is formed;
- The overlaps are secured with tape.
Popular questions
Although underlayment materials vary, general installation recommendations apply to all. Let's look at the most popular questions.
Is it permissible to level the base using the substrate?
It is acceptable, but very conditionally and within certain limits. Manufacturers indicate this characteristic for their products only for advertising in order to attract buyers. Try a simple experiment: squeeze any substrate. If it deforms without problems, then what loads will this floor endure? The laminate will begin to sag greatly over the recesses, and the substrate will not cope with additional loads.
Interesting! For this reason, professionals recommend achieving the greatest accuracy in the process of preparing load-bearing bases, and not thinking about leveling the defects using substrates.
How to level a floor using a laminate underlay
Why do substrates have foil coatings on their external surfaces?
This is usually explained by the fact that this coating does not allow water to pass through and reflects infrared heat rays. What about life?
- In fact, this material reflects infrared rays to some extent. This allows you to save heat energy. However, the value is so insignificant that it is not taken into account in the process of calculating the heat balance. At the same time, aluminum transmits heat well during contact of the laminate with the substrate in the opposite direction.
- The foil does not allow moisture to pass through, but does not stretch. If there is a force to break, then it can be damaged without problems.
How does the underlay affect the performance of the floor covering?
If we talk about characteristics related to heat conservation, the impact is practically invisible and may not be taken into account. We have already talked about the leveling effect. The noise absorption indicator remains. Significant sound reduction is achieved using polystyrene foam and cork. However, these products are expensive and have a significant impact on the budget. They should be used only in situations where the coating will be placed in rooms on the second floor or higher.
The underlay does not affect the functionality of the floor covering in any way.
In other cases, packing such expensive products for little gain is unwise. Reduction of heat loss is ensured during the construction of walls and ceilings. The thickness of the insulation of these components always exceeds 10 centimeters, and in the north it can be more than 20 centimeters.
Styling tools
To lay cork or any other substrate under the laminate, you will need to stock up on the following tools:
- sharp scissors or a stationery knife for cutting material;
- a long ruler or rule for making precise cuts with a utility knife;
- masking or construction tape for gluing canvases;
- a square to make markings strictly under the street 90 degrees;
- tape measure for measuring sizes;
- vacuum cleaner (broom) for cleaning the surface before and after installation.
Is it possible to use two layers of underlay for laminate flooring?
When laying floors, people sometimes wonder whether it is permissible to lay two layers of underlayment under laminate flooring. Sometimes this problem occurs due to loud neighbors, that is, you need to remove unnecessary sounds. Another reason is the desire to level it with tiles or other floor covering. Another option leads to the fact that the base cannot be corrected with cement solutions for various reasons. As a result, the idea comes to form two insulating layers. In some cases, double backing is acceptable, in others it is prohibited.
Double backing for laminate
Companies that sell laminate provide guarantees for their products only when one layer of substrate is used with a thickness of no more than three millimeters. The double layer is not considered at all. In other words, official sources do not discuss the issue of double backing for laminate flooring.
As a general rule, installing a double layer of underlayment is not recommended.
However, there are many situations when it is better to make a double substrate with a thickness of 5 millimeters or more, rather than follow the manufacturers’ advice.
One such situation is the application of a second substrate on a leveled base.
Many times there have been cases when in panel houses built before the nineties or brick buildings in floored rooms, a junction of slabs occurs, one of which is covered with cement, and it is higher than the second.
- Let's discuss a situation that is very common: with the joint of a slab in a room and linoleum on top. If the repair was carried out on a budget, then linoleum is used as the first substrate. At the site of the protruding joint of the slab and other protruding stones, you need to trim part of the linoleum. An insulation of 2 millimeters is formed on top. Greater thickness is not recommended as it will be too soft. It is better to use foam insulation at 3 millimeters.
- Get rid of the old coating entirely. Take a polystyrene foam backing, the thickness of which is 5 millimeters. Lay out 5 mm polystyrene foam boards - the insulation will hide small defects due to its softness. If we talk about significant problems, such as a long longitudinal influx, do not report the growth, replacing it in the designated area with a thinner lining, and secure with tape. It looks unprofessional, but we are talking about reducing costs and optimizing results.
It is better to completely get rid of the old coating before laying the substrate and the laminate itself.
A little more about leveling the base.
Sometimes the base cannot be leveled for the following reasons:
- Time frame. To bring the floor covering level and horizontal, it is necessary to wait 5 days after filling with self-leveling products, if the layer does not exceed 5 millimeters. Usually there is not enough time for this, especially if the apartment is used for living.
- Price. An inexpensive laminate costs 400 rubles + baseboard + underlay and the services of a hired professional, so the total cost is about 800 rubles per square meter. In other words, a room with an area of 15 square meters requires about 12 thousand rubles.
Some people use two layers of underlayment to level the floor as this is the cheapest solution to the problem.
General advice if you need to use two layers of backing.
- For old linoleum, use a 2-millimeter-thick cork backing to insulate sounds. To save money, you can use foam - 2 millimeters.
- If you are using cork underlayment and soft insulation, place the harder cork insulation underneath.
- When installing pine insulation and polystyrene foam underlay, the order of the first layer is not obvious.
Laying the substrate: step-by-step instructions
The amount of substrate is calculated based on the length and width of the room, as well as the dimensions of the coating. It is recommended to purchase the product with a margin of 5-10% to eliminate material shortages due to inaccurate measurements.
Before laying the underlay under the laminate, it is necessary to level the floor and install waterproofing. The fewer irregularities, the thinner the base can be applied (2-3 mm). On the one hand, this is cheaper, and on the other hand, the floor covering will last longer.
Preparatory work can be done in several ways:
- Concrete-sand screed. This design is the most popular, smoothing out floor unevenness in the horizontal plane up to 80 mm. Filling is carried out according to the “beacons”, the base is mounted after the mixture has completely dried.
- Self-leveling floor. In this case, specialized stabilizing solutions are used, which include plasticizers. The mixture is well distributed over the floor and left to dry the residual moisture.
- Dry screed. This method involves leveling the floor by installing a frame of wooden beams, onto which sheets of plywood, fiberboard or gypsum fiber board are attached. The space inside is filled with a special dry backfill (most often expanded clay).
- Use of chipboard or plywood sheets. The fastest way to prepare flooring. The thickness of the leveling depends on the height of the particle boards.
After the preparatory work, laying the substrate under the laminate with your own hands is carried out using the following technology:
- Use a vacuum cleaner or broom to thoroughly clean the surface of small debris and dust. Otherwise, after installation of the entire structure, unpleasant creaking sounds will be heard.
- A primer is applied to the base prepared floor. The operation is performed 2-3 times with an interval of 3-4 hours. If the base floor is lined with plywood or chipboard, this step can be skipped.
- Install the waterproofing (after the primer has completely dried). All parts of the sheets must be carefully and carefully glued together so that there are no gaps.
- Then you will need to lay the underlay correctly. The sheet base is mounted in a checkerboard pattern, natural analogues are mounted at 45 degrees to the direction of the laminate boards, rolls are mounted transversely in relation to the future coating.
The material begins to be laid from the far corner of the room, continuing until the entire surface is covered. Adjacent sheets or ends of the roll are mounted end-to-end (without overlap) and carefully secured with tape.
Advice! To prevent damage to the substrate from point loads when stepping on feet, the substrate is laid in strips and the laminate is installed immediately on top of it. This reduces the exposed surface and reduces the chance of the backing being crushed under the pressure of the technician's knee or foot.
To match the geometry of the room, rolls or sheets are cut to size using a square and a knife. The base, like the boards of the future floor, is placed under the door jamb, for which it is filed (if necessary).
Knowing how to correctly lay the underlay and laminate, anyone can handle the process, regardless of how laborious the procedure is. All stages must be approached responsibly. If everything is done correctly, the new floor will last for decades.
Results
The use of underlays is advisable when you use so-called floating laminate floors. This is the simplest technology that professionals like due to its speed.
An underlay is a must when installing floating laminate floors.
Previously, it was recommended to install floors of this kind with glue, which completely reduced the likelihood of squeaks, bends and other troubles. The base was well leveled under each lamella. In addition, for laying with glue, an inexpensive laminate was used, which does not have complex locks. Substrates were not necessary.
However, this work requires more time and effort, and this causes a negative reaction from both workers and firms. That's why the so-called floating method arose. Floors should not float at all, they should be stable. The final verdict regarding the installation of laminate flooring should be made by the customer after he has studied in detail the specifics of his home.
Difficulties when laying laminate flooring
In order to make shaped cuts in the laminate for heating pipes or wall bends, you should use a jigsaw, a marking pencil, a knife and a construction angle.
Creaking of the laminate shortly after installation may be a consequence of its installation on an insufficiently level base.
To avoid such a problem, it is very important to properly level the floor before laying the laminate, as well as select a good quality underlay. Significant difficulties during installation arise if it is necessary to bypass heating pipes
To make markings, the panel is turned over with its back side up and the dimensions of the future hole are applied to it, which exceeds the diameter of the pipe by 1-2 mm. The individual elements are fastened together with glue.
Significant installation difficulties arise if it is necessary to bypass heating pipes. To make markings, the panel is turned over with its back side up and the dimensions of the future hole are applied to it, which exceeds the diameter of the pipe by 1-2 mm. The individual elements are fastened together with glue.
If the walls are sheathed from plasterboard or plastic, then laminate, as a more durable material, should be placed under the sheathing.
In conclusion
Thanks to the wide variety of laminate colors and textures available to buyers on the building materials market, it has become possible to install a high-quality and reliable coating in your home that will last for many years. In this case, it is worth focusing not only on the pricing policy of individual manufacturers, but also on the parameters of each individual type of coating, its purpose and quality.
We advise you to study - Best infrared heaters - user ratings, comparisons, pros and cons
Provided that the material and consumables for it are correctly selected, you will be able to install the coating yourself without making significant efforts. Compliance with the basic installation rules will guarantee long-term and trouble-free operation of the coating.
Floor preparation
Before installation begins, the base must be prepared and leveled. Laminate places high demands on the quality of the subfloor surface, because the condition of the laminated coating and its service life depend on this:
- The surface of the subfloor must be very carefully leveled, dry and clean. First, the condition of the existing screed, if it already exists, is critically assessed. If there are cracks or damage, they are repaired.
- If there are unevenness and significant differences in height (more than 2-3 mm), the surface can be leveled using a self-leveling floor or laying plywood sheets.
- Before laying laminated panels, the screed or self-leveling floor must be completely dry. The moisture content of the subfloor can be easily checked using plastic film attached to the base with tape or using a small glass jar placed upside down on the floor. If even a little condensation appears the next day, you should wait a little longer with installation.
- With a plank base, it is also necessary to pre-prepare it. If the foundation is weak or shaky, either a complete re-flooring is done, or defects are eliminated, or partial replacement of boards or joists is made. Roughness and differences are removed by grinding or laid on plywood sheets.
- Clean the floor from all dirt using a vacuum cleaner.
Installation of a water system involving a substrate
The water heating system has a high device threshold. Therefore, in order to minimize the height of the room, it is necessary to use a material with a minimum thickness. The installation process proceeds as follows:
- A layer of waterproofing is laid on the prepared surface.
- The substrate is laid end-to-end on this layer so that the reflective side faces upward.
- The seams between the pieces of material are taped with metallized tape.
- Next, the heating system is installed.
- The pipes are filled with screed.
After the screed has dried, proceed to installation of the floor covering.
Compatibility of substrates and heating systems
For each model in the heat supply, appropriate insulation materials are manufactured. If they are used incorrectly, you may incur additional costs or not obtain the desired heating of the room.
Therefore, before purchasing them, you need to pay attention to the following indicators:
- The foil underfloor heating substrate is intended for film infrared coatings. This is a new insulating combined product. The sides of this substrate are equipped with a layer of foil with an aluminum layer or metallized polypropylene film. Due to this, the product is able to maintain and reflect the required temperature in the room.
- For a water heating system, foil insulation should consist of classic heat insulators, such as penofol, isolon, polyethylene foam and other similar materials. The second is a reflective coating consisting of polypropylene metal film or aluminum foil.
- The underlay for a warm electric floor is made of foamed polymers with a laminated coating. This substrate does not conduct current, does not interact with alkaline solutions and retains its properties throughout its entire operation. The thickness of this material is no more than 5 millimeters, which allows it to be used in rooms with low ceilings.
Having decided what underlying material is needed when installing the heating system, you can begin the installation process itself.
Types of lock connections
Now you can proceed directly to choosing a laminate that will be laid on the floor according to the instructions. In addition to its qualities, it may differ to a greater extent in its locking connections:
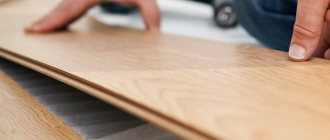
- "Click" The beginning of installation is oriented towards the walls. When the first row of flooring is assembled, wedges should be inserted between it and the wall. The technological gap is usually taken within 10-12 mm. The protrusion of the first row of slats should face the walls. There should be no gaps; all locks should fit tightly together. Correct closing of the locks is guaranteed if the panels are inserted into each other at an angle of 45 degrees. When lowering, a characteristic click should be heard, indicating that the instructions for laying the laminate have been followed. The second row is mounted according to the following basic rule: the panels are connected in an end lock, after which they are shifted to be inserted into the groove at a certain angle. All subsequent rows are laid in a similar manner.
- "Lock". Instructions for laying laminate flooring will be slightly different. Before joining the panels together, they must be installed strictly horizontally in order to connect the tongue on one of them with the groove on the other. After this, using a hammer and a wooden stand, they are tightly adjusted until there is no gap. There are features for the second (subsequent) row of flooring. Initially, the first panel is placed, which is driven into the groove of the first row. Before installing the second panel, an indent of 10 mm is made from the end part of the first, connected to the previous row and adjusted to the first panel.
- Adhesive connection. The longest installation process is typical for using glue to connect laminate slats. Some will think that there is no point in this method, it only takes up personal time. In this case, the laminate will last much longer, since all its joints will be reliably protected from moisture. As for the glue used, it must be waterproof. The installation process is similar to the process with “Lock” type locks. Only apply the adhesive composition to the end sections.