Finger painting for babies: first finger painting for children under 1 year old, drawing lessons for older children, tools and templates for drawing.
Drawing for kids helps to realize children's creative energy, to express their still small but original “I”.
Surprisingly, the cause of children's emotional depression may be unclaimed creative abilities.
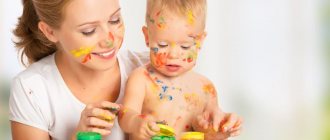
Finger painting for babies under one year old is one of the trends in the development of children of the new millennium . You can start at about six months of age or when the child can sit independently. Is there any point in such an “early start”? Certainly.
Finger painting for children 1 year of age:
- stimulates sensory, color perception and fine motor skills,
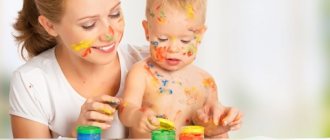
- helps to establish creative and emotional contact between mother and child,
- develops attention and thinking using artistic methods.
It is very important to let your child draw with the fingers of both the right and left hands. Don’t worry, even if the baby gives preference to the left - under the age of 3 years this does not mean anything. And developing both hands is important for the development of both hemispheres of the brain.
Finger painting for children with finger paints
The optimal tool for the first drawing lessons of 1-year-old children is finger paints . Drawing with paints for kids begins with choosing a color and mixing colors and shades.
The youngest children draw only with their fingers, a little later mastering the technique of leaving an imprint entirely with their palm.
The brush can be offered to children over 1 year of age.
We should never forget that finger painting with babies under one year old is not about working for results, but about enjoying the process.
A child at such a tender age will not yet feel proud that his drawing was hung on the refrigerator. But you may well feel negative emotions from your mother’s excessive interference in the creative process.
You can hear from many kindergarten teachers that there is a category of children who are afraid of the “blank sheet”. In order for such children to start drawing, an adult has to “push” the child by drawing something on a blank sheet of paper. Drawing with kids from an early age allows you to avoid this problem.
Mastering new opportunities
The baby is already old enough to use real art materials - gouache, watercolor or special paints for finger painting. Unlike a brush, the smooth surface of the finger does not hold enough paint to draw a long line, so to create paintings it is better to “dip”, “rub” or “print” paints on paper. To print by hand, the paint must be diluted to the consistency of liquid sour cream and poured in a thin layer onto a flat plate.
It will be useful and interesting for a child to explore the capabilities of his own hand, because with the help of one single palm you can get a huge number of different prints, and by adding your own imagination, turn them into real masterpieces. You can smear, draw and print any abstractions, enjoying the color and painterly flavor. Or - create interesting plot pictures. For example, a print of an open palm with your fingers down can become a cheerful octopus, you just need to draw its eyes and mouth.
With the help of mom and dad's palms, you can draw a whole family of octopuses of different sizes. And plant them on the seabed, with imprinted pebble fingers and waves or algae, which are obtained if you dip four fingers in paint and draw wavy lines in the desired direction. And a closed palm will give an imprint of the silhouette of a fish. All that remains is to finish drawing her fins and tail with your fingers.
The same palms can also turn into magical flowers with finger petals - you can print an entire meadow from them! Or you can “limit yourself” to the wings of a beautiful bird.
Printed palms with pressed fingers can become amazing butterflies, just draw long antennae on them. A hand clenched into a fist produces a round imprint that looks like a shell or a snail's house. In addition, from the resulting circles you can print a snowman, a sun, or a funny little man.
A half-open fist makes an arc.
When printing the pads and phalanges of the fingers, the resulting impressions are rectangles or small segments of different lengths. Each finger has its own unique fingerprint.
By turning your hands in different ways and adding recognizable details to the printed elements, you can realize any ideas. Thus, by connecting and combining simple elements, the baby develops imagination, spatial and imaginative thinking, and finds the first design solutions. With this method of drawing, you can use both hands alternately, or use them simultaneously, which perfectly develops coordination. T
Some simple creative exercises are especially important for left-handed children, as they unobtrusively stimulate the full development of the right hand. This, at first glance, not very neat and downright dirty work on large sheets of paper serves as an excellent means for relaxation and relaxation, liberates the child, relieves him of the fear of spoiling something or getting dirty, and gives the child the necessary creative courage, the lack of which little children often suffer from. artists.
Creativity with mom in the kitchen
Paper and paints are not at all necessary attributes for finger painting. Beautiful finger paintings can be created on a tray or baking sheet sprinkled with flour or semolina. A sufficient amount of flour or cereal must be leveled by shaking the tray so that the entire loose mass is distributed in an even, not thick layer. So your improvised sheet of blank paper is ready. You can use your finger to draw any objects or scenes that are not overloaded with details. Painted pictures can be easily erased by shaking the tray several times. A baby who is captivated by such an unusual drawing will free up a lot of time for his busy cooking mother.
“Artistic” cleaning
Another great place for finger painting is the bathroom. The little artist-experimenter can have tiled walls, a mirror, and the bathtub itself at his disposal. The choice of colors here is limited only by the assortment of the toilet shelf. You can draw on tiles, mirrors and bathtub walls with both children's toothpaste and dad's shaving cream. The main thing is that these “paints” do not contain fat - it is difficult to wash off.
You can draw by dipping your finger in paste or cream. Or - run a clean finger over a dense foam base, which is obtained if you cover some smooth surface with a thin layer of shaving foam. A shaving brush or sponge works well to apply the foam. The tile can be used as a basis for ornaments: let the child find a pattern and repeat his mother’s drawing on the adjacent tile.
Such hygienic paints will not only entertain the baby, but will also help clean the bathroom. You don’t need to scrub anything special, just wash off the drawings with a shower, and the bathroom will only become cleaner. If you want brightness here, you can use gouache or watercolor. These paints are water-soluble and can be completely washed off with plain water.
Instead of paints - plasticine
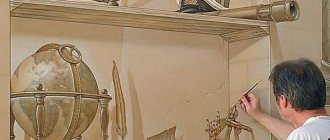
Drawing... with plasticine will further strengthen your fingers and prepare them for writing. You need to apply a simple design on the cardboard base, and then pinch off small pieces of plasticine and smear them over the design with your fingers, as if painting over it. The work turns out complete and very decorative if the entire surface of the picture is covered with such “paints” - both the drawing and the background.
Plasticine pieces mix well with each other and new, unexpected colors are obtained. From a distance, this work looks like it was painted in oil. Hands and fingers are a universal tool that is always with the child, and instead of paper and canvas, the whole world is at his disposal.
Is it possible to resist drawing with a tanned finger on the warm sand at the edge of the sea, so that the waves, like a huge eraser, wash away the drawing?
How can you help but draw a funny face on the foggy glass or run your finger along the dusty side of the car?
How can one avoid oddly picking at the ice on a frozen trolleybus window, if sometimes even adults can’t resist doing it?
By allowing a child to feel and try everything for himself, to put everything through his own hands, we expand the boundaries of his knowledge and creative horizons. After all, a dirty finger can easily be washed off with soap or a damp cloth, and the desire to create, suppressed in early childhood, may never wake up.
Introducing your child to finger paints
Dip your baby's finger into the paint. Swipe across the sheet. It may be necessary to repeat several times for the child to grasp the cause-and-effect relationship.
Then you can show how to mix paints of different colors - right on the sheet. Some experts recommend starting to get acquainted with colors with warm, moderately bright shades.
Do not forget to voice all your actions and the actions of your child, and name the colors of the paints.
Personal life hack: My kids learned to draw by smearing white porridge on the orange surface of their high chair tabletop. The action took place after eating. I took away the spoon, and replaced the porridge and the plate with others, so that the child would not get confused: when to eat and when to draw.
But there were zero worries about the child tasting the paint. However, there were few such attempts. Later, jars of finger paints began to be added to the porridge. When mixing white porridge and colored paints, the effect was very beautiful! And the sensory system is 100% involved.
Developing fine motor skills in a child
Psychologists believe that creative experiments with finger paints can begin at 10–11 months. Even then, the baby can trace the relationship between the paint and the mark on the paper. But it’s better to focus on your child’s individuality. If he can already move freely, crawling or on his feet, and is fully engaged in research activities, it’s time to introduce him to creativity and introduce him to finger paints.
It is advisable to start finger painting in the first half of the day, when the child is more active. The baby will remind you about the end of the lesson, because it is simply impossible for a one-year-old baby to hold attention for a long time. The first lessons, as a rule, do not last long - literally a couple of minutes. In the future, an enthusiastic child can draw for up to 15–20 minutes without stopping.
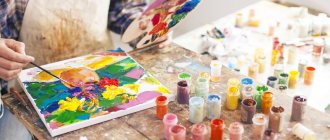
What do you need for finger painting? First of all, special finger paints, they can be bought in almost any store that has a department of goods for children's creativity. They have the desired consistency and do not require additional dilution with water. When choosing, pay attention to the jars themselves: they must close tightly so that the paint does not thicken too quickly. For your first experiments in fine art, it is better to choose bright, but not “acidic” colors. As for paper, A3 size watercolor sheets are preferred. They are big, the baby will have room to “swing”. And if you take a roll of old wallpaper on which you can draw on the reverse side, then there will be no limit to a child’s happiness. And also make a blank - a green leaf on which the ladybug sits. You will need it.
Step 1.
Taking into account the child’s age, we prepare a workplace: cover the table or floor with oilcloth (newspapers), put a sheet of paper and paint, open a couple of jars. It is better to start getting acquainted with finger paints with one or two colors. At first, the baby is surprised by the very fact that the paint leaves a mark on the paper, and does not try to change colors.
Step 2.
Take your time to dip your baby’s finger in the paint. He may get scared and flatly refuse to “get his hands dirty.” Better show him an example by leaving a long colored line on the paper with your finger or a print of your palm. Then invite your baby to “play around” with you. Celebrate the activity with rhymes or songs.
Step 3.
Now let the baby dip his finger in the paint and run it across the paper. Give your child time to get comfortable and understand that the line on the sheet is the work of his fingers. And then move on to simple game exercises.
Step 4.
Now we take our blank - a green leaf with a ladybug. Invite your child to finish painting her paws and dots on her back using a finger and black paint. Children love it when there is a playful moment in the lesson. This really captivates them. And if they like it, the next “lesson” will be a great success!
Vigilance first!
Before purchasing, check whether the finger paint you choose meets safety standards. Russian manufacturers must indicate the number of the sanitary-epidemiological report. On the packaging of imported paint, pay attention to the presence of the “CE” or “AP” marks. This marking means that the product meets the requirements of European or American standards and is safe for the health of its consumers.
Finger painting templates for kids
I highly recommend Elena Yanushko’s reusable educational drawing cards for children aged 1 to 2 years. But if you don’t buy them, you can get by with free templates.
For example, download and print suitable pictures from our article Pictures for drawing with plasticine - they are also suitable for paints. The advantage of drawing templates is that you will receive a masterpiece from a small artist with a clear plot with minimal effort on your part.
For example, templates for drawing rainbows, bee stripes and flower petals.
And below are templates for drawing watermelon seeds, apples on a tree, grapes on a vine. You can perform such work with your fingers, brushes, rollers, and other tools for making prints on paper.
Ideas for finger paintings
Finger painting is the most accessible form of creativity for babies starting from six months. At about the age of two or three years, the child will ask the parents to draw something. Then you can use a little trick. Ask your child to make paint impressions with their fingers. And then turn them into different drawings: images of animals, flowers, transport. Older children will also enjoy this method of finger painting. Any preschooler will love the idea of turning their prints into funny drawings. This is an opportunity to develop fine motor skills, imagination, creativity, and an idea to have fun.
Print finger painting templates
Simple templates with “spaces” for finger painting or DOT stamps are very popular in the West. There are even special markers for this type of creativity. It is difficult to find such markers in Russia.
Here you can read about similar drawing with smaller dots - drawing with cotton swabs - and templates for such drawing.
Therefore, as an alternative to drawing using such patterns with your fingers, use your imagination. “Circles” can be stamped with bottle caps, a cut-out stamp made of potatoes, sponges, eva, etc.
Below you will find black and white and color templates. Colored templates are, of course, more interesting and educational for children. But if it’s not possible to print them, download regular monochrome ones.
Color templates
Black and white templates
These are the same drawing templates that are presented for download above, but not colored.
Age of first use of paints
At what age can you use finger paints? If the paints indicate that the material is not intended for children under three years of age, you should not buy them for your child: the composition contains components that are undesirable for ingestion.
Manufacturers often add bitter substances to finger colors, because this is a non-food product and cannot be consumed in large quantities. All paints for children under 3 years of age can be used without any special age restrictions. The main thing is that parents can ensure control over the drawing process and not lose sight of the child.
It is best to wait until the baby can sit independently and shows an active interest in drawing. This usually happens at 9–10 months, although some children can practice finger painting as early as six months. Manufacturers indicate the age from one year as recommended for the use of such products, based on reasonable restrictions and the real hobbies of most children.
Drawing tools other than paints
So, here is a list of tools for drawing with your baby:
- Finger paint,
- gouache,
- watercolor,
- wax crayons,
- pencils (pencils with a triangular cross-section are considered ideal for establishing a correct grip),
- felt-tip pens (water-based only),
- special thick DOT markers that leave large dots on a sheet of paper (they are also suitable for drawing on finger drawing templates),
- thick colored crayons for drawing on asphalt,
- plasticine (for plasticineography, preferably after 1 year),
- brushes (the smallest ones can be given a wide silicone brush from your kitchen),
- sippy cup,
- paper,
- An easel is an optional but nice addition for babies over one year old.
Precautionary measures
Small children get tired quickly; for the first time it is enough to practice for no more than 5 minutes . Further, the child’s attention will not concentrate on creativity. The first few lessons are an adaptation period. You should not set difficult-to-achieve goals while you need to conduct lessons in the form of a game. While drawing, children, with the help of their parents, will be able to study geometric shapes, names of colors, various animals and types of transport, even body parts.
It is important to properly prepare the workplace and monitor the baby. First you need to deal with the paints. If it is watercolor, then it is diluted with water to a paste-like state. Thick gouache should also be made more liquid. Finger paints are ready to use. You can add glitter to them to make drawing more interesting.
It is better to pour the material into a flat saucer or plate. It is difficult for kids to get paint out of a small jar with their fingers; it is much easier to scoop it out of a large bowl. It is recommended to place a bowl of warm, clean water nearby. The child will wash his hands in it in order to continue using a different color. You also need to place a towel nearby, which can be stained with paint.
It is not advisable to leave your baby alone during classes. A small child can be so inventive that he will paint more than just paper . The role of parents during creativity is to channel the children's energy. The mother or father must communicate with the baby, prompt or help him. But you need to be allowed to make mistakes. Let a child draw crookedly or ugly - this is how he still expresses his “I”.
If the baby is not yet a year old, then it is better to provide him with a floor instead of a table. It is advisable to remove the carpet from it and lay down oilcloth. It is also recommended to remove all items that a child could damage. Wardrobes and beds can also be covered with oilcloth, otherwise they may be painted. If parents are afraid that the baby will freeze, you can put a warm blanket under him.
How to organize finger painting classes for children under one year old
- The optimal age for a child to get acquainted with drawing for the first time: 6-7 months. This is an infant who is actively interested in the world around him and controls his arms and back (that is, sits independently).
- The workspace depends on the mother's preferences and ease of cleaning. You can draw: at your own table (usually a high chair with a table), on the floor, in the bathroom directly on the bathtub or tiles (very convenient from the point of view of subsequent cleaning).
- Baby's "work suit" . It is most convenient to draw in the costume of Adam or Eve. But if this option is not for you, use clothes that you don’t mind. Special aprons and bibs will most likely not yet be the right size and will be inconvenient for your baby to draw.
- drawing using templates (which can be downloaded and printed below) after one and a half years.
Idea: you can combine drawing and music classes (in the background). Perhaps soon you will be able to observe the following effect: while listening to different compositions, the child will select different colors for his drawing.
Do your children like to paint with their fingers?
Why is finger painting useful?
Thanks to drawing:
- the child calms down and enjoys the activity;
- fine motor skills of the hands develop;
- knowledge of the surrounding world is underway;
- children become more diligent and attentive.
Many argue that with the development of fine motor skills in children's hands, speech develops more quickly. With frequent use of paints, the child begins to mix different colors, which allows him to learn to think logically and be more attentive to detail.
Also, using finger paints with your child, you can create very beautiful paintings, which can be presented as a gift if desired.
On video: children's creativity using finger paints.
Types and composition of paints
Good paints that can be used by a child at home consist of extremely simple ingredients: water, binders to create a thick base, pigments. The mass always remains thick, but not hard, unless you leave it without a lid. To easily remove color from the surface, juices and plant extracts, for example, aloe juice, can be added to it. The box should indicate that these paints are intended for finger painting (simple gouache is not suitable for this purpose).
Main types:
- gel - include special moisture-retaining substances, have a transparent texture, do not dry out the skin, and can be used by the smallest children;
- sensory - after drying, the picture will be rough, since special components are added to the material;
- fluorescent - after drying, the coloring will glow in the dark, further developing the child’s imagination.
Finger products for babies are usually sold in small sets - from 4 colors (red, yellow, blue, white). Such sets are suitable for the youngest children; for an older child it is recommended to buy a larger set (12 tones), with included stamps, stencils, and other devices. With their help you can color pictures with great interest.
The most famous manufacturers of finger colors:
- Jovi. A Spanish brand that produces high-quality paints that are sold all over the world. The colors are bright, the price is reasonable.
- Djeco. Created in France, suitable for children under one year old. Many kits include plastic stencils that attach to the lids of the jars. Even wooden toys and boxes can be painted with these paints.
- Crayola. American products, safe, very bright. The paints are easy to wash off and are of the highest quality. The downside is the higher price.
- Ses. Dutch paints intended for allergy sufferers. They do not contain any components that can cause allergic reactions in children.
Among Russian manufacturers, Kalyaka-Malyaka, Luch, Orange Elephant, Tsvetik, Molly, and Trolls have proven themselves well.
Advantages of the palm painting process
The baby's hand muscles develop during the process of drawing.
- The child begins to distinguish colors.
- The baby's creative abilities appear.
- Motor skills develop.
- The baby begins to distinguish different shapes.
- By learning something new, the baby prepares for school.
- Children's horizons are expanding.
Making your own paints
Finger paints are sold everywhere, but you can make them yourself. There are several recipes that use only available products.
From starch
Combine 3 tablespoons of sugar, half a teaspoon of salt, ½ cup of starch, 300 ml of water. Add any food coloring to the paint or divide the mixture into parts and paint with different colors. Next, you need to heat the paint over low heat until the mixture reaches the consistency of sour cream. The pigments you can use are those used to color eggs. It is allowed to use vegetable and fruit juices (for example, beets), but in this case they are introduced after the mass has cooled.
From flour
Mix 500 g of flour, 3 tablespoons of salt, 1 tablespoon of vegetable oil. Next, water is added until a “sour cream” texture is obtained, pigments are added after pouring into jars.
From shaving foam
Squeeze out a little shaving foam, add a small amount of gouache and honey watercolor. Homemade finger paints are ready. You can store them in jars of baby fruit and vegetable purees.
It is advisable that the finger colors are not pale - children do not like such colors, they are less interesting. It is better not to save on purchases and purchase only the highest quality paints, taking into account the shelf life, lack of toxicity and the reputation of the manufacturer.