Benefits of wall painting
Decorating walls with hand-made drawings has a lot of positive aspects:
Inexpensive and quick option for interior renovation.- Variety in design, since in this case everything is limited only by imagination (or not limited?).
- Long service life. If you choose high-quality materials, then this painting will last more than 15 years and will not lose its original appearance.
- Additional protection for the walls, since after painting, another layer of protection is applied to the drawing.
If a professional handles this matter, the result will be amazing. If you want your apartment to have a painting, but you don’t have the talent and drive as such, then it’s still better to hire a professional who will create the design taking into account all your wishes.
What to draw?
Choosing the original picture for the wall according to the principle of “like it or not” is by no means forbidden. After all, that’s what professional art is all about. In this case, you need to take a photograph of the wall to be painted and try to attach selected originals or your own creation to it in any computer graphics program. Usually they use Photoshop for this - you can immediately edit the original in it.
If you created the source in CorelDraw vector software, then it will be more convenient to use the bundled Corel PhotoPaint; it is not inferior to Photoshop in terms of image processing capabilities, and is superior to it in the basic set of effective filters. To finalize a vector image, its elements in CorelDraw are grouped and converted to a raster (convert to bitmap option). Then select the bitmap and select the option to edit the bitmap. PhotoPaint will automatically launch, and after processing the raster image will remain in its place in the vector composition.
Types of paints for painting on walls
To figure out what kind of paints you can paint on the walls, you should know what composition you used to cover the base. So, if the walls are covered with acrylic paint, you can only use this and no other types. It is also possible to decorate a wall with water-based emulsion, but again, if the wall is covered with a similar composition. Let's take a closer look at which paints can be used and in what case, as well as the advantages and disadvantages of each type.
Acrylic paints
Acrylic paints for painting are the leader among paints and varnishes. The popularity of the material is due to the fact that it dries quickly and is easy to apply, and also has a high level of adhesion to all materials and does not have an unpleasant odor. A nice bonus is that the paint is resistant to high temperatures. After the paint dries, a film forms on the wall, which is also resistant to mechanical stress. The paint and varnish material is safe, and therefore has become so relevant, especially when used in children's rooms.
Helpful advice! When using one of their application technologies using a special tool, painting on the wall in an apartment with acrylic paints will become embossed.
There are currently two types of acrylic paints on sale, namely organic and synthetic dyes. Each of these materials is based on artificial resin. The only difference is in pigmentation. For synthetic paints, dyes are used that are obtained from metal salts, and then painting walls with acrylic paints will be more vibrant, brighter, more saturated.
If the idea of the drawing does not include the need to use bright shades, but, on the contrary, some kind of pastel image, then it is better to use organic-based paints and varnishes. The tool for applying to the wall is chosen depending on how much area the drawing will occupy. This could be a roller, brush or even a spray gun. The use of acrylic paint for painting walls is not limited only to the room, since it is now possible to decorate the facade of the house.
Usually acrylic paints are produced only in white, and to obtain a shade you need to buy a color scheme. This is convenient for painting, since you can make a color that will be relevant and not get lost in shades when buying ready-made paint.
Fluorescent paints
Such paints are used to create unique paintings that will decorate any interior. Images painted with this paint will appear at night after absorbing ultraviolet rays during the day. This way, you won’t be able to apply complex designs, and you will need to focus on simple shapes, for example, butterflies, a scattering of stars or an image of a galaxy.
The easiest way to do the drawing is to use stencils, from which you will get the clearest drawings. Professionals often combine such paints with other types of paints and varnishes so that the main design is complemented by a glow.
Stencil and oil paints
The use of this type of paint for painting on walls is limited by several factors:
- Application is difficult; the work can only be entrusted to a qualified technician with extensive experience.
- High cost of materials.
- Long drying time for the image.
- There is an unpleasant odor that will accompany the entire process of applying paint and drying it.
Important! Using oil-based paint will make it possible to achieve a visualized image with all the details. This effect will be difficult to achieve when using acrylic paint.
Another interesting type of design is the use of stencil paints, since even with a small amount of paint you can create an interesting picture.
Color palette
The variety of paint shades largely depends on what paint material was chosen. Since acrylic-based paints are most often used, they should be used as a basis. To create a beautiful and high-quality painting in your home, you will need to purchase basic colors such as blue, yellow and red. It would also be a good idea to have a violet color on hand, since when mixing pure blue and red, the shade turns out to be dirty.
Orange and green shades are also used for variety. You can get pastel shades by adding a little white to the main color. If additional shades are required, purchase the appropriate color.
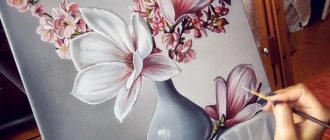
Painting a pencil drawing
When painting, water-based paints and a palette are used to combine shades. First of all, a transparent layer is applied, due to which the color distribution is ensured. The entire picture is gradually filled with color spots. It is not recommended to use bright colors at this stage. It is recommended to draw objects located in the foreground as clearly as possible. Small details should be painted after applying the main drawing; thin brushes are used when carrying out the work.
Review of brands
Construction stores offer an assortment that can confidently be called wide, and therefore choosing a high-quality composition will be difficult. Paint for creating paintings from the Italian company Maimeri is extremely popular among buyers. This composition will be suitable for any type of surface, and also has resistance to mechanical influences and excellent hiding power. In this series the paint is presented in a large number of shades.
No worse is acrylic paint for painting on walls in an apartment from the Raphael brand, which has a reasonable price and high quality. The brand has only pastel shades. Don’t forget about the domestic manufacturer, which includes the Lagoda brand. This is a budget segment, but this does not reflect the quality in any way. Thanks to use over many years, the paint has proven itself. It comes in tubes, there are only basic shades, but you can buy more colors in cans.
What to draw with?
Usually colors are selected to match the subject and style of drawing, but for a beginner it is better to do the opposite. Amateurs mostly paint walls with acrylic water-dispersed paints: they are easy to dilute, they mix without restrictions, they can be used to create fairly smooth halftones, and if necessary, acrylic paints are washed off the wall without leaving marks on it; An acrylic primer is also needed for them. But other options are also possible; eg You can paint a relief design with oil, or with gouache and tempera you can create a particularly fine shading. For information on paints for wall painting, see the video review below:
Video: about paints for wall painting
Preparatory stages before registration
Before you start decorating the wall with delights, you should prepare the surface well. First, clean it - remove the wallpaper, remove the old layer of paint/whitewash, and any loose plaster, if any. In order to improve the adhesion of the leveling substance and the wall, the latter should be degreased. Use white alcohol or a special primer as a degreasing agent.
After this, you can begin to level the wall by applying plaster. After drying, the plaster should be treated with sandpaper and all dust should be removed. Treat the prepared surface with acrylic primer for good adhesion. The primer will help ensure that the future picture is well fixed. When everything is dry, the wall is considered prepared.
It is worth remembering when priming that the same primer mixture is not suitable for rooms with different humidity levels. If the room has high humidity, use a moisture-resistant mixture with antibacterial additives as a priming mixture. In a dry room, the walls must be treated with an acrylate solution.
Interesting solutions
To make the interior of a room with artistic painting even more interesting, you can resort to some design tricks.
The design can be applied to decorative plaster, or it can be used to surround the image. If the skill level allows, we use relief painting technology; some of the elements here are made using plaster or putty. Don’t be afraid to experiment, and your creative ideas will be embodied in the interior of the room with exclusive hand-painted paintings.
Photo gallery
Application options
Now there are many techniques for applying patterns to wall surfaces. Typically, an airbrush or a brush is used as a working tool, and if you have a lot of experience, the tools can be combined.
Important! When applying a drawing using an airbrush, the drawing will turn out similar to the photo, since high-quality transitions between colors will be obtained. You can't achieve this effect with a brush.
To create a beautiful picture on the wall, use the following algorithm:
- Make a sketch.
- Divide the area of the drawing into squares.
- Mirror the breakdown by marking the squares, this can be simplified using a laser level.
- Paint the outlines of the picture with the chosen shade.
- Once the outline is ready, apply spots of color, and at the very end you can begin to add volume to the drawing. The last step will be detailing.
- Cover the resulting drawing with acrylic-based varnish. Usually matte varnish is used to protect against external factors and mechanical stress.
Thanks to this step-by-step action, you can capture the image and remove imperfections as you work. If you don't have the skill of a professional, use templates that are easy to find online or at a hardware store. To do this, transfer the selected figure onto cardboard, and then cut it out and use it for its intended purpose.
Please note that to create a design over a large area, you can use store-bought or custom-made stencils.
How to choose a drawing?
Today there are many specialists who are ready to paint the interior, a separate room, using any, even the most incredible, techniques.
Naturally, the more complex the work, the more the specialist will charge for its implementation. But the problem is, not everyone can create a drawing that meets all the customer’s requirements. But you still have to pay decent money for the work. And sometimes you want to decorate a room with your own hands. And let painting a wall in the interior not become a work of art. But with what sense of pride you will look at the surface you painted yourself.
This work can also be done collectively. For example, a child will always be happy to paint the interior of a nursery. Of course - if his age allows him to hold a brush in his hands. And a luxurious wall painting in the bedroom interior will instill romantic feelings if you do the painting together.
The choice of painting theme should depend on the room in which the painting is planned.
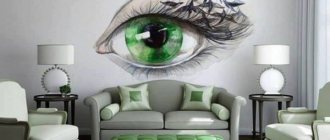
If you are painting a living room, then it is advisable to choose landscapes, beautiful flowers, trees. Of course, mountains and coniferous forests will look original, but a professional can draw them carefully.
But it won’t be difficult to depict dandelions and lilies on the wall. To make the ornament truly interesting, it is advisable to use the above-mentioned stencil.
For the kitchen, the ideal option for wall decoration, given the vast majority of classic designs, is a still life made in the colors of bright vegetables. Most will be able to draw a plate of fruit and glasses of wine with sliced cheese with interesting patterns. The main thing is to settle on a drawing that is relatively easy to execute.
Have you seen a photo of a wall painting and are inspired by the idea of repeating the drawing yourself, but are you upset that you had no previous experience in fine art? No need to worry in advance. Just pay attention to the following techniques:
- Drawing made along the contour;
- Stencil;
- Drawing using slide projection.
Getting ready to draw
No one wants to ruin a wall with a bad experience, so for beginners it’s better to first practice on something like a sketchbook for wall painting. Exactly - on a piece of plywood. It is covered with starting plaster (there is no need to build up the layer to the building thickness), and then with finishing plaster. Next, we try to draw and hone our technique. It didn’t work out - we peel off the coating with a spatula, and - all over again, until we are confident that it will be no worse on the wall.
Preparing the wall
Many sources recommend leveling the wall for painting with dry plaster (sheets of plasterboard) with gypsum glue. It's a good thing, but expensive and complicated. Leveling the wall for painting according to building codes is not required: if the wall is really bad, then it is sanded, the potholes are filled with putty and covered with finishing plaster, white or colored. Suddenly the wall is damp, with mold, streaks - you can’t paint it, you first need to repair it.
Note: if you still intend to level the wall with plasterboard (for example, under a panel with dandelions, as in the figure at the beginning), then be sure to take the branded material and the complete grout for it, otherwise the seams between the plates will be visible.
Let's draw
Stencil
There are 2 significant tricks to painting walls using a stencil. The first is that the downloaded templates will probably have to be scaled. If you do this in the original compressed .jpg, .png formats, then compression artifacts can greatly blur or lead to contours, and the stencil outline is everything for it. A small deviation from the contour can literally kill the drawing. Therefore, the downloaded stencils need to be scaled like this:
- We pass the original drawing in Photoshop through the AutoLevels option; If you know what this means, it is advisable to manually remove the upper peak using Levels.
- Next we convert it to gray, and then to black and white with a 50% threshold.
- We clean up the remaining dirt and change it back to gray.
- We increase it to the desired size, you can add sharpness using the mask (unsharp mask).
- We save for printing in uncompressed .bmp or .tif formats; as a last resort – .gif.
The second is to fill the stencil not necessarily with one color. On the contrary, as you move along the stencil, it is advisable to change the paint. In this way you can revive a rather monotonous stencil, see fig.
Multi-colored stencil printing
As an example, below we give fairly simple drawings for a stencil, which can be quite scaled up in raster format. The feather and goldfish will have to be filled in with shading; It’s time for us to move on to the techniques that require it.
Stencil drawing templates
Let's give it a try
Shading areas filled with paint is possible in 3 ways: washing, erasing and rubbing. All of them are carried out from the center to the edges, and always in several stages: in no case should you rub everything at once. He rubbed, walked away, looked, rubbed again, again from the center to the edges, etc. Blend the paint with a brush, swab or finger. General rules for coloring for shading - the warmer the tone, the deeper it should lie. If the color scheme is monochromatic, light and faded tones go underneath. However, these rules are very relative.
Washing is done only with a tampon. The bottom layer of paint should be completely dry, and the top layer should just set. It is partially removed with the lightest, without pressure, tangential movements. The color of the shaded area will be the color sum of the layers' colors.
To shade by erasing, the top layer of paint is applied to the still slightly damp bottom layer and the tinder is pressed down. Now the color of the shaded area will be the color product of the colors of the layers, because The top paint is rubbed into the bottom. By rubbing, small shaded fragments are created over large areas, over dry or not completely dry underlying paint.
Note: airbrushing allows you to obtain only the color sum of paints.
How a leaf that has begun to turn yellow is outlined by shading is shown in Fig. below:
Shaded drawing on the wall
- Fill the outline with the background color;
- Once it dries, apply a dirty greenish color;
- The 2nd layer has dried, wash off the excess;
- Fill it with a greener color;
- Once it’s dry, we erase what’s unnecessary and immediately apply strokes of even more saturated green;
- The 3rd layer has dried, rub the greens over it.
On the trail. rice. Flowers are given that can be made on the wall by combining contour filling with a stencil and shading. To scale them, you need to save them immediately in .gif format (the necessary preparation has already been done), but it is better to transfer their outlines to the wall using a grid, see below.
Sketches of flowers for wall art
Outline on the wall
Transferring the drawing to the wall along a grid and painting the contours is already a completely professional type of wall painting. Currently, this very painstaking and responsible task can be significantly simplified with the help of modern technology.
Without mesh
Photoshop has a special edge selection tool. The resulting contour drawing is enlarged to the required size: Photoshop allows you to work with pictures up to 10,000x10,000 px, which with a resolution of 72 dpi, which is more than sufficient for a wall, gives an image of 3.5x3.5 m, and with a quite sufficient 24 dpi - 10.5x10.5 m. Next, the outline picture is printed in pieces onto an A4 sheet (almost every printer has this option), or in the same Photoshop, a large picture is divided into pieces and printed separately. Then the sheets of paper are glued into one sheet, placed on the wall and the contours are drawn with a hard pencil; The last stage, but not amenable to automation, is coloring.