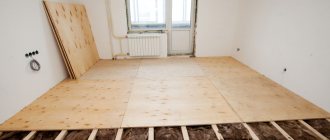
A big or small hole in the wall is a defect in any case. Even excluding aesthetic aspects, any crack or hole in the surface is a serious flaw, mechanical and decorative at the same time. A sloppy hole from a wall clock or painting raises the same question. How and how difficult it is to repair a hole in the wall, does it depend on the materials, their age, the degree of mobility of the structures and the size of the hole itself? Today we are revealing step by step all the issues related to the removal of defects in the form of through holes from pipes or small holes from sockets.
How to seal a hole in plastic on the ceiling surface
Published without name on January 16, 2012 – 23:26.
Jewelry operation, I myself encountered a similar difficulty and suffered all day. Required: a stationery knife, glue for plastic or silicone, a whole panel with a similar coloring and a plastic profile. Take out the fragments and longitudinal ribs (those that go along the length of the entire panel and connect the back and front parts of the panel). If they are very small, cut out the required size from a new piece, and in the cut-out piece, use a stationery knife to cut off the back part of the panel, leaving less than half of the longitudinal ribs. Next, cut out, using a utility knife, short strips of plastic from the profile, any profile (side, docking, it doesn’t matter, you are interested in the surface) 5x1 cm, the number depends on the size of the hole, 4 or 6 are enough for you . Check how these strips fit on the piece of plastic you cut out; they should lie between the longitudinal ribs. Lubricate one of the halves of each strip with silicone or plastic glue. Glue the greased strips from the inside to the front of the panel, wait for it to dry, grease the other half of the strips and glue the cut patch to it.
There is also the option of purchasing part of a seamless ceiling (client) and gluing it on. Or use mounting foam to blow out the hole, cut off the foam that has come out and stick a patch on top of it. under any circumstances the view will deteriorate, but it will be more beautiful than a hole.
Published by Guest on February 16, 2014 – 20:05.
There is an easier option. We take similar plastic or find the remains of the ceiling surface. We cut out a circle depending on the hole so that it slightly covers the hole. We cut out the back part of the circle (ribs) so that thin plastic comes out, adjust the thickness using sandpaper. Glue the round timber onto the hole.
A reliable old-fashioned way to fix a burst bucket
There is an old and reliable method for repairing a broken bucket at home, which is suitable for flat surfaces such as the bottom. It is necessary to cut two patches from thin rubber that will close the crack on both sides. On top of them are placed two plates of the same size made of thin metal, for example, duralumin. Holes are drilled around the perimeter of the “pie” through which the seal is riveted with aluminum rivets. The result is relatively thick “patches”, and not very beautiful. But the seal will be reliable. Another repair method is in the next video.
Is it possible to replace only a few plastic panels?
Good afternoon, is it possible to replace several panels after a bathroom has already been finished with panels? The thing is that our craftsmen left us a hole in one panel and on the same wall they did not close a non-working exhaust system and a foul odor is coming from it into the bathroom. We would like to remove three panels, seal the exhaust system and replace the leaky panel. Is this possible?
Good day, Elena. As a rule, it is, of course, possible to replace several panels, and without much difficulty. But here I will immediately warn you on this point.
It is ideal if after renovation work you have several unused panels left that were purchased for finishing work. However, if there is no replacement plastic panel, then you should pay attention - the same collection of plastic panels from different BATCHES differs in shade. This difference is small, but it will be noticeable when installed on a wall surface.
If PVC panels were purchased not so long ago , immediately run to the same store and buy what is missing. If there is no chance of finding panels from the same batch, there are several ways:
- The color of the new panels may be virtually similar and will not be much different and eye-catching. This is the maximum.
- If the difference in shade is still noticeable, then a great option would be to completely redo one damaged wall.
- Try to repair damage to the panel. The hole must be well coated with sealant and some decorative component (sticker, mirror, etc.) should be fixed on top of it, if of course this is appropriate. The hole for the exhaust system can be covered with an ordinary white grille for hoods (as in this article in the first photo), which are sold in every store that sells building materials and tools.
I would also like to warn you! By sealing the hood hole, you will disrupt the air circulation in the bathroom. This will encourage very high humidity and therefore mold, mildew, etc. We recommend that you read the article Ventilation system in the bathroom. to understand its working principle. If there is a foul odor coming from the hood, you should contact your own management company; they are required to monitor the condition of all systems in the house.
We hope we helped you with advice.
Calculate the cost of your renovation! For free!
Exclusively for Muscovites, Moscow region, St. Petersburg and Leningrad region:
Interesting article? Rate it and add it to your bookmarks!
Please rate the publication:
We use sealing tape
Nicoband sealant tape, self-adhesive, bitumen-based
One of the modern ways to eliminate small pipe leaks in a bathroom or toilet is the use of sealing tape. This material is an adhesive fabric with special impregnation. As a rule, sealing tape is used at joints and joints, but it is also quite suitable for straight sections.
The progress of work will look like this:
- The section of pipe being repaired is cleaned of contaminants and dried.
- Stretch a small piece of tape and begin to wind it onto the pipe. In this case, the material must be constantly kept under tension to prevent wrinkles from appearing.
- When winding, you need to lay the next section of tape on half of the previous one. As a result, your pipe will be “packed” in two layers of sealing material.
Note! This method has one drawback. Sealing tape does not withstand sunlight well. Therefore, the repaired area must be covered with a protective layer.
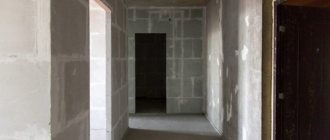
How to repair a hole in the ceiling: recommendations and life hacks
A hole in the ceiling, which may cause repairs, can cause a lot of inconvenience because it makes the room unsightly and unsightly. If a deep hole is located near the riser, then the sound insulation in such an apartment will be compromised, which means that this problem should be solved immediately. First you need to find out what type of ceiling you have in your room.
Popular types of ceilings:
- suspended cassette;
- tension (made of fabric);
- plastered;
- suspended and plasterboard.
Depending on the type of ceiling, the work required to seal a hole in the ceiling is determined.
How to seal the gap between the wall and the sides of the bathtub: 7 simple ways
Renovating a bathroom is such a difficult task that even minor mistakes of builders sometimes baffle. For example, what should you do if, when installing a bathroom, it turns out that there are wide gaps between its sides and the already lined walls? We offer 7 ways out of this situation
Cement-sand mortar
The easiest and cheapest way is to seal the cracks with cement-sand mortar. But this method cannot be called ideal (or even good). Quite quickly, under the influence of moisture, the porous material begins to mold, crack and crumble. Protection is required - painting, sealing, etc. And this is additional trouble. So they resort to cement only when the gap between the walls and the bathroom is too large (more than 0.5-0.7 cm) and a high-strength seam is needed.
Polyurethane foam
Another option for sealing relatively wide seams is polyurethane foam. But not just any one. For extreme bathroom conditions, only a one-component polyurethane composition is suitable. It is strong, elastic and moisture-resistant enough to cope with the task.
The sealing job is simple enough that you can do it yourself. The sides of the bathtub are thoroughly cleaned and degreased, and then masking tape is glued around the perimeter, trying to lay it as close to the crack as possible. After this, the gap is filled with foam and left until it hardens completely. Finally, cut off the excess material with a sharp knife and remove the tape.
Is it possible to do without tape? You can, but then you will have to spend a lot of time and effort to scrape off the foam from the edges of the bathtub. This is quite difficult to do, and most likely you will have to resort to washes.
So, closing the gap with foam is quite easy. But you can’t leave it in its pure form. Firstly, this material does not look very good, and secondly, over time it will turn yellow and deteriorate. Needs additional finishing.
Sealant
One of the most common materials for sealing joints is silicone sealant. It performs well in cases where it is necessary to close a seam no more than 0.5 cm wide, and does not require any additional finishing.
Before sealing the surface, you should thoroughly wipe it with white spirit, then place the nozzle of a container with sealant in the gap and run it along the entire perimeter, gradually squeezing out the compound. Then wet your finger in soapy water and coat the joints. This will both seal and level the sealant.
This protection usually lasts for several years. Then the sealant begins to darken and become moldy. You have to remove it and apply a new one.
Only silicone sealants should be used in the bathroom. Acrylics do not have proper elasticity
Plastic border strip and plinth
Self-adhesive border tape
One of the common options for sealing joints is a flat tape with a longitudinal seam, which is folded and laid in the joint area. Many manufacturers apply glue to the reverse side of products, trying to make installation as easy as possible. But experienced craftsmen strongly recommend buying clean tape and fixing it with reliable moisture-resistant glue or liquid nails purchased separately. Factory self-adhesive often does not stick well. However, it also has a right to exist, especially if the joints need to be repaired quickly.
To ensure a better fit of the plastic tape with a self-adhesive layer, its back surface can be heated with a hairdryer before laying.
In addition to tape, there are also plastic borders (fillets, strips, corners)
. You can choose corners and end caps for them. Obviously, products of this kind are more expensive than tapes, but they also last much longer. And they look more aesthetically pleasing.
In any case, almost anyone can lay a plastic product in a seam. You need to clean and degrease the sides of the bathtub, measure them and cut pieces of tape/border of the required length with scissors, a sharp knife or a saw with fine teeth.
The tape or plinth with glue applied is pressed tightly to the surface and left for 24 hours. After this period, the bathroom can be used.
Plastic tape and border are inexpensive and easy-to-install materials. But you shouldn’t expect that such a finish will last for decades. After a couple of years, even the best glue will lose its useful properties and the seam will have to be sealed again.
Acrylic baseboard
Acrylic border
A more reliable, durable and aesthetic analogue of plastic plinth is acrylic plinth. This is a rigid monolithic product of white color that does not turn yellow over time. Dirt does not settle on its smooth surface, so no special care is required. It is enough just to wash the border occasionally with soapy water or a gentle cleaning agent.
Seamless ceiling repair
Before you begin sealing a hole in a fabric ceiling, you need to determine how large it is considered to be. Small slits can be sewn up using strong nylon threads. And if a large hole forms, then you will need a suitable piece of fabric. If there is no such material in the house, it’s not a big deal.
You can always count on the help of the company from which you purchased the ceiling. Here you can purchase fabric of the required color.
In order to seal a hole in a fabric ceiling, it is better to use instant glue. The smeared patch should not be pressed too hard against the ceiling, otherwise the glue will protrude beyond the edges and spoil the appearance of the entire ceiling.
Composition and principle of action of adhesive materials
Plastic products are glued together using specialized chemical compounds that dissolve the outer surface of the material. The active component in most variants is methyl ethyl ketone, cyclohexane or tetrahydrofuran. Glue for sewer pipes made of PVC or polypropylene is made from the same substance as the pipeline parts themselves. In addition, various additives are mixed into adhesive materials to influence the viscosity of the mixture and its setting time, as well as improve adhesion.
During the curing process of the glue, plastic pipes are rigidly connected due to the interweaving of molecular polymer chains on the outer surfaces of the parts being connected. The solvent evaporates and a compound is obtained that has the same characteristics as the new solid product.
Damage to plasterboard ceilings
There are several options that allow you to seal holes on the surface of a plaster ceiling. If there is a crack between the ceiling slab and the wall, then you need to carefully trim the edge of the gypsum fiber sheet so that you end up with a 45 degree angle. After this, the gap can be filled with gypsum putty.
The putty area can be covered with paper tape and smeared with glue. If the hole in the plaster sheet itself has been removed, and the walls are located next to the riser, then you first need to cut out a stencil from cardboard in a square or rectangle shape. Its dimensions should completely cover the holes. After you need to apply the stencil to the hole in the ceiling, you will be able to carefully make a hole of the required shape. After this, using such a stencil, it is necessary to cut out the insert from a new gypsum fiber sheet.
In order for the insert to stick to something, you need to insert a strip of thick plywood or a block of wood into the hole, which should be screwed to the ceiling using screws or dowels. After this, a patch is attached to a block of wood. To seal very small cracks, you can use reinforced tape and putty. This will give the surface a smooth and beautiful appearance. All dowels and screws should be tightened so that their heads are not visible on the ceiling surface.
How to repair small cracks
Hiding a small crack will require approximately the same amount of effort as filling a small hole.
But there are some nuances to consider before you start:
- A small gap means a minimum of labor and materials for the entire process. But step-by-step steps to remove the finish and eliminate dust inside the crack are also relevant.
- The inside of the opening should be moistened with water for better adhesion. Convenient to spray from a spray bottle.
- Using a long-bristled brush, coat the interior with primer.
- Carefully, without spreading it over a large area, we seal the gap with a spatula - we use alabaster or cement mortar for this.
Next, we proceed as described above: we clean the dried layer with sandpaper, leveling and clearing the surface of unevenness. Then we cover it with paint or the same type of coating, as on the entire surface of the wall or ceiling.
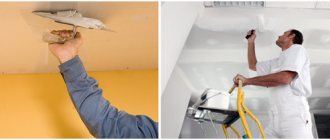
Characteristics of repairing a plastered ceiling
In order to cover up a hole in the ceiling, you can use any good method. If the hole is not very deep, you can use putty. The gaps created in the joints of materials should be covered with elastic putty, which will help smooth out all the irregularities. The place where the plaster has fallen should first be cleaned and then treated with a primer mixture that has disinfecting properties. After this, the hole must be coated with a primer, which will improve the characteristics of the material.
Putty on a ceiling covered with plaster should be applied in 3 layers. Each new layer is applied to a very clean and dry surface. The finishing layer should also dry perfectly, after which it is sanded and coated with a primer mixture.
If the place where the plaster is applied is damaged, then the damaged area can be replaced with plaster without much effort. A painting mesh is applied to the insert, and then the area is covered with putty.
Application of sealing tape
Using a special sealing tape is an effective way to eliminate leaks in a plastic pipeline both at joints and in flat areas. The tape is made of adhesive fabric, which has a special impregnation.
Pipeline repair with its help is carried out after thorough cleaning and degreasing of the repaired area, followed by drying it. After such preparation of the pipe surface, it must be tightly wrapped with sealing tape, avoiding the appearance of wrinkles. The winding is overlapped, covering at least half the width of the tape.
It is important to consider that sealing tape can quickly lose its properties when exposed to direct sunlight. Therefore, if the pipe being repaired can be exposed to such effects, the tape must be covered with an additional protective layer.
Difficulties in filling deep holes
If the holes in the ceiling are deeper, then the sealing process usually has many difficulties. Narrow and deep cracks appear between the ceilings. They can be filled with installation foam, and then the excess can be removed using a knife.
A narrow and short gap can be painted over with paint and a bandage applied on top. After this, it is worth applying a secondary coat of paint.
A coarse metal mesh is applied to the overall cracks, which is covered with plaster on top. If the hole is deep and is located near the riser, then its edges can be trimmed with a chisel and hammer. This will help create a lot of nicks in the surface. Afterwards a mixture of sand and cement is laid. It is applied in portions, waiting until the previous layer has completely dried. At the end, the problematic area is covered with a water-repellent primer mixture, and then plaster is used. Especially large holes are sealed with cement. And in order for it to hold better, the surface is reinforced with large wire and several electrodes.
By applying our recommendations for repairing holes in the ceiling, you will be able to solve this problem without any problems. Now damage to plaster or plaster will not scare you, and you will personally be able to cope with both minor and large holes on the ceiling surface. Do not forget that when filling holes, it is quite important to choose good materials that will make it possible to get rid of the problem once and for all.
Nissan 100 NX 1993, 93 l. With. - with your own hands
Cars for sale
Nissan AD, 2007
Nissan Qashqai+2, 2011
Nissan NP300, 2011
Nissan Serena, 2016
Comments 17
Tell me, please, is there a way to fix a hole in the bumper? :)
You can do the same thing, just solder the plastic with a mesh in the places where the cracks meet. And to give the shape to the fiber it is better to use plasticine. You just need a separating layer. Plasticine is greasy and the putty does not stick well to its remains.
but it seems to me that foamed pvc, the kind that advertisers have in sheets, and cosmofen glue, will also make it faster
In versions with music on the back, these covers are made of metal mesh that covers the speakers. The speakers are attached to a metal frame rather than a plastic casing. If you are interested in what it looks like, I can take a photo of what it looks like, although now these parts are lying separately, since the interior has been disassembled.
Well, if only for the general development of the photo. The probability of finding them is negligible =)
In versions with music on the back, these covers are made of metal mesh that covers the speakers. The speakers are attached to a metal frame rather than a plastic casing. If you are interested in what it looks like, I can take a photo of what it looks like, although now these parts are lying separately, since the interior has been disassembled.
I have a Sunny in my donor with a sloping 5th door, and there were speakers there, although the Bolton infection didn’t work for a hundred thousand, I drive with 2 front speakers, although the standard wires went somewhere from the radio in the harness, where could they go?
About the racks. You should not try to make this part of the rack from one piece of iron. I would make the patterns not from cardboard, but from thick paper, it’s easier to work with. I would make patterns of four planes (the first is the outer most complex one with a bend, the second is the one that adjoins the windshield, the third is the one that goes under the door glass, the fourth is the one that goes into the A-pillar) and glued them together the way you did in the previous part of my BZ. There may be an outer part with a bend that would have to be divided into two parts. If everything is fine, then you transfer the resulting paper patterns to metal, and then it’s a matter of technique.
I bent this dumbest part 4 times. All are clumsy. It must be tightened because She has a spiral (twisted) bend. And from 2 longitudinal halves, the idea might work. I'll try if it doesn't work with the frame.
If it’s where I think it is (behind the passengers under the elbows), then it would be easier to find from the version with music, fortunately there are many of them. PS - it turned out great, but where should I put the speakers?)
Well, first of all, shoving speakers into these rattling cavities is a completely stupid idea. secondly, I am for full stock with reasonable upgrades. And for music there will be a sub 600 + amplifier 300 + mid 120-150 in the door panels under the podium +
4 beepers around the perimeter. Enough with the head. I won’t mess up the shelf in the back; no one drives there anyway.
1) they rattle if they are not screwed on well or if they do not fit tightly! 2) Your hundred square meters is the first in which I see “empty” cavities (I have speakers there without a collective farm) I generally have the idea from time to time to throw a 30kg speaker (like S90) in the back and don’t care)))
there are 2 legs in the grooves and 2 metal latches. All this is kept in plastic. Either silicone it or tighten it with self-tapping screws so that it fits tightly. Well, in general I will keep it in mind. But I would rather put speakers in the back instead of pockets. There's the same volume for small ovals.
Ceramic border
Ceramic border
This option is the most reliable and aesthetically pleasing. By closing the joints between the wall and the bathroom ceramics, you can forget about the problem. The border will last as long as the cladding.
You can purchase additional internal and external corners and connecting strips for the baseboard. This will simplify the installation process, since you will not need to trim the border itself with pinpoint precision. The joints will be closed with additional elements.
To fix the border, use moisture-resistant tile adhesive and appropriate grout. Installation requires at least minimal experience in working with ceramic cladding, so it is wiser to entrust it to a specialist.
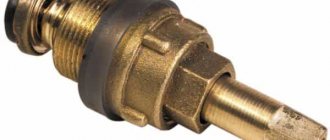
Self-tapping screws in a metal-plastic frame
The main fastening material for the auxiliary elements of a plastic window is a self-tapping screw screwed directly into the surface of the frame. This type of fastening is used on the inside and outside of the window.
The presence of self-tapping screws in the frame of a metal-plastic window is normal and fully complies with the operational requirements of the window. The characteristics of the window do not deteriorate, because the design of the self-tapping screw ensures a tight fit of the cap to the surface of the plastic. However, if an attached element, such as a blind, has been removed, the remaining holes will compromise the seal of the window and ruin its appearance.
And in this article, read how to install plastic windows with your own hands - tips and recommendations.
Which profile for a plastic window should I choose? Which one is better? The answers to these questions are here https://4okna.info/vybor-okon/vybor-profilya-dlya-plastikovogo-okna.html.
Borders for tiles
There is a special type of borders that are installed on the edges of the bathtub even before the tiling work begins. The edge of such a molding is placed on the wall and then pressed against the tile. Obviously, the fixation in this case will be as reliable as possible, which is both a plus and a minus.
On the one hand, the seam is sealed “forever”; on the other hand, if the curb is installed incorrectly or is damaged over time, the lining will have to be chipped off to replace it. So the installation of such elements should be entrusted to professionals.
Borders for tiles are made of plastic and metal (aluminum, copper, brass, stainless steel). The second option is the most reliable.
Joint design options
In the process of equipping a bathroom, it is necessary to perform a number of sequential actions. Due to this, water will not get into the joint. Many experienced specialists offer many options for solving this problem in accordance with a specific situation.
You can completely prevent water from getting into the joint by installing a bathtub with one side walled directly into the wall. After sealing the bathtub into the wall, it is necessary to treat the joint with a special grout. The main advantage of this solution is the complete exclusion of moisture from entering the joint.
The bathtub is not always stationary. Therefore, the masonry at the junction may be damaged. Due to any unforeseen situation, tile repair may be necessary. It will need to be removed and reinstalled. It is not always possible to select tiles from a similar collection so that they look organic. For this reason, replacing tiles is often a rather painstaking and time-consuming task.
It is better not to mount the bathtub into the wall. To seal the joint between the bathtub and the tiles, you should use modern materials specially designed for this task. There are several popular options:
- tile grout;
- cement mortar;
- finishing the joint with foam;
- sealant;
- installation of curbs.
Each of these methods has its own advantages and disadvantages. They can be mutually exclusive with a certain combination of methods. If we consider the process of finishing the joint between in more detail, we can understand this situation better.
Bathtubs made of acrylic are lightweight, so disruption of the junction of the bathtub and tiles as a result of displacement of the structure is unlikely. The back walls of bathtubs are usually made flat, so there is no need to cut a groove in the wall for them.
To ensure high-quality sealing of the seams between the acrylic bathtub and the wall, it should be securely fixed at the installation site. To do this, the bathtub is glued to the floor with sealant.