If you want to understand how to make stained glass on paper, then this article is for you. Stained glass on paper is also called squiggle design - this is an unconventional technique for making stained glass. This is mainly a children's activity. Making a wonderful picture using this technique is quite simple and interesting. Cardboard, glass, plastic, plywood are suitable for the base of the picture. For wall paintings, it is better to use opaque materials.
It’s up to you to decide which subject to choose for the picture. The image affects the atmosphere of the room. For a nursery, of course, it is better to choose children's drawings, for the kitchen - geometric drawings or abstraction. For the remaining rooms, you can choose a variety of ideas that will fit well into your interior and will look stunningly beautiful. Stained glass has been known for several centuries and is an element of luxury and a sign of wealth.
What is needed for the job? The basic list of required materials and tools may include:
- Paper – sheet A4;
- Simple pencil;
- Marker or black felt-tip pen;
- Cardboard;
- Eraser;
- Watercolor paints;
- Frame.
Master class on making stained glass windows from paper “Autumn Leaves”
Svetlana Davaeva
Master class on making stained glass windows from paper “Autumn Leaves”
A wonderful time of year has come and I decided to decorate my group with autumn leaves . Just draw and cut out colored leaves ? No! I want something new. Again my beloved Maam comes to the rescue. After walking around the posts of my colleagues, I stopped to visit Olga Zholobova from St. Petersburg. I saw wonderful stained glass windows made from paper “ Autumn Leaves ”, which are beautiful and easy to make . Without wasting time, I made the same stained glass windows , only a small change: I replaced the corrugated paper with colored paper and cardboard . Many thanks to Olga Zholobova!
1. 2 sheets of cardboard : yellow and black;
2. 1 yellow sheet of paper;
6. a simple pencil.
Take black cardboard
Turn it over and draw a frame on the back side, in the center - a leaf of wood (in our case, an oak leaf )
and along the edges of the connection line with the frame.
Cut it out with scissors, you get a black stencil
Place a sheet of yellow paper under the stencil and trace the sheet .
We cut out an oak leaf along the contour and glue it on .
We put orange cardboard on the bottom and glue it on.
We do the same with maple and linden leaves.
Master class “Summer and autumn leaves with wax pencils” Dear colleagues and caring parents! This master class will be especially valuable for preschool workers whose students do not yet know how to do this.
Master class “Module “Autumn Leaves” I bring to your attention a simple DIY craft. Module of autumn leaves. Required material for making the module: -Double-sided.
Master class on making flowers from paper “Poppies” Purpose: making a bouquet of flowers to decorate the group. Objectives: educational: - teach techniques of “paper-plastic” technique; developing:.
Master class on making paper doves Hello, dear colleagues! The spring matinee dedicated to dear women has come and gone! On the eve of this day, the senior teacher and I.
Master class on making paper chrysanthemums Today is Valentine's Day! And I sincerely congratulate you all! Spring is coming! And of course we need flowers! Today I offer you a master class.
Master class on making “Little Frog” from paper Master class on making “Little Frog” from paper. Working with paper is very interesting and exciting. I present to your attention the master.
Winter village landscapes made of paper: templates and stencils for cutting out and window stickers
For some reason, it is small houses in snowdrifts with a chimney that evoke the New Year's mood. By the way, making them is very simple - you need to choose the stencil you like, print it, transfer it to paper and decorate the window.
- Consider the size of your window. You can create a garland of houses and Christmas trees below, and strew Christmas balls on top. By the way, for this purpose you don’t need to make a lot of stencils, just take one main one.
- And then you can add some elements yourself. For example, a chimney, a fence, a Christmas tree or snowdrifts.
- You can even depict a dog with a booth. But, in this case, a color drawing will look more beautiful. Although you can cut out the corresponding patterns.
- Rural landscapes look good in white against a black background (night window). But, if you wish, you can decorate the picture. The kids will definitely appreciate this pastime.
Village landscapes
Village landscapes
- You can make one big house, but in this case you need to pay attention to details. That is, add a door and windows. By the way, you can put a New Year’s wreath on the door (you can make it bright).
- And if you add a drop of humor, then depict Santa Claus (although this is more the privilege of Santa Claus), who is trying to get into the house through the chimney. Or stuck in the process.
- And don’t forget about such details as smoke. After all, in the village (now, of course, they have other heating methods) they heat with wood. And the chimney indicates the presence of a stove.
How to make stained glass from paper with your own hands: master class for children
Stained glass windows made from paper are a great spring craft for children in kindergarten or at home. We will now tell you how to make stained glass windows from paper with your own hands simply, quickly and in a way that will bring pleasure to children.
When a paper flower garland and an applique on the “Spring” theme have already been made, there is only one thing left - to make stained glass windows from colored paper. Stained glass windows can be made from paper not only to keep a child busy, but also to decorate a group in a kindergarten or a room at home. If you attach a thread to such a stained glass window made of paper and hang it on the window, then the children will be immensely happy when the sun's rays begin to break through the multi-colored pattern.
In order to make a stained glass window from paper, you will need thick cardboard for the base, glue, scissors and colored rice paper, tissue paper or thin napkins that you have on hand.
We use available material: paper
You don't have to use paint to paint a stained glass window. You can decorate a window, mirror or interior glass door using colored paper. Helpful Tips:
- Tissue paper is best because it is translucent, inexpensive and easily available. But to create a realistic glass look, it's worth working with colored cellophane.
- Think in advance about how your stained glass window will look, taking into account the combination of tones and the size of the parts.
- Paper or cellophane is best applied to glue. If you are using the film specifically for window glass, then it is attached using ordinary water and careful smoothing.
- The main feature of any stained glass window is the highlighting of details with a black outline.
Step-by-step instructions on how to make paper stained glass with your own hands
We will show you how to make a stained glass window from colored paper with your own hands using the “Butterfly” template as an example.
- Select a shape for the stained glass window, draw a template on thick cardboard, cut it out with scissors or a stationery knife (just in case, we remind you that children should not be trusted with a knife).
- Apply glue to the inside of our base.
- Glue pieces of colored paper to the cardboard base. This can be rice paper, tissue paper or napkins, which are usually used for decoupage.
- We cut off the excess colored paper that protrudes beyond the base. And the stained glass window is ready!
Now you know what to do with your child this spring, and how to make a stained glass window from colored paper with your own hands.
Peculiarities
Before you learn how to draw stained glass on glass with your own hands, let's look at what features it has. Considering these nuances, you can create a unique decoration at home:
- Stained glass can look different, it all depends on your imagination. Try depicting a bouquet of your favorite flowers, a large castle, a fancy mosaic, or even an inscription.
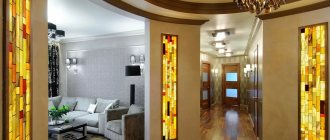
- Stained glass windows are one of the most striking decorative elements. They bring classic charm to the house, add lightness, airiness and unique style, and also create a particularly warm atmosphere. Stained glass windows in the interior transform the space, making it festive, sophisticated and luxurious.
- Previously they were made by hand. Complex structures were literally assembled piece by piece and soldered together. Today, stained glass can be made using simple means.
Making stained glass on colored paper: step-by-step master class with photos
To make a picture from paper, you will need half a sheet of Whatman paper, scissors, and a pencil.
- Prepare a sketch of the future painting, draw it yourself or download a ready-made template.
- On a sheet of paper, draw a frame of 3–4 cm and transfer the drawing to it in full size. The contours should be made wide.
- Color the outline with a black felt-tip pen.
- Cut out fragments of the design with a sharp knife.
- Cut out pieces from colored paper and glue them to the back of the work. The excess needs to be cut off.
- Frame the finished painting.
Winter city landscapes made of paper: templates and stencils for cutting out and window stickers
This stencil is more suitable for modern interior style. By the way, in this matter it is important to cut out every window in a multi-story building. And the secret of such a landscape is that it can be either white or black. Yes, the first option will delight you at night, and the second will decorate the window during the day.
- A stencil of a cityscape can be printed and then transferred to paper, or you can create it yourself. A ruler and a simple pencil will help. Only all sizes must be strictly observed.
Winter landscapes
- Christmas trees, snowflakes and snowdrifts next to houses have not been canceled. They can be used as additional decor.
- And at the top of the picture Santa Claus on a sleigh will fit perfectly. Naturally, there will be several reindeer in the team.
- And, of course, you can add angels, pine branches with balls or snowmen to such a picture.
We create a stained glass window with our own hands using acrylic paints
Original stained glass can be made with acrylic paints on glass.
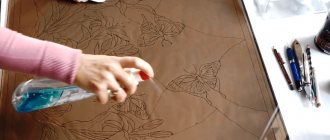
1. Degrease the glass or wash it thoroughly with detergent, then place it on the sketch (you can secure the sheet with tape).
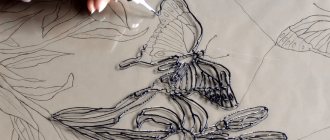
2.Gently begin to apply the contour. To keep the contour lines thin, use a metal tip. If you need a volumetric contour, then hold the tip at an angle at a short distance from the glass. When finished, leave the painting until the contour paint is completely dry.
3.Next, start filling the surface of the drawing between the contours with colored paints. You can mix several colors of paint using a toothpick to achieve the desired shade. You can apply one color, starting from the outline and spreading it slightly towards the middle of the fragment. Then start from the middle with a different color, spreading the paint in the opposite direction with a toothpick, you will get a beautiful color transition. If you slightly touched the contour, do not be upset; after drying, nothing will be visible. Also, if you think that the colors look a little pale, then know that after the paint dries, it will take on a darker shade.
You can paint window glass with acrylic paints; stained glass windows will look very colorful, and in terms of practicality they are in no way inferior to other technologies.
Little tricks
Stained glass is a decorative picture that can be made in any style.
Masters often keep silent about some, in their opinion, insignificant details. Here are some tips to help you make stained glass:
- Never start learning with the most complex, start with the simplest. Never take on a large drawing with many small details at once. Try a simple pattern first, and when you master the technique a little, you can take on complex designs.
- use different types of paints for your work, they all also apply to the drawing differently. The brightness and light transmission of the design depends on the number of layers of paint.
- To carefully adjust the pattern, use ear sticks and cotton pads.
- Use a sharp knife or blade to remove defective lines.
- Use wet alcohol wipes on your hands.
- The lighting should be good both from below and from above the work in order to immediately reveal the shade of color and the density of the coating.
- One of the main components of beautiful and neat work is its quick completion. For example, if you apply the contour paint too slowly, it will vary in both color and thickness. If poured slowly, the paint will lay down in an uneven layer and this will affect the quality of its surface.
Related article: Beaded rose in Greek style for beginners with photos and videos
We study step-by-step painting of glass with stained glass paints
Painting glass with stained glass paints will also look colorful on your window or other glass surfaces. The work is almost similar to other glass painting technologies and is performed in stages.
To work you will need:
- Sketch of a future painting.
- Sheet of glass.
- Contour paint.
- Stained glass paint for painting.
- Brushes.
- Steklograf (pencil for drawing on glass).
When all the paints are completely dry, insert the finished stained glass into a window frame or photo frame.
Types of stained glass designs
Popular topics include the following types:
- Abstraction looks beautiful as a panel on an elongated surface or on glass of a non-standard shape.
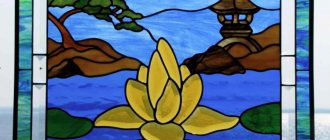
- It is better to depict nature on rectangular and square glass. Landscape paintings will decorate the hall and living room.
- Pictures in the Art Nouveau style are suitable for decorating any living space.
- Gothic patterns are distinguished by the angularity of their details. The figures of people, birds and animals are made in the style of the Middle Ages. They look beautiful on round, oval and arched shapes.
- Antique stained glass will appeal to lovers of the classics. He combined portrait subjects, floral arrangements and intricate mosaics.
New Year's Moon and Month made of paper: templates and stencils for cutting and window stickers
What would it be like without her? It can be either a separate picture or an additional element. It can be depicted in different phases (that is, growing, decreasing or full). If you want, you can add a nose, eyes and lips to her, or just make her round.
- If you want to make the moon the main object, then it is better to spice it up a little (that is, make a face). But, anyway, you can’t do without stars, snowflakes and New Year’s balls.
- A stencil where the Moon is watching the children playing will look very nice. Or depict the process of sculpting a snowman, as an option.
- The full moon goes well with a team of reindeer and Santa Claus.
New Year's Moon
- We will give you several options on how to depict the moon. It is not necessary to print out such templates, because they can easily be redrawn on paper. Moreover, even a child can cope with this task. A little secret ! To draw the Moon, simply circle a plate of the appropriate size.
The month and the Moon are different states of the same object. We mentioned this a little in the previous paragraph. The month is shaped like the letter “C” (just in case, we remind you).
- Which direction the Month will look is up to you to decide. The beauty of the picture will not change at all. It will just depend on what phase it is now. On a note! If you put your finger on the points of the Moon and get the letter “P”, then this indicates that now is the growing phase. If the letter is in an expanded state, then the phase will be decreasing.
Decoration for the holidays Decoration for the holidays
- And, of course, stars, snowflakes and other New Year’s elements will make the picture complete. By the way, the Moon will look beautiful over the spruce forest.
- Or, on the large half of the window, depict a rural landscape, and on the narrow half, let the Moon flaunt over the snowdrifts.
Technicians
Amazing work of a master, incredibly complex stained glass window
Any novice craftsman, and even a person who has never done this before, can create glass paintings if you choose the right technology. Now there are ways to create stained glass that give a result that is not much different from the classical version, but the process itself is much simpler.
And materials for this type of art can be found in art stores, they are available to everyone.
Stained glass techniques have evolved over the centuries, combining the knowledge of old masters and new methods, a large number of which are still used today.
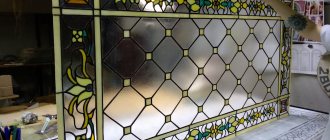
Beautiful stained glass windows
Depending on the conditions in which the finished stained glass window will be located, it can be made either in an ancient spirit or in a more modern one. Each of the styles and methods of performance finds its application, as they say, “for everyone.”
Now there is an incredible variety of ways in which stained glass windows are made with your own hands, but only a few of them are the main ones.
Classical technique
Classic stained glass on the ceiling
Classical technique Classical technique gained its popularity back in the Middle Ages. Its peculiarity is that each fragment of the picture, cut with a glass cutter, for example, a diamond, and having a different shade, is placed in a metal frame.
This method is the most complex and very painstaking; glass paintings that involve its use are trusted only to highly qualified craftsmen with extensive experience who have their own secrets of the technique.
To work, you need a large number of special tools designed for cutting fragments (glass cutter), soldering iron and solder. It is also necessary that the workplace is well lit.
It makes sense to buy all the tools only if the goal is to do it professionally, since the equipment is quite expensive.
This technique is used, for example, to make stained glass with facets - very popular and beautiful glass paintings.
Film technology
Delicate film stained glass
Film technique It is also called the English technique, and it is much lighter than the previous one. The essence of the method is to apply a self-adhesive film to the prepared glass according to a previously prepared sketch of the painting.
Each piece is then framed with lead tape to imitate a metal frame. This tape does not need to be soldered. The film also gives a slight mirror effect, which looks very nice.
This method is much simpler than the previous one, since it does not involve cutting a huge number of small pieces of glass and processing them. The English technique requires much less time, and a novice master can easily master it and create stained glass with his own hands.
Fusing technique
Fused glass looks unusual
“Fusing” technique The technique has existed exactly as long as glass has been produced and during all this time it has been significantly improved by craftsmen. The name comes from the word “fusing” - mixing.
It is on the mixing of glass fragments that this method of creating stained glass is based. The technique requires special equipment, so you won’t be able to familiarize yourself with this method at home.
The principle of the technique is as follows:
- First of all, a drawing is prepared and applied to a sheet of paper.
- Glass coated with a special glue is placed on top of the sheet.
- Colored parts are laid out on a layer of glue
- The painting blank is placed in a furnace, where the glass is melted and the fragments are fastened together
The mosaic is gradually heated and maintained at a temperature of about 800 degrees. The process must proceed under the strictest control, because if the moment of readiness is missed, the material will begin to change structure and crystallize.
- After the product has become homogeneous, it is cooled
- The procedure is performed again
- The product is not only heated and cooled, but also processed
At the end of the work, the output is a solid picture of fragments of colored glass firmly welded together, which does not have sharp corners in the image, in which bubbles can be seen.
Stained glass "Tiffany"
Elegant glass painting using the Tiffany technique
Stained glass “Tiffany” This method is somewhat similar to the classic one. To work, you need to prepare two sketches in natural size in duplicate. One of them is cut into fragments; colored glass will be cut along them.
Each piece of stained glass is processed and framed with copper tape, which is soldered when the picture is assembled. Copper tape is much easier to use than lead due to its flexibility, so products made using this technique are used to decorate not only windows and doors, but also interior items.
This stained glass window looks especially beautiful in combination with varnished wooden elements.
Casting technique
Variety of interesting shapes
Casting technique One of the most complex and rarely used methods. Its complexity lies in the fact that colored glass fragments are not cut, but blown by hand according to an already conceived shape and folded into a kind of panel.
Then all the fragments are assembled using mortars. Such applications are especially beautiful because they create a special play of light.
It is difficult to apply this technique at home, and as a rule, such paintings are not used for interior design, but are individual pieces of art.
Sandblasting method
Fascinating stained glass
Sandblasting method To work in this technique, you need special equipment that delivers a stream of sand under high pressure. Very often used for stained glass ceilings using curved patterns.
The work consists of the following stages:
- The layout of the drawing is fixed on transparent glass
- Free areas of the stencil are processed using equipment that supplies sand. After processing, the glass becomes matte and opaque
The stencil is removed and a light drawing is obtained. There is no need for cutting glass or soldering, but without equipment it is almost impossible to do this at home. Of course, you can use sandpaper and make the stencil out of metal, but the quality of the work will still be much worse.
Etching technique
An unobtrusive addition to the interior
Etching technique Here it is necessary to use hydrofluoric acid, which has a destructive effect on silicon dioxide, the main component of glass.
To ensure that the acid acts only on certain areas of the stained glass window, stencils made of acid-resistant material are used. Thanks to such stencils, you can create multi-layered patterns with different reliefs, which are even used to decorate tableware, such as glasses.
It is better not to engage in such activities on your own, as you can easily burn the skin and mucous membranes.
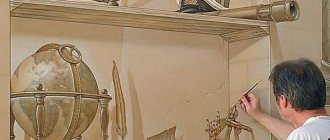
painting
Painted stained glass
Painting Painted stained glass imitates any possible technique, for example, in this way you can imitate lead binding.
The process occurs in several stages:
- It is necessary to develop a sketch and prepare glass
- Laying glass on top of the pattern
- Repeating contours on glass, most often black paint is used for this
- After the outline has dried, the drawing is filled with colored paints.
This technology is one of the most accessible; it will be discussed in more detail below as step-by-step instructions. Even children can be involved in the painting process - it’s absolutely safe and interesting, and in the future the finished creation can be placed in a children’s room to create more comfort.
Contour filling of stained glass
Filled stained glass
Contour filling of stained glass Just like the previous method, this one allows you to imitate all other methods of creating stained glass paintings; it is also very simple to perform stained glass filling by watching the corresponding video master class.
First, the outline is transferred to the glass, and then the stained glass paint is poured in a fairly thick layer.
Stained glass styles
Refined floral stained glass window
Stained glass styles The appearance of a future glass painting is influenced not only by the method by which it will be made, but also by the style, which is selected in accordance with the rest of the interior elements to achieve a harmonious interior environment.
There are quite a lot of styles of stained glass compositions, and even more subtypes of styles , so sometimes it is quite difficult to attribute a drawing to a specific style. First of all, you should rely on the distinctive features of the image, the selection of colors and the main characteristics.
Antique stained glass
Antique motifs
Antique stained glass This style largely gave rise to other, later ones. It is based on ancient Greek culture.
Such stained glass windows can be made using any technique, but they must consist of a huge number of fragments. Features of antiquity in stained glass include the presence in the paintings of amphoras, columns, nymphs and triangular pediments of buildings.
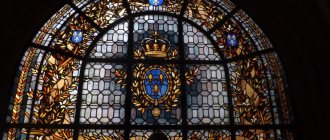
Gothic
Intricate Gothic stained glass windows
Gothic originates from Western Europe during the Middle Ages. Initially, only religious scenes were used, then animal figures and hunting scenes were included.
The style is characterized by deep shades: black, purple, blue, dark green.
Ancient Egyptian stained glass
Vibrant colors and recognizable images
Ancient Egyptian stained glass In Europe, this style of stained glass became popular thanks to Napoleon, who brought it from Egypt after his journey there.
A distinctive characteristic is the use of golden, sandy, ocher shades in combination with brown, green and cobalt. Hieroglyphs and Egyptian ornaments are used.
Indian stained glass
Indian style
Indian stained glass Initially, such paintings were used to decorate rich houses in India.
Characterized by bright, uplifting colors: light blue, bright red and yellow. The presence of gilding is often observed. Indian deities and ornaments are depicted; paisley, also known as “cucumber,” is especially popular.
Modern
Delicate stained glass
Modern Style became popular after an exhibition in Paris in 1990, since then it has firmly established its position in art.
The main principle in such paintings is “form is more important than content.” Stained glass windows are distinguished by refined lines, delicate tones, and often contain plants or bouquets.
Art Deco
Simplicity and symmetry
Art Deco Based on simple, uncomplicated forms.
Stained glass windows of this style are characterized by symmetrical figures, clear lines and repetition of patterns.
Abstract stained glass
The strangeness of abstraction
Abstract stained glass Abstract art is characterized by a combination of regular and irregular forms, bright colors, as well as expression, which is transmitted to the entire interior.
Winter landscapes made of paper: templates and stencils for drawing on the window
I would like to immediately clarify what the drawings on the windows are used for. To do this, they often resort to gouache, toothpaste and a special store-bought product. First of all, you need to choose a stencil and approximately select its location.
- If you plan to use the same pattern several times, then make several copies of the template.
- To apply paint, take a kitchen sponge (a small piece of it).
Stencils
- To make clear and even outlines of the sketch, use toothpicks or skewers. Yes, they will need to be held in the right places. And a dark outline will appear on a white background (if viewed at night).
IMPORTANT: It is better to cut the stencil out of cardboard, since the paper base will deteriorate very quickly. But also prepare a spare copy.
- If you want to use toothpaste as a base, you can draw with it either in its pure form or diluted with water.
- Some people apply the design with ear sticks, or you can again use a kitchen sponge.
- If you want to create a spray effect, then use a toothbrush. We have already mentioned a little about this kind of drawing above. That is, they glued a stencil (after all, the picture is created around the template) and sprayed it with a toothbrush. Then the template was carefully removed.
Stencil
- By the way, we can’t help but remember the frosty drawings. It is not necessary to use prepared stencils for them. Such patterns can be applied with your fingers. And imagine how much joy you will give to your child! And then, use a toothpick to correct the elements.