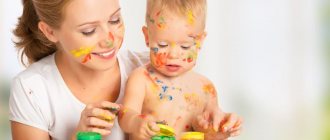
Finger painting is not only interesting and fun, but also very useful. With its help, fine motor skills develop, and the baby also makes his first progress in mastering color schemes. The tools are the fingers and palms of little artists, the “object for smearing” is special paints, and the first teacher is mother. How to organize the first lesson correctly, how to develop fine motor skills? You will find answers to these and other questions in this article.
The benefits of finger paints
Finger painting has many advantages. Using the material from an early age (up to a year or later) helps ensure the harmonious development of the child. Drawing for children is a fascinating process through which they learn about the world, and do this with the help of visual perception and tactile (sensory) sensations.
The main advantage of using finger-type paints is their complete safety for the child’s body. A child touches the material with his hands and can smear his face and body with it, so the composition of the pigments should be harmless.
Other advantages of the method:
- the paints are quickly washed off with water and do not leave stains that the parent will have to scrub off;
- the paints do not flow, but lie beautifully on the surface, allowing you to create original drawings;
- you can use paints on a wide variety of materials: pictures look great on paper, cardboard, glass, plastic, fabric, tiles, ceramics and even on your own body;
- no expensive drawing equipment is needed - the child only needs a minimal set;
- for children aged 1 year or a little younger, holding pencils and felt-tip pens is very difficult, but anyone can draw with a finger or palm;
- Making pictures with such colors will also be interesting for older children - even those who don’t know how to draw at all can easily learn by playing.
Why do most psychologists recommend activities with finger paints, and what beneficial effect do they have on the child? Some fathers and mothers mistakenly think that children in the first year of life do not understand anything, so drawing will be pointless.
For a child, the use of finger colors serves the purpose of obtaining pleasure and learning something new and unknown. During the process, new neural connections are created in the central nervous system, so the child begins to develop faster.
Useful qualities of paints:
- development of fine motor skills;
- acceleration of the formation of the nervous system;
- stimulation of the motor and thinking centers;
- improved mental health, reduced risk of psychological problems in the future;
- alignment of the emotional background.
Drawing helps calm a child if he is overexcited, and the use of bright colors activates those children who are too calm and phlegmatic from birth. Regular drawing lessons bring even greater benefits and affect the development of the child as an individual:
- Artistic taste. If you engage in creativity with your child from an early age, the child will better understand the world around him with its colors and will be able to “transfer” what he sees to paper.
- Perception of colors. Using finger painting, the child will learn to combine colors, obtain different shades and see their diversity. Such children usually already know all the colors from the second or third year of life.
What are the benefits of finger painting?
You shouldn’t assume that finger painting for kids is a useless activity, thinking that the child doesn’t understand anything yet. A small child draws not for the sake of the result, but for the sake of the process. He does not yet put his feelings into thoughts and words, and especially does not understand what exactly he is doing and why.
The baby enjoys new sensations: tactile, visual and even taste. This is how new neural connections are created in his head, and the more there are, the faster he develops.
Adults expect results from children's drawings too early. It is important for mom and dad that the object depicted by the child is recognizable, but a beautiful picture does not indicate creative abilities. Creativity is a process. Your baby's blots reflect the world as he feels it.
Finger painting is pure self-expression that is possible at any age.
Vivid childhood experiences affect the child’s psychological health. When a child is busy doing something pleasant with an important adult, it creates a positive outlook on the world and reduces the risk of developing psychological disorders in the future.
Drawing lessons should not be long and tedious for your child. A few minutes is enough. During the drawing process, be sure to praise the child and tell him about this or that color (what it is, what color it comes in).
Age of first use of paints
At what age can you use finger paints? If the paints indicate that the material is not intended for children under three years of age, you should not buy them for your child: the composition contains components that are undesirable for ingestion.
Manufacturers often add bitter substances to finger colors, because this is a non-food product and cannot be consumed in large quantities. All paints for children under 3 years of age can be used without any special age restrictions. The main thing is that parents can ensure control over the drawing process and not lose sight of the child.
It is best to wait until the baby can sit independently and shows an active interest in drawing. This usually happens at 9–10 months, although some children can practice finger painting as early as six months. Manufacturers indicate the age from one year as recommended for the use of such products, based on reasonable restrictions and the real hobbies of most children.
How to prepare for drawing
This is perhaps the main question that worries many parents. The cleanliness of the room after drawing, as well as the parents’ interest in repeating the experiment, depend on the degree of preparation.
To begin, choose a place where the drawing will take place. It is better to always draw in the same place so that later the child does not go beyond the designated boundaries. This could be a table or a corner on the floor. If you paint on the floor, remove the carpets and rugs; you can cover them with oilcloth. It is also better to cover a sofa and other upholstered furniture with oilcloth. The best canvas for drawing is what paper or large sheets of A3 format. Ordinary album leaves will probably not be enough for your child’s creativity to fly.
Before drawing, put on clothes for yourself and your baby that you don’t mind. The paints are easy to clean, but it never hurts to be on the safe side. If it’s warm at home, you can leave the baby in panties or a diaper - it will be easier to wash. You can also buy a special waterproof apron in art stores that will protect you from paint.
how to teach a child to roller skate
Types and composition of paints
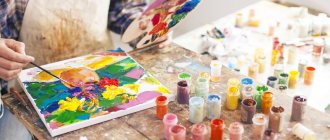
Good paints that can be used by a child at home consist of extremely simple ingredients: water, binders to create a thick base, pigments. The mass always remains thick, but not hard, unless you leave it without a lid. To easily remove color from the surface, juices and plant extracts, for example, aloe juice, can be added to it. The box should indicate that these paints are intended for finger painting (simple gouache is not suitable for this purpose).
Main types:
- gel - include special moisture-retaining substances, have a transparent texture, do not dry out the skin, and can be used by the smallest children;
- sensory - after drying, the picture will be rough, since special components are added to the material;
- fluorescent - after drying, the coloring will glow in the dark, further developing the child’s imagination.
Finger products for babies are usually sold in small sets - from 4 colors (red, yellow, blue, white). Such sets are suitable for the youngest children; for an older child it is recommended to buy a larger set (12 tones), with included stamps, stencils, and other devices. With their help you can color pictures with great interest.
The most famous manufacturers of finger colors:
- Jovi. A Spanish brand that produces high-quality paints that are sold all over the world. The colors are bright, the price is reasonable.
- Djeco. Created in France, suitable for children under one year old. Many kits include plastic stencils that attach to the lids of the jars. Even wooden toys and boxes can be painted with these paints.
- Crayola. American products, safe, very bright. The paints are easy to wash off and are of the highest quality. The downside is the higher price.
- Ses. Dutch paints intended for allergy sufferers. They do not contain any components that can cause allergic reactions in children.
Among Russian manufacturers, Kalyaka-Malyaka, Luch, Orange Elephant, Tsvetik, Molly, and Trolls have proven themselves well.
Preparing for the creative process
Necessary items for drawing:
- a container of water where you can wash off paint from children’s hands;
- napkins and towel;
- paper or whatman paper;
- newspaper or film if the process will take place on the floor.
The most important thing is to prepare the child himself for a creative activity. If the room temperature allows, then it is better to remove all excess clothing and leave only diapers or panties. The composition is very easily washed off the skin with warm water.
For the first acquaintance with this activity, you can provide space in the bathroom. Both the bathtub itself and the walls can be easily washed with a stream of water from the shower. It is best to use whatman paper or the reverse side of wallpaper in order not to limit the baby’s imagination. A small sheet of paper quickly runs out and the child may get tired of drawing with his hands.
If a child stops drawing or becomes interested in something else, there is no need to force this activity on him again.
Finger painting - organizing the process
How to paint with finger paints and keep the room clean? It is better to choose one place for classes so that the child gets used to it and then does not go beyond the boundaries. A table or a corner on the floor will work well. Carpets and paths must be removed or covered with oilcloth. You should protect the sofa, bed, and other furniture that is nearby.
It is better to draw for the first time on white paper - A3 sheets, whatman paper, but A4 sheets should be abandoned due to their small size. Clothing should be loose, but easy to wash. You can even start the process in just panties and diapers, and then wash the baby in the bathroom. Older children should be given a special apron for classes.
How to thin the paints if necessary? For this purpose, ordinary water is suitable, which must be prepared for classes.
Child training
At the first lesson, it is important to show the child what the paints are for. You need to dip your finger in the color and run it over the paper - this way the child will understand that drawing is interesting and safe. When the baby becomes interested, you need to take his finger and repeat the manipulation. Afterwards, it’s worth giving the initiative into his hands: the child himself will choose the desired tone and draw on paper. Parents can only control the work and name the colors more often - this way the baby will quickly remember them.
You can draw a picture after a few lessons. First, mom or dad show the child how to do this, choosing the simplest option (for example, the sun). Children are good at drawing grass, snow, rain, clouds. By drawing a rainbow you can get acquainted with all the colors at once.
As you grow older, you can use various drawing techniques:
- Handprints. You need to dip your palm in the paint, apply it to the paper, making an imprint. Next, you can make a flower from such prints, draw a line with green paint, and make handprints in the form of leaves on it.
- Leg marks. By smearing your child’s feet with finger colors, you can get original prints. In the future, they will help to find out how quickly the baby’s leg grows.
- Drawing with a sponge, sponge. An ordinary sponge absorbs paint well and is easy to wring out, so it can be used in creativity.
- Prints, stencils. The additional accessories included in the set also help to create different shapes and pictures. Stamps, rollers, and entire stencil boards are often on sale.
- Passepartout. After painting the picture, ready-made applications made of colored paper are glued onto it. For example, you can make a drawing of grass and flowers, and place two adult figures next to it and a third one for a child.
- Mixing tones. Even four colors in the set are enough to create various new shades, and the technique of combining paints should definitely be shown to your child. Instead of a palette, you can use the baby’s palm directly.
- Coloring crafts. Using finger paints you can paint cubes and patterns - this will be interesting for children and adults.
After finishing painting, you need to dry the painting. You can hang it on the wall - let your child be proud of the work.
Mastering new opportunities
When is it time for a child to start drawing? The earliest is in the second year of life, many parents will answer and... be mistaken. The first artistic experience can be instilled in a child when he is not yet a year old. Of course, it is impossible to give brushes with paints, felt-tip pens or pencils to a baby who has not yet reached the age of one year. But he doesn't need it. The necessary “tools” with him are always his own hands. And all that is required of parents is to provide the child with more freedom for creativity.
Svetlana Lykova, teacher
"Attempt at writing"
6 months - 1 year
Having learned to sit independently, the baby not only expands his horizons, but also frees his hands for a variety of activities. His hand motor skills and, accordingly, his thinking begin to actively develop. It's time for your first drawing lessons!
Of course, these activities cannot be called training, because drawing for such a small child does not at all mean depicting recognizable images. Infant drawing is the development of a new type of activity and the study of new interesting properties of objects, as a result of which the most unexpected applications are found for familiar things. Here is a toddler happily smearing half-eaten porridge or vegetable puree on the table. This does not mean at all that he is playing around and playing pranks to spite the adults. The child explores the material, explores its possibilities, or even creates.
Of course, the unappetizing mess on the table is the least likely to resemble a work of art, but such an activity gives the child great pleasure. However, it is important for parents to remember that for such a young child, the main thing is safety. This applies to everything that falls into the field of his research. Therefore, it is better if the first artistic experiments are associated not with paints, the production of which uses chemicals, but... with food. However, you should not mix the process of nutrition, which is important for the baby, with targeted drawing lessons, so it is better to conduct lessons with a well-fed child, without using foods that make up his usual diet.
For the first artistic experiments, you can pour a little “adult” blueberry yogurt or baby cottage cheese with fruit fillings on the table or feeding table - let the baby smear them with his fingers or the whole palm as soon as he wants. Some of the yogurt or cottage cheese can be warmed up a little, and some can be cooled in the refrigerator.
Mixing warm and cold is just as useful and interesting for a child as colorful ones. And the tactile sensations from such exercises will become much richer. The child's dirty palm can be printed on a piece of paper. It’s not worth keeping such a masterpiece for centuries, but it can be photographed as a souvenir - like your first work of art.
I drew it and... ate it!
1–2 years
All children at this age are not creators, but manipulators. By manipulating objects, materials and forms, they study their properties and capabilities. To understand the world, babies use all types of senses and sensations, including taste. Therefore, even at this age, creative materials should be absolutely safe.
There is no point in getting carried away with fashionable paints for finger painting just yet. Their main advantage is that they can be easily wiped off any surface and washed off any clothing. But the fact that these colors are very bitter does not always prevent kids from trying them. So it’s better to opt again for edible food coloring.
A grown-up child is already able to experience real pleasure from the artistic process. For creative experiments, he can be given paper. It is better if these are large sheets with a rough surface - the reverse side of old wallpaper or whatman paper.
As paints, you can use boiled beets or their juice, bright berries - blueberries, blueberries or black currants, boiled carrots, greens or spinach. Adults themselves can show the child what mark these unusual colors leave on a sheet of paper.
For mom, dad or grandma, it’s enough to smear a puddle of beetroot juice with your finger, crush a bright berry on a leaf or draw a line with a carrot, and the little one will enthusiastically begin experimenting and creating: smearing “paints” with your fingers, clapping your palm on colored blots, changing their shape, mixing unusual paints between themselves.
The child is fascinated by the possibility of magical transformation of shapes and unexpected changes in color. You can show your child how to draw a line with his finger, how to draw a stream out of a puddle, how to connect two multi-colored blots with each other, how to make the footprints of a small bunny or mouse with his little finger, and how to draw a large footprint of an elephant or a bear with a whole palm or fist.
This kind of finger painting is useful not only for the aesthetic, but also for the speech development of the baby - it’s not for nothing that speech therapists love finger games and finger massage so much. By training separate finger movements, the baby stimulates the part of the brain responsible for speech.
You can draw not only with vegetables and fruits. Finger painting paints can be made perfectly from ordinary semolina porridge - you just need to divide it into portions and add harmless food coloring to each. The porridge should not be very liquid, then the finger strokes will be rich and thick.
You can add additions to semolina paints in the form of berries to decorate the “masterpiece” or a spoonful of jam (jam) to create a richer color. Of course, very soon the food picture will turn into a homogeneous and not very attractive mass. But the fascination of the process for the child is much more important than the final result. The baby has not yet developed imaginative thinking, so you should not look for special meaning in his drawings yet - he simply enjoys and is happy with everything he does.
By the way, parents also have something to rejoice here. As a result of “artistic” exercises, children’s fingers were well trained, the child received a rich range of tactile sensations, the stimulation of which contributes to the development of his brain activity and thinking - this relationship has long been proven by scientists.
Enriching the palette
After 2 years
At this age, the child is no longer so interested in continuing to experiment with products. Still, the palette of colors is too poor, the drawings turn out faded and inexpressive. At this age, children begin to actively use bright markers, pencils and brushes for drawing. But this does not mean at all that you should forget about finger drawing as a passed stage. On the contrary, with age, children have new opportunities to master this interesting technique. After two years, a child is able to fantasize, guess specific images in drawn abstractions and develop them. Now a line for him is not just a stick, but a road along which cars drive or the trail of an airplane in a clear sky. A blot is a cat curled up in a ball or a cheerful teddy bear with a barrel of honey. The baby doesn’t just create, he lives out his creativity. All his works are emotionally charged. When drawing mouse tracks, he squeaks like a mouse, and when he traces the road with his finger, he growls like the cars that will drive along it. The baby cannot always create a recognizable image himself, but he willingly develops and complements the proposed images.
Making your own paints
Finger paints are sold everywhere, but you can make them yourself. There are several recipes that use only available products.
From starch
Combine 3 tablespoons of sugar, half a teaspoon of salt, ½ cup of starch, 300 ml of water. Add any food coloring to the paint or divide the mixture into parts and paint with different colors. Next, you need to heat the paint over low heat until the mixture reaches the consistency of sour cream. The pigments you can use are those used to color eggs. It is allowed to use vegetable and fruit juices (for example, beets), but in this case they are introduced after the mass has cooled.
From flour
Mix 500 g of flour, 3 tablespoons of salt, 1 tablespoon of vegetable oil. Next, water is added until a “sour cream” texture is obtained, pigments are added after pouring into jars.
From shaving foam
Squeeze out a little shaving foam, add a small amount of gouache and honey watercolor. Homemade finger paints are ready. You can store them in jars of baby fruit and vegetable purees.
It is advisable that the finger colors are not pale - children do not like such colors, they are less interesting. It is better not to save on purchases and purchase only the highest quality paints, taking into account the shelf life, lack of toxicity and the reputation of the manufacturer.
Advantages of choice
The choice of finger paints for babies is determined by the variety of color palettes and the presence of sponges, stencils, seals, templates, etc. Finger paints are best used at 1 year of age, because younger children are unlikely to be able to understand what is required of them. At 6 months, only the most desperate mothers give such a toy to their children. Children from 1.5 years old are already able to figure out how to use a new toy. They are happy to discover a new world of bright colors and unusual sensations.
A recipe for finger paints, the composition of which must necessarily contain water and food colorings approved for use in the Russian Federation and the EU. Good children's paints should not contain alcohol! Finger paints for 2-3 year old children differ from gouache in that they are easily washed off from clothes, tiles, bathtubs, and floors. The composition is unsuitable for food, so it has an unpleasant or even bitter taste. Having tried it, the curious researcher immediately loses the desire to repeat this unpleasant experience.
Gouache sometimes has a sweetish taste, which is why the baby may decide that it is edible. That is why it is not recommended to give gouache to younger children.
On video: children's creativity using finger paints.
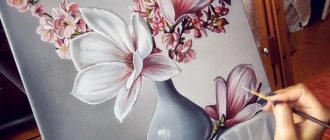
A little about painting on glass
Glass is an ideal material for creative self-expression and the realization of your fantasies. If you have a great desire, the ability to draw and a little artistic taste, then you can try to master the technique of painting on glass yourself. But, you need to draw on small objects first.
Using stained glass paints on glass, you can amazingly transform everyday household glassware into a real work of art. An ordinary smooth glass with a simple design can change beyond recognition, and a bottle with painting on the glass can become a real decoration.
After acquiring practical skills in painting on glass, you can try your hand at painting large areas of glass. Drawing stained glass is very interesting.
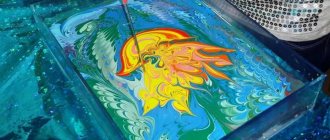
Finger painting. Draw with your fingers
Intentionally getting dirty with paint is very fun, unexpected and interesting for any child. And turning this getting dirty into an artistic activity is even more so. When a child is still small, it can be difficult for him to handle a pencil or brush. Drawing with a finger is easier and more natural for him. And this is not only a game, but also a preparatory stage for the transition to traditional drawing, in which the child learns to feel the boundaries of the sheet, mix and study colors, and trains his imaginative thinking.
A lot of interesting master classes, lesson notes and GCDs using finger painting are collected for you in this thematic section.
Finger painting is a stepping stone to real painting.
Showing publications 1-10 of 600. All sections | Finger painting. Draw with your fingers
Summary of the finger painting lesson “Vitamins in a jar” in the younger group
Goals: to introduce children to an unconventional drawing technique (
finger a finger in them , to consolidate knowledge of colors, to navigate on a sheet of paper. Objectives: Developmental: to develop the memory and attention of children, to develop.
Finger painting on a zip bag
I suggest trying an unusual way of drawing for children -
finger drawing on a zip bag (zip-lock). This activity promotes the development of sensory abilities, fine motor skills of the hands, tactile sensations, thinking, and color perception. You can study shapes, colors, etc. with your child.