Pencil drawing of a house in cells
To draw a house schematically but beautifully, take a pencil, a piece of checkered paper, an eraser, and follow these steps:
- Draw a horizontal straight line along the cells of the sheet.
- On the sides of the resulting line, draw two vertical lines parallel to each other. It is better if they are shorter than the horizontal one.
- We connect the parallels from above with a straight line, draw from it, having first retreated 7 cells upward, finding the middle of the upper horizontal segment, two lines to one point. It turns out to be a roof.
- On the resulting roof we will draw a pipe: draw two straight lines parallel to each other on the side of the roof, connect them at the top, and also add a rectangle on top. Afterwards, you can draw the bricks, marking them straight along the cells of the notebook.
- We add windows and doors to our drawn house the way we want. Here you need to turn on your imagination. You can also add an attic window, shutters, etc.
- To prevent the house from dangling in space, you can add a straight line lawn, a fence, flowers, trees, stones, and a bench. You can also colorize the drawing or leave it black and white.
- The house, drawn in pencil according to the cells, is ready.
This pattern is very simple - even a child can repeat it, but at the same time, everything will look harmonious and beautiful.
Correct markup
Use a stencil or steel profile. In this case, a metal rod, tape measure and marker are used. Drawing a brick wall according to plan:
Measure 1-2 cm from the bottom of the wall - this is the seam. They retreat from the resulting mark to the height of the brick and mark a line.
Article on the topic: What is better to build a house from: brick or aerated concrete?
From the auxiliary points, apply a profile horizontally and draw broken lines 25 cm long in increments of 1 cm. Similarly, mark the wall to the ceiling.
They also make equally intermittent vertical contours - length 6-8 cm with an interval of 1 cm.
The lines marked with a marker or chalk should not intersect opposite lines. For example, a vertical contour follows the boundaries of horizontal lines. If intersection occurs, then this is asymmetry. We'll have to redraw it.
It is more convenient to draw with a marker than with chalk, but if a beginner makes a mistake, it is difficult to hide the defect. You will need to mix the paint with the correct shade and paint over the lines on the background.
Fairytale house
If you don’t want just a sketchy house, then you can always draw a house from a fairy tale. Because there are no rules here, only your imagination. Here are some tips to guide your imagination:
- You can start drawing from the roof, make it slightly curved, asymmetrical.
- Next, we draw the bottom so that it matches the roof and does not go beyond its boundaries.
- Then we draw windows, you can make them of absolutely any shape, doors.
- Add a few details, for example, a lawn, a path, flowers, firewood, whatever you like.
- Decorate with bright colors.
- The house is ready.
Drawing such buildings is perfect for stimulating the imagination and relieving the head of unnecessary thoughts.
We use a software design method
To facilitate the process and increase the speed of development, specialized programs are used. In 3D scenes, architectural design is carried out at various stages, visualizations are viewed from an adjustable camera position, and lighting is changed. The software method allows you to create a wide variety of solutions, select materials for walls, floors, ceilings, and arrange furniture.
Below are the programs - from professional ones to those accessible to anyone familiar with a computer. They will help you draw a house plan yourself, as well as calculate the amount of materials needed for construction:
- ArchiCAD;
- AutoCAD;
- Revit;
- SweetHome;
- FloorPlan 3D;
- Google Sketch Up.
In addition to programs installed on your computer, you can find online applications for simplified design and calculations on the Internet.
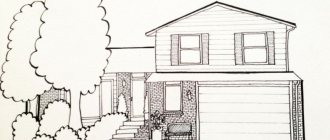
Drawing of a three-dimensional house
In order to add a little reality to the house, it can be made voluminous. To do this you need:
- Prepare drawing materials;
- Let's draw a drawing: start it with a rectangle of any size, whatever is more convenient for you. It's best to start with small sizes first.
- Mentally divide the rectangle into 3 equal parts; you can also use a ruler. And separate one part with a straight vertical line.
- For most of them we find the middle and mark it with a dot. This is how we will outline the roof.
- From the point we draw two straight lines to the side parts of the house. You should get a triangle.
- From the lower right corner of the triangle, draw a horizontal line to the side of the smaller side of the rectangle. That is, we outline the roof of a smaller part of the house.
- Adding windows to most of the house, or living room.
- Let's draw a door.
- You can add a foundation by drawing a narrow rectangle at the bottom of the house.
- Using wavy lines we draw the tiles on the roof. You can also make an edging.
- Add a chimney of the shape you want to the roof.
- We divide the door into two equal parts and draw handles.
- Add a threshold at the bottom of the doors.
- We draw bricks on the foundation.
- We add frames and shutters to the windows.
- You can add a lawn, flowers or a tree.
- All that remains is to color the drawing.
- Our three-dimensional house is ready.
How to determine hidden character traits through the “Nonexistent Animal” test?
The “Nonexistent Animal” psychological test is aimed at highlighting character traits that are hidden from the eyes of others. To do this, you need to draw a non-existent animal, freeing yourself from oppressive thoughts.
Beast Location:
- At the top edge - the desire to assert oneself, high self-esteem, lack of normal attitude from others.
- At the bottom end - low self-esteem, indecisiveness, lack of confidence in one's own actions.
- The drawing in the center of the sheet is a harmonious person.
Head Direction:
- Turned to the left - a person likes to think, is afraid to make decisions, to act.
- Turned to the right - the desire to develop, to achieve assigned goals.
- Looks straight - the individual attaches great importance to his own experiences and problems.
Head parts:
- Ears - the desire to receive new information.
- Eyes - outlined along the contour indicate internal fears. Eyelashes say that
- the subject wants to stand out from others.
- Mouth - denotes talkativeness (if open), secrecy (if closed).
- Horns - aggression.
- Fur located on the head - emphasizing masculinity or femininity.
Paws:
- Big ones - relying on facts, the desire to think, weigh your decisions.
- Small ones - frivolity, impulsiveness.
Additional details:
Functional - courage, passion, self-confidence. Decorating - mannerism, high attention to the opinions of others.
Tail:
- Directed to the left - the individual’s attitude towards his own thoughts (depending on the color).
- Directed to the right - attitude towards one’s own actions.
Drawing tests are popular in the practice of many experienced psychologists. With their help, you can see what cannot be seen by external signs. Decoding can indicate a person’s internal fears and experiences.
Multi-storey building
In order to draw a multi-story building, you need to calculate the height, number of floors, as well as windows and doors.
All this must be taken into account in order for the design of the house to be harmonious.
The algorithm is as follows:
- First we sketch the facade, drawing a rectangle of the required height.
- We designate the places where windows and doors will be located. You need to make outlines along horizontal lines so that it is even. It's better to use a ruler.
- If the markings of windows and doors suit us, then we draw the windows and doors.
- We add additional details such as pipes, ladders to doors, foundations.
- If you want the house to be brick, then draw the bricks on the facade of the building.
- We color the drawing.
- The multi-storey building is ready.
Note: if you want to draw a house sideways, you can first, after drawing a rectangle, dividing the house vertically into three parts, draw a line, separating one smaller part, thus creating the impression that the house is not facing straight, but sideways.
Basics of Perspective
Before moving on to working on the image of houses, let's look at something without which architectural drawings cannot exist - perspective. There are two types of perspective - linear and aerial.
Linear perspective is based on changing the proportions of objects. When working on linear perspective, we need to identify the horizon line and the vanishing point on it, this is the point to which all the horizontal lines of our drawing will converge. This way we achieve a feeling of volume.
Aerial perspective allows you to convey the foreground and background using colors. The closer an object is to us, the brighter and lighter it is, the further away it is, the less saturated it is.
Use thick, good paper and avoid rulers; only hand-drawn lines will make the drawing alive and real.
Hut
In order to draw a hut, you don’t need much time, you just need to take a pencil and follow the instructions:
- Draw a straight horizontal line.
- Next, draw lines a little sideways and up, forming the outline of the hut.
- We mark the middle on the horizontal line, draw a straight line upward with a stroke, mark a point at the top.
- We draw two straight lines through this point, you should get a cross.
- We mark the boundary between the roof and the house.
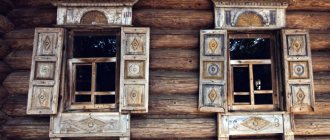
- We draw windows in the attic, facade.
- Add shutters, draw logs.
- We decorate the hut.
- The drawing is ready.
Materials for work
To know how to draw a house beautifully, you need to decide what will be useful for the job.
The list of materials can be varied:
- Paper or sketchbook;
- Regular pencil and eraser;
- Paints, brushes, sippy cup;
- Markers or colored pencils.
The main thing is to determine what the drawing will be drawn with before work, otherwise time will be wasted searching for the necessary materials.
Drawing an igloo
If you want to add a little exoticism to your drawing of houses, you can draw an ice house - an igloo.
The algorithm is as follows:
- Draw an even semicircle.
- At the bottom we draw an oval.
- Erase the top part with an eraser.
- We draw in a semicircle, stepping back approximately a centimeter from each.
- We mark bricks on each semicircle.
- We decorate the cubes with suitable colors.
- The ice igloo is ready.
Ice house is very easy to draw and you can teach it to your child.
How to draw Big Ben?
We will draw this complex building in order to consolidate the knowledge acquired today.
We outline the building of Big Ben.
The work will be done in a sketching style, so free lines are allowed.
We remove all unnecessary construction lines.
Practice studying perspective, this is what will help you draw houses correctly.
House with watercolor paints
You can also paint a house with paints, it will turn out very non-standard and interesting.
To get the picture right, take brushes of different sizes and watercolors. Start drawing:
- To begin, you will need a small brush to outline the outline.
- Draw a cube, it's okay if it's not completely straight.
- Draw a pyramid above it. You can choose other shapes for the roof.
- Take a smaller brush and add windows and a door.
- Let the paint dry.
- With the same brush, mark small details such as: handles, shutters, tiles, bricks.
- Let the paint dry again.
- Add foundation using a thick brush.
- While the paint dries, paint the roof.
- After the part where the foundation is drawn dries, paint the facade.
- You can add earth, flowers, trees, paths, stones, sky also using paint and brushes.
- The house is ready.
This technique is somewhat more complicated than drawing with a pencil, but more interesting.
How to make an imitation brick wall: a short list of methods
The easiest way is if you have brickwork hidden under the plaster. Beat the plaster, clean the seams, prime and paint. The result is a natural brick wall. Moreover, it will look quite “old” and vintage. Those who are less fortunate will have to imitate this brickwork. The good news is that there are many ways, inexpensive materials are available, and you can make a “brick wall” on concrete, plasterboard, plywood... any more or less durable surface. By the way, most techniques take little time. So, here's how to make imitation brick for interior decoration:
- Make “brick-like tiles” by sawing ordinary bricks into plates.
- Paint using acrylic paints.
- Print the picture and use it as photo wallpaper.
It’s clear why “brick” walls are so popular lately
Frame to imitate a brick wall
This is just a short list. There are several technological differences at each point. So imitation brick for interior decoration can be done in at least a dozen ways. Let's talk about some in more detail.
House using sketching technique
This technique seems complicated, but only at first glance; besides, if you hone the skill, you will get very beautiful, unusual drawings.
For the sketch you will need:
- leaf watercolor;
- pencil;
- eraser;
- brush;
- watercolor;
Having prepared everything you need, move on to the instructions:
- Divide the sheet into four more or less even parts.
- Draw a rectangle.
- Mark the places where the roof will be located. This part should take up half of the top of the rectangle. Draw a horizontal line.
- On the left side we depict a visor. Let's make it triangular.
- Erase the auxiliary lines in this part.
- From the visor we draw two parallel straight lines.
- Next we will outline the windows and doors. You can mark the balcony.
- Below the window we mark the door.
- We draw the cornice and window shutters.
- We outline the drawing and erase all the auxiliary lines with an eraser.
- We add greenery to the house: bushes, trees, grass, flowers and so on.
- We draw windows, doors, and tiles with a thick pencil.
- We schematically designate the brick.
- We begin to paint the sketch with watercolors. You can go beyond the contour.
- Try to make shadows in places where there should be shadow. But not necessarily.
- The drawing is ready.
The sketching technique is fast and beautiful. In addition, you don’t need to worry about drawing and perspective.
Now you know how to draw at home using various techniques, you can choose the best one for yourself or your child. In addition, drawing develops the imagination very well.
The main thing is not to prohibit adding various elements and not to demand that the child unquestioningly adhere to the drawing algorithm. Among other things, drawing is also good for developing perseverance.
Preparing to Draw
To begin following step-by-step instructions for children, you must first prepare your child for a creative activity:
- In order for the child to be more diligent during this period of time, it is better to initially conduct some kind of active activity before work;
- Careful preparation of the work area will also help to master the master class for beginners. Place the light source on the left, remove everything unnecessary from the table surface so that the child is not distracted.
- All tools also need to be laid out on the surface in advance, this will help you not to look for the desired object while drawing and, again, will not cause you to be distracted. You can involve the child in preparing for the lesson, then this will replace active play;
- Remember that children are just learning everything, so you shouldn’t demand a lot from them right away. While drawing, support your child and answer questions;
- The child must master a simple drawing technique; for this, you should not interfere with his creative process by introducing something or showing him in his drawing. Keep a separate sheet for this, otherwise interest in creativity may fade.
sawing brick
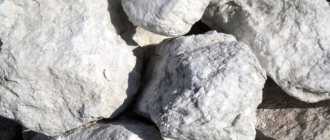
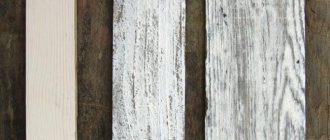
The idea of replacing expensive “brick-like” finishing tiles with bricks loosened into plates seems reasonable. But you need good quality brick, without voids, inhomogeneities, underburning or burnt areas. In general, you need an expensive brick. Or old.
An example of sawn bricks... but these are two “beautiful” parts
It is better to cut it with a water-cooled circular saw. The result will be decorative brick-like tiles in a natural color. The thickness of the tiles is at least 8-10 mm. The advantages are clear: low price, no need to paint - there is a natural color. These homemade brick tiles are then glued to the walls using regular tile adhesive.
But there are also disadvantages: you need a good quality brick, but you still have to find it. When cutting, the plates may break. Only two of them are obtained with a beautiful surface - the extreme ones. The rest will have to be modified manually, creating relief. It’s tedious, dusty, time-consuming, difficult, and it’s not a fact that brick imitation will actually be learned “at the level.”
Despite all the shortcomings, this method is used. And this is, perhaps, the only option for homemade imitation brickwork that can be used for exterior decoration . For these purposes (finishing the facade of a building), by the way, you can cut the brick into two halves. Everything is cheaper than buying tiles.
Making a mold for casting brick tiles from plaster
An imitation of brick for interior decoration in an apartment or house can also be cast: you can make gypsum tiles in the form of bricks yourself. To do this, an impression is taken from interesting specimens of bricks (a mold is made to form an artificial finishing stone), and then a gypsum solution is poured into it. The resulting tiles are used for wall decoration. This technology is good because it allows you to prepare several molds in which you can make bricks of different colors for different rooms.
We find bricks of interesting shape and several almost ordinary ones, but with various minor defects. We will use them to cast the mold. It is desirable that there be at least a dozen of them, or better yet, more. “Artificial brickwork” will be more varied.
The result can be very similar to real masonry
On the side that we will “multiply”, apply grease or heated wax mixed with kerosene. This is necessary so that the silicone does not stick to the surface. When everything is dry, apply a layer of silicone sealant to the treated side. The layer thickness is 1-1.5 cm. Leave until the silicone is completely polymerized (the time depends on the type, it is written on the package).
You can also make the following shapes: imitation brick with marine motifs
When the silicone has hardened, take the foam and coat the mold without removing it from the brick. After the foam has hardened, remove the brick and level the bottom of the mold so that it stands level. Can be used by filling with gypsum mortar. It sets quickly; if you have a dozen molds, in 2-3 days you can make tiles for a couple of squares simulating a brick wall. By the way, gypsum mortar can be painted in bulk. Then new cracks and chips are not a problem - just like a brick.
Imitation brick for interior decoration using plaster mortar
The general idea is simple: a layer of plaster or tile adhesive is applied to the wall, and a seam is cut/pressed into it. After processing the edges of the “bricks” and seams, and painting, the result is a semblance of brickwork of varying degrees of plausibility. Everything is simple, but there are significant differences and nuances.
Imitation of brick for interior decoration of premises made of mortar, plaster (regular and decorative)
What and how to make a solution from
The first question that arises is: what kind of solution is needed and from what? There are many recipes. Here are some options:
- Ordinary cement-sand mixture: for 1 part of cement (ordinary Portland cement is suitable, but if you want, look for pink or white), take 3 parts of sifted fine sand, mix with water.
- Plaster mixture and tile adhesive (approximately 1 to 1).
- Textured plaster of a suitable color, to which is added roller plaster (such as bark beetle, with sand) of a similar color, but of a different shade. They are mixed only slightly so that the composition remains heterogeneous.
This is what a mixture of “simple” textured plaster and roller plaster looks like. Quite a plausible imitation of brick for interior decoration
Regardless of what you make the solution from, it should be semi-dry and should not leak under any circumstances. It will not need to be leveled, so its plasticity is not important to you, and the adhesive ability will be provided by additives - tile adhesive and PVA. To adjust the consistency, add water in small portions.
Surface preparation
The wall on which we will make imitation brickwork does not have to be even. It should be free of dust and dirt, crumbling fragments and particles. This is where the requirements end.
The process of preparing the wall is a careful approach: first they make markings
Before starting work, it is better to prime the wall. The type of primer depends on the substrate. If the wall is concrete or loose, walk with “concrete contact”. It will bind crumbling particles and create an adhesive surface on which any composition fits perfectly. If we are decorating plywood, gypsum board or other similar material, we can do without a primer, or we can coat it with diluted PVA.
Technology No. 1. We use thin tape to draw seams
First, we paint the wall to match the color of the seams between the bricks. Some are planning gray-brown, others white-gray. We cover the wall with paint of a suitable shade. Using narrow masking tape (1 cm or slightly less/more), apply markings to the prepared base. The tape will mark the seams between the bricks, so stick it horizontally, at a distance of about 6-6.5 cm from each other. When the horizontal lines are pasted, glue the short vertical ones. They are 23-25 cm apart from each other - this is the length of a standard building brick, but decorative ones can be shorter.
Now we take the solution and apply it to the wall. The layers are unequal, the thickness is 0.3-0.5 cm. We apply it “as it turns out”, without achieving a flat surface, smooth transitions... As it turns out, so be it. We only avoid obvious bald spots through which the wall shines. We filled the area, took a flat trowel (grater), and slightly smoothed out what we got. Leave until slightly dry: so that when you press with your finger, the composition is slightly pressed through.
We apply the solution without worrying about beauty and uniform thickness
We pry up the ends of the horizontally pasted strips of adhesive tape in any place (when gluing, leave the “tails”), pull, removing along with the solution adhering to the tape. We remove the entire mesh. The edges of the “bricks” turn out to be torn and uneven. This is fine. Even good.
Take a toothbrush or paint brush with fairly stiff bristles. Use a toothbrush to go along the seams, removing any remaining mortar. At the same time, the edges of the bricks are rounded. Then we take a wider brush and use it to go over the surface, adding naturalness and removing too sharp edges. Leave to dry at room temperature for about 48-72 hours. Do not force dry it - it will crack. Although, if you want to have cracks... If the composition was not painted in bulk, it's a matter of painting.
Technology No. 2: cutting the “seams”
This method of simulating brick for interior decoration takes less time: no tape is required. Apply the solution to the surface of the wall. Everything is exactly the same as described above, only the layer can be thicker - up to 0.8-1 cm. After waiting until the solution “sets” a little, we mark the seams. Here again there are options:
- We stretch the string along which the horizontal “seam” of the decorative brickwork will run. Using a knife, cut two lines. Do not use a ruler, cut by hand.
- We take a strip of the required width - 0.8-1.2 cm, press it in the right place so that it is slightly imprinted. Using a knife, cut the applied solution along the marked lines.